OCP Conversational Natural Language® User Guide
Overview
This document describes how to use OCP Conversational Natural Language® User Interface, an intuitive and easy-to-use tool created to build, test and deploy NLU models.
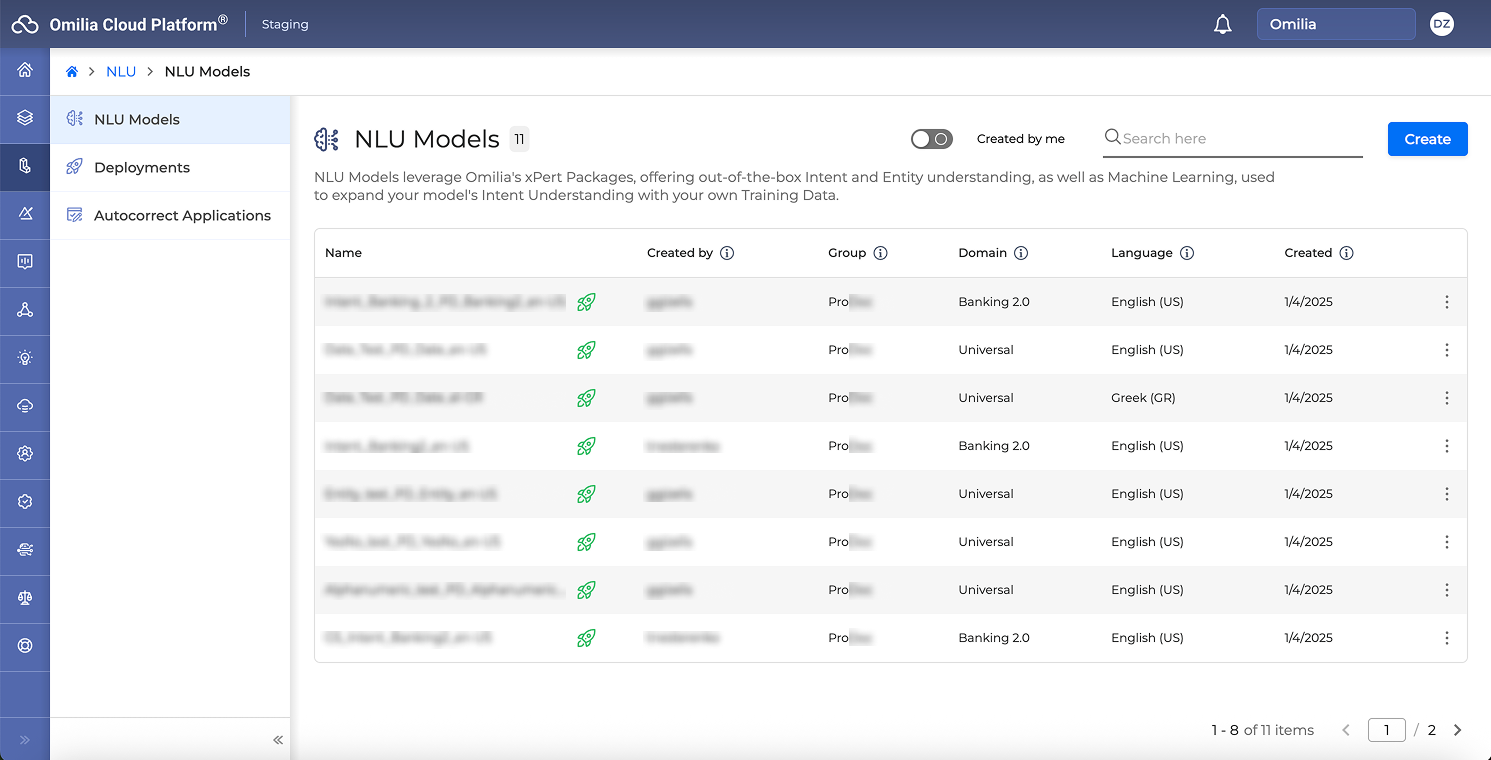
The NLU models are necessary to analyze text and extract meaningful entities, entity features, intents, and other syntactic elements. With the help of OCP Conversational Natural Language®, you can leverage both Omilia’s xPacks (Rule-Based Technology, offering out-of-the-box intent and entity understanding), as well as Machine Learning to expand your model’s intent understanding.
Logging in
To access Conversational Natural Language®, log in to OCP Console®. This is the unified entry point for managing all OCP services.
To log in, follow the steps below:
Go to the regional OCP Console URL that you are using and enter your credentials.

2. If the credentials are correct, you are forwarded to the OCP Console® landing page.

3. To access Conversational Natural Language, select NLU from the sidebar on the left.

4. After being redirected to the Conversational Natural Language, the main page looks like this at your first login:

After you have built a model, the landing page shows the list of NLU models that you have access to based on the groups you are part of and their related information.

Navigation
The Conversational Natural Language navigation bar consists of 2 sections:
NLU Models, which allows creating models, training models, and evaluating models
Deployments, which allows deploying and testing models.
Creating an NLU Model
To create a new model, proceed as follows:
Navigate to NLU → NLU Models section.
Click Create. The following dialog box opens:

3. Fill in the fields below:
Name: Model name
Group: Group of users who can access the model
Domain: Based on the selected domain, an out-of-the-box understanding of intents and entities will be available using Omilia’s pre-tuned xPacks. Regardless of the selected domain, you can add your own data to augment your model’s understanding using Machine Learning. Available domains are the following:
The Universal domain offers out-of-the-box Entities understanding only. In case you want to also include intents, you can build your own fully custom intent understanding.
The Custom domain has no out-of-the-box understanding and you can fully customize it by adding your own data and uploading your own custom NLU Logic (which is your own NLU file developed on Conversation Studio).
Insurance
Telecommunication
Car Retail
Banking
COVID
Energy
Language: The NLU model’s Language. Out-of-the-box understanding is for the language you select.
Version: Software version. The default value is 2.7.2.
Training Set: Allows you to add your own custom training data to augment the model’s intent understanding using Machine Learning.
Add a file with training data in TXT, CSV, or TSV. This is an optional field.
Description: Provide a short description of the NLU model. This field is optional.
4. Click Create to confirm. The model is created.
Model drill-down page
After having created a model, you are forwarded to the model drill-down page.

Element | Description |
---|---|
1 | The model name. |
2 | The language selected for the model. |
3 | The model domain. |
4 | The model identification number. To copy the ID to the clipboard, click . |
5 | The model status. The following statuses are possible:
|
Depending on the model domain, the drill-down page may look different:
If you have created a model with a specific domain, all the out-of-the-box intents, and example utterances, if available, will be visible there as shown below:
If you used a TXT, CSV, or TSV file to add your custom data (intents and utterances), they will also be visible on the drill-down page.
If you have created a custom domain model, no out-of-the-box understanding is available and you have to build it from scratch.
Custom data
You can extend your model’s understanding with your own data or you can create a custom domain model that will include your own data only. There are several ways to add custom data to a model:
Uploading a file with your custom data
Manually adding intents and utterances one by one
Below you can find step-by-step instructions for each way.
Uploading custom data
To upload your custom data:
Navigate to NLU → NLU Models section.
Select a model and click on it. The model drill-down page opens.
Click the Upload icon. The following dialog box opens:

4. Select a file with utterances in TXT, CSV, or TSV. For example:
I don't need my account anymore;Close.Account
i have a question;Inquire
When is the new model coming out;Inquire.Availability
I want to change my username.;Update.Account
My credit card was declined. Can you rerun it;Trouble.Payment
5. Click Create. The dataset is uploaded, and the intents and utterances become visible:

Now you can proceed to train your model.
Manually adding intents
To find out how to create your own intents, check out this section.
Prerequisite: To be able to add an intent, make sure you have built a model.
To add an intent:
Navigate to NLU → NLU Models section.
Select a model and click on it. The model drill-down page opens.
Click + Create. The following dialog box opens:

4. Enter an intent name and click Create to confirm. The intent has been added:

To edit an intent name, click the Pencil icon.
To delete an intent, click the Delete icon.
Manually adding utterances
To add an utterance:
Navigate to NLU → NLU Models section.
Select a model and click on it. The model drill-down page opens.
Click on an intent to activate the Utterances field. If no intent is selected, the field remains greyed out.
Enter an utterance into the highlighted input field.
Press Enter on your keyboard.
NLU Model Training
Training a model might be necessary in the following cases:
You have created a custom domain model.
You have added your own custom data.
The training process will expand the model’s understanding of your own data using Machine Learning.
You can also find out training best practices in this section.
If you have added new custom data to a model that has already been trained, additional training is required.
To train a model, you need to define or upload at least two intents and at least five utterances per intent. To ensure an even better prediction accuracy, enter or upload ten or more utterances per intent.
Deployed NLU models cannot be trained or edited in any way. They are locked and available in the view-only mode.
Training an NLU Model
To train a model:
Navigate to NLU → NLU Models section.
Select a model and click on it. The model drill-down page opens.
Select the Train tab.
If the model requires training, a yellow mark is shown next to the Train tab and the Train button is green.
If the yellow mark is absent and the Train button is greyed out, the model has already been trained.
Click the Train button, if it is green.
The training starts. The model status is set to Working.
When the training is completed, the model status is set to Ready. Depending on the training data scope, the training can take up to several minutes.
Confidence Threshold
The confidence threshold defines the confidence level needed to assign intent to an utterance for the Machine Learning part of your model (if you’ve trained it with your own custom data). By default, the confidence level is 0.7. You can change this value and set the confidence threshold that suits you based on the Quantity and Quality of the data you’ve trained it with.
The more data you train your model with, the more accurate it will be, so a more loose Confidence Threshold (around 0.7 - 0.9) can be used. For models with a small volume of training data, a higher Confidence Threshold must be used to avoid false predictions.
To change the confidence threshold:
Navigate to NLU → NLU Models section.
Select a model from the list of available models and click on it. You are now in the model drill-down view.
Go to the Settings tab.
Select Confidence level and set the needed value.
Click Save.
Exporting your NLU model’s custom data
To export your custom data as a CSV file:
Navigate to NLU → NLU Models section.
Select a model from the list of available models and click on it.
Click the Options menu icon next to the model status.
Select Download Custom Training data:
Evaluating a model
Evaluating allows you to discover the performance of your model’s Machine Learning part. Thus, evaluating a model is only possible for models expanded with custom training data.
To find evaluation best practices, check out this section.
To evaluate a model:
Navigate to NLU → NLU Models section.
Select a model from the list of available models and click on it.
Select the Evaluate tab and click Evaluate.
Upload the data you want to evaluate your model with and confirm by clicking Evaluate. Supported file formats are TXT, CSV, TSV.

5. The evaluation starts and can take up to several minutes depending on the evaluation data scope. When the evaluation is finished, the high-level metrics of the evaluation report are presented on the screen:

6. To download the report, click the here button. The downloaded report version includes more detailed statistics and is available as a ZIP file containing three TSV files.

To evaluate a model, avoid using the data that you have used to train your model with. Make sure that your evaluation set includes data that are unseen for the Machine Learning Part of your model.
Duplicating a model
A deployed model cannot be changed or additionally trained. If you have already deployed your model and realized that additional training data needs to be added, just duplicate your model. Duplicating a deployed model allows you to add more intents and utterances to the model and re-train it.
To duplicate a model:
Navigate to NLU → NLU Models section.
Select a model from the list of available models and click the Options menu icon next to it.
Click Duplicate:
In the dialog box, enter the duplicated model name and confirm by clicking Duplicate:

The duplicated model appears in the NLU Models section.
If your NLU model has been created by the Omilia Professional Services, contact your Account manager before duplicating it.
Deleting a model
Deleting a model cannot be undone. Before deleting one, make sure no one else is using it!
To delete a model:
Navigate to NLU → NLU Models section.
Select a model from the list of available models and click on it.
Open the Settings tab:
Click Delete Model. The following dialog box opens.

5. Type DELETE MODEL and click Delete.
Deploying a model
To use your model with your application, you need to deploy it.
To deploy a model:
Navigate to NLU → Deployments section and click Deploy.
The following dialog box opens:

3. Fill in the form and hit Create.
Name: Name for your application
Group: Group of users who can use the deployed model
NLU Model: The actual model to be deployed
Description: An optional description for the deployment
The deployed NLU model automatically gets the status set to Running:

For your convenience, in the NLU Models section all the deployed models are marked with the Rocket icon:

Model deployments list
To see the model’s deployment details, proceed as follows:
Navigate to NLU → NLU Models.
Select a model from the list and click on it. The drill-down page opens.
Go to the Deployments tab. All the model deployments are listed here.
Click the Arrow button to navigate to the deployment management page and see more information on a specific deployment.
Testing a deployed model
As soon as you deploy one of your models, you can test it manually.
To test a deployed model, proceed as follows:
Navigate to NLU → Deployments section.
Select a deployed model and click on it. The following page opens:
Click on the Test box.
Enter your query into the input field and press Enter on your keyboard.
The result is returned as JSON:
Property | Description | |
---|---|---|
| Phrase under query | |
| List of intents and their parameters. | |
| intent the queried phrase is associated with | |
| The source the intent is originated from.
| |
| Details about the constraint that matches this intent. Null for ml intents. | |
| List of n best intents and their parameters. | |
| intent the queried phrase is associated with | |
| The source the intent is originated from.
| |
| The Machine Learning confidence for the intent. |
JSON description
Managing a Deployment
General tab
The General tab shows the information on the selected deployment:

ID: The identification number of the deployment. To copy the ID to the clipboard, click the Copy icon.
Name: The deployed model name
Group: Group of users who can use the application
ORN: Omilia resource number generated for the deployed application
Description: Description of the application
Authentication: Contains the App Token for API authentication. Click Copy Token to copy the token to the clipboard.
You can modify the Name and Description fields. All the other fields cannot be changed.
NLU Model tab
The NLU Model tab displays information about a deployed model and deployment history.

Name: The deployed model name
Language: The language used for the model deployed to the application
Domain: The knowledge area of the model, deployed to the application
Version: Machine Learning server version
These fields cannot be changed.
Deleting a deployment
To delete a deployed model, proceed as follows:
Deleting a model cannot be undone. Before deleting one, make sure no one else is using it!
Navigate to NLU → Deployments section.
Select a deployed model and click on it.
Click Delete Deployment at the bottom of the page. The dialog box opens:

4. Type DELETE DEPLOYMENT and click Delete.
Custom data & Machine Learning best practices
This chapter provides guidelines and best practices that Conversational AI developers can use when working with their custom data, leveraging Omilia’s Machine Learning technology.
NLU model development & evaluation best practices
This chapter provides guidelines and best practices around how to best tune, train & evaluate your NLU model to get optimal performance.
Creating your own intents
Follow a top-down approach when you build your intents. Define generic intents and build your way up to more complex ones. For example, if you want to build intents around Bank Account Balance inquiries, you can work your way up following the methodology below. Keep in mind that it all comes down to the level of understanding you want to get to and the effort you want to invest into the model’s preparation.
Use at least 5 utterances per intent to get decent accuracy.
Create a generic
Account
intent with the following utterances:account
it's about my account
account inquiry
I want to ask something about my account
question about an account
inquiry about my account
Move to the more specific
Account.Balance
intent and use phrases like the following:account balance
an inquiry about my account’s balance
can I get my balance, please
I want the balance of my account
account remaining balance
whats my account remaining balance
Training
The best guidelines and practices for training an NLU model are given below.
intents you create should have a minimum of 5 utterances per intent.
The more utterances you use per intent, the better.
Keep your intents balanced. The intent with the most utterances, should not have more than double the utterance count than of the one with the least amount of utterances.
Use a variety of different utterances for each intent. It increases the model’s generalization.
Do not use the same utterance per intent more than once. Duplicates are NOT taken into consideration when training the model.
Adjust the number of utterances and their corresponding generalization according to the granularity of your intents.
Creating similar intents requires a more careful selection of utterances.
Similar utterances for different intents can lead to poor performance.
Create meta intents in cases you see that your end customers express such requests. For example:
In case of absence of the intent
Meta.Negative
, the utterance "No, I do not want to know my balance" could be mistakenly identified as theAccount.Balance
intent.Could you repeat please? → intent
Meta.Repeat
.
If needed, create
OOScope
intents, that is out-of-scope intents.These are in-domain intents that you are aware of but have intentionally chosen not to service them.
Delete my account? →
Account-Deletion
→ could be out-of-scope for your banking agent.
Once your solution goes live, it may be exposed to out-of-domain utterances that are considered in-domain. Periodically populate an
OODomain
orUnknown
intent with the incoming confusing utterances.Work/life balance →
OODomain
instead ofAccount.Balance
.
Avoid special characters like
{
,_
,#
, and so on.
Evaluation
The evaluation of a trained model requires an evaluation set. The following best practices can help you draft a proper one:
Avoid using the same utterances that you already used to train your model.
Your evaluation set must include all the intents you built. Do NOT include xPack intents since they are not part of the model’s training process since they are already pre-tuned and ready to be used on runtime.
Your evaluation set must be as balanced as possible.
Adopt the same text formatting for both training and evaluation utterances (upper/lower case, punctuation, and so on).
See some insightful use cases below which can help you better understand what it means to NOT follow the best practice guides discussed in this section.
Your evaluation set utterances are identical to the ones you used for training your model. →
Accuracy 100%
Your evaluation set only includes a single intent, the model’s favorable one (the one with the most training utterances). →
Accuracy 100%
Your evaluation set contains all the training set intents, but it is heavily imbalanced. For example, 990 utterances for the model’s favorable intent, and one utterance for the rest of the 10 intents). →
Accuracy 99%
(even though it fails on 10 intents and succeeds in 1).