Intents and entities
What is an intent?
An intent is the underlying goal or purpose expressed by a user in their utterance. It basically represents the action the user wants to perform. Users can express the same intent in various ways, using different phrases known as utterances.
When creating a model within a specific domain, pre-built intents and utterances are automatically loaded, if available. Your model will use these elements to understand the natural language input and and guide the conversation flow effectively. You can see the intents lists and associated utterances for different languages under Intent lists.
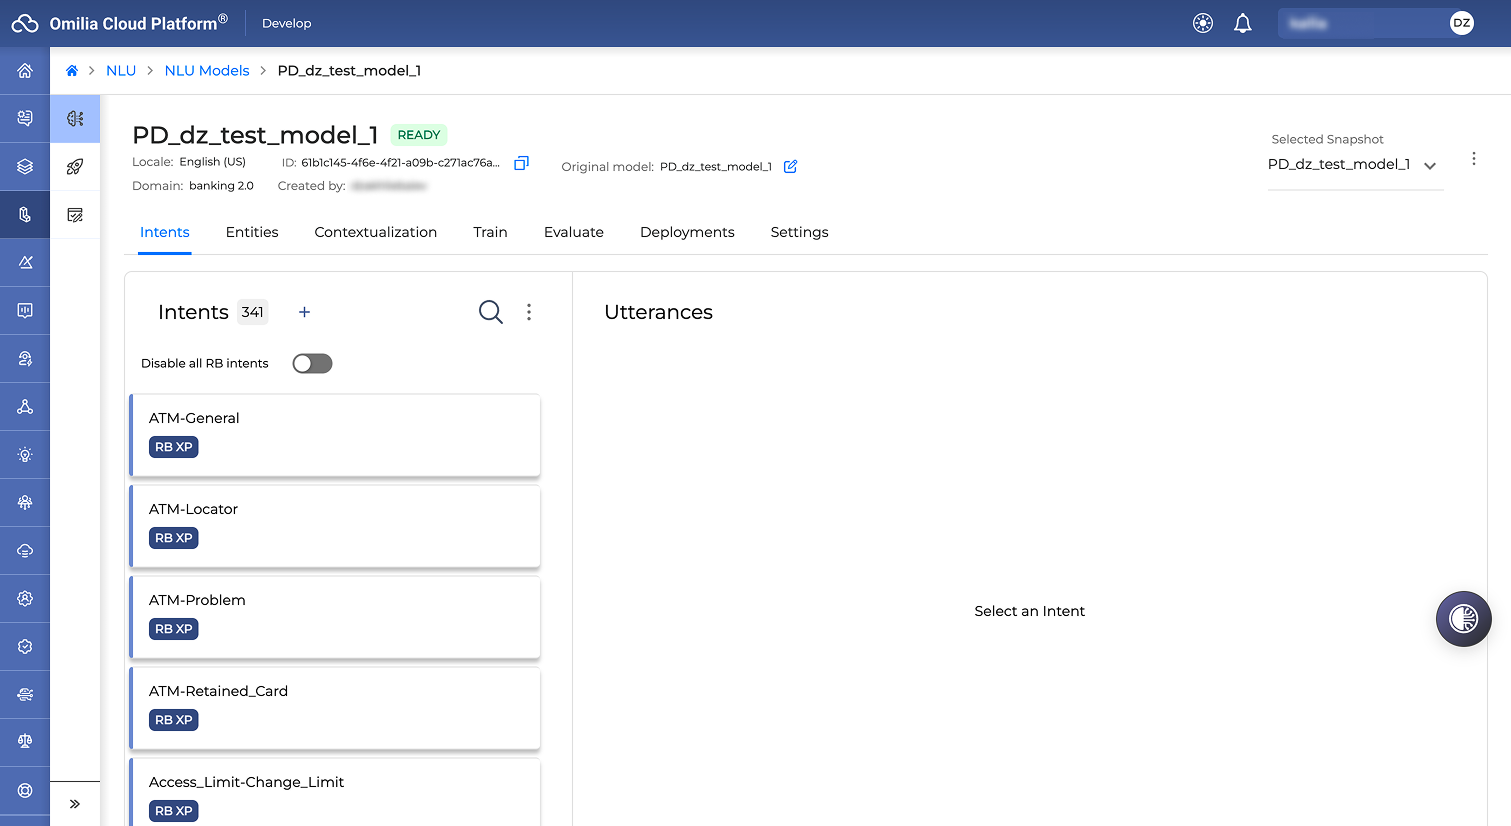
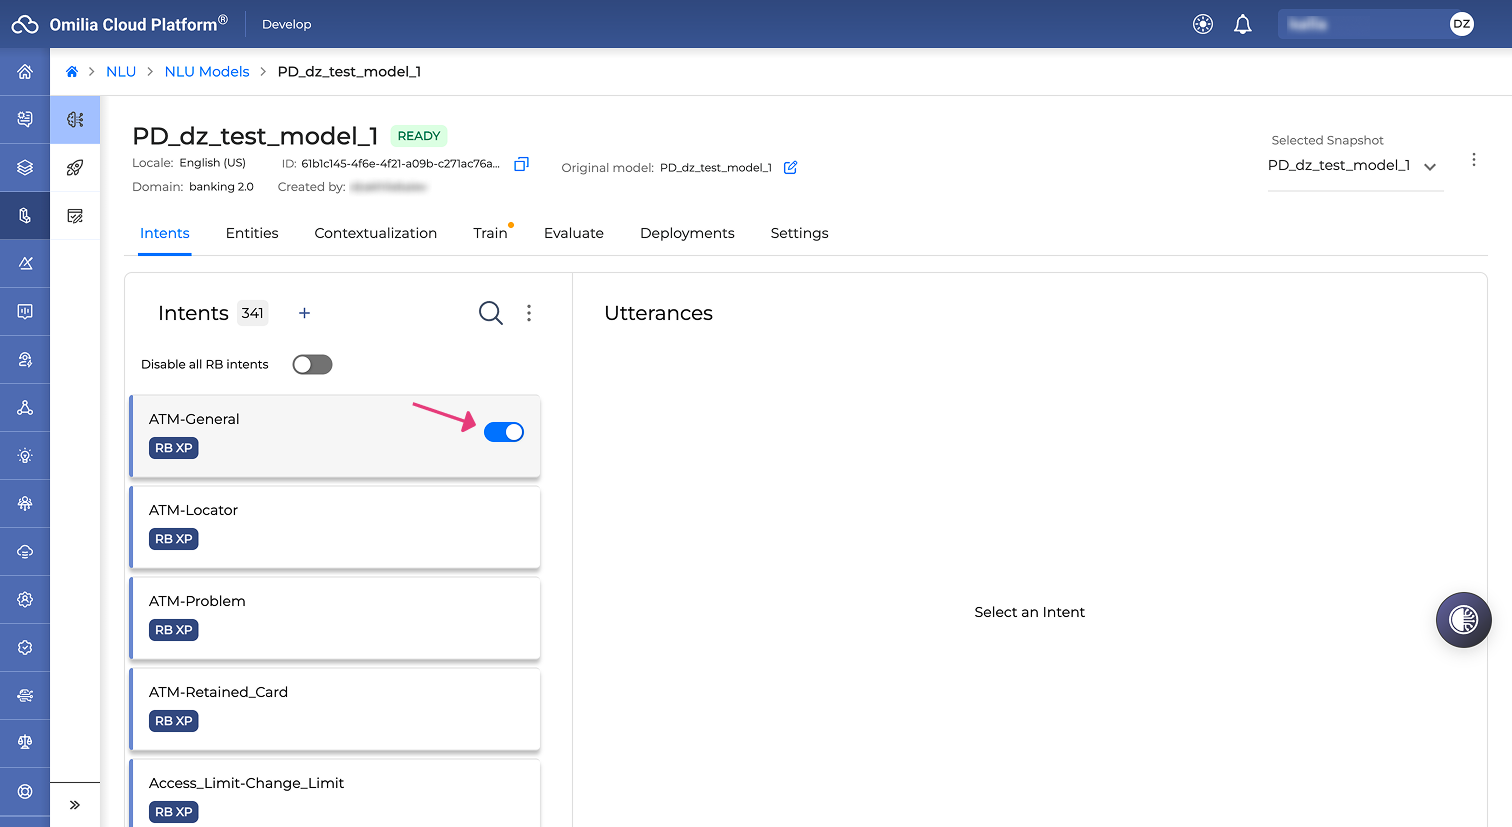
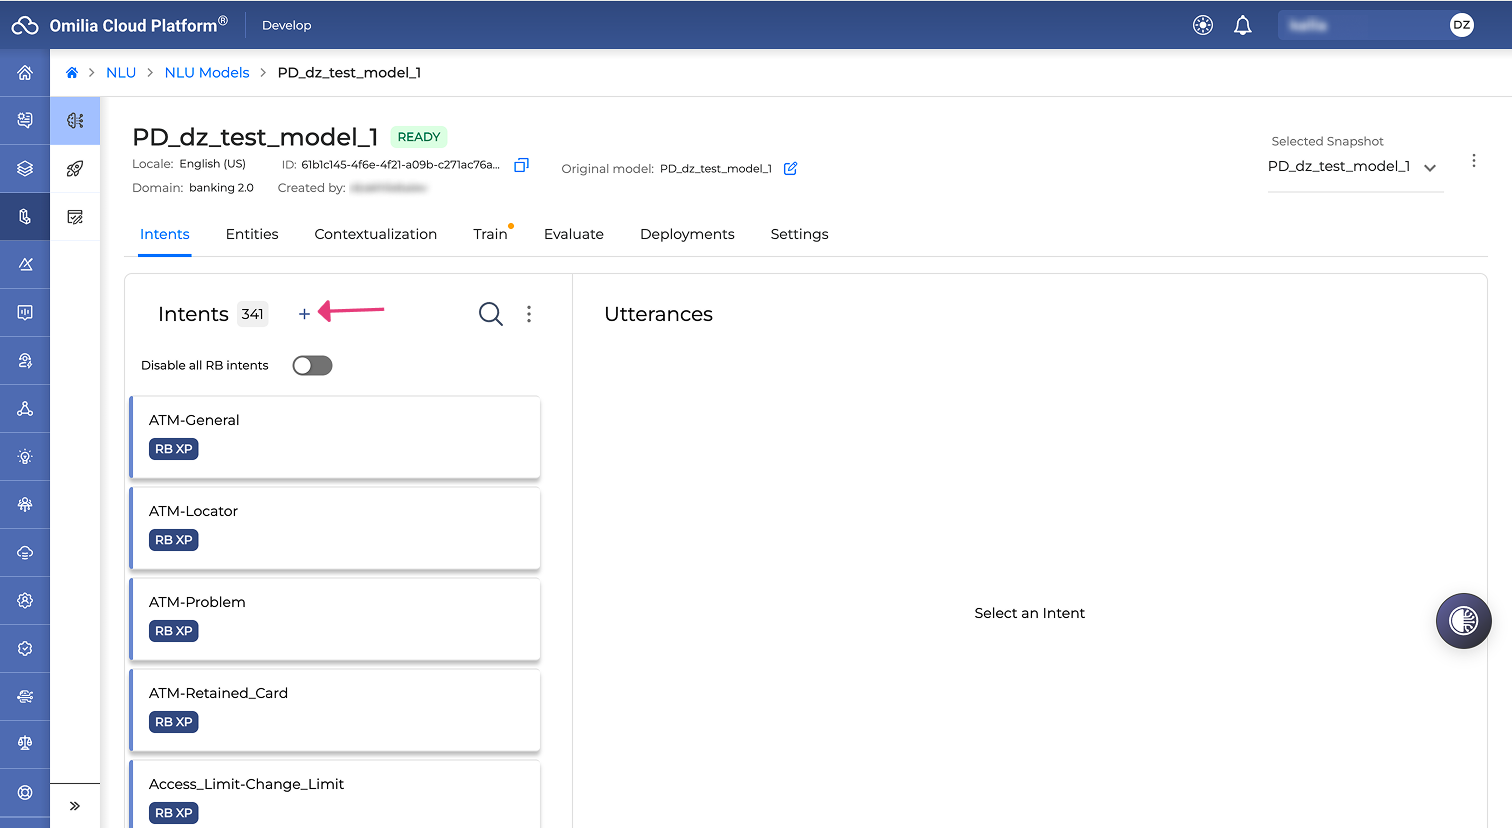
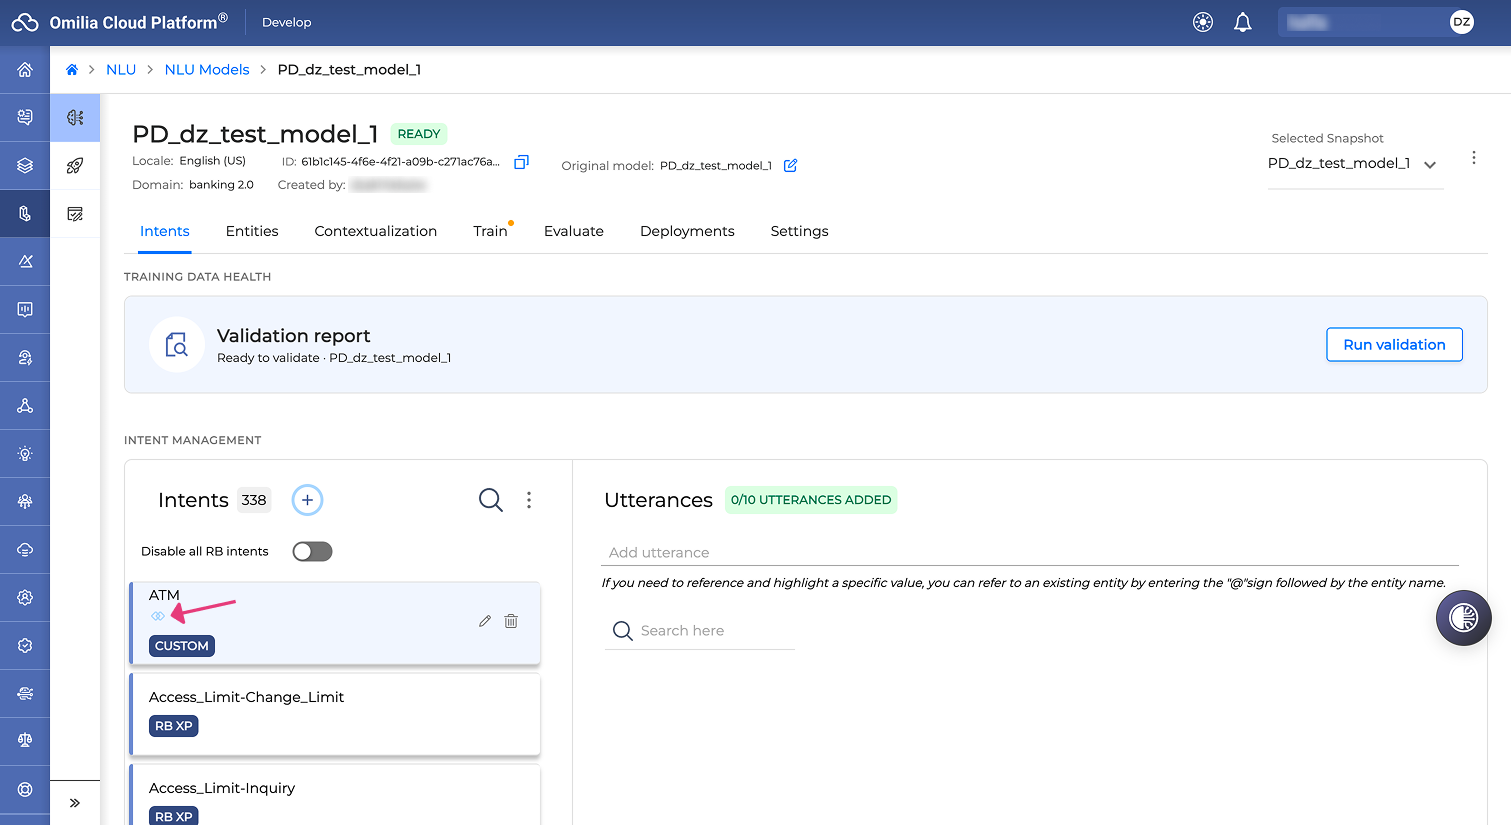
Pre-built intents are labeled as RB-XP and cannot be deleted. However, you can easily disable specific pre-built intents by toggling them off as shown below:
You can disable all the RB intents at once as shown below:

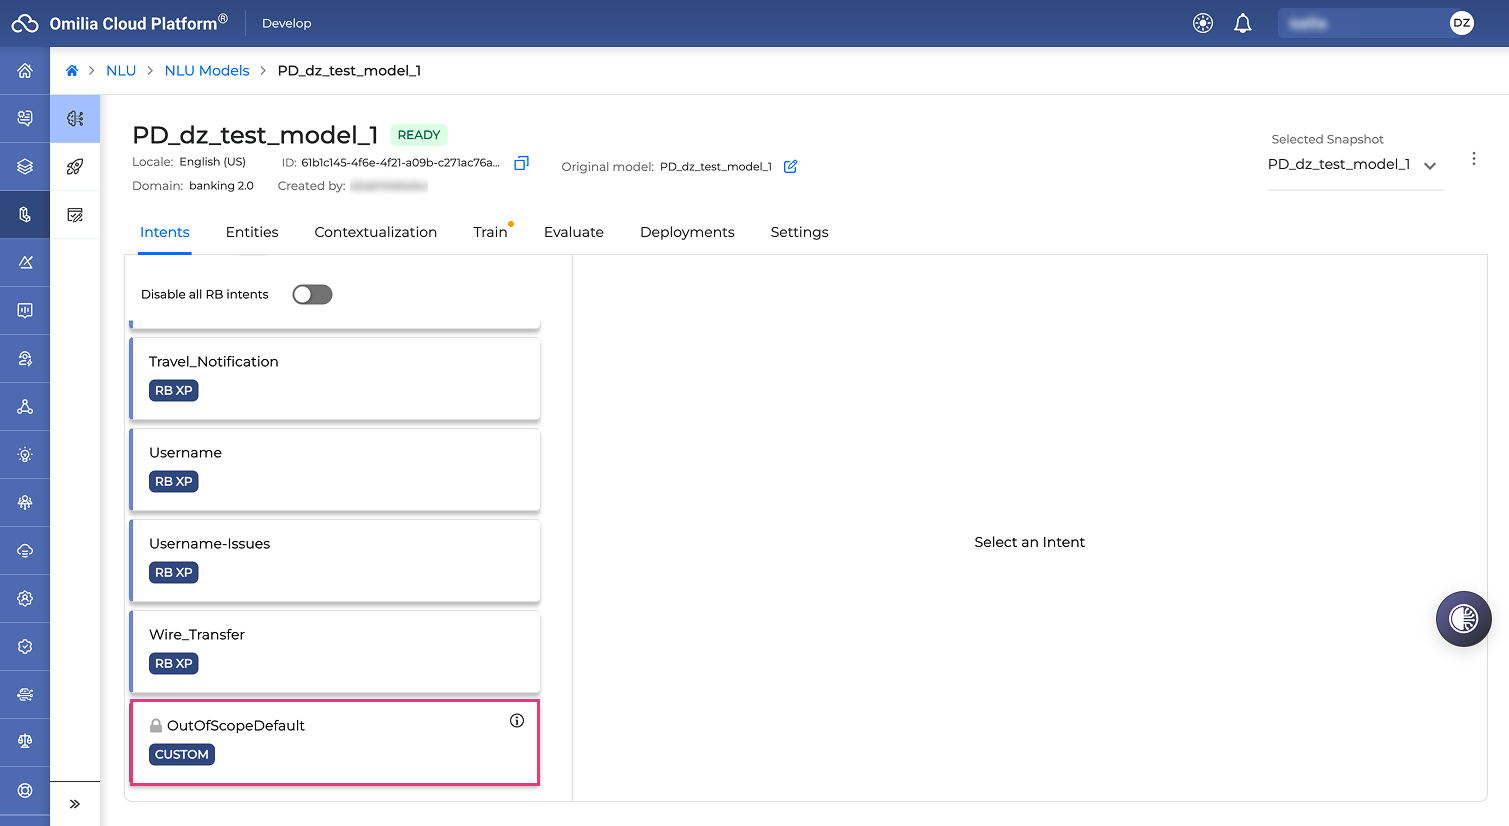
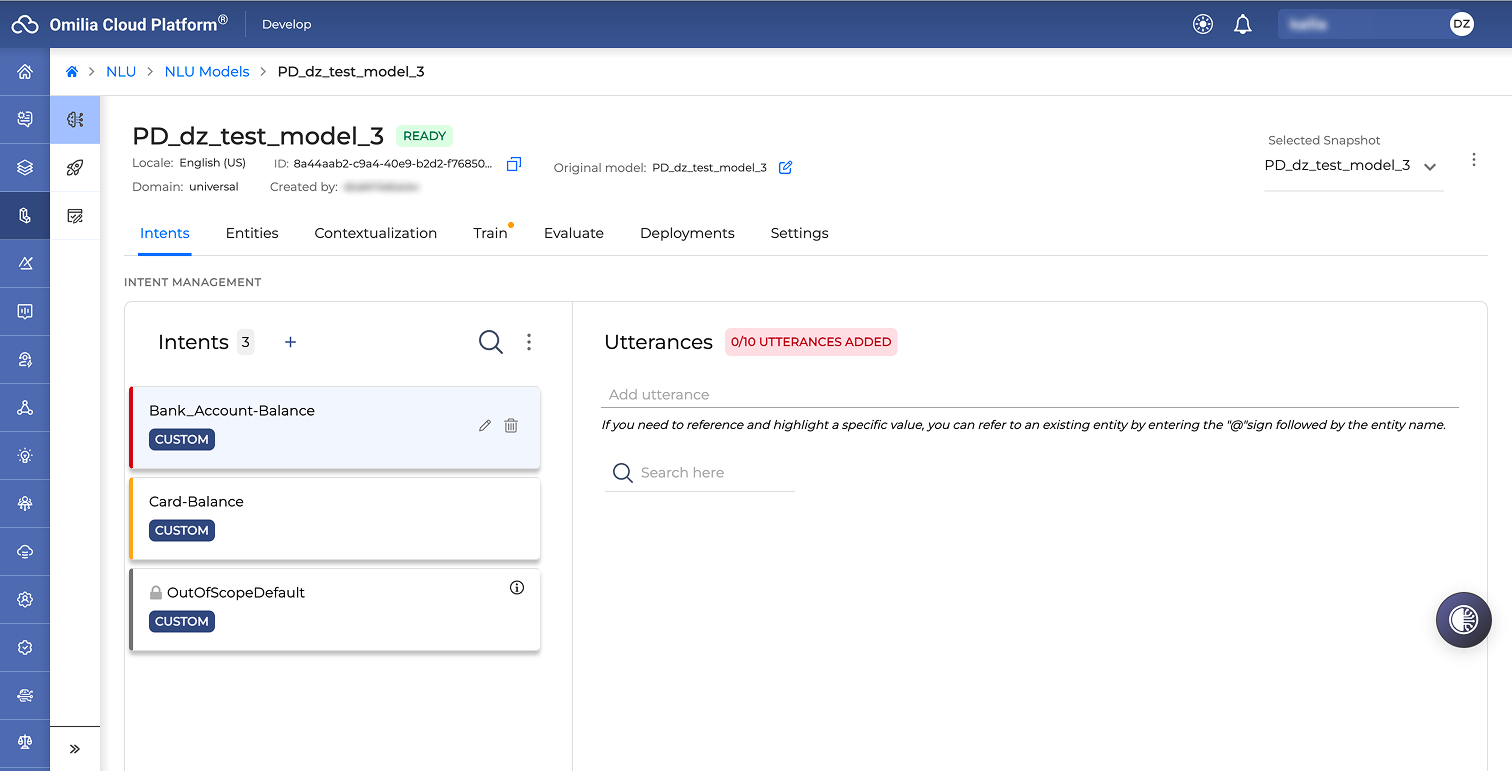
By default, for both models with a specific domain, or with a custom domain, an OutOfScope Intent is created:
What is an entity?
Entities are values extracted from a user's conversation that help resolve their query. Essentially, an entity is a keyword or piece of information you wish to capture from the user’s utterance. Like intents, pre-built entities are also automatically loaded, if available.
Double intent recognition
Omilia’s pre-built offering also includes double intent recognition. It handles scenarios where a single user input might involve more than one intention.
For example, a customer might state, "I want to check my balance and pay minimum payment". In this situation, the system will identify and process the two intents: Balance-Inquiry and Payment-Minimum_Payment. The intelligent double intent recognition algorithm ensures efficient and accurate processing of user intentions, enhancing the conversational experience.
Adding custom data
Besides using the existing resources, you may also want to extend your model’s understanding with your custom intents and entities. Also, if you are creating a custom domain model, you will have to add your own data from scratch. Either way, you can find the step-by-step instructions below.
Uploading custom data
You can upload your Custom Training Data using TXT, CSV, or TSV file format making sure the encoding is UTF-8 and that the line breaks are Unix/Linux style. Below in the text you can find an example on how the file’s content should look like.
To upload your custom data, proceed as follows:
-
Navigate to NLU → NLU Models tab.
-
Select a model and click on it. The model drill-down page opens.
-
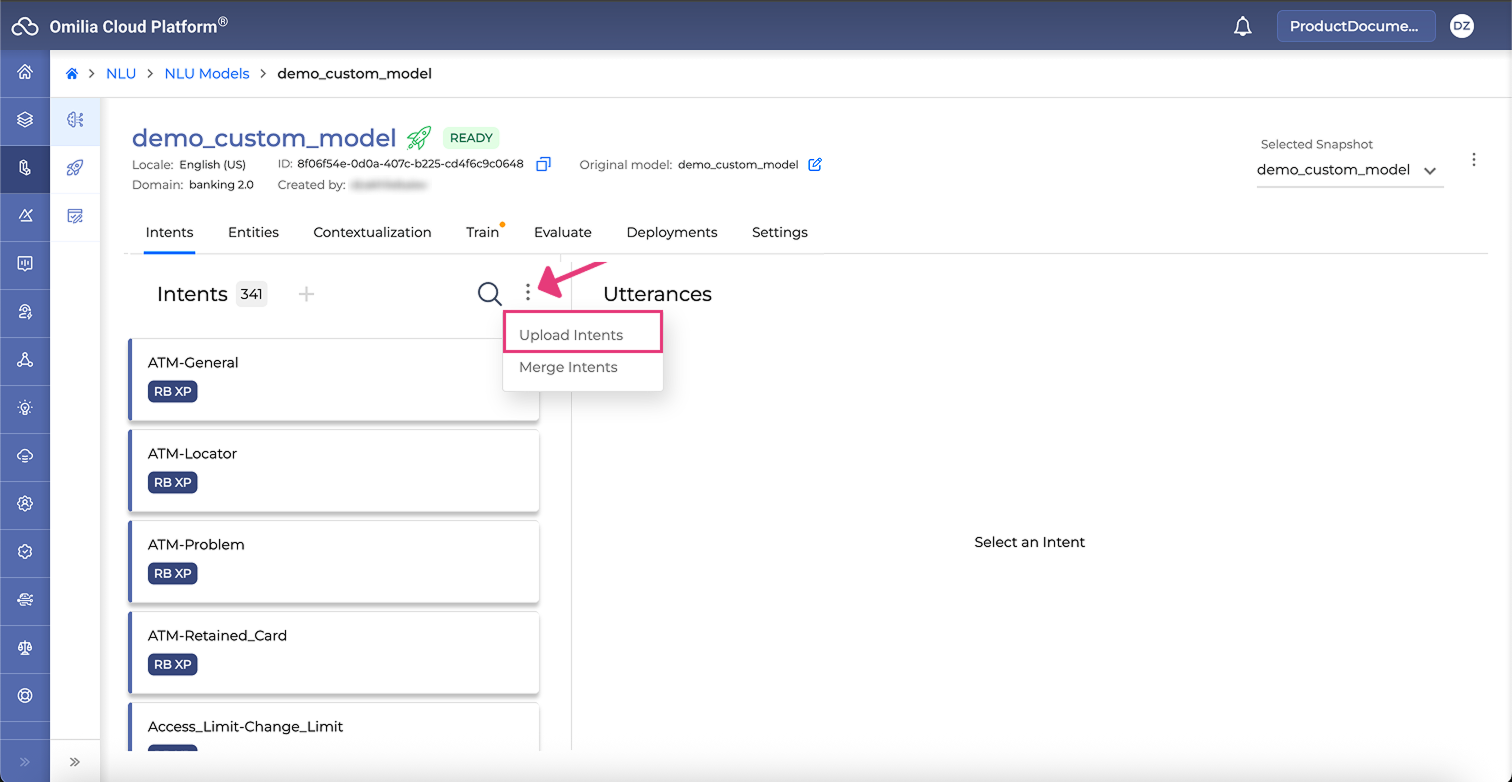
Click the Context menu icon → Upload intents.
-
In the opened dialog box, upload a file in TXT, CSV, or TSV by dropping it directly or clicking Browse Files to select one.
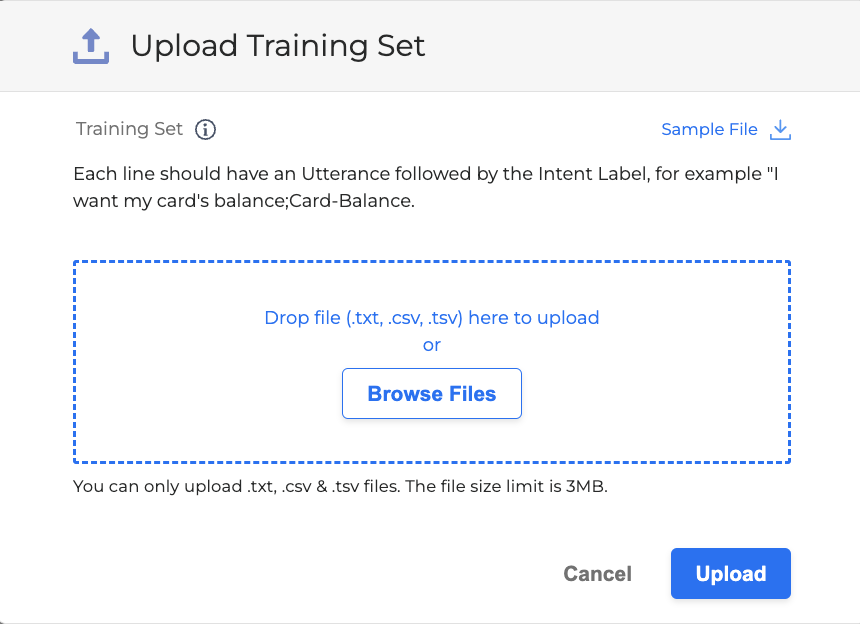
Click the Sample File button to download a sample set of intents in CSV. Also you can see an example of the training set structure below:
I don't need my account anymore;Close.Account
i have a question;Inquire
When is the new model coming out;Inquire.Availability
I want to change my username.;Update.Account
My credit card was declined. Can you rerun it;Trouble.Payment
-
Click Upload. The dataset is uploaded, and the intents and utterances are now added to your model.
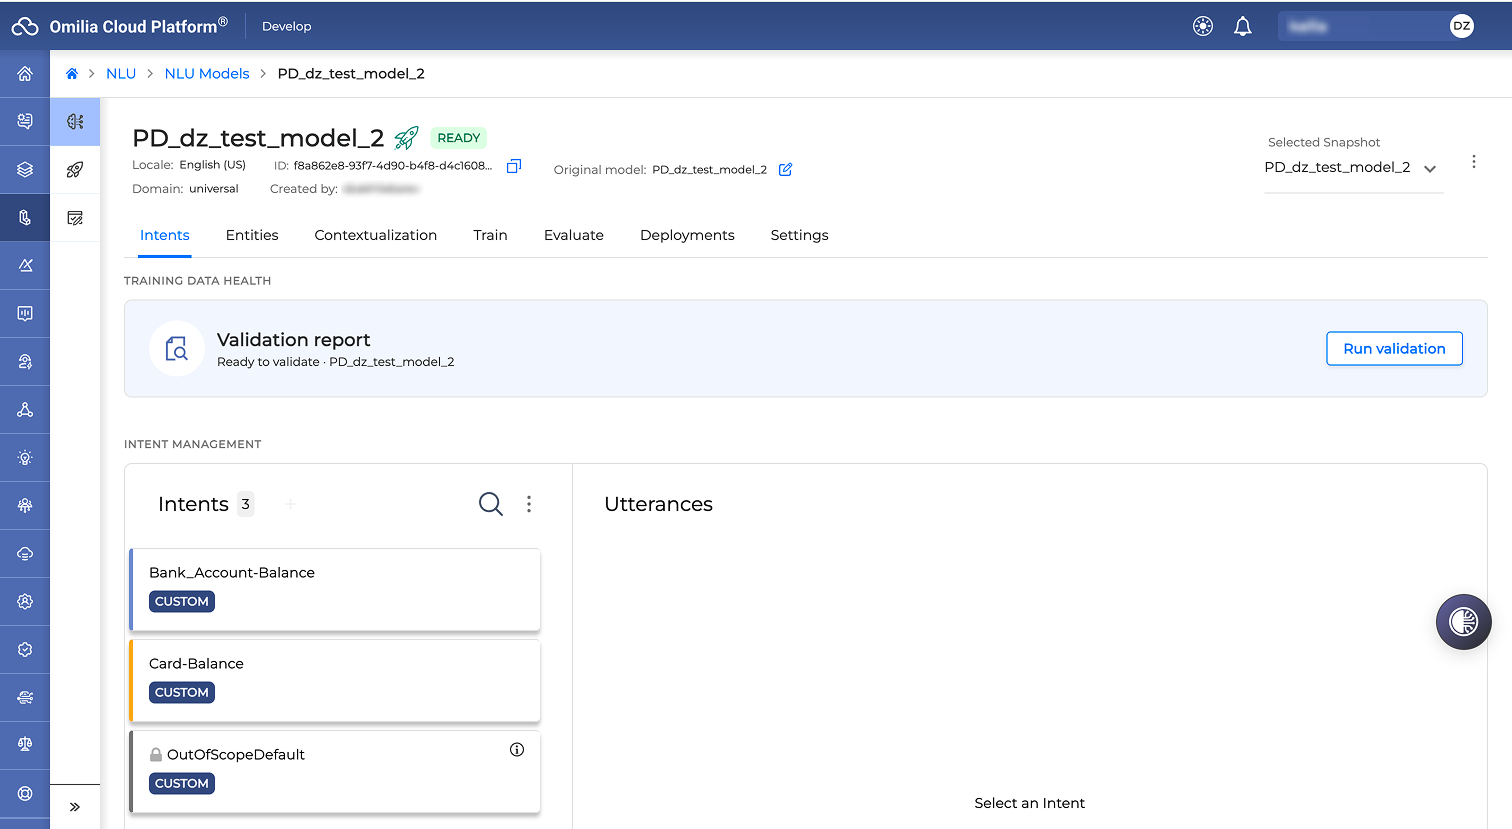
When at least one custom intent is created, a validation block appears.
Adding intents
The intent is the goal of the user's request to the application that describes what the end-user wants. For example:
Airline Virtual Assistant: Welcome to ABC Airlines. What can I do for you today?
User: I'd like to get a ticket from New York City to Jamaica for next Friday.
In the example above, the user wants to buy a ticket, so the application will analyze the request and select an intent from the list of intents. In this case, it would be something like Flight_Ticket-Purchase.
To add an intent to your model, proceed as follows:
-
Navigate to NLU → NLU Models section.
-
Select a model and click on it. The model drill-down page opens.
-
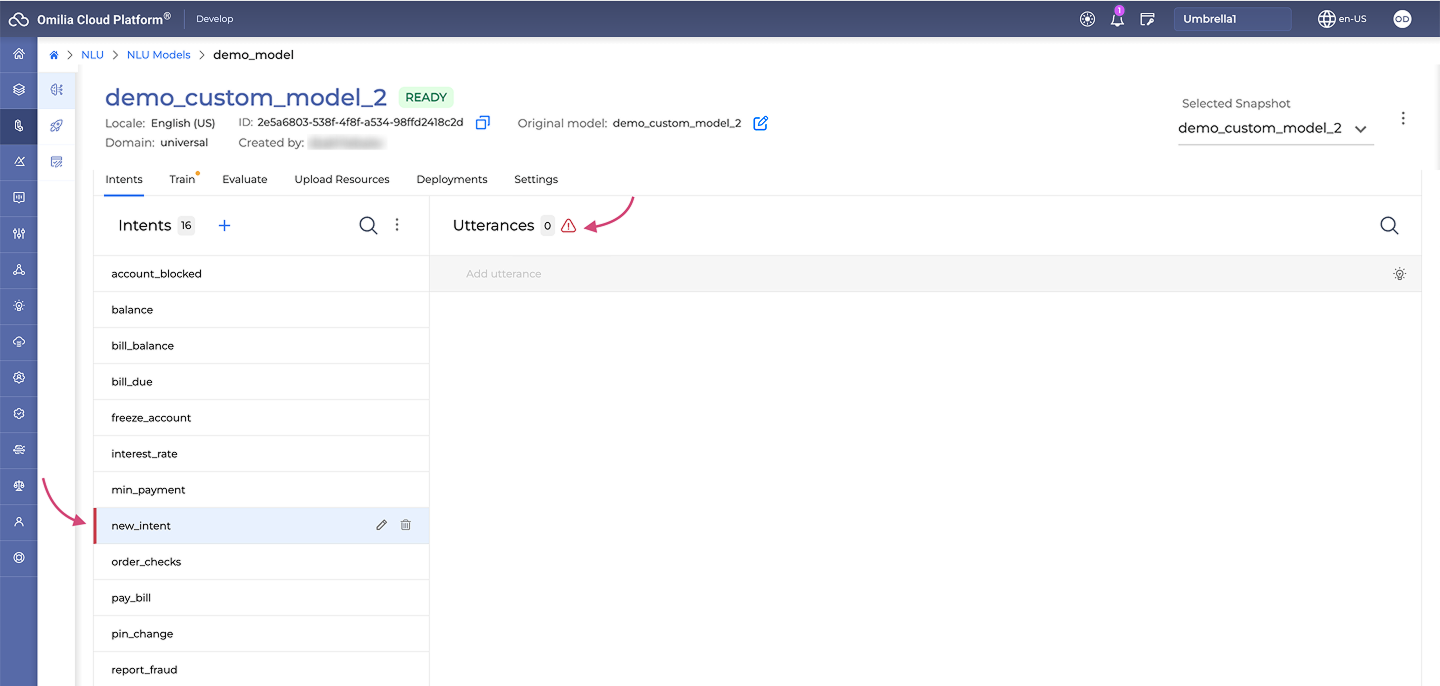
Go to the Intents tab and click the Plus icon.
-
In the opened dialog box, enter an intent name.

The intent name must start with a letter and contain no spaces. It can consist only of letters, dots, hyphens, or underscores. Symbols must be followed by a letter. Between symbols more than one character has to be used.
-
Click Create to confirm. The intent has been added.
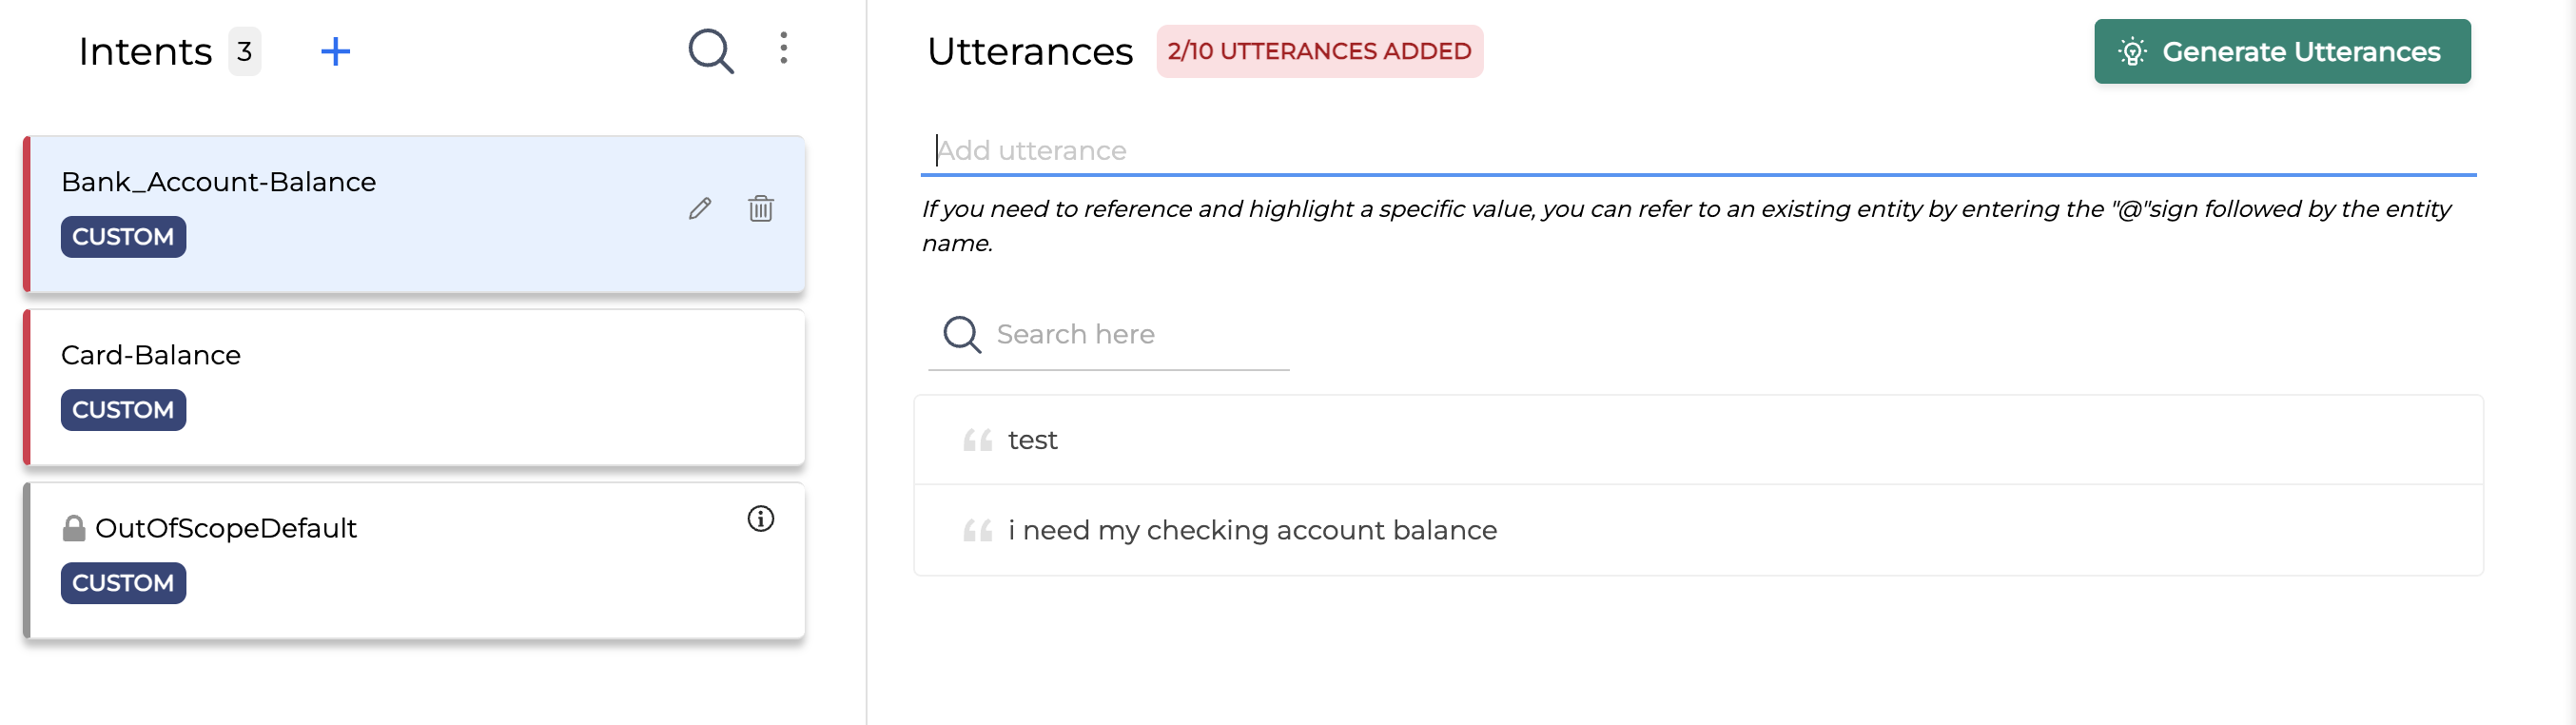
The created intent is highlighted in red. The red Exclamation sign next to the Utterances list informs you that no or not enough utterances have been added to the intent.
Models with intents that are highlighted in red cannot be trained! Add utterances to your intent to be able to train your mode.
-
To edit an intent’s name, click the Pencil icon.
-
To delete an intent, click the Delete icon.
You can only delete custom intents. The out-of-the-box intents cannot be deleted or edited.
Merging intents
There may be cases where it is desirable to combine several intents into one singular intent. You have the capacity to do this with both standard out-of-the-box intents and those that are custom-created.
To merge intents, proceed as follows:
-
Click the Context menu icon in the Intents section and choose Merge intents.
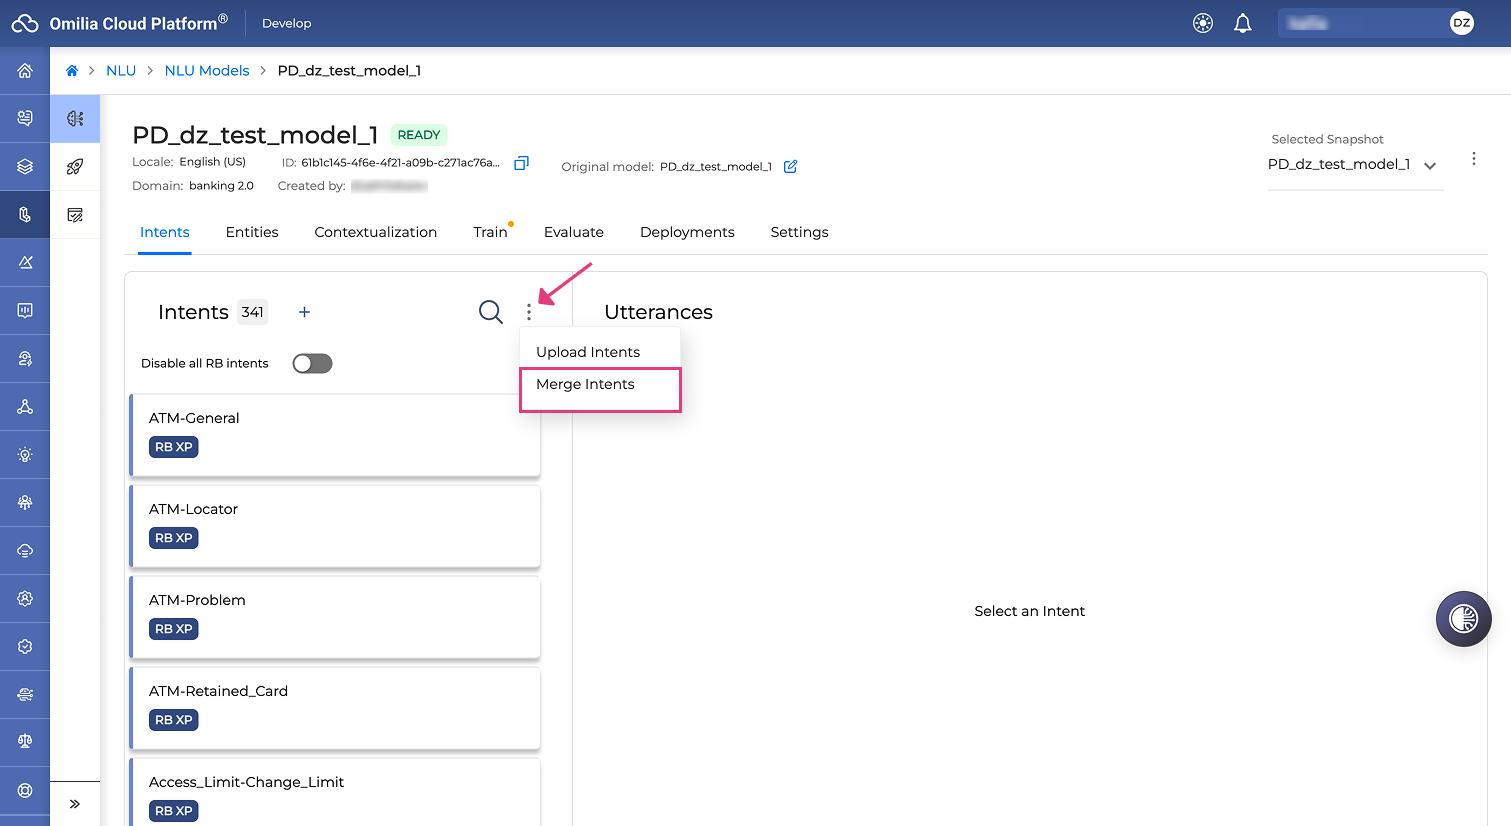
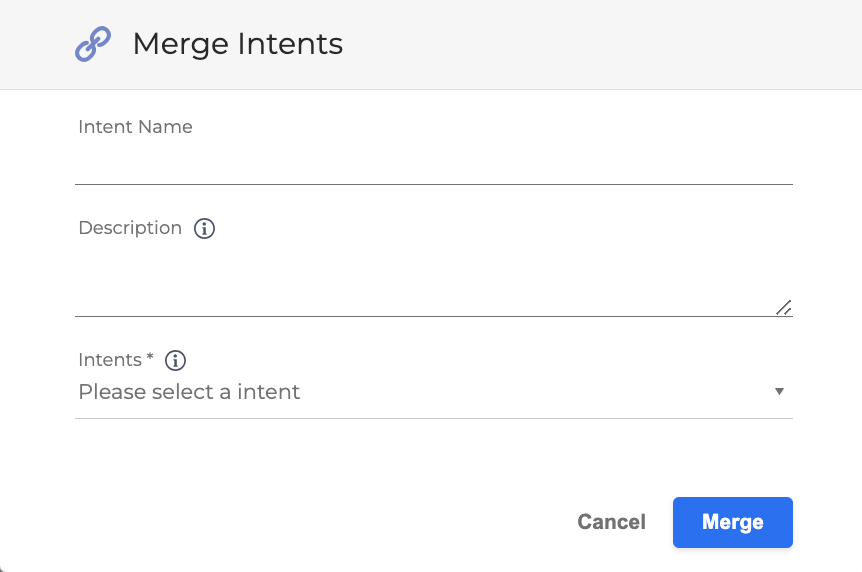
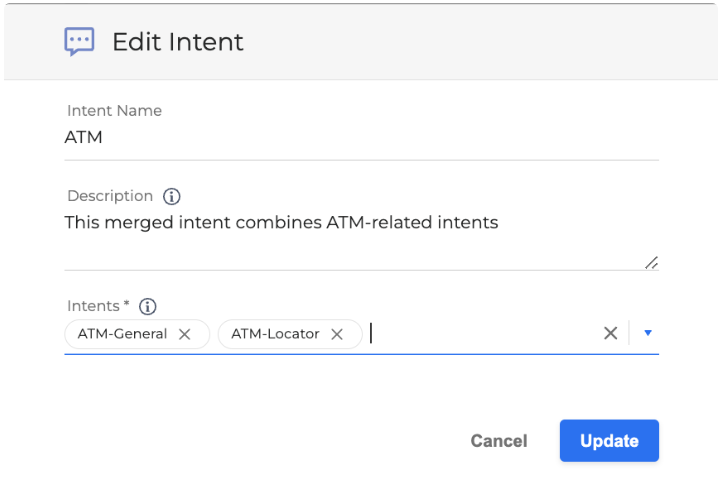
A window will appear where you should complete the fields as illustrated below:
-
Intent name: Input a name for your newly merged intent.
-
Description: Give a brief explanation of the intent. This field is optional.
-
Intents: Choose the intents to merge; you have the option to select multiple intents.
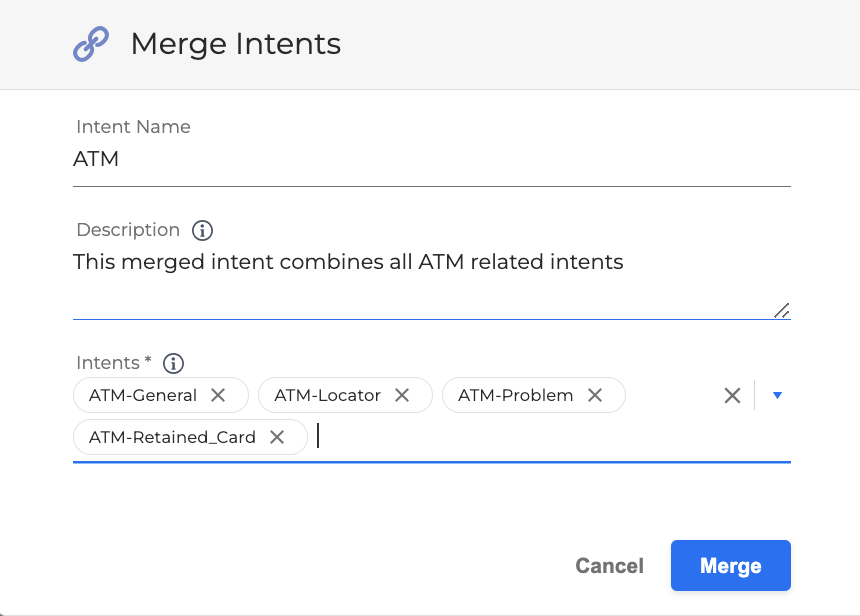
As an illustration, we are consolidating a new intent named ATM that includes several out-of-the-box intents as depicted below:
-
Click Merge to confirm. The newly merged intent will appear under Intents, marked with a Merged icon. The intents that have been merged will no longer be visible in the Intents section. In our ATM example, all the ATM-related intents are no longer showcased in the list.
-
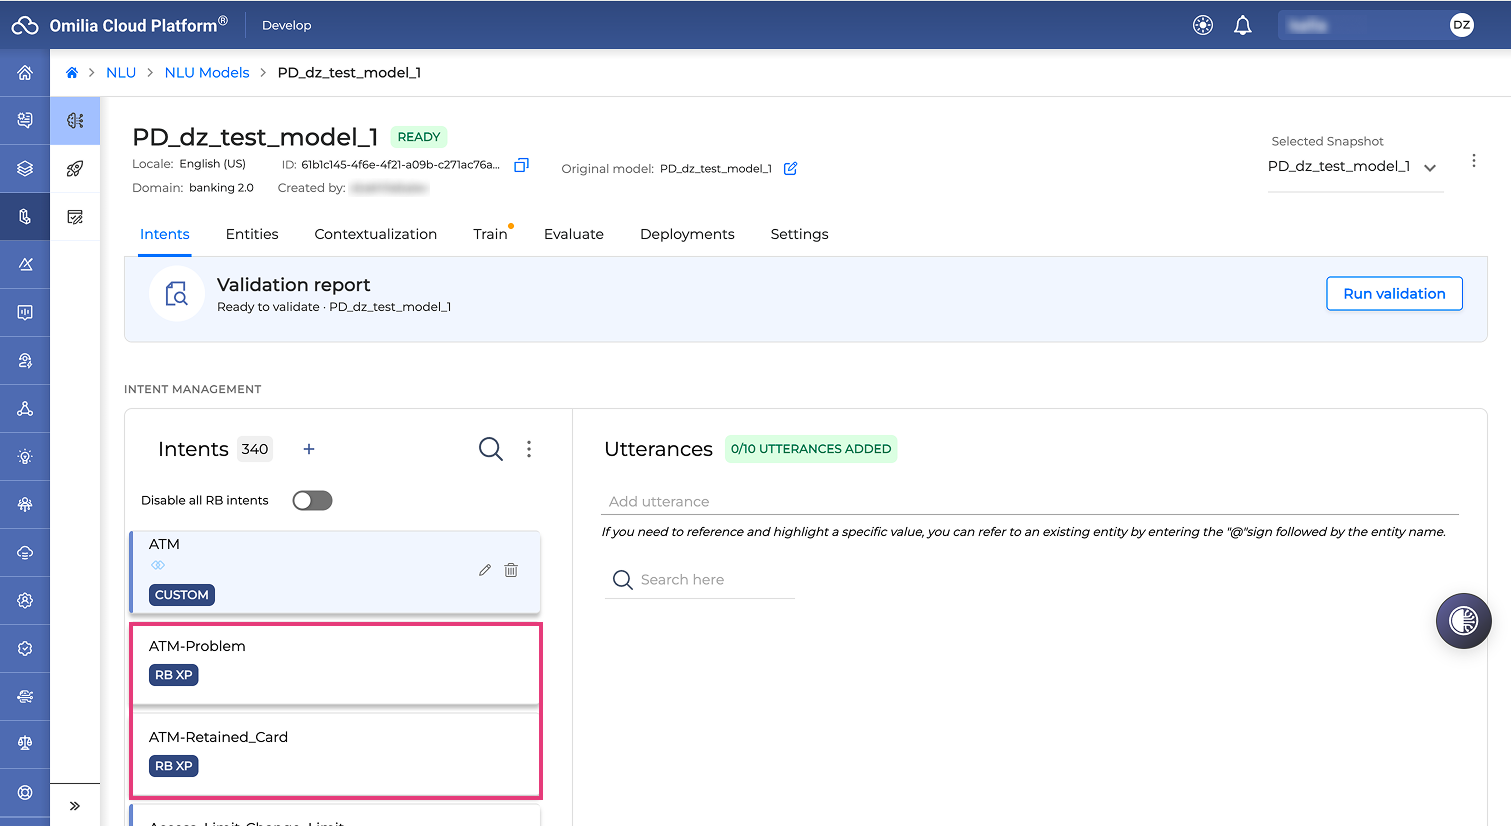
The merged intent can be updated at any point. To revise the intent, select the Edit icon and modify the necessary fields. All fields are editable.

For example, in our ATM intent, we decided to remove ATM-Problem and ATM-Retained.Card intents from being merged.
After clicking the Update button, the excluded intents, in our case, ATM-Problem and ATM-Retained.Card, will reappear in the list of Intents.
Deleting merged intents
If you wish to delete a merged intent, simply select the Delete icon and confirm the deletion.

Take note that deleting a merged intent will permanently erase any custom intents that were part of the merger. However, the standard out-of-the-box intents that were earlier involved in the merger will be restored in the Intents list.
Adding utterances
The same intent can be expressed by the user in many different ways, or phrases. These phrases are called utterances.
You need to add at least five training utterances for each intent. Ideally, ten or more utterances should be added. The more utterances you add, the better the result will be.
To add utterances to an intent, follow the steps below:
-
Select an intent and click on it to activate the utterance input field.
-
Enter an utterance into the highlighted input field.
-
Press <Enter> on your keyboard to add the utterance to the corresponding intent. The Exclamation sign next to Utterances will change its color from red to yellow depending on their number:
-
Red: Less than five utterances have been added
-
Yellow: Less than ten utterances have been added.
-
As soon as ten or more utterances are added, the exclamation sign will disappear and the intent will not be highlighted anymore.
-
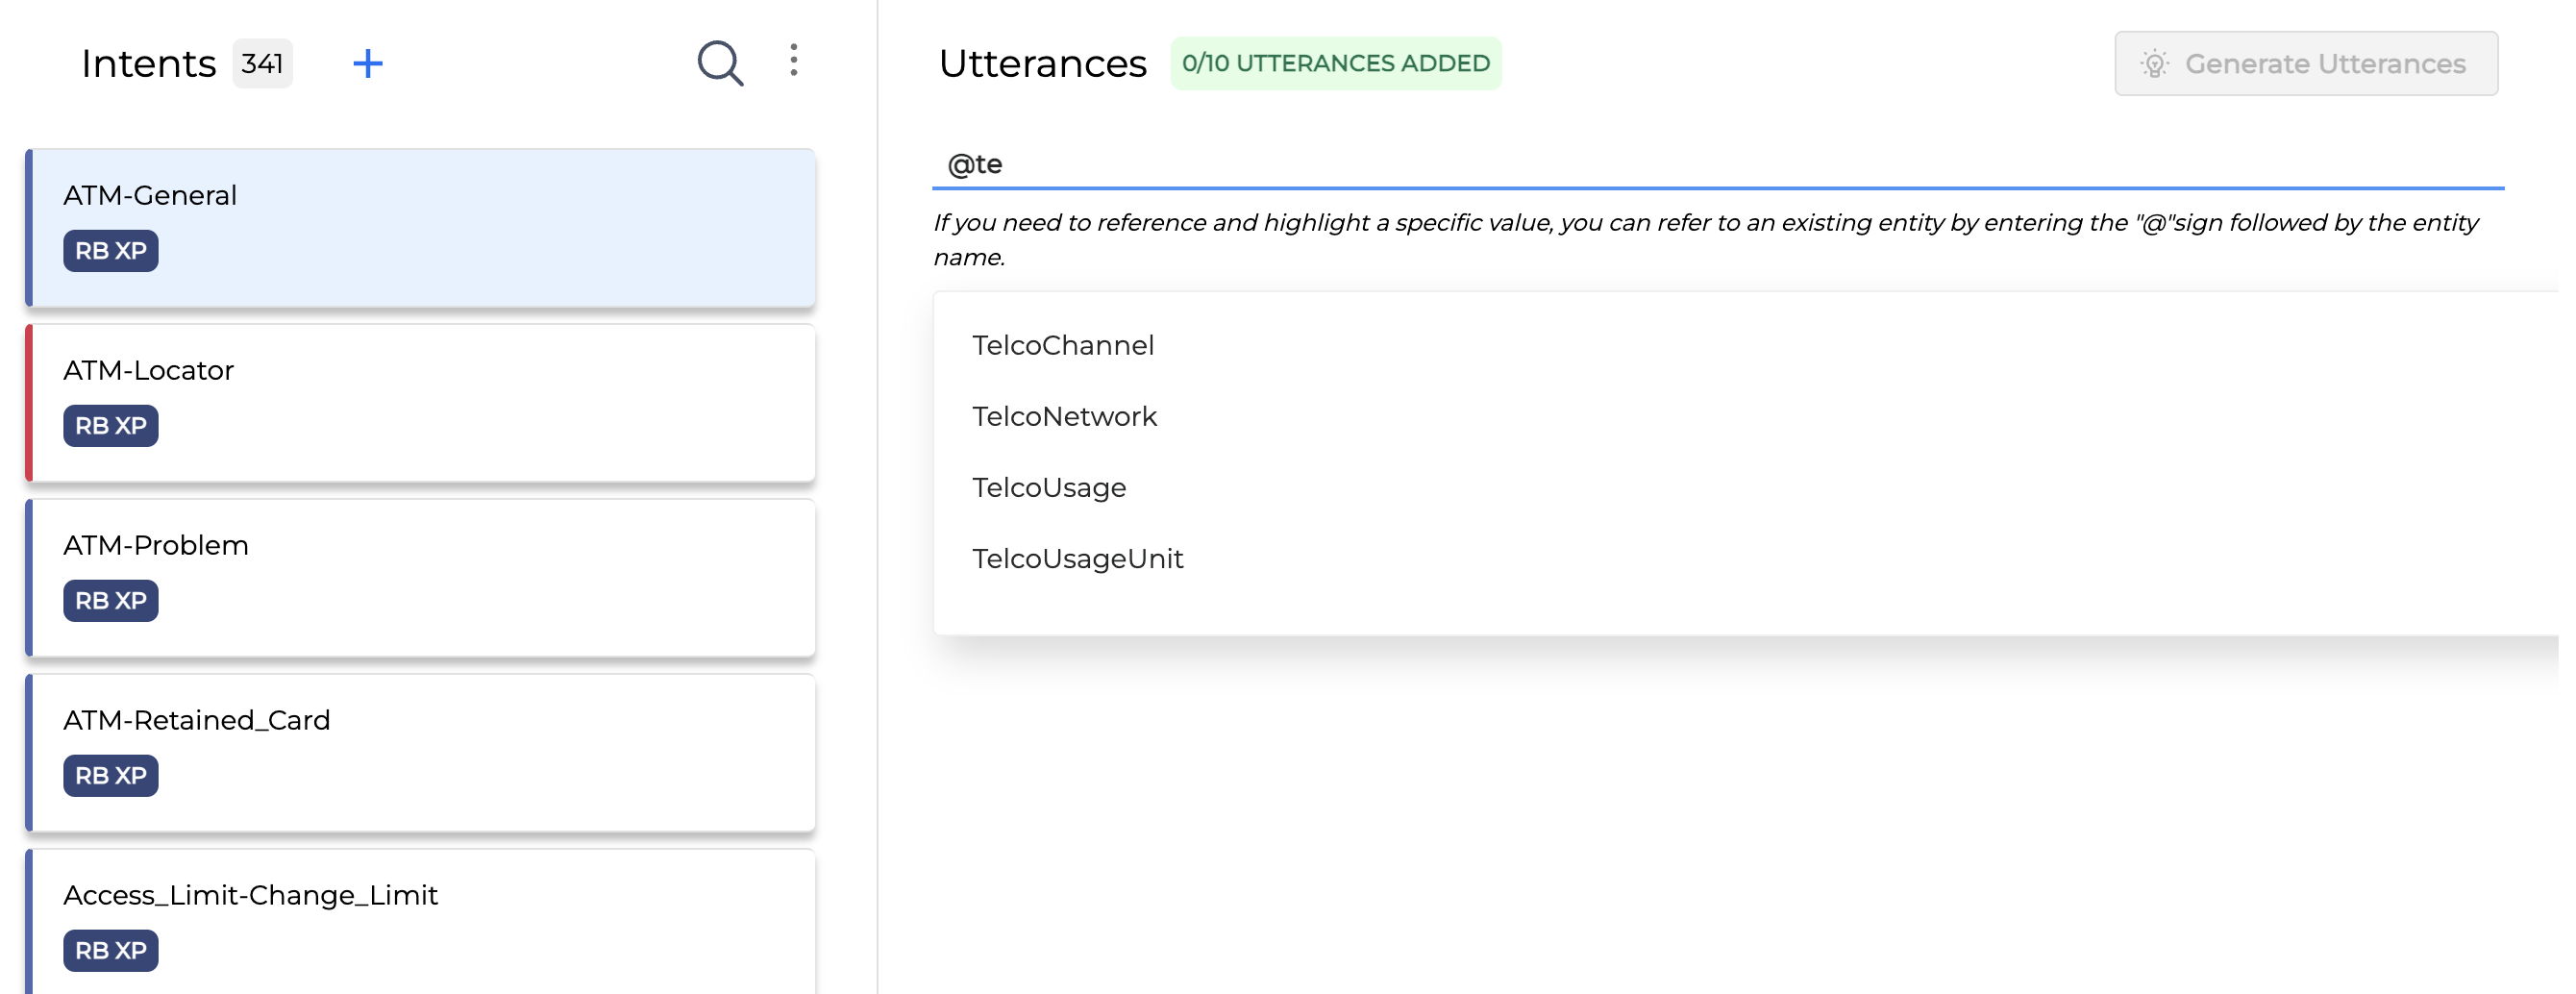
When adding utterances, you can refer to the existing entity by inserting the @-sign. As you start typing the entity name, you will be presented with a dynamic drop-down list from which you can select your desired entity.
-
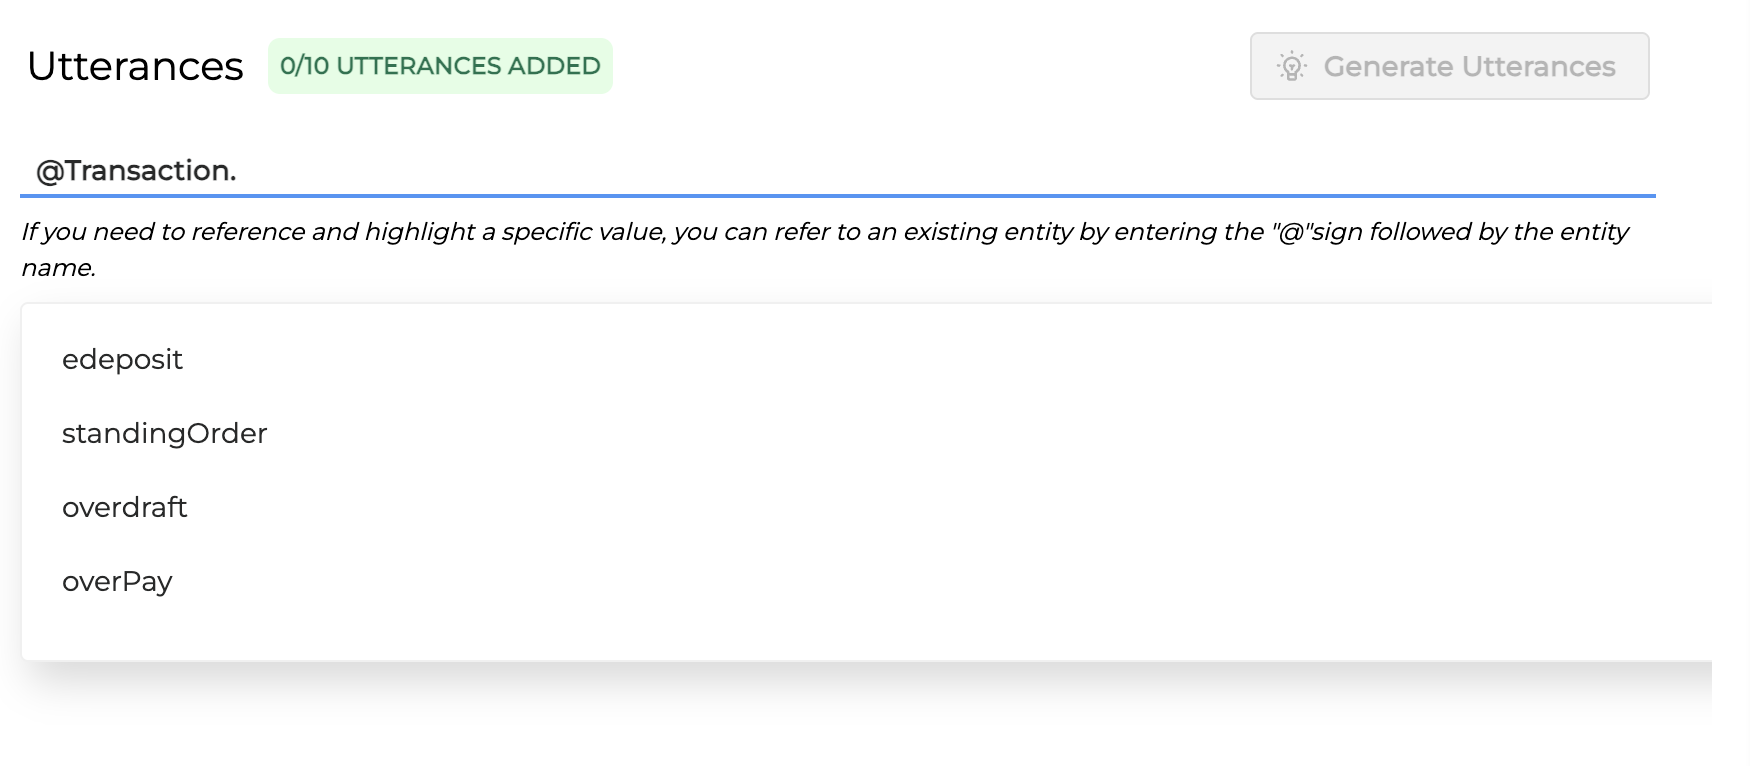
If you need to refer to a specific value and not to the whole entity, add a dot after the entity name and select an entity value from the existing entity dictionary.
-
If an entity holds no values, you will be alerted via a corresponding message.
-
After selecting an entity or an entity value, you will see the Information icon next to Utterances that urges you to pay extra attention to this utterance. When hovering over this icon, you will see the following message: This intent includes entity references that might impact its effectiveness. Consider reviewing them for quality and relevance.
Deleting utterances
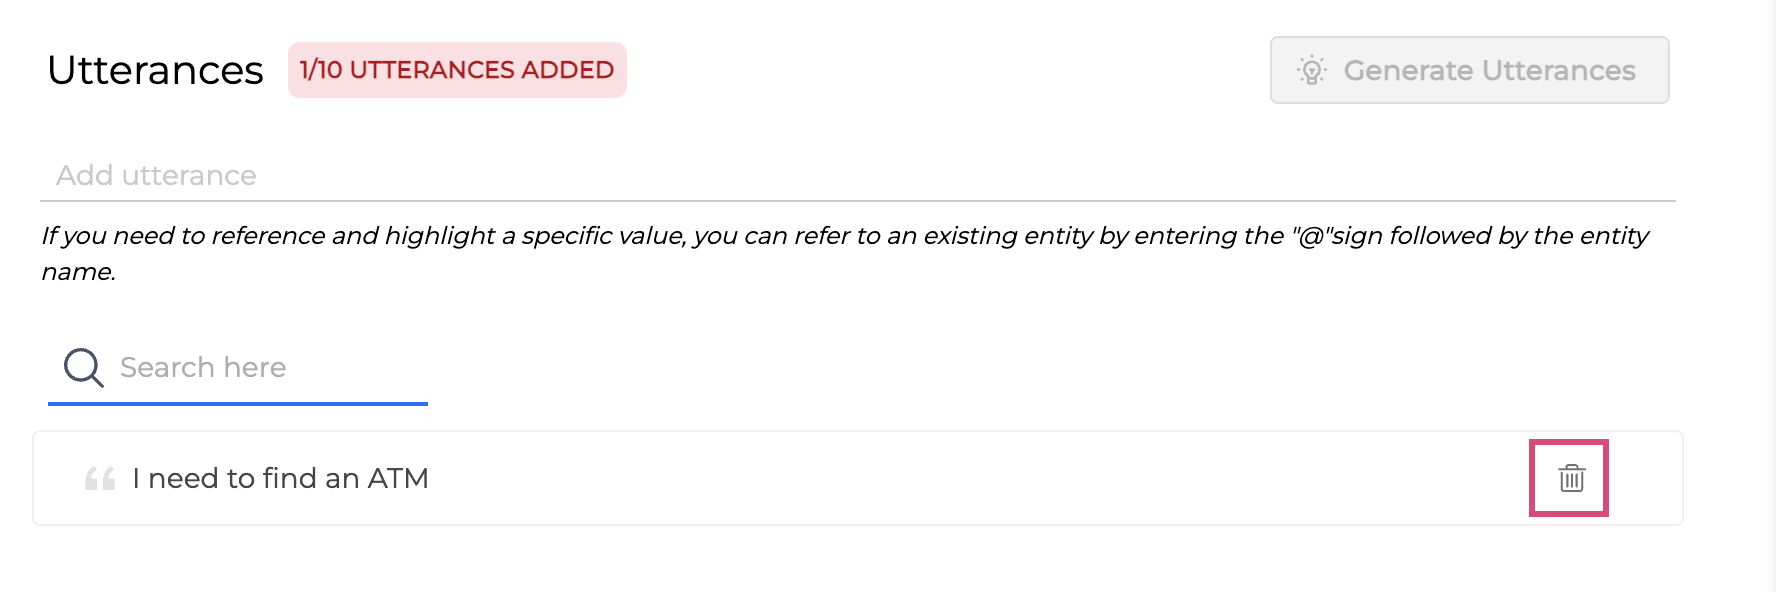
To delete an utterance, hover over it and click the Delete icon.
Dataset Validation
The Validation report block validates the training data health of an NLU model.
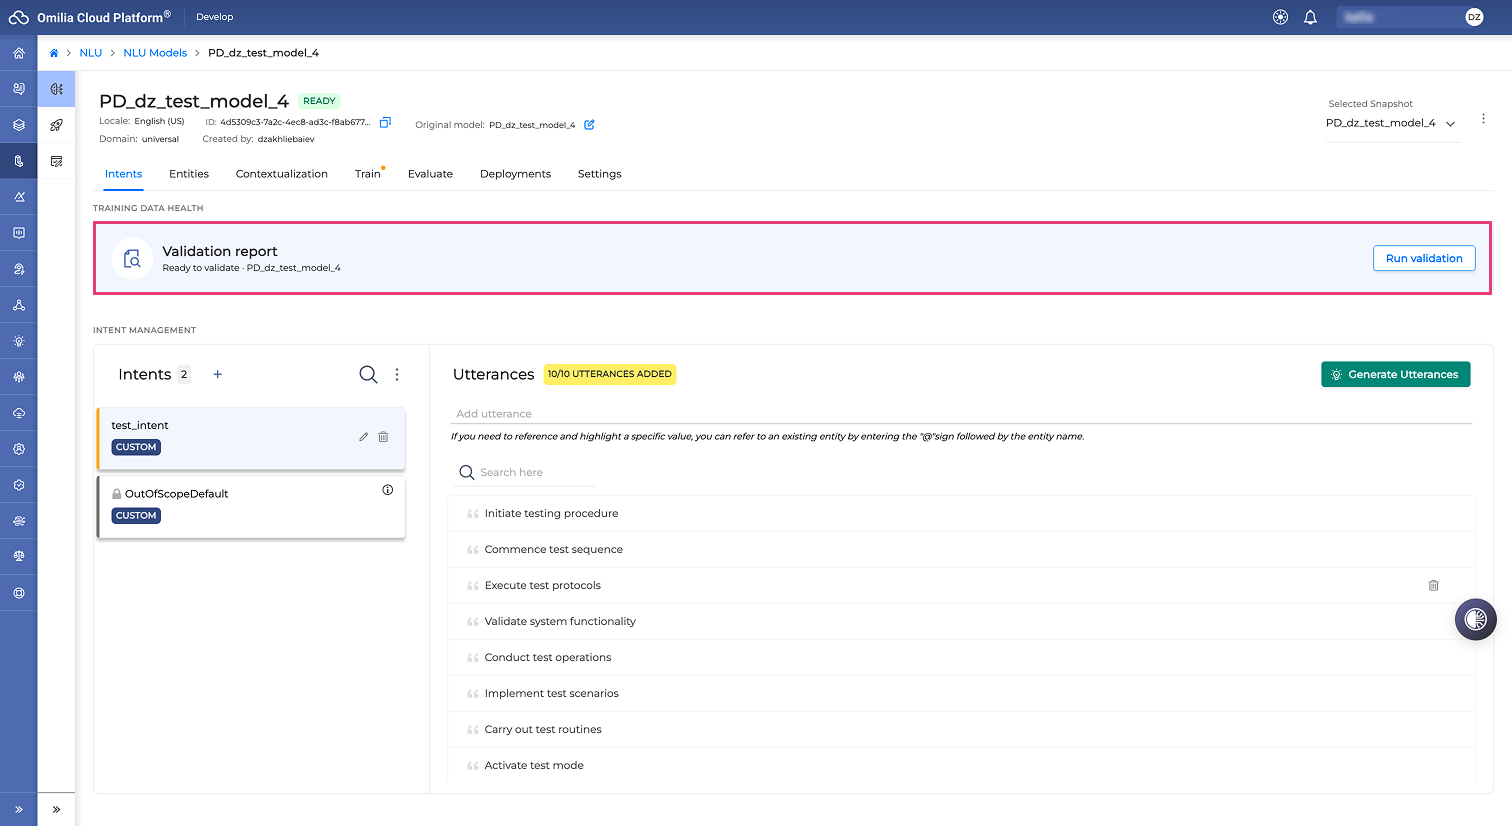
The Validation report appears when you create at least one intent for the NLU model.
If you attempt to run a validation without adding utterances to the intent, the system displays a dataset is empty error.
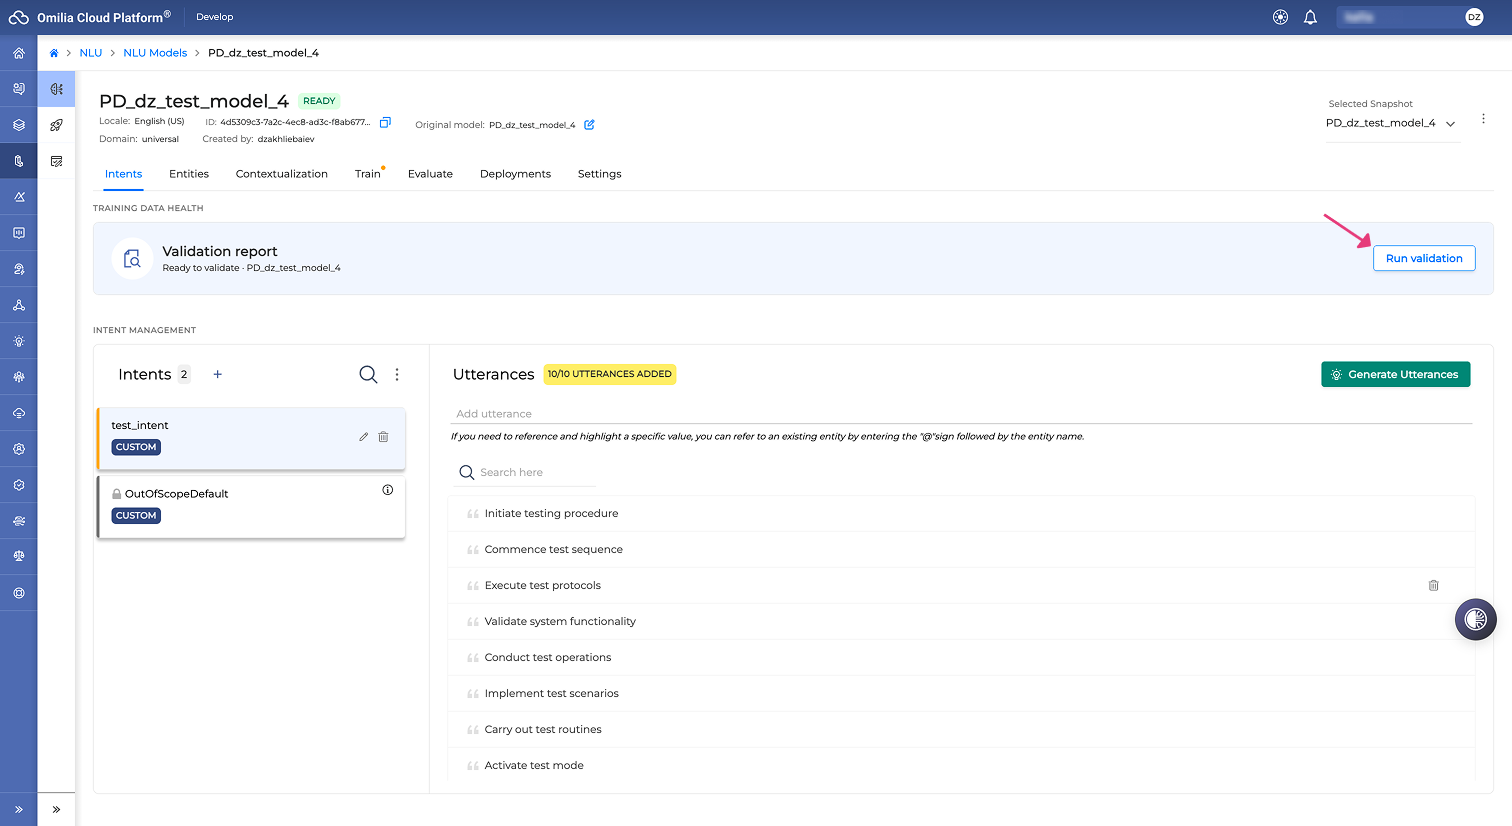
Running validation
To run a successful validation, follow these steps:
-
Create an NLU model.
-
Create one intent.
-
Add 10 utterances to the new intent.
-
Select Run validation.
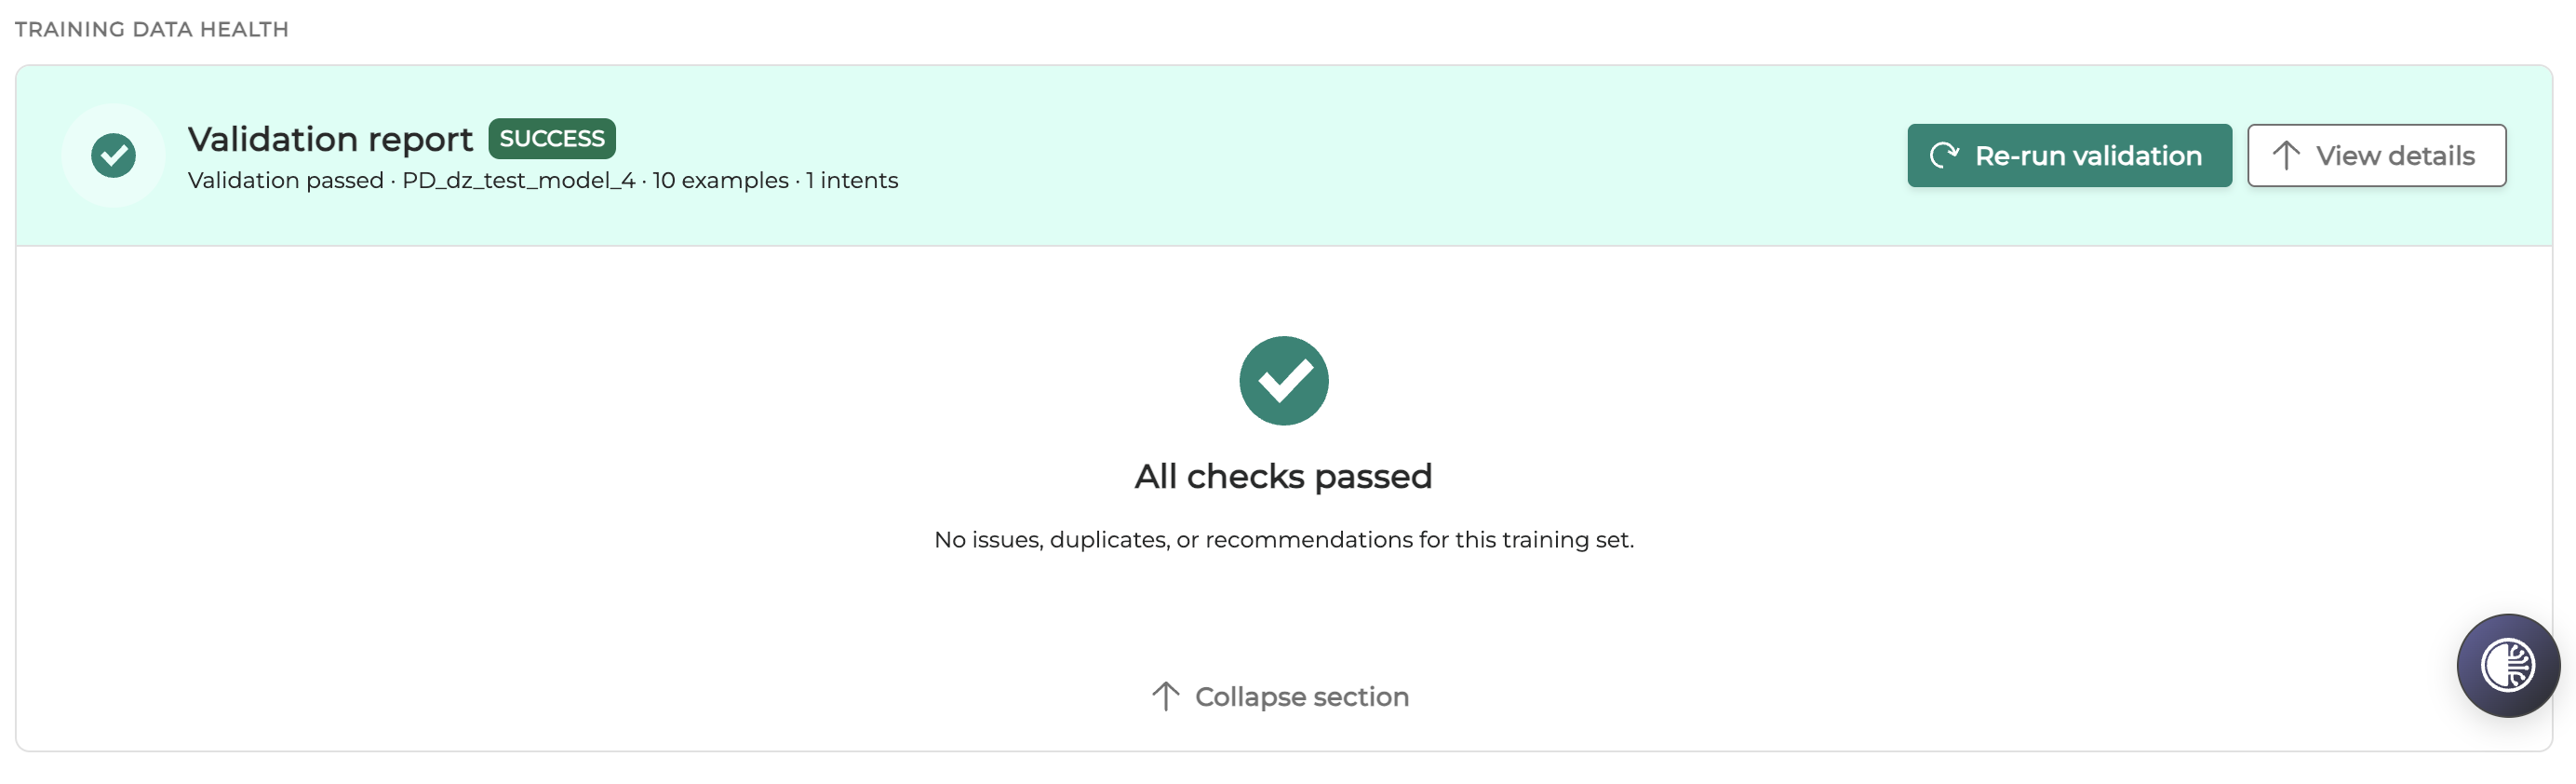
When the validation is complete, the block displays a success message.
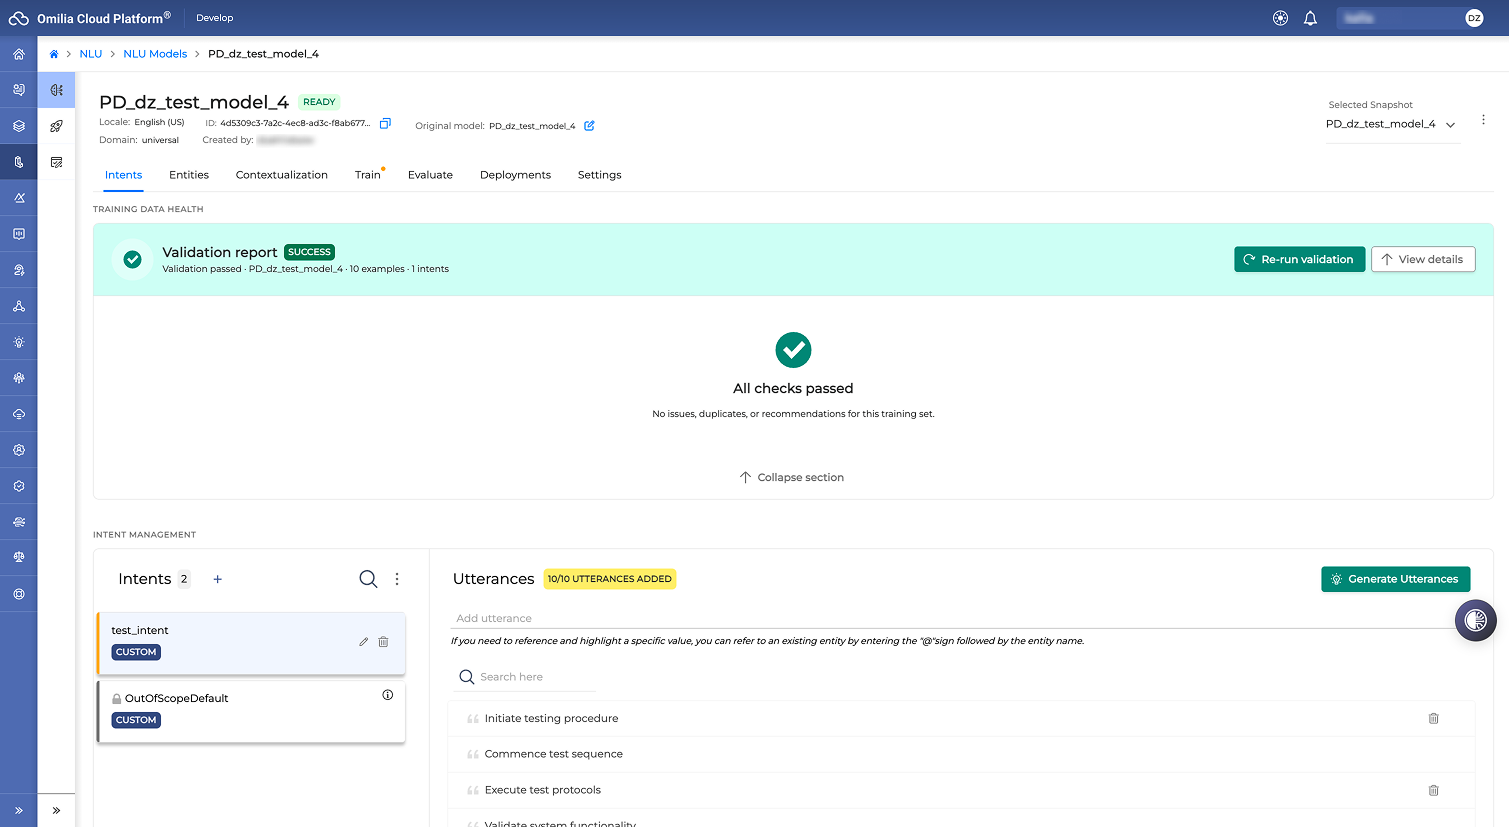
Viewing validation details
You can expand or hide the validation details using the interface buttons:
-
Select View details to expand the section and review comprehensive validation information.
-
Select Collapse section to hide the details.
Reviewing validation failures
If the training data contains errors or conflicts, the Validation report area displays a FAILED status.
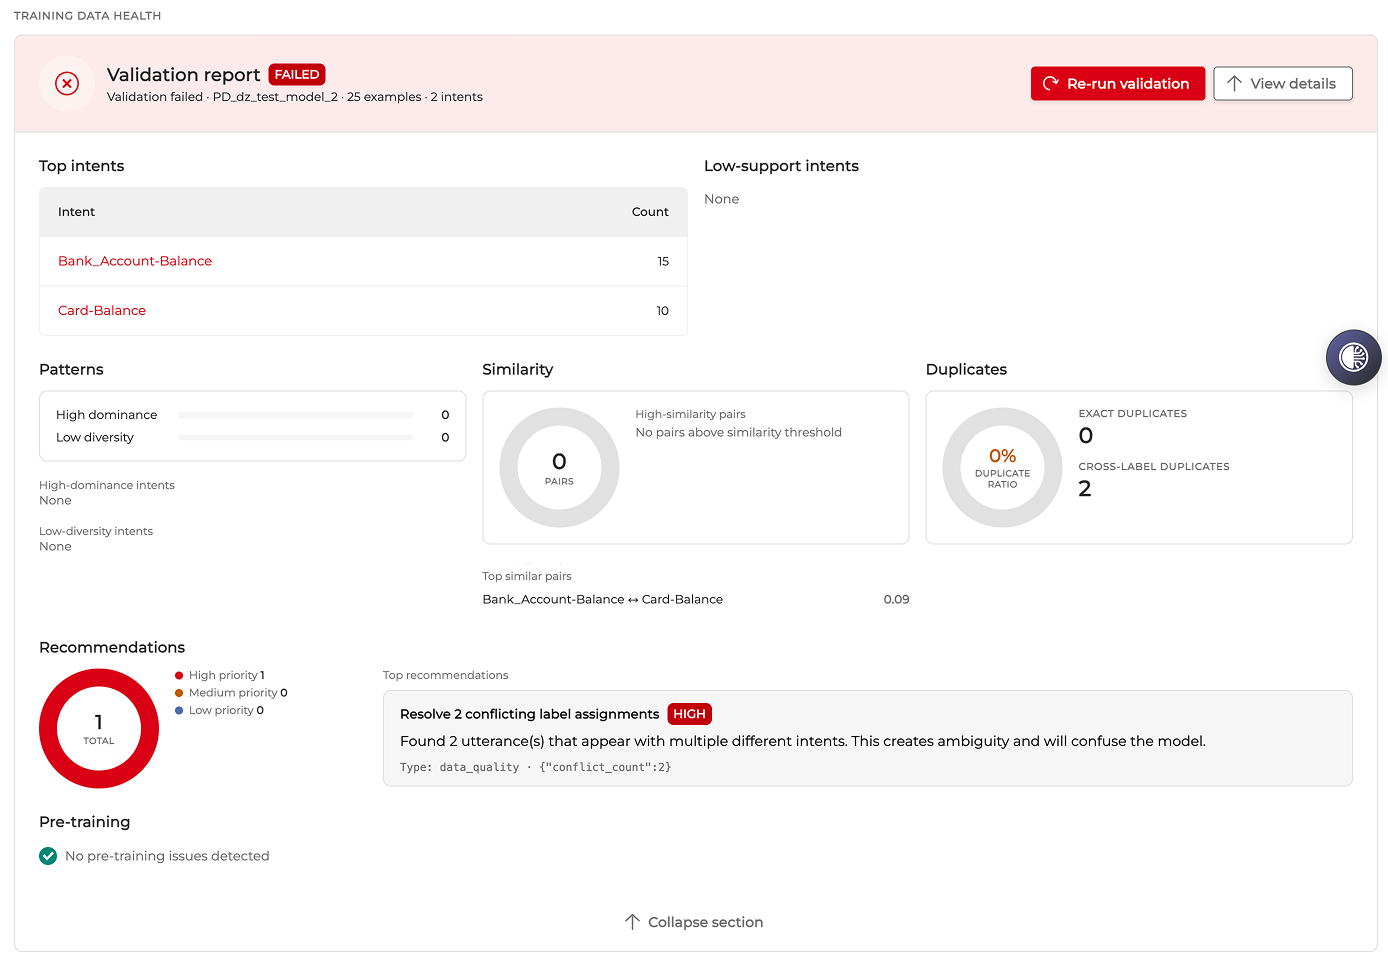
Select View details to expand the section and review the specific issues.
The expanded validation report contains the following areas:
-
Top intents: Displays the intents with the highest number of training utterances. Intents causing issues are highlighted in red text.
-
Low-support intents: Lists intents with an insufficient number of utterances.
-
Patterns: Identifies high dominance or low diversity issues within the dataset.
-
Similarity: Highlights intent pairs with high similarity that might confuse the model.
-
Duplicates: Displays the duplicate ratio, including the number of exact duplicates and cross-label duplicates.
-
Recommendations: Provides suggested actions to fix the training data issues. The system categorizes recommendations by priority (High, Medium, and Low). For example, it identifies conflicting label assignments where the same utterance appears in multiple different intents.
-
Pre-training: Indicates if the system detected any pre-training issues.
After you resolve the identified issues in the training dataset, select Re-run validation to validate the training data health again.
Adding entities
Entities allow an application to understand the meaning of natural language text and extract relevant information for further processing.
An entity is a specific piece of information or data within a sentence that represents a real-world object, such as a person, place, thing, event, action, concept, and so on. It’s a label we use to shelter words or small phrases under the same umbrella. For example, green, orange, blue, purple, yellow, red are colors. Visa, MasterCard, and American Express are card networks.
Custom domain models do not support entities.
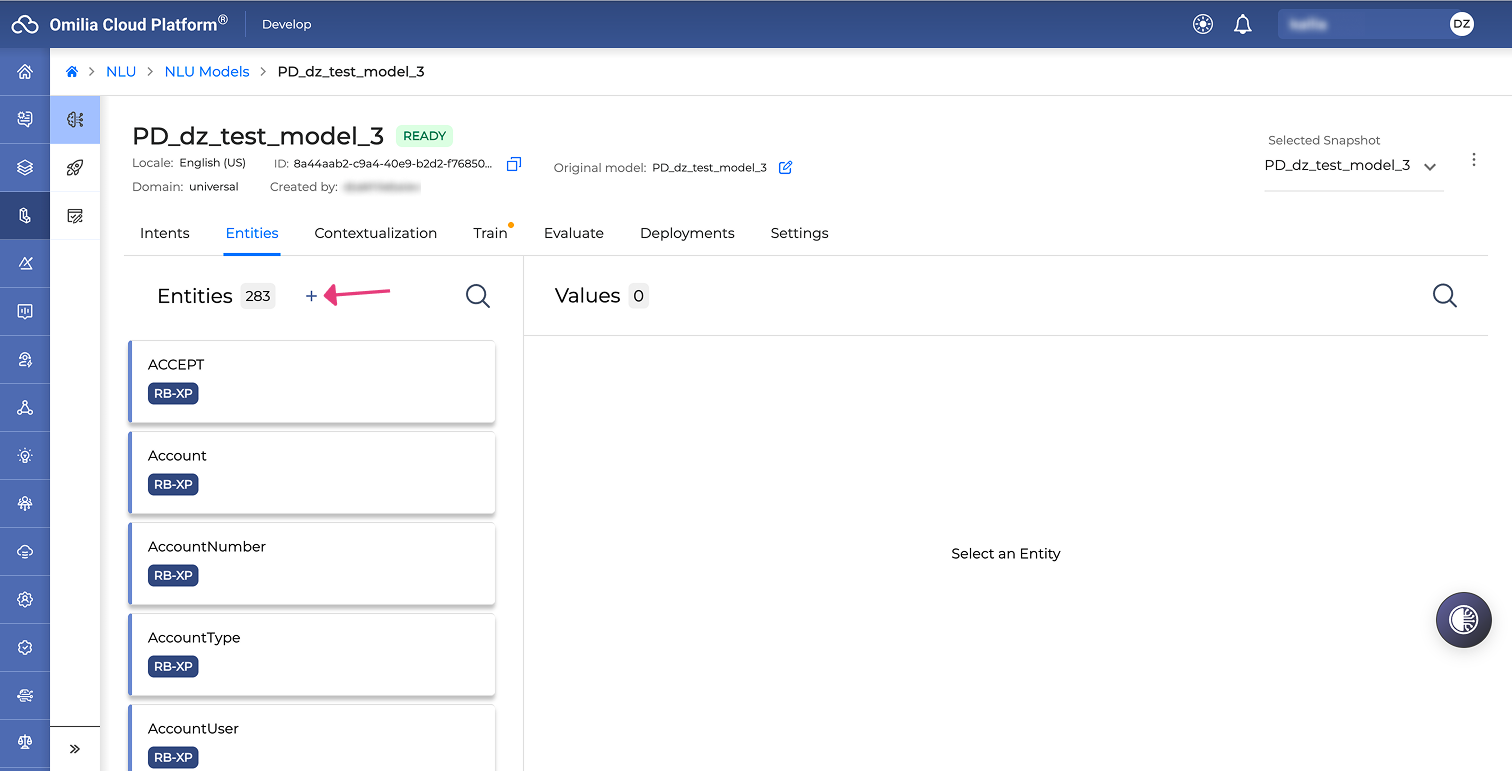
To add an entity, follow the steps below:
-
Navigate to NLU → NLU Models section.
-
Select a model and click on it. The model drill-down page opens.
-
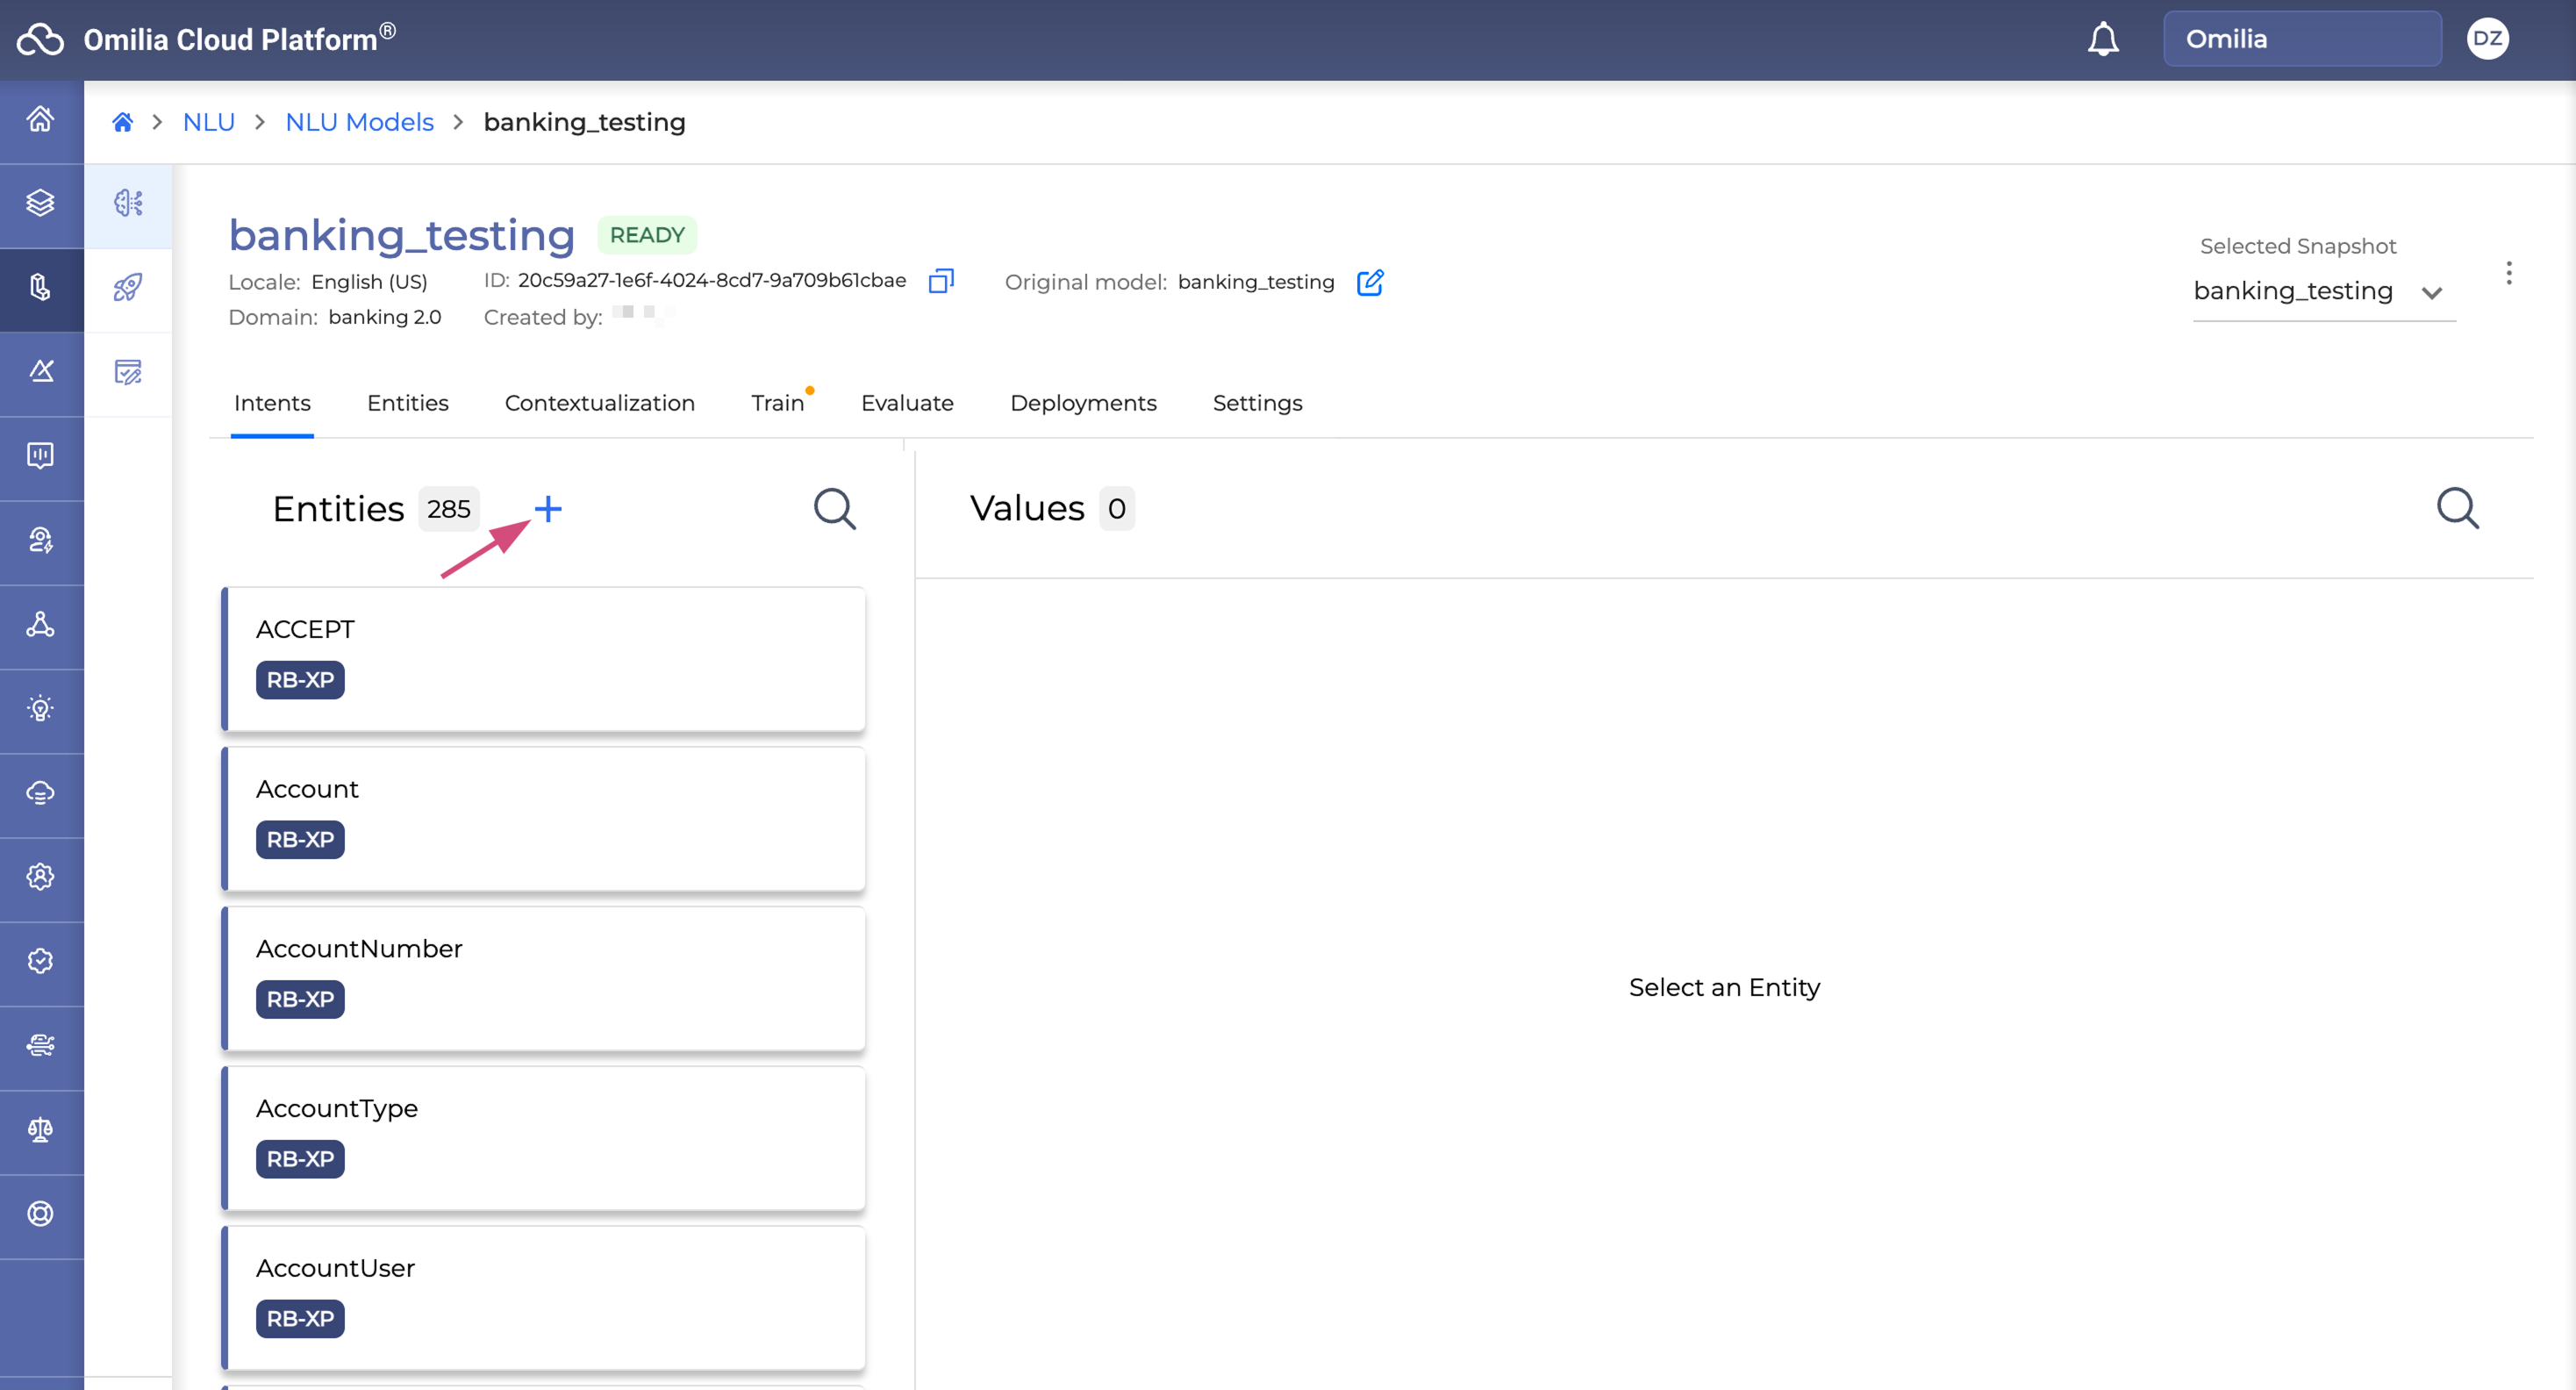
Go to the Entities tab and click the Plus icon.
-
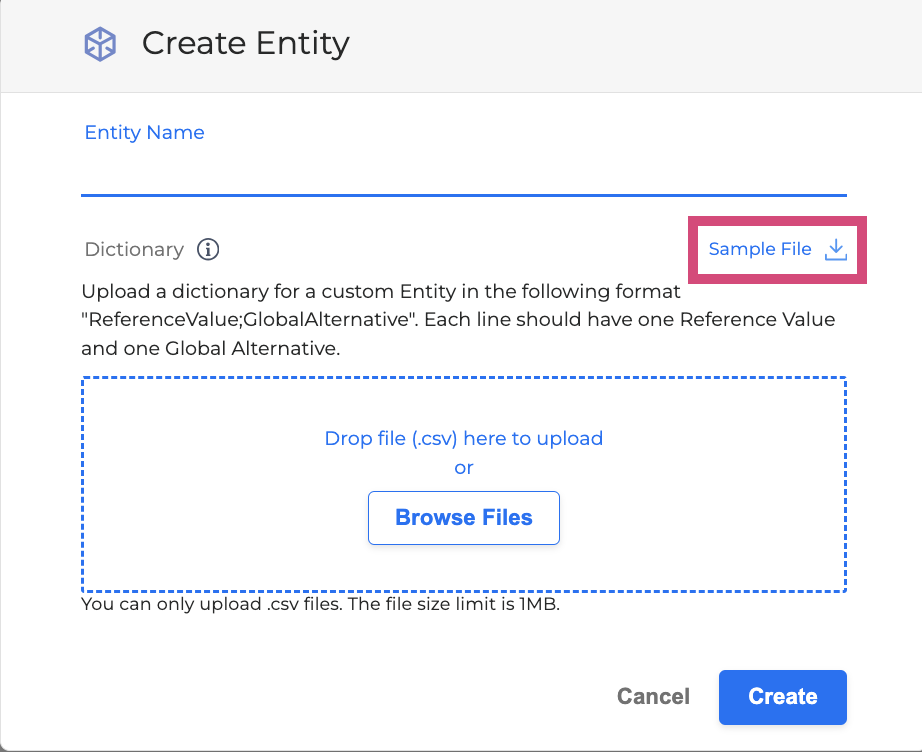
In the opened dialog box, fill in the fields as described below:
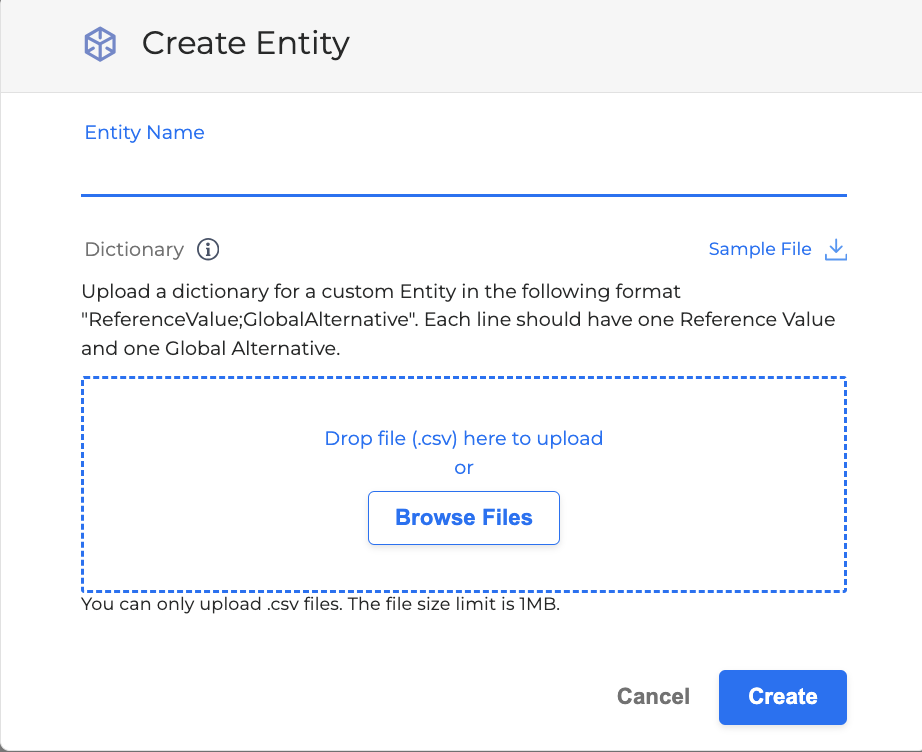
-
Entity Name: Enter the entity name.
The entity name may only consist of letters and contain no spaces. Please note that entity names are treated as case insensitive.
-
Dictionary: Upload an entity dictionary file. Omit this field if you are going add values and alternatives manually.
-
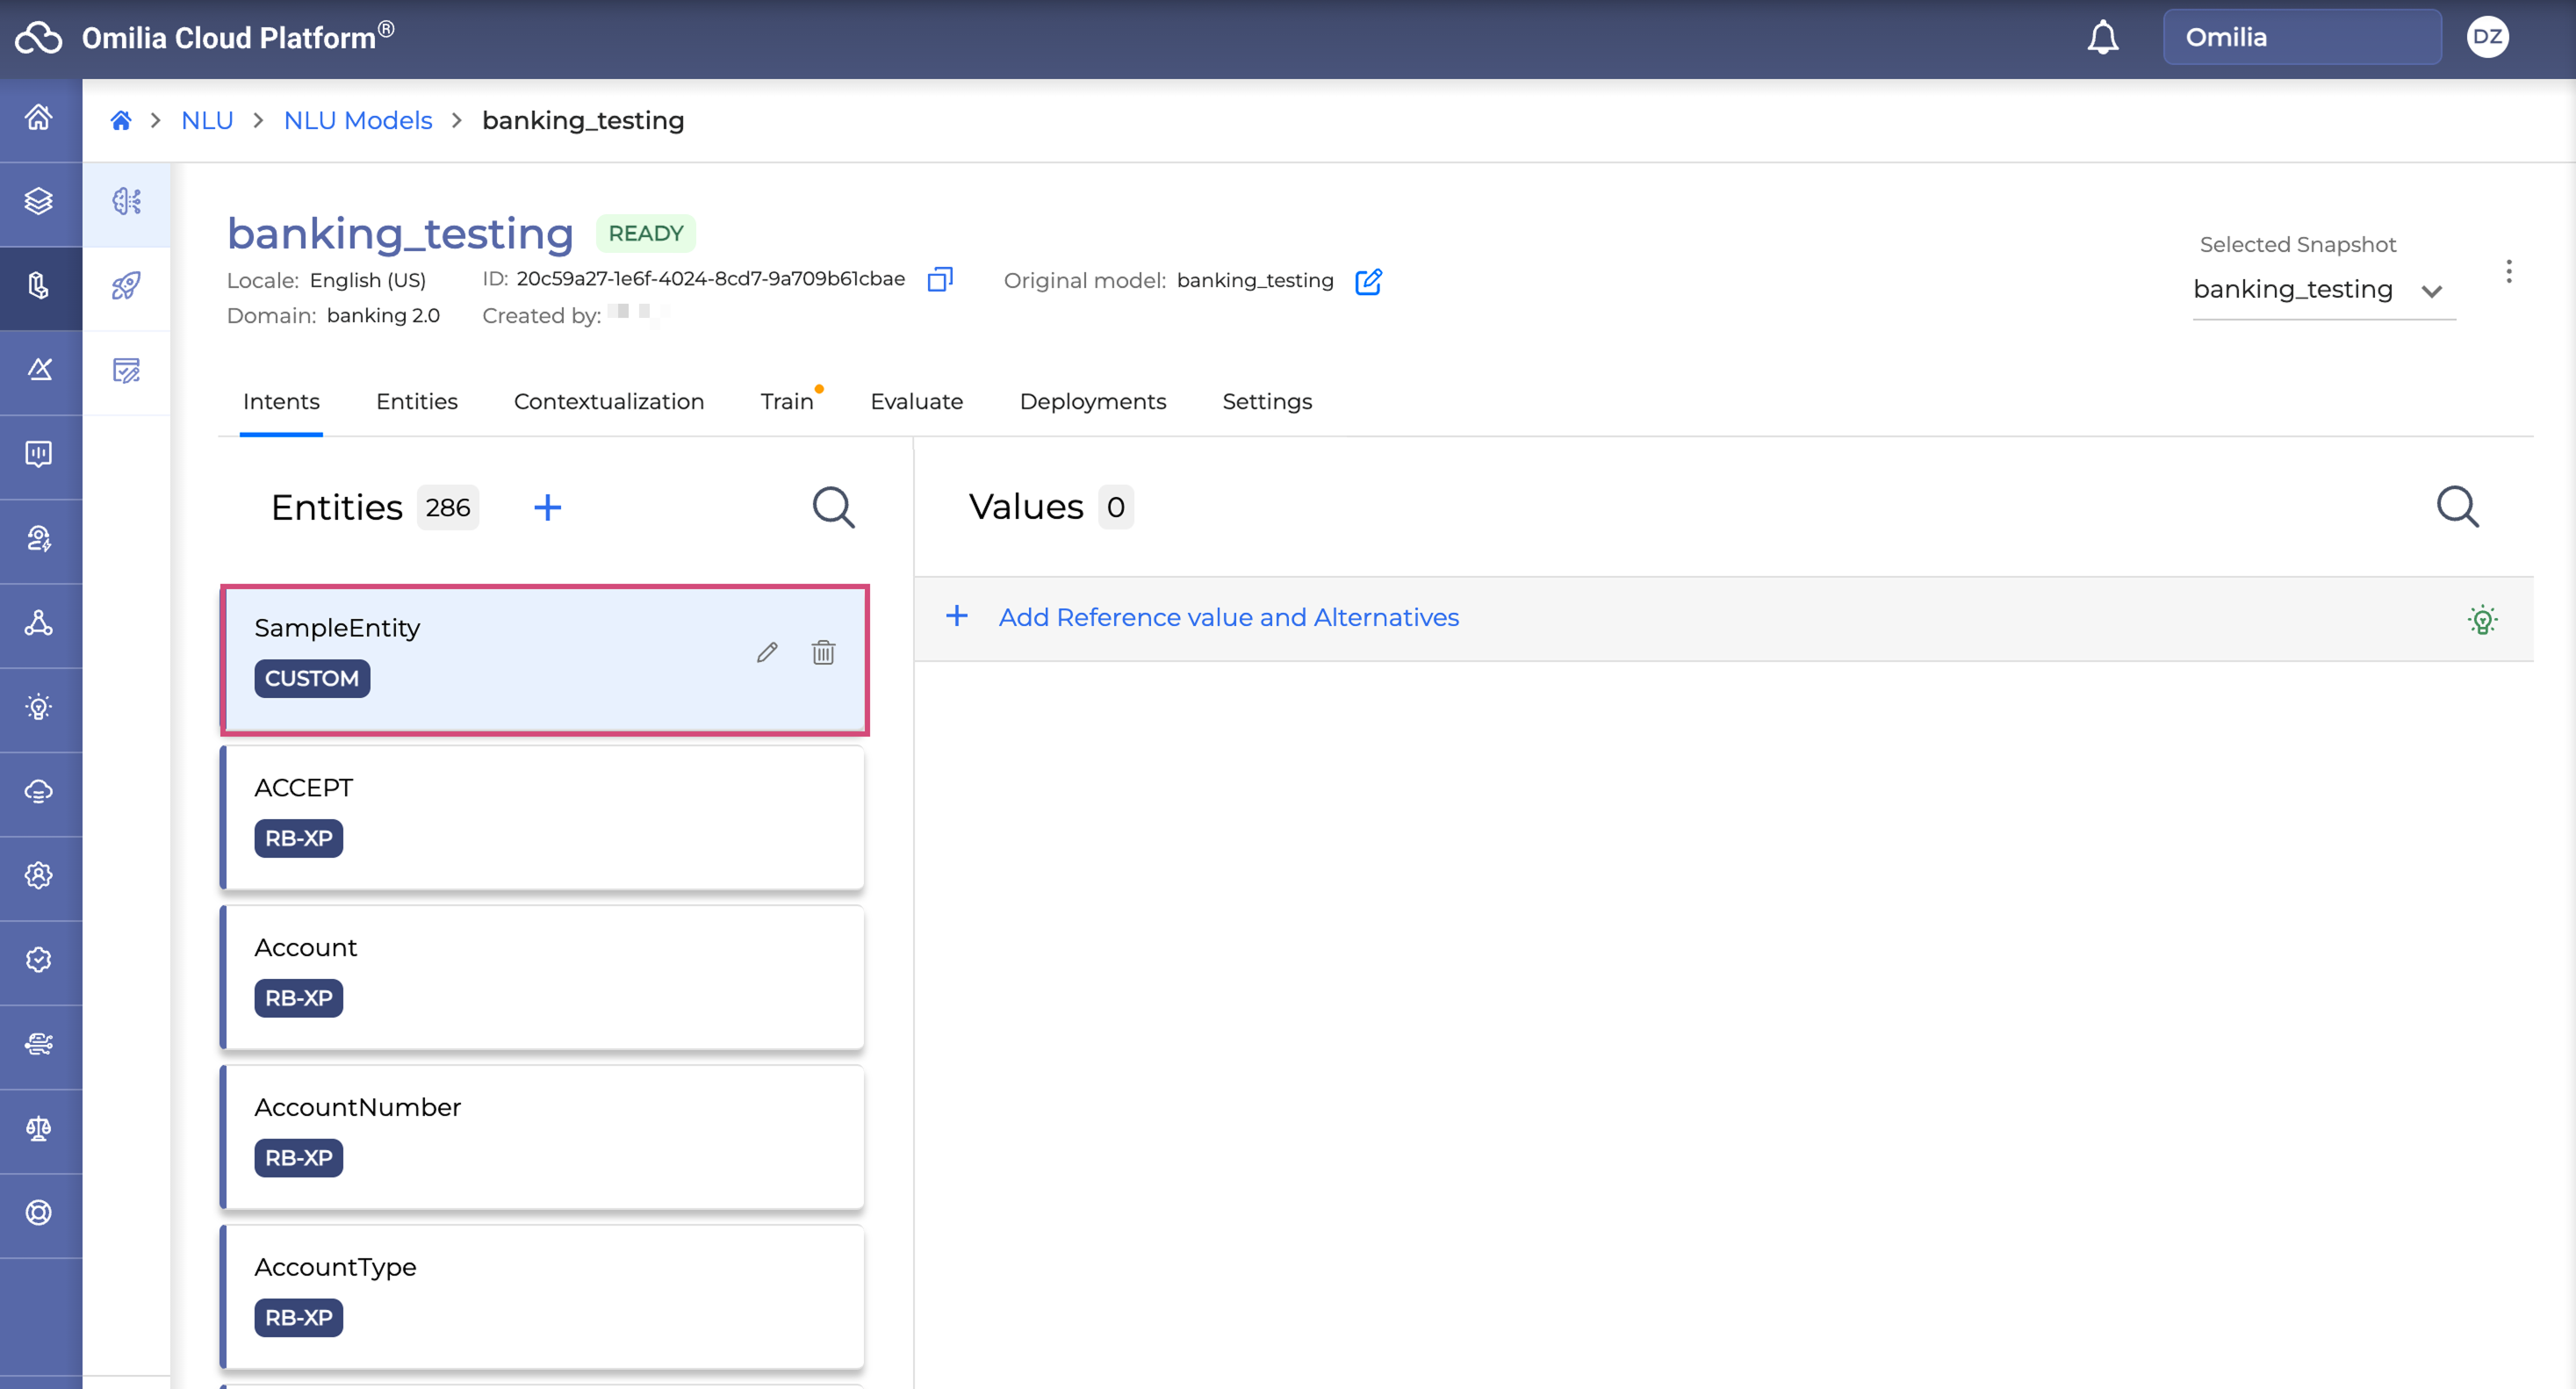
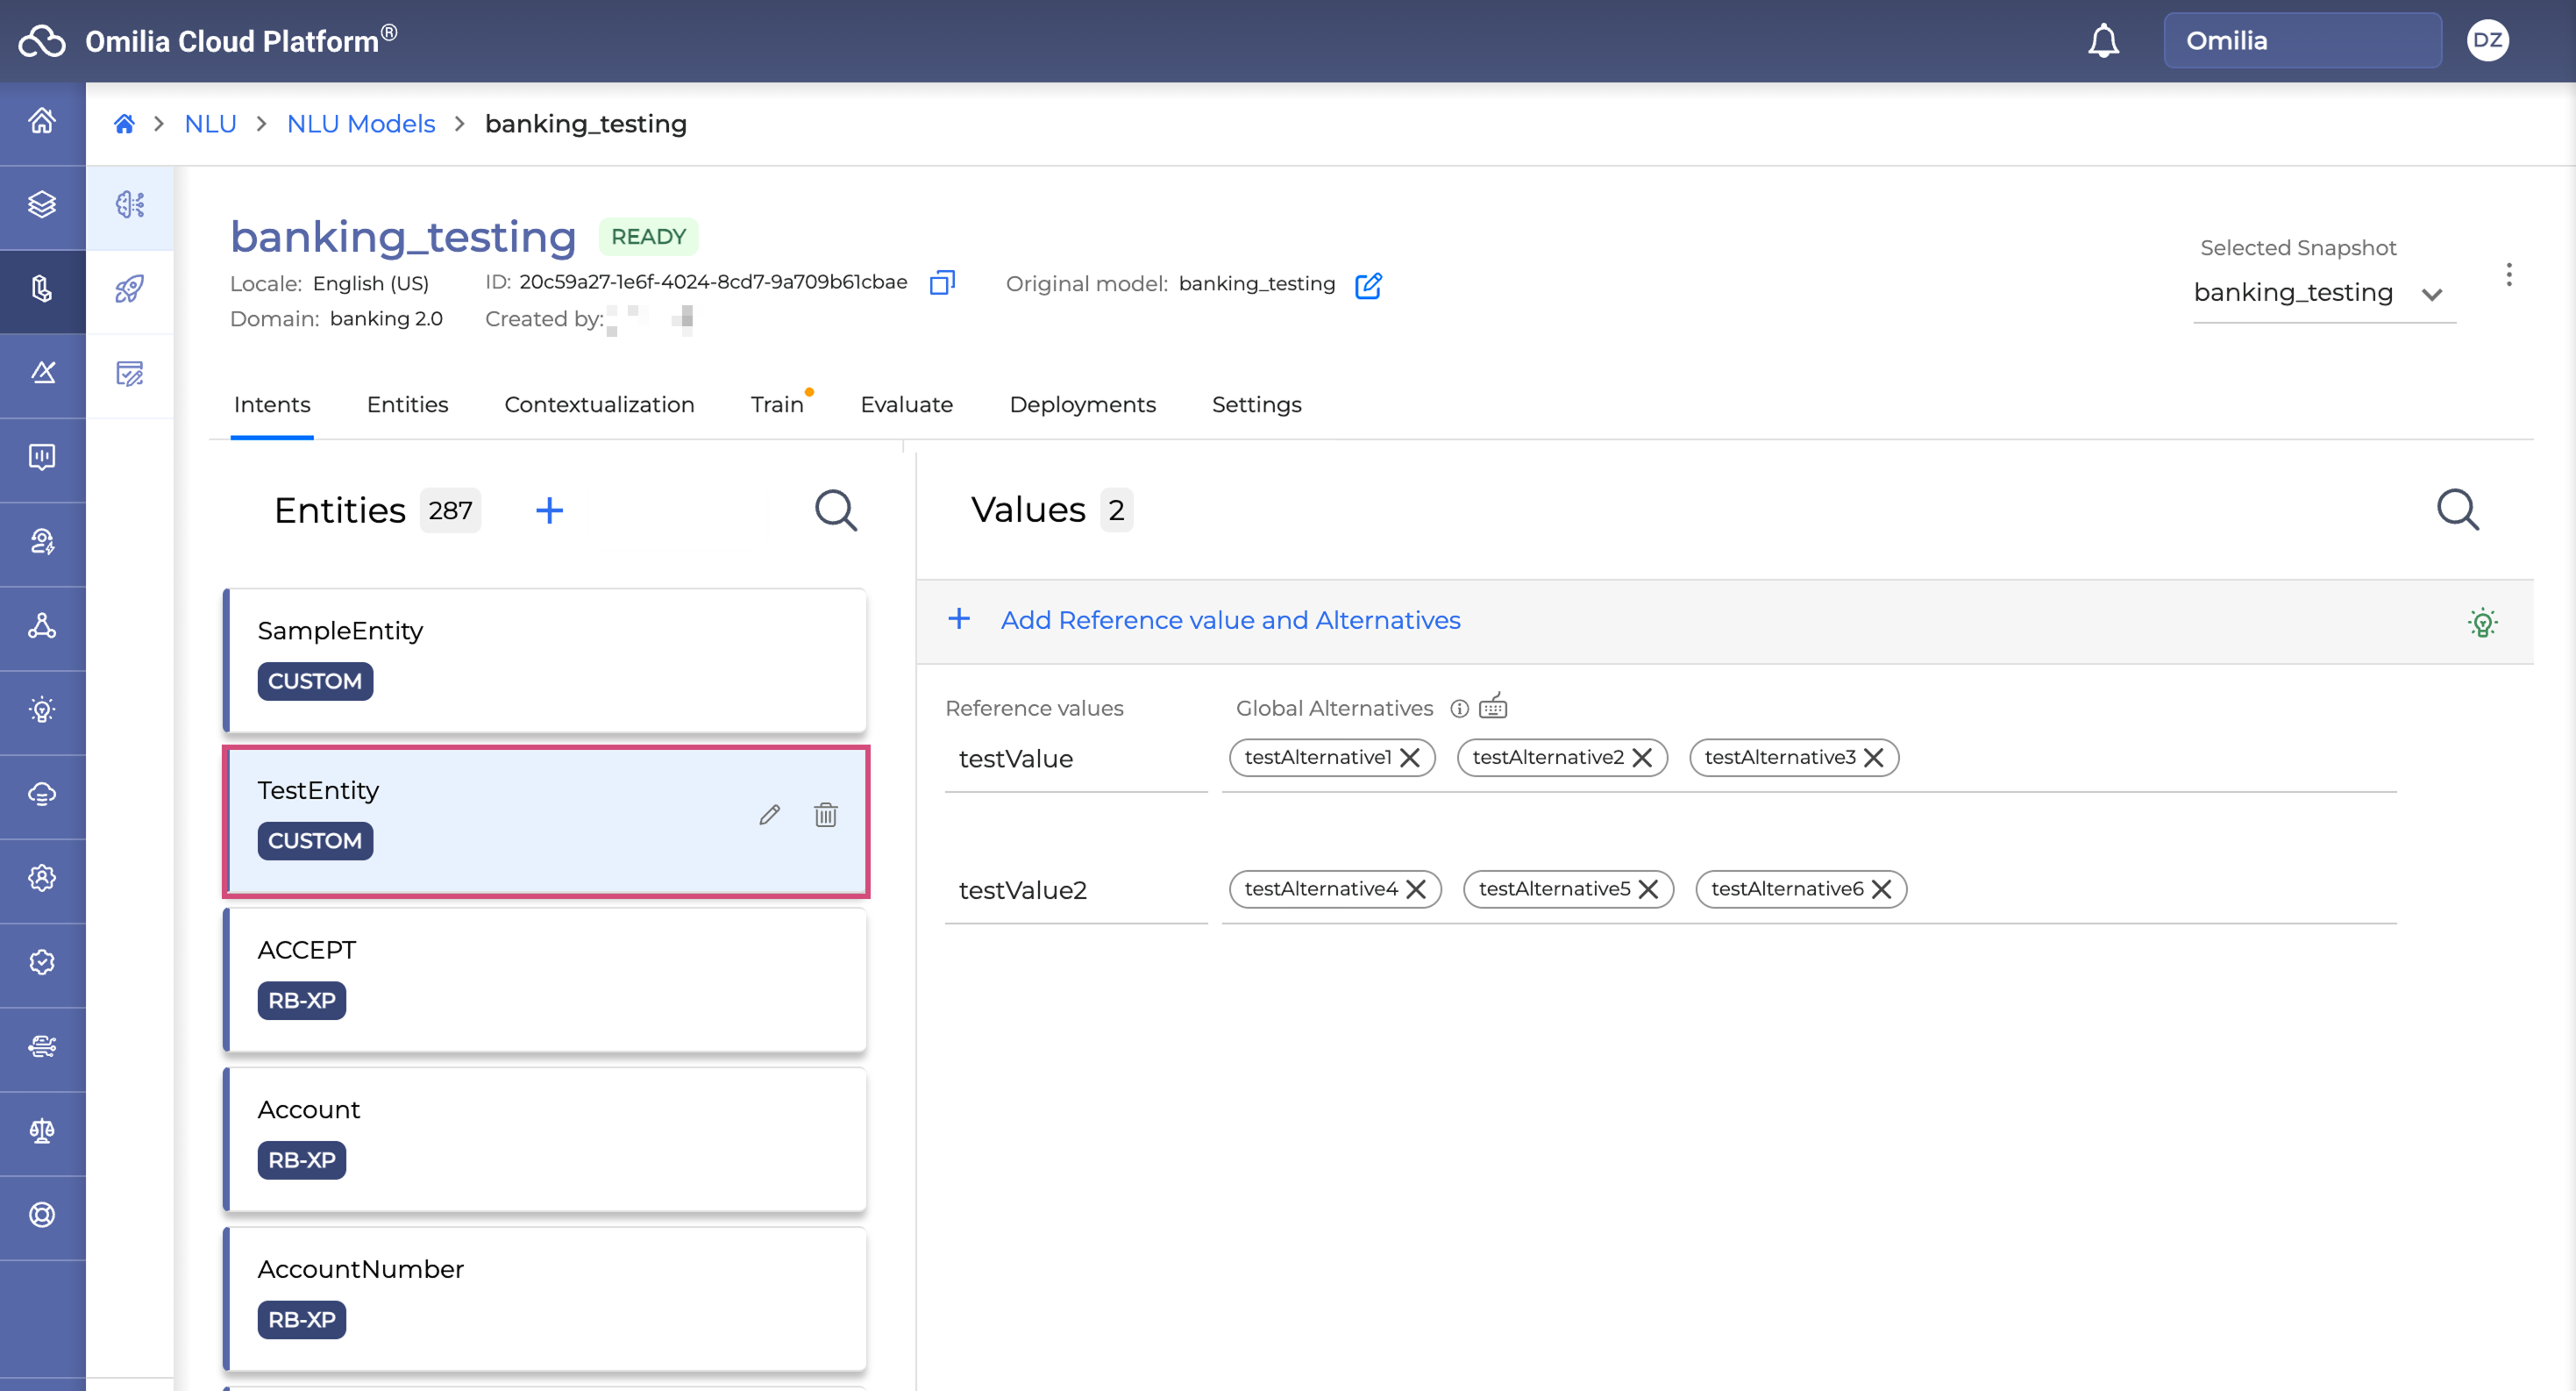
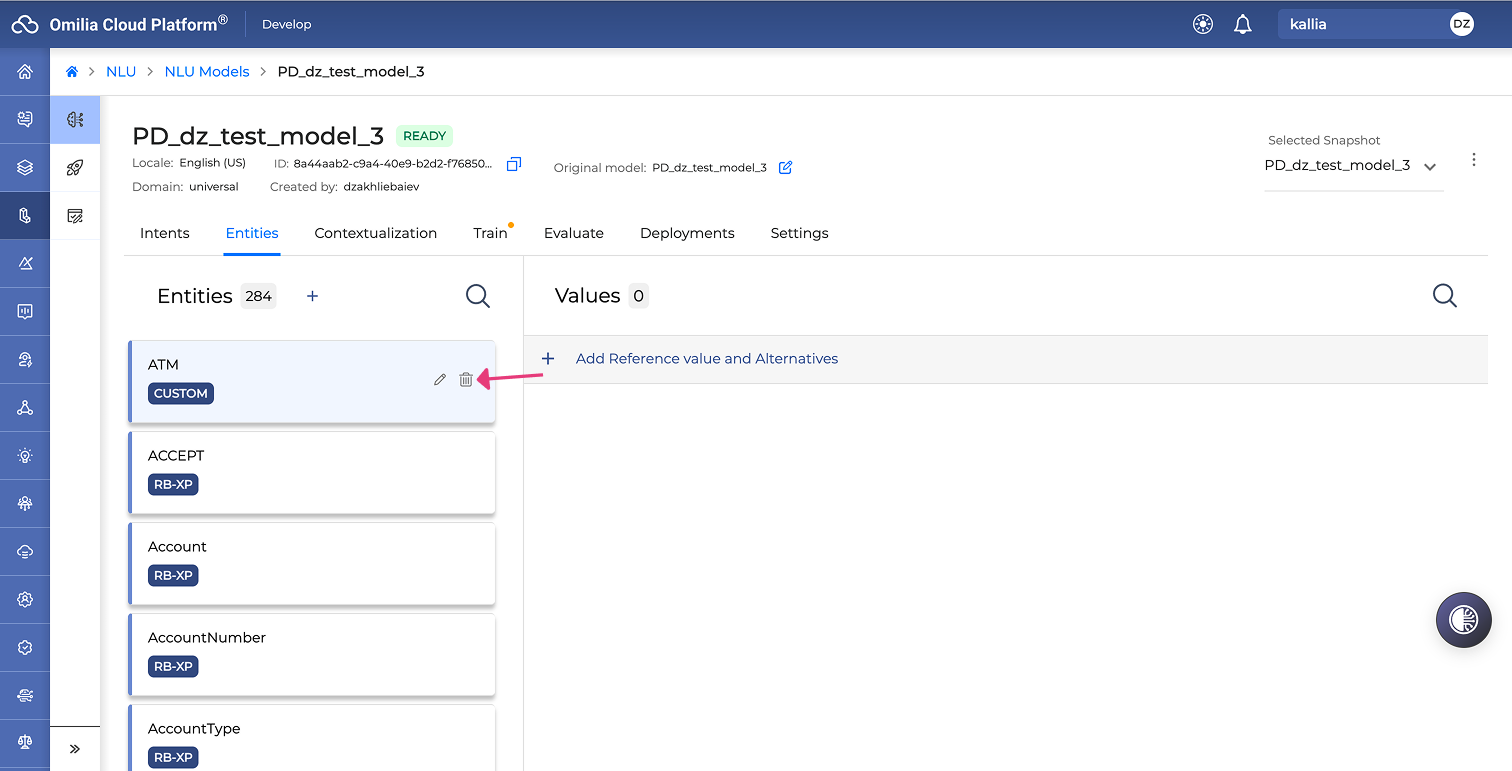
Click Create to confirm. The entity has been added. The added entities are labeled as CUSTOM.
Uploading an entity dictionary
The upload entity dictionary feature allows you to quickly and easily create or update a custom entity by uploading a dictionary file. Instead of manually adding values and alternatives to your entity, this feature significantly reduces the time and effort involved in the process.
To upload a dictionary file, follow the guidelines below:
-
Navigate to the Entities tab and click the Plus icon.
-
In the dialog box that appears, fill in the fields as described below:
-
Entity Name: Enter a name for your entity.
-
Dictionary: Upload a dictionary file for your custom entity. This file can either be dragged and dropped directly, or selected by clicking Browse Files. Ensure your file is in CSV format and does not exceed 1 MB in size. Each line in your dictionary file should contain one reference value and one global alternative, as illustrated below:
testValue;testAlternative1
testValue;testAlternative2
testValue;testAlternative3
testValue2;testAlternative4
testValue2;testAlternative5
testValue2;testAlternative6
There is also an option to use a sample file to experience this feature. Simply click Sample file to download the file.
-
Click Create once everything is set. The uploaded dictionary is now visible and should populate your custom entity with the respective values and global alternatives.
-
To update the dictionary, click the Edit icon in front of the entity name and repeat steps 2-3 described above.
Uploading a new dictionary file will overwrite the existing values and global alternatives!
Adding values and alternatives
Sometimes, we can use different words for the same meaning. This means that several words under the same entity can have the same value. For example, cat, kitten, dog, canine, puppy, hen, duck, chicken are animals. As you can see below, dog, canine and puppy are different alternatives of the same value.
|
Value |
Alternative |
|---|---|
|
cat |
Cat, kitten |
|
dog |
Dog, canine, puppy |
|
chicken |
Hen, chicken |
|
duck |
Duck |
For each entity, you can add multiple values and multiple alternatives for each value. All alternatives (global and context ones) are mapped to the reference value that you’ve defined. If you do not want to declare a reference value and you just want the entity to be triggered based on your alternatives, just leave it blank.
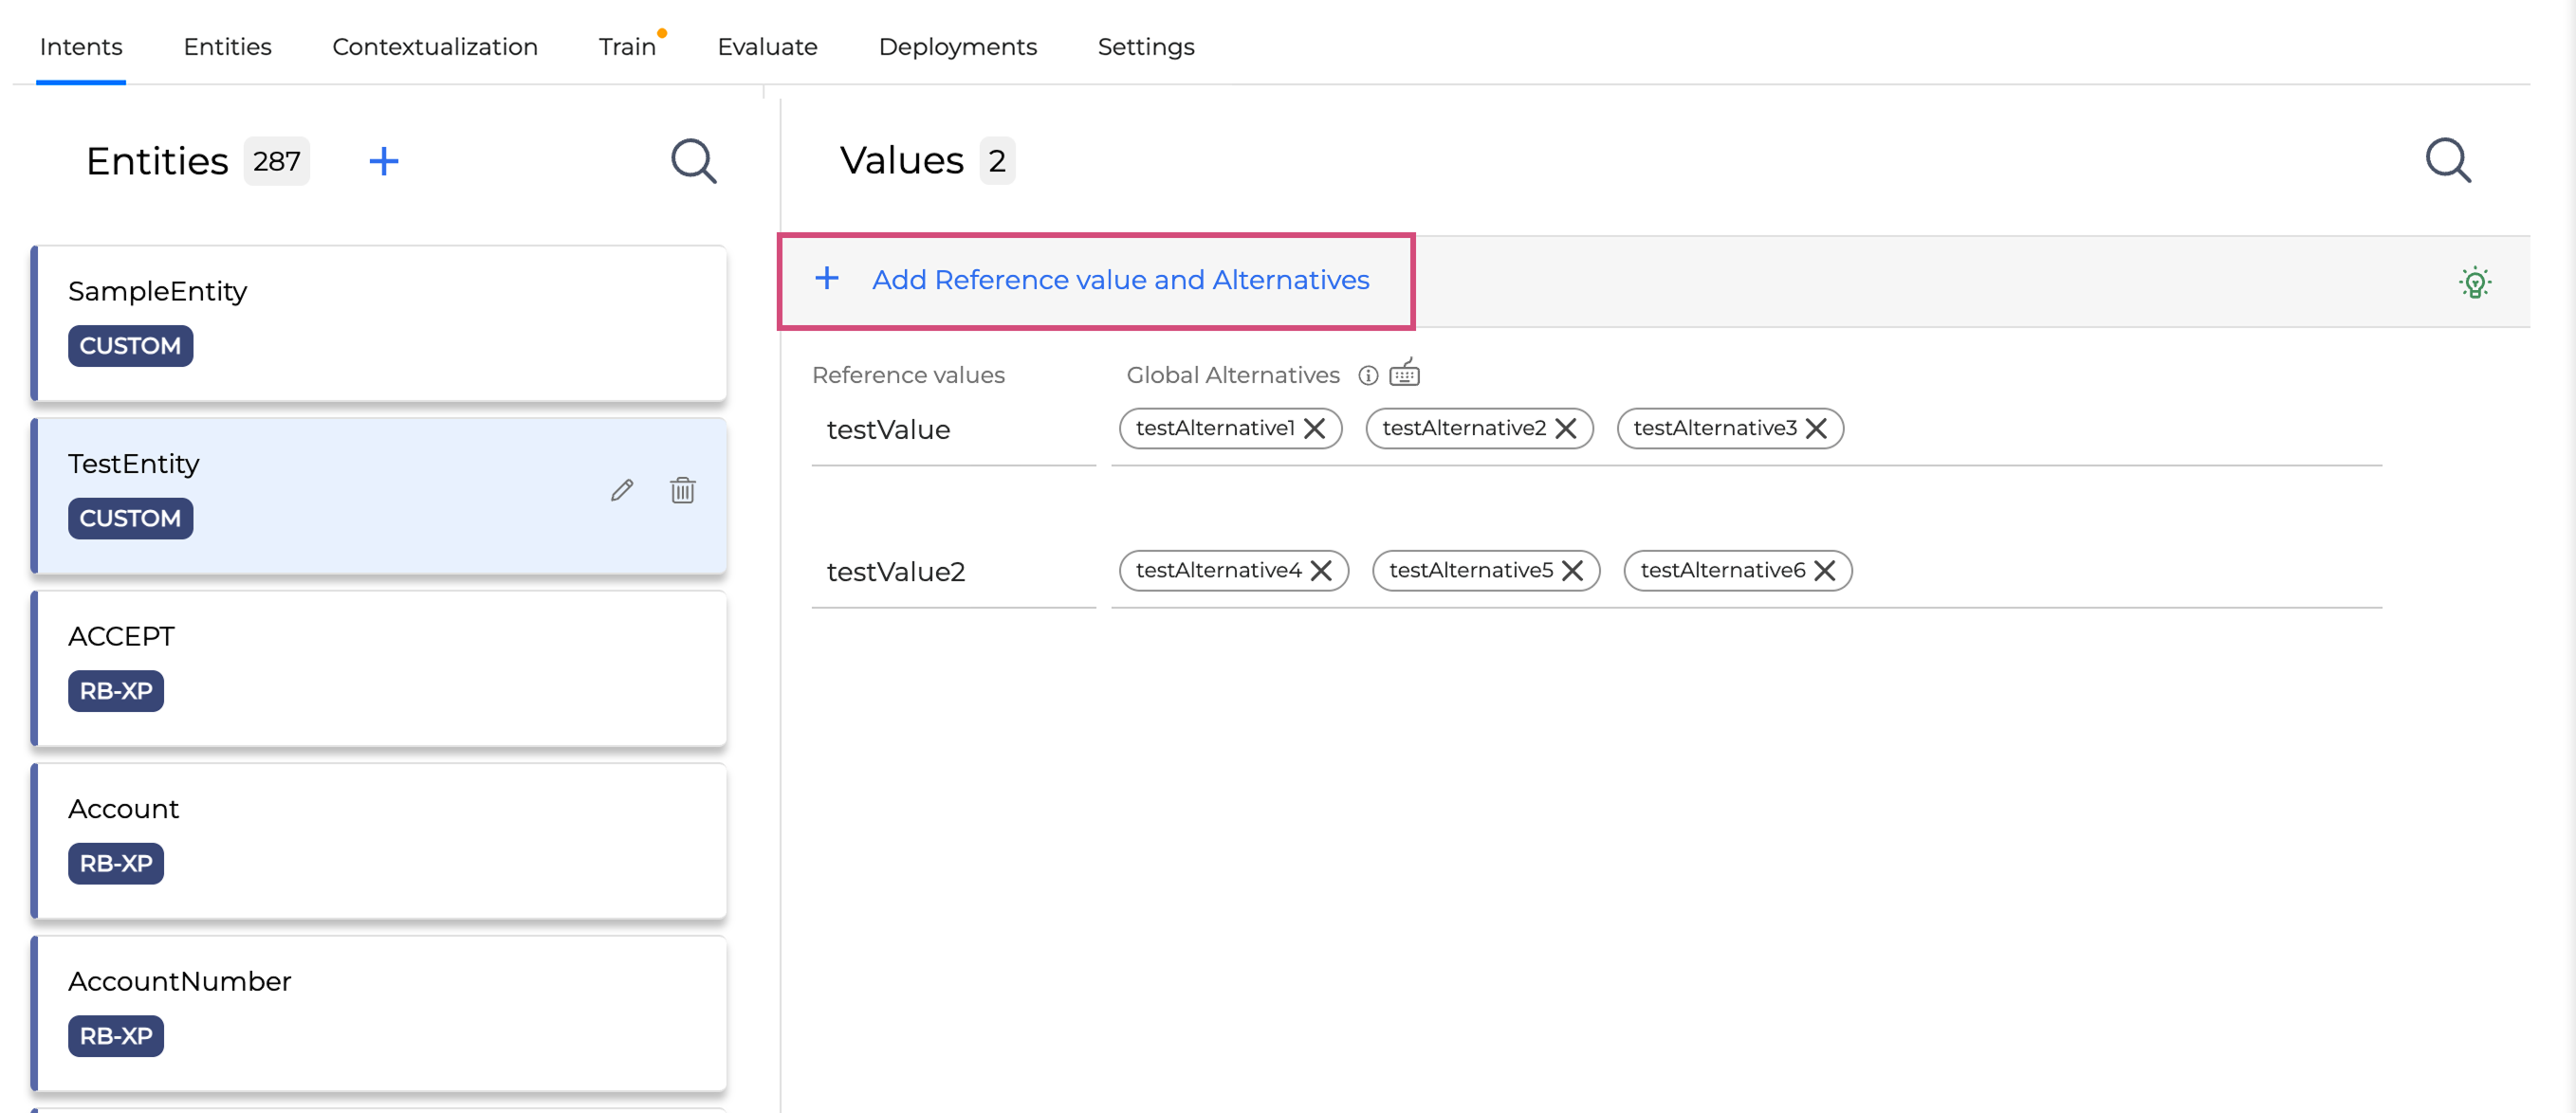
To add a reference value and global alternatives to the entity, follow the steps below:
-
Select an entity and click on it.
-
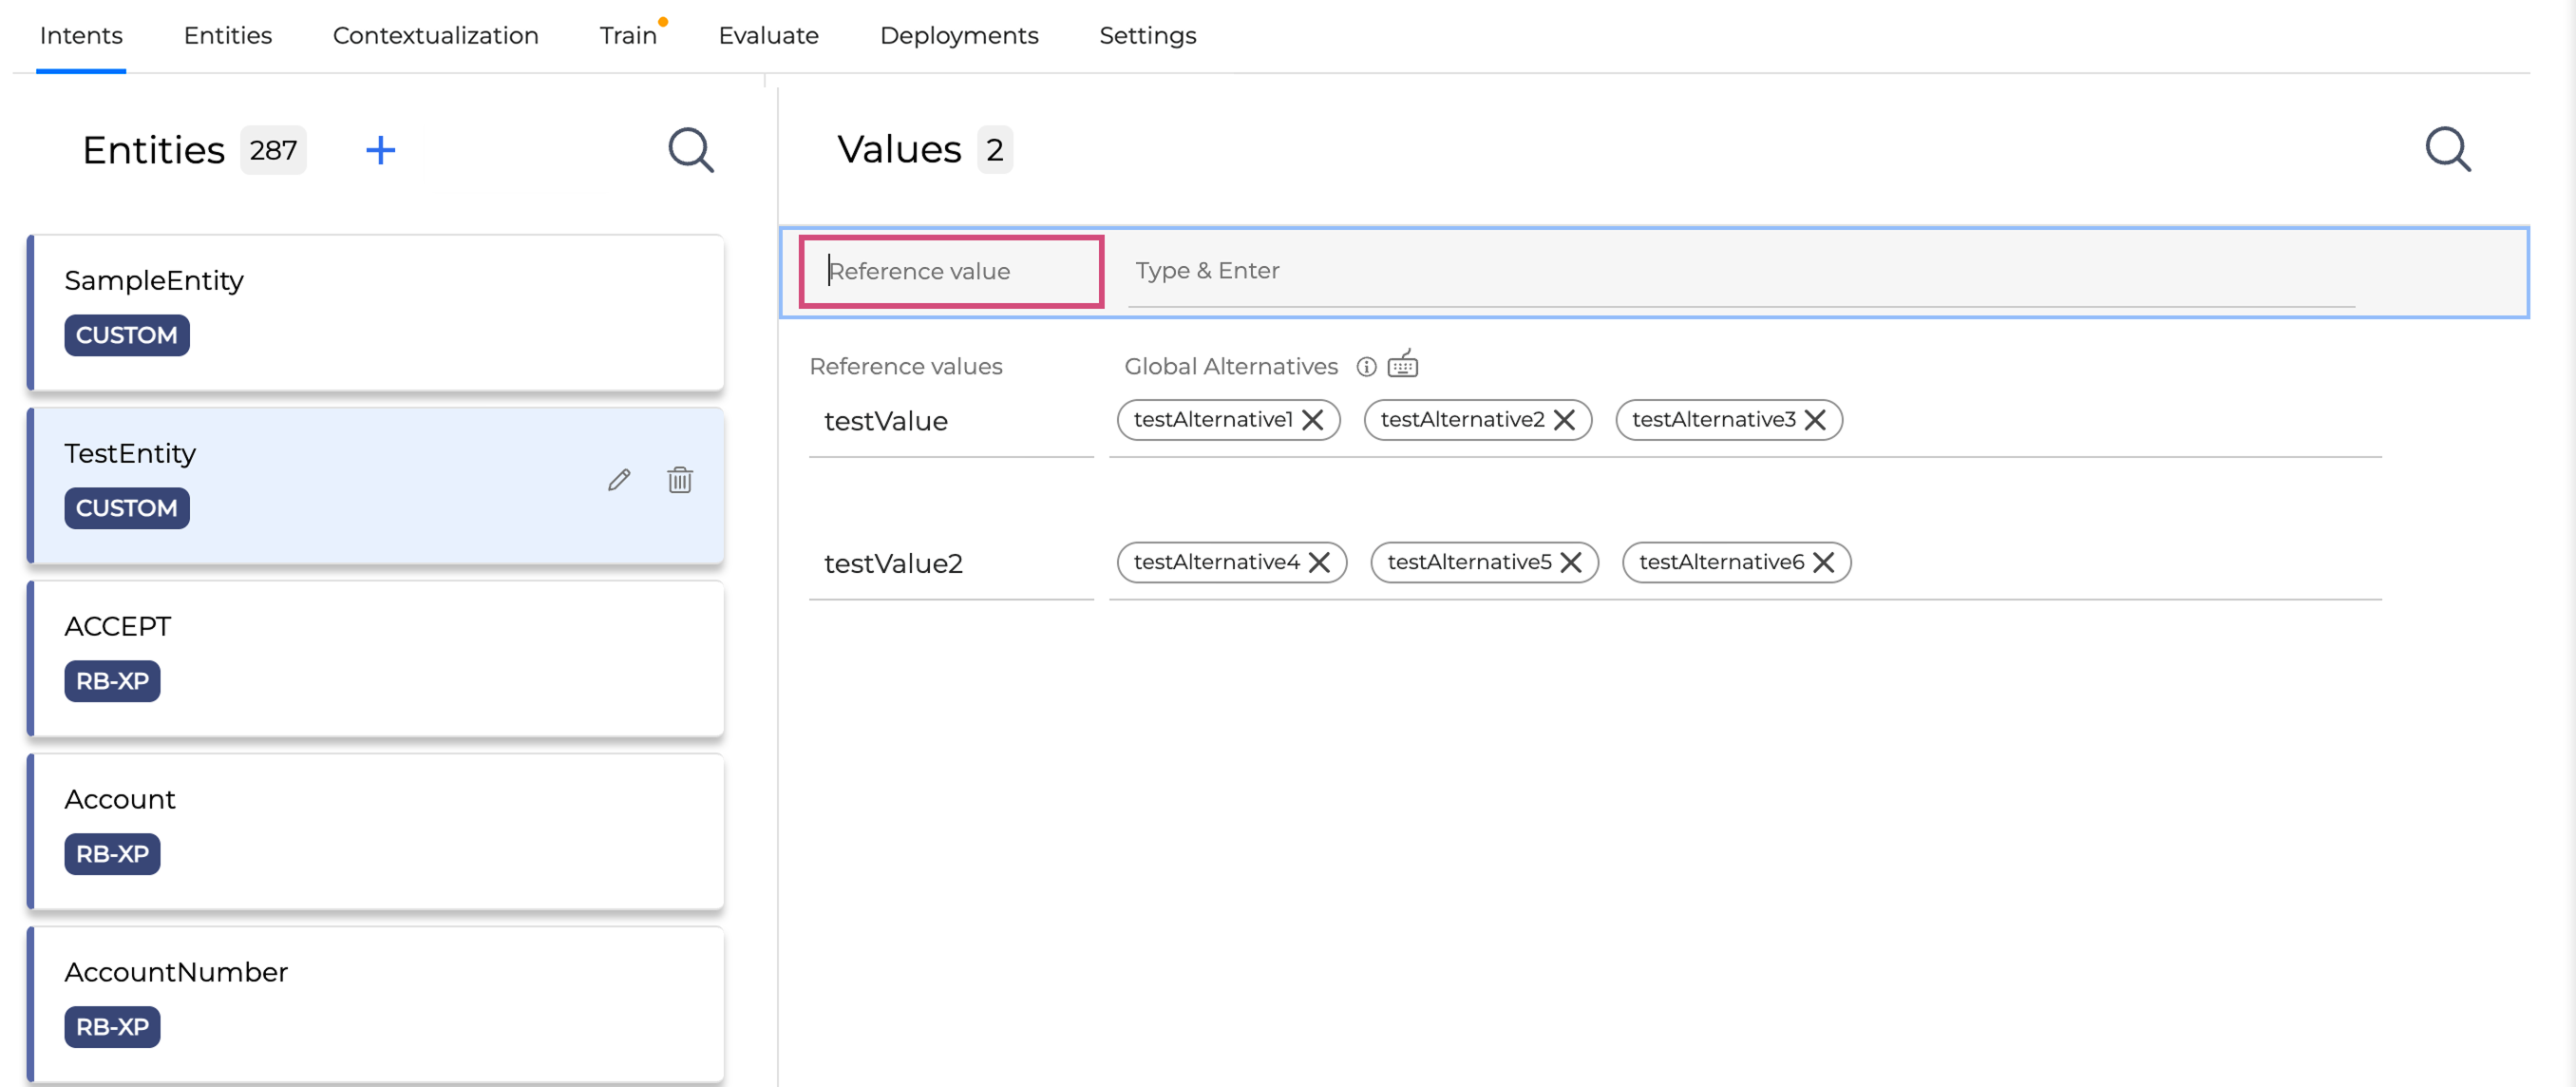
Click the + Add Reference value and Alternatives button.
-
Enter the reference value.
-
Enter a global alternative and press <Enter> on the keyboard. You can use the smart dictionary commands to refer to the existing entities and streamline the process of adding alternatives.
You can add multiple alternatives to one value. For alternatives, you can use single words and short phrases.
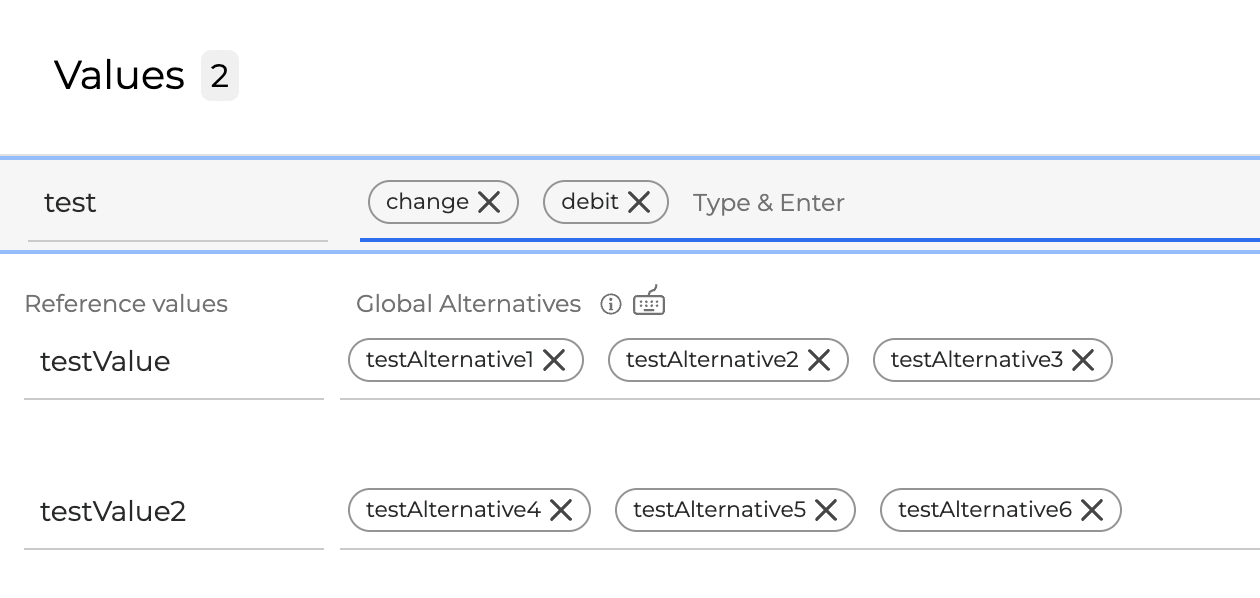
-
When you are finished, press <Enter> on the keyboard again. The value and alternatives are added.
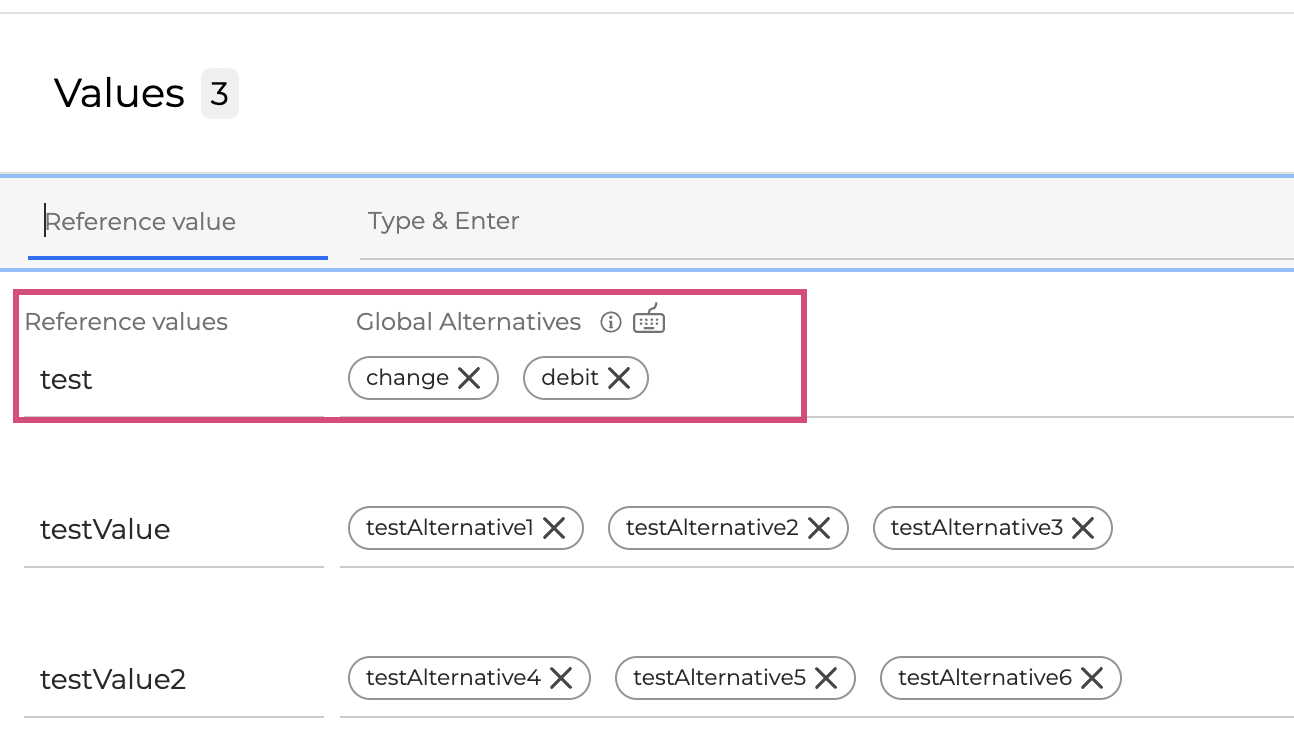
Unmarking an alternative
The functionality to unmark or exclude specific entity alternatives is now managed exclusively through Context Rules in the Contextualization tab.
Please refer to the Contextualization guide to learn how to use the Unmark action (using the -@Entity syntax) to exclude entities based on specific conditions.
Deleting values and alternatives
To delete a reference value, hover over it and click the Delete icon.
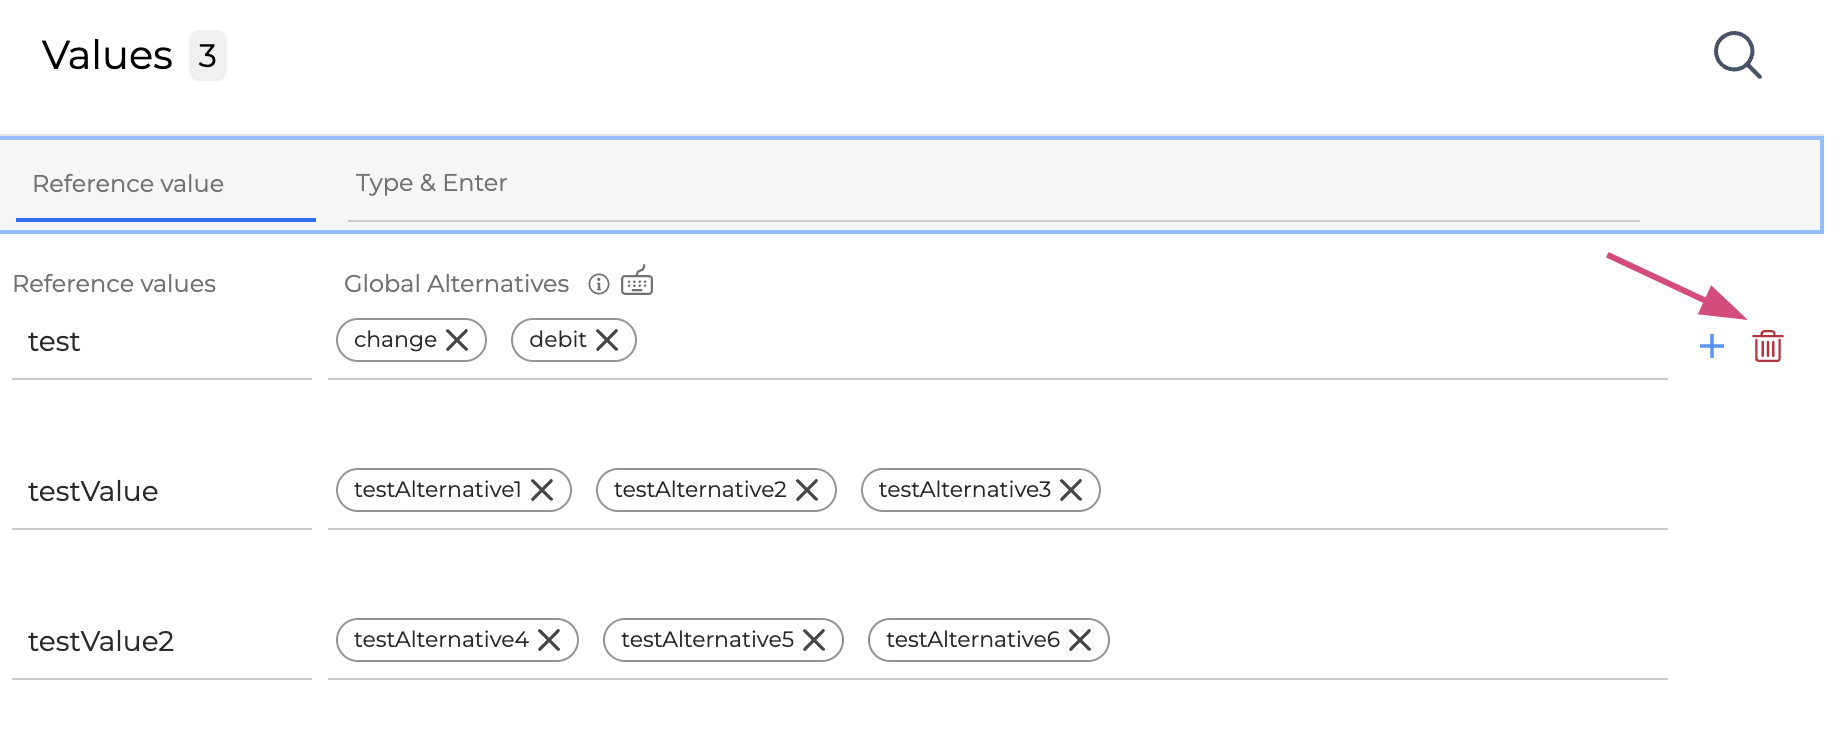
To delete an alternative, double-click it and then click the Delete icon.
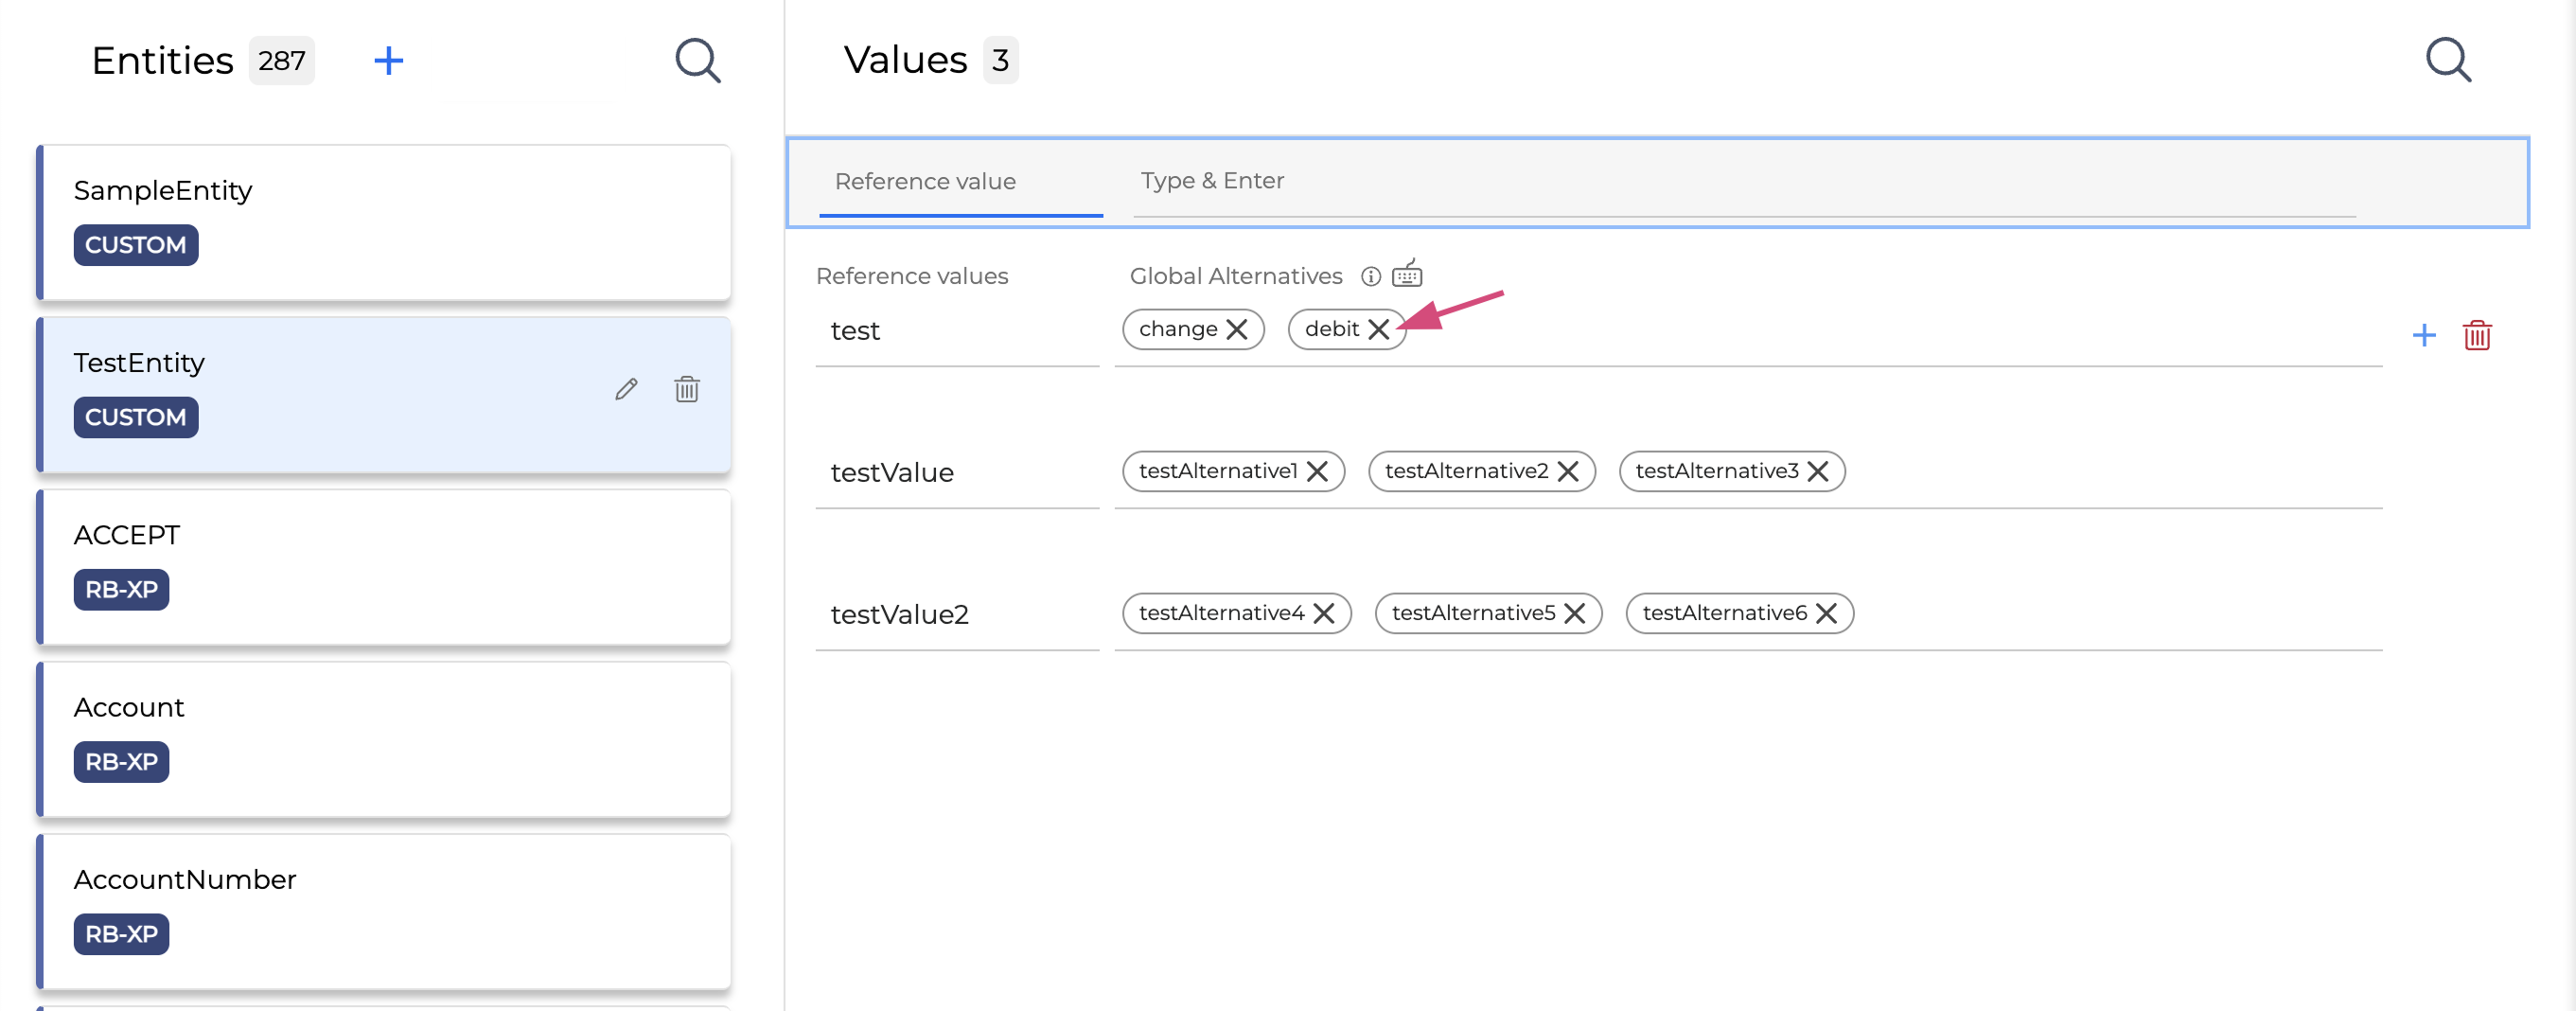
You can only delete your custom values and alternatives. The out-of-the-box elements cannot be deleted, however, they can be excluded from being annotated.
Suggested values
The Suggested Values feature uses AI to automatically generate reference values and their alternatives for an entity. This helps you quickly populate your entity dictionary with relevant data, saving time and effort when building or expanding your model's entity understanding.
To generate suggested values for an entity, proceed as follows:
-
Navigate to the Entities tab and select an entity.
-
Click the Values Suggestions button.
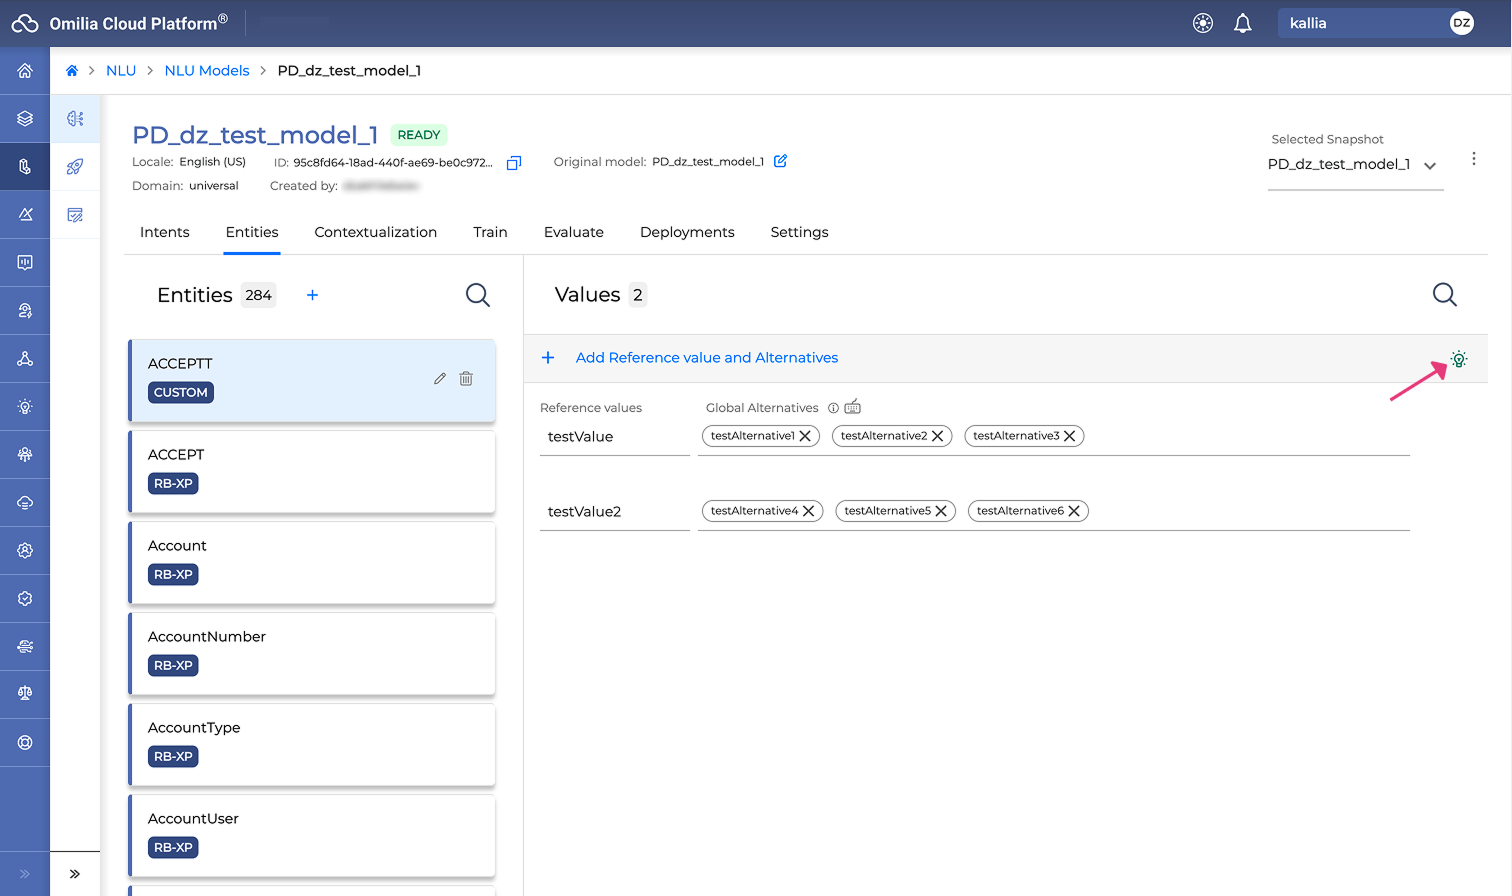
The Suggested Values dialog box opens. -
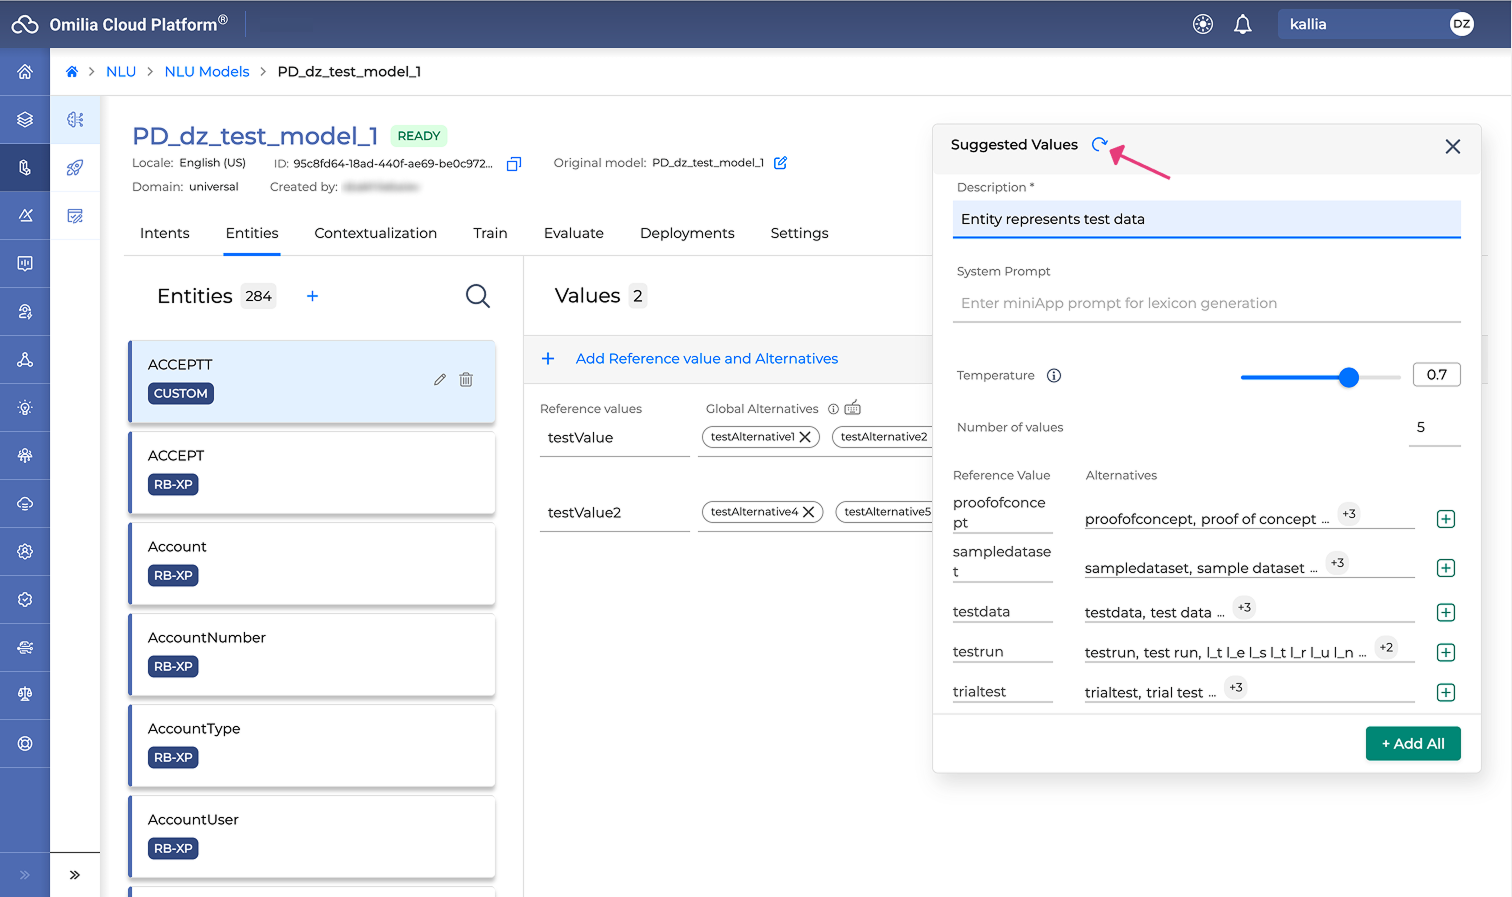
Configure the generation parameters as described below:
-
Description: Type the entity description. This field is mandatory. Do not use special characters. Commas and dots are allowed.
-
System Prompt: Type the miniApp prompt for lexicon generation.
-
Temperature: Adjust the slider or type a value to control the creativity of the generated suggestions. A lower value produces more predictable results, while a higher value increases the variety of suggestions. The default value is 0.7.
-
Number of values: Type the number of reference values you want to generate. The default value is five.
-
-
Click the Regenerate icon located next to the Suggested Values dialog box title to generate the suggestions.
-
Review the generated suggestions. Each suggestion displays a reference value and its corresponding alternatives.
-
Add the suggested values to your entity. You can either add individual suggestions by clicking the + button next to a specific suggestion, or add all suggestions at once by clicking + Add All.
-
To regenerate the suggestions, click the Regenerate icon located next to the Suggested Values dialog box title. The feature generates a new set of values based on your current parameter settings.
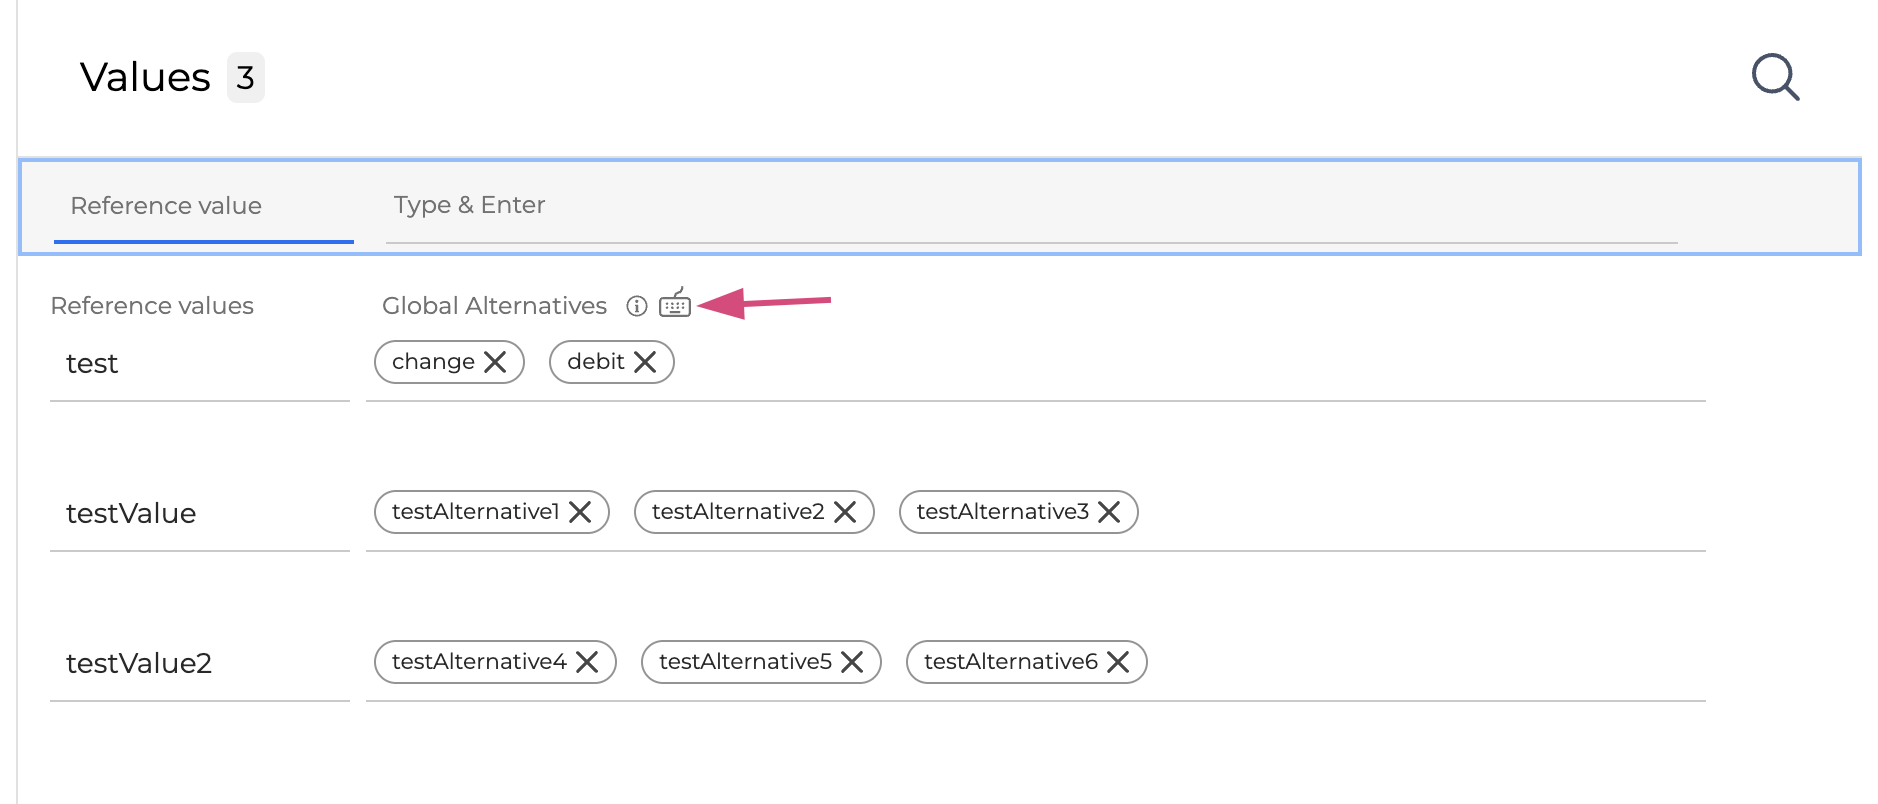
Smart dictionary
The smart dictionary feature has been designed to streamline the process of adding global alternatives. You can effortlessly refer to pre-existing entities, or formulate new alternatives by leveraging the existing entity dictionaries. With the smart dictionary feature, incorporating or excluding entities is now quicker, simpler and more efficient.
Start by hovering over the Keyboard icon. This will present you with a comprehensive overview of all the operations supported by the smart dictionary.
Referring to an entity
The functionality to refer to entity alternatives is now managed exclusively through Context Rules in the Contextualization tab.
Referring to a specific entity value
The functionality to refer to a specific entity value is now managed exclusively through Context Rules in the Contextualization tab.
Excluding an entity from annotation
The functionality to excluade an entity from being annotated is now managed exclusively through Context Rules in the Contextualization tab.
Removing entity reference
The functionality to remove entity reference is now managed exclusively through Context Rules in the Contextualization tab.
Adding contexts
The ability to create Contexts within the Entities tab is no longer supported.
To create new contexts or manage context groups, you must now use the Contextualization tab. Please refer to the Contextualization guide for detailed instructions on organizing your automation strategies.
Adding context alternatives
You can no longer add Context Alternatives directly in the Entities tab.
Defining specific values or alternatives based on context is now handled exclusively through Context Rules. Please navigate to the Contextualization tab to configure these rules. For more information, see the Contextualization guide.
Deleting an entity
To delete an entity, hover over it and click the Delete icon.
Adding custom NLU Logic
The Custom domain is not loaded with a pre-set understanding, hence it allows you complete flexibility to customize it. You can either incorporate your own data or integrate your own NLU Logic. The NLU Logic can be added by uploading a custom NLU file. For this, you can use the NLU file from an exported OCP NLU model.
To integrate your NLU Logic into your Custom domain model, follow these instructions:
-
Navigate to NLU → NLU Models section.
-
Select a model and click on it. The model drill-down page opens.
-
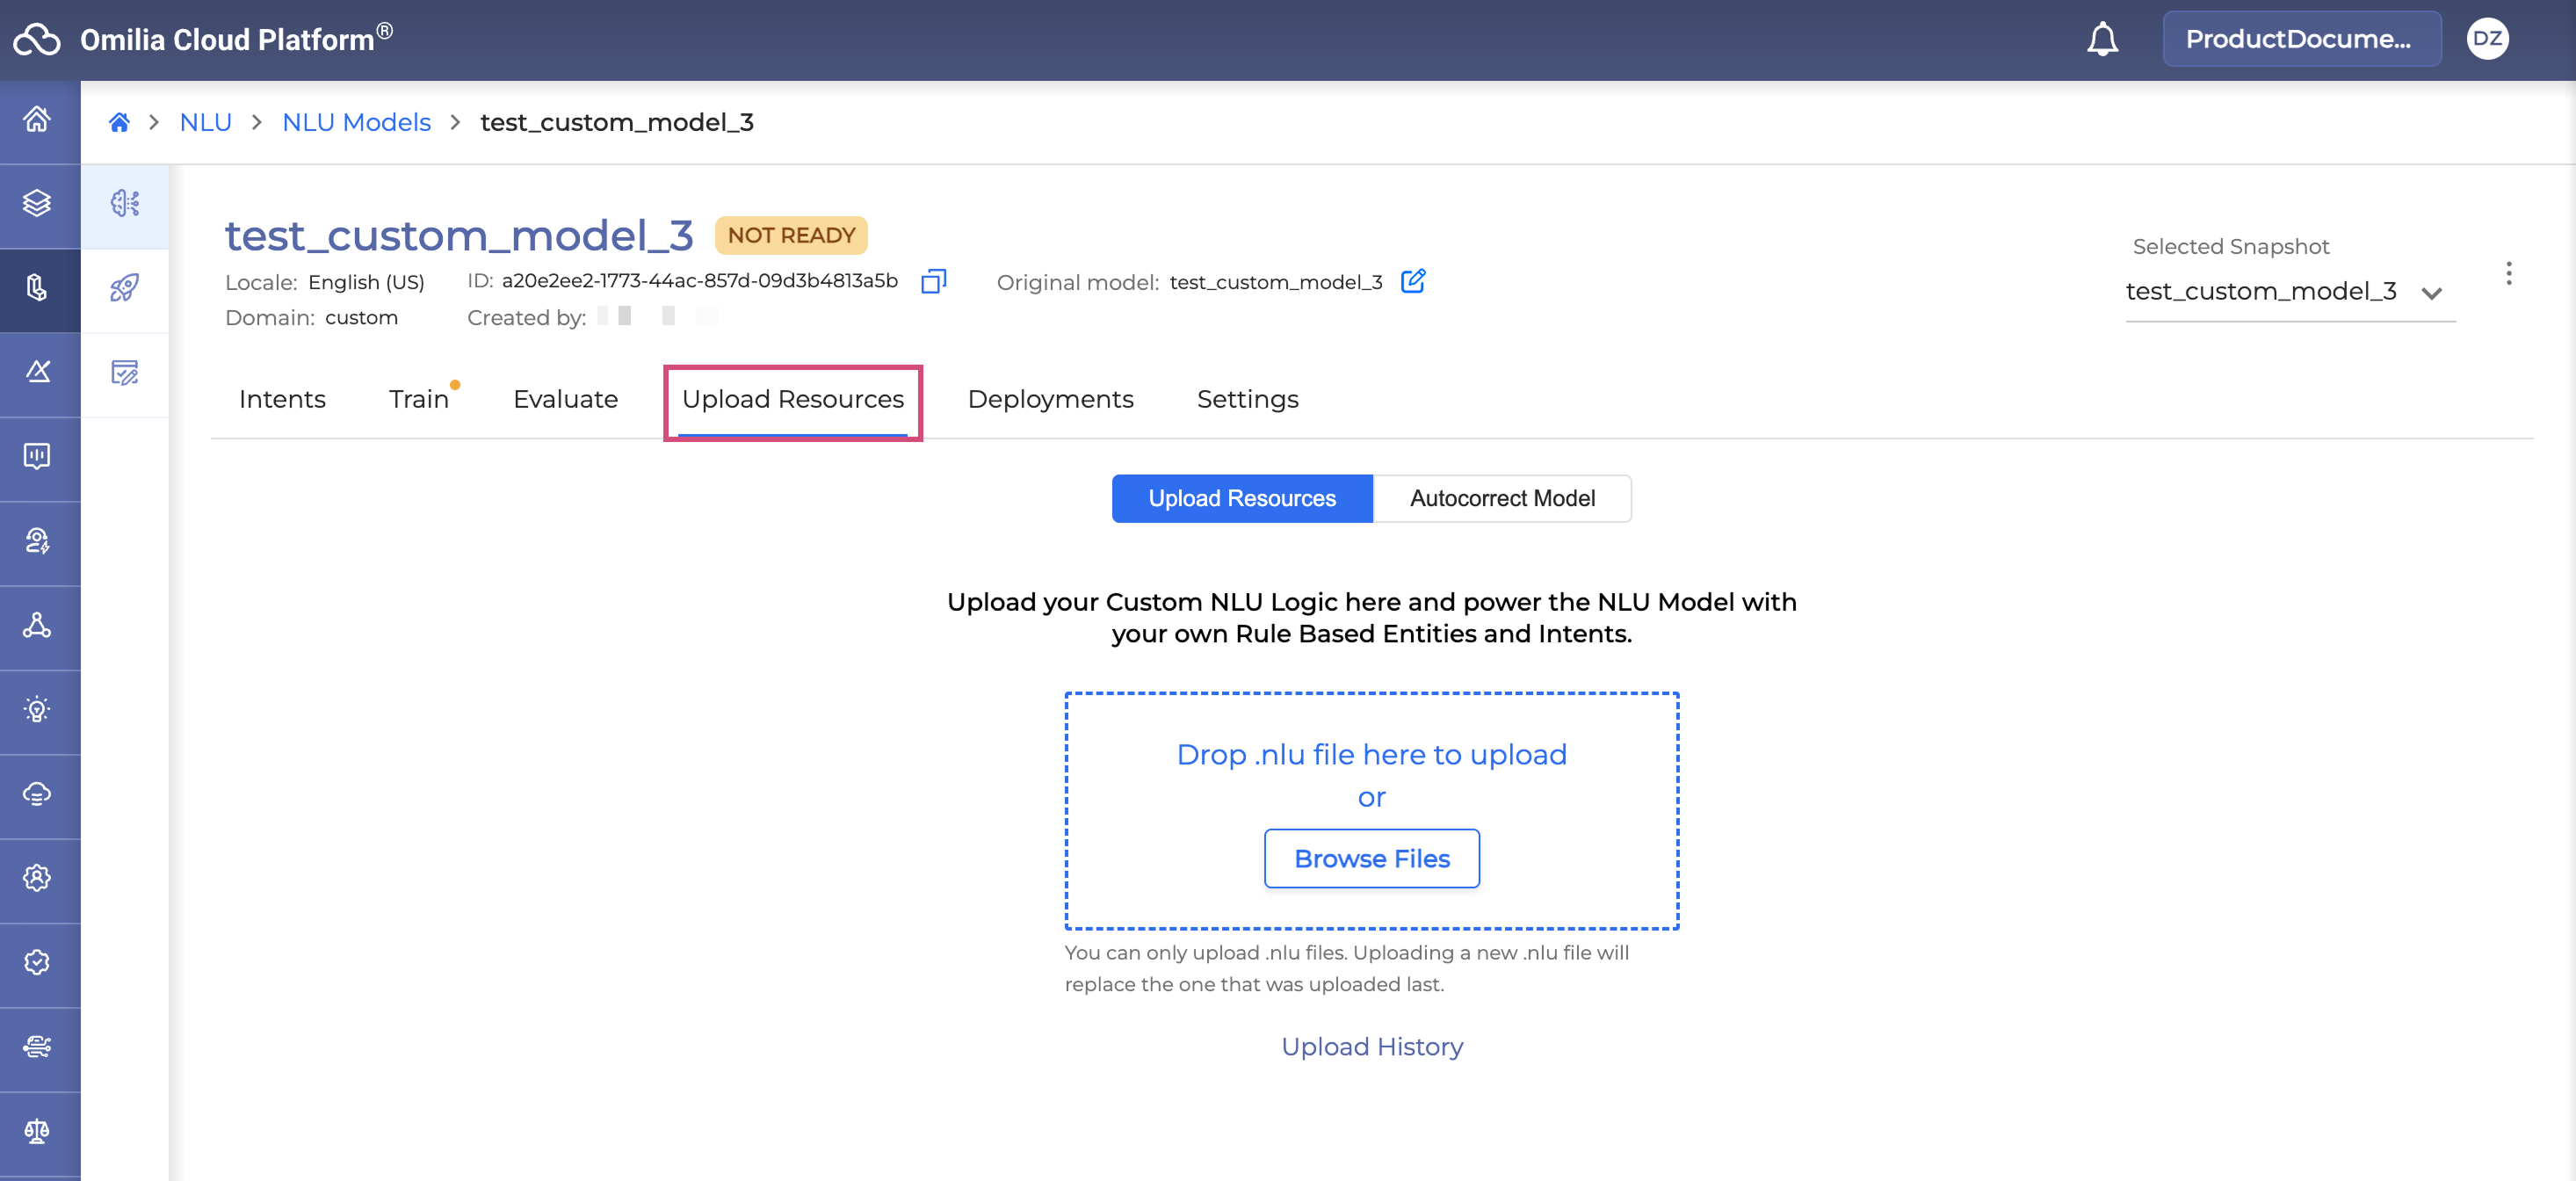
Open the Upload Resources tab.
-
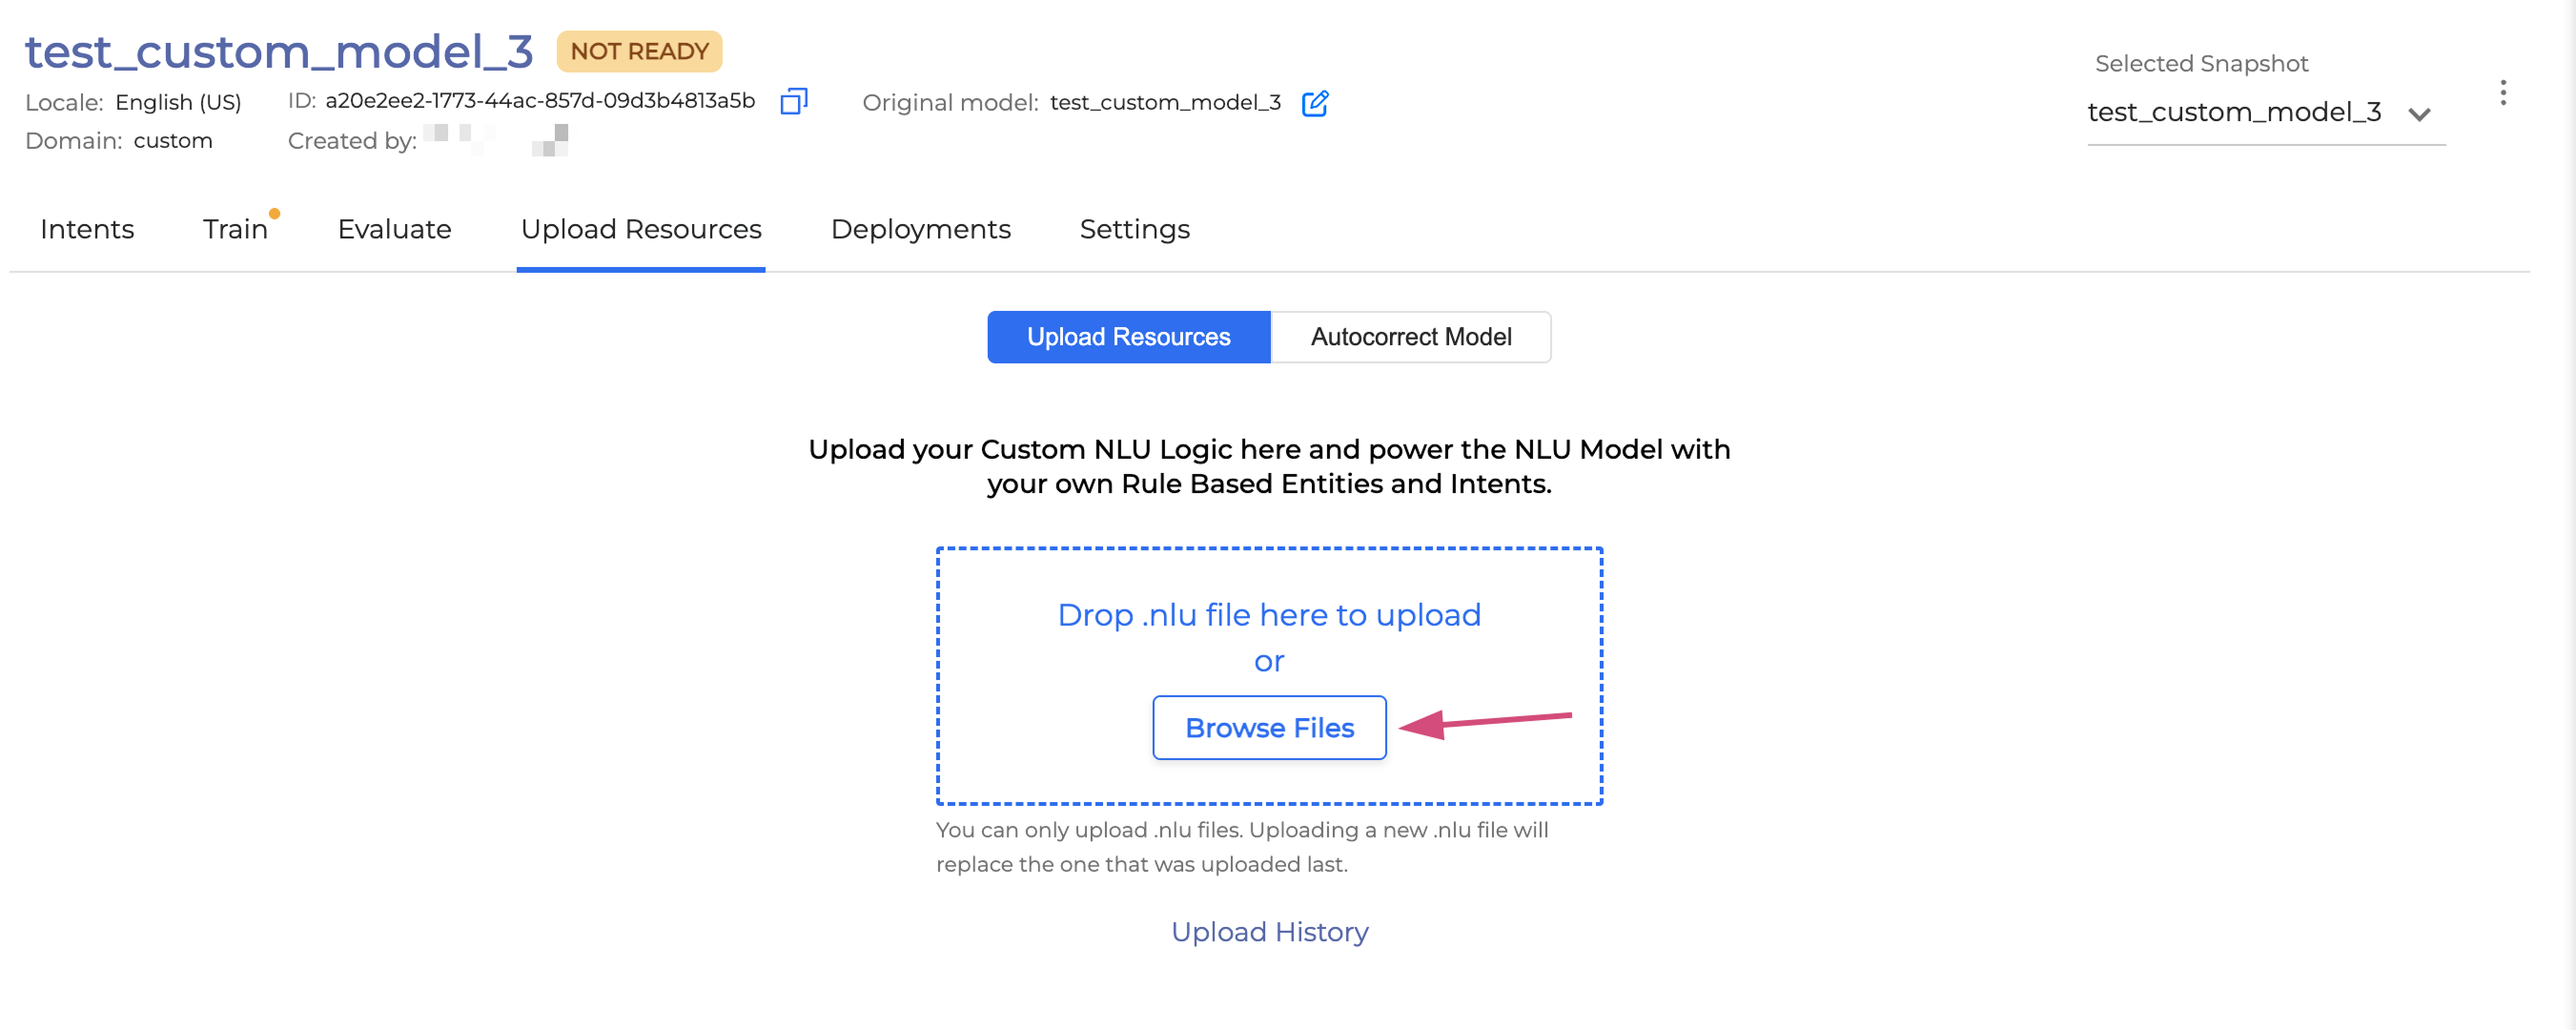
Upload your NLU file. This can be done by either clicking on Browse Files to locate the file on your device or by dragging and dropping the file directly into the upload section.
-
Once your NLU file has been uploaded, it will appear in the Upload History list.
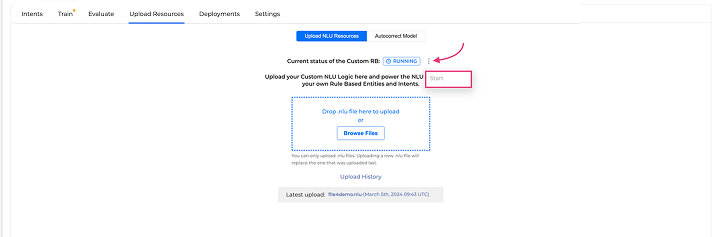
-
Check the current status of the custom RB model. The custom RB model can have the following statuses:
-
Running: The model is up.
-
Working: Temporary status from the model creation up until the model up and its status is changed to Running.
-
Stopped: The model is not running.
-
-
In case the custom RB model stops for any reason, you can re-activate it manually by clicking on the Menu icon and then selecting Start.