Disclaimer
The Agentic Flows feature is available only in specific environments. Depending on your configuration, this functionality may not be visible in your interface.
1. Getting Started: Setting Up Your OCP Environment
Obtaining Your Access Credentials
To gain access to OCP please follow the Signing up to OCP® guide.
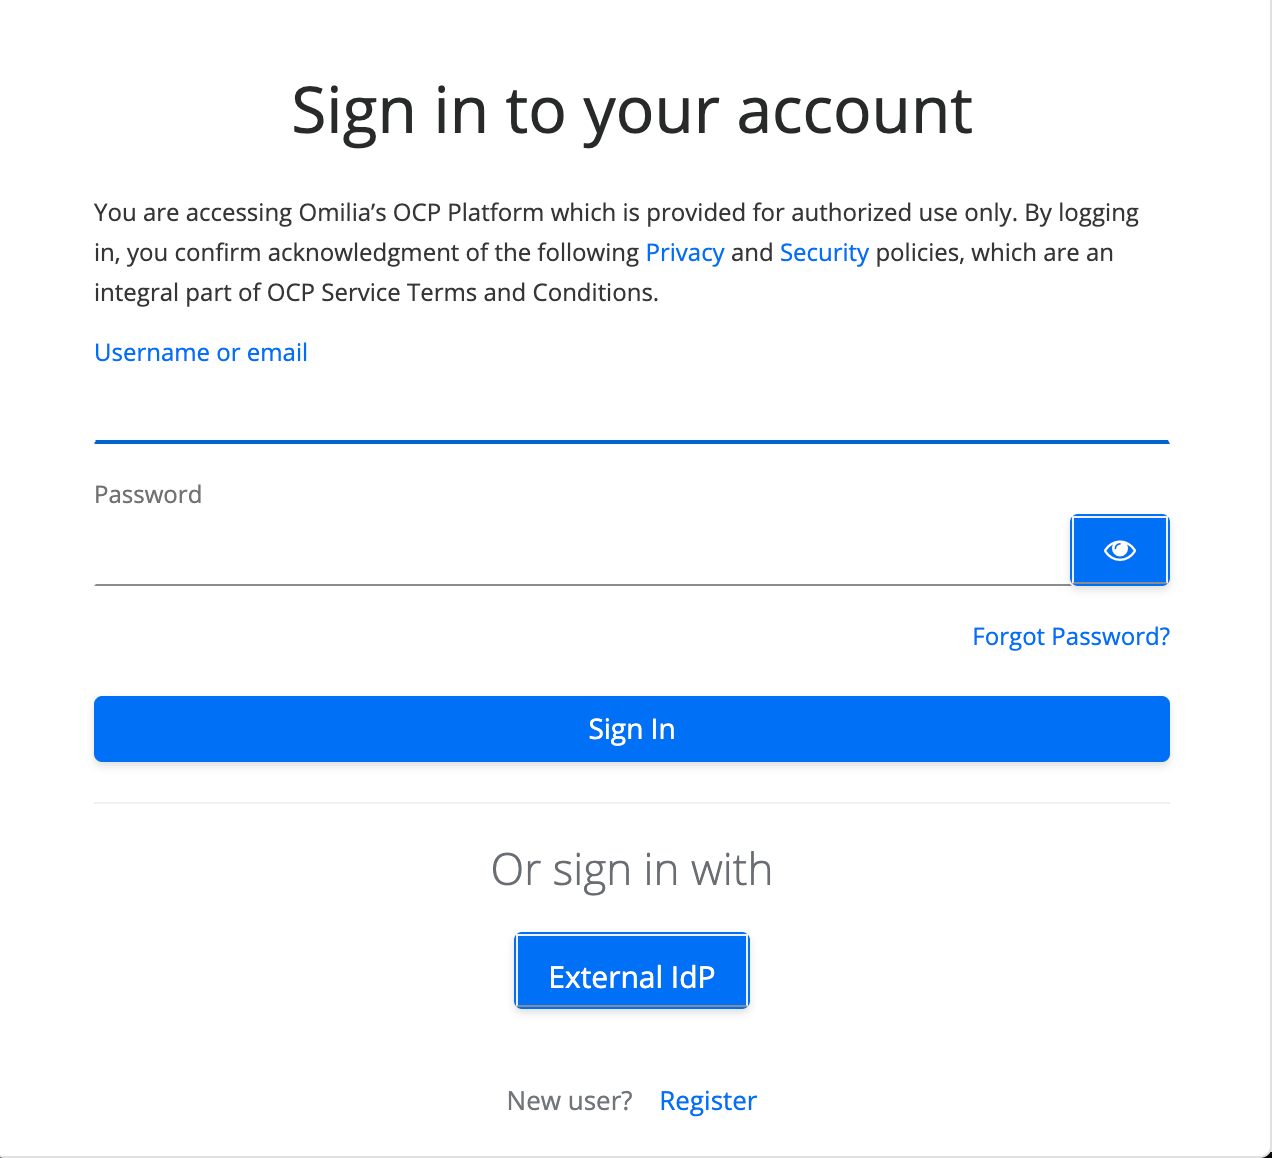
Logging Into the OCP Platform for the First Time
-
Open your browser and go to your OCP environment (for example https://us1-m.ocp.ai)
-
Enter the username and password from the registration email. Click Sign In.
-
After you log in for the first time, you will automatically land on the home page:

-
In the top right corner, you will see your Organization’s name. If you do not have one, you need to create one. Follow the getting started guide for Set up your Organization and Groups.
-
Click on your avatar in the upper right corner to access your profile. You can find all the groups you belong to in the Groups tab. You should see at least one default group.
Learn more about Organizations, Groups, and Roles.
Confirming That OCP Is Properly Connected
The fastest way to verify whether everything is set up correctly:
-
On the right side of the OCP console, click the CoPilot chat bubble

-
Type in a question like the one below and press Enter:
Can I get the list of available queues from my account?
Expected result:
CoPilot replies in a few seconds with a list of your account’s actual queues by queue groups (e.g., Sales, Support, Billing, etc.).
CoPilot is the fastest way to build, test, and troubleshoot agents. You can access it anywhere in the console by clicking the CoPilot icon ![]()
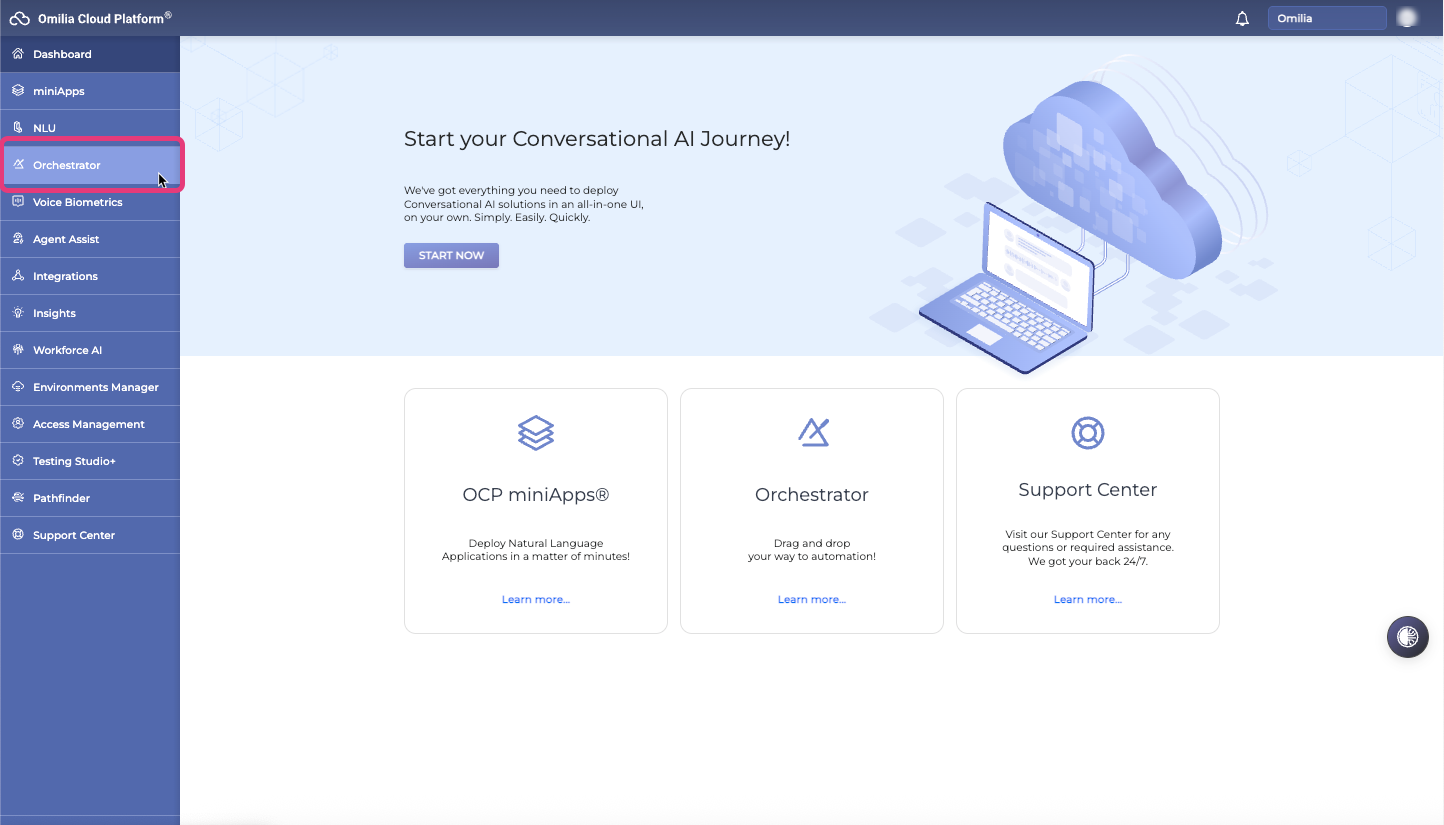
Creating Your First Orchestrator Project. The place where your AI agents live.
For a detailed user guide for creating an Orchestrator Agentic Application, please visit Orchestrator | Agentic Flows.
Before you can build any agent, you need one empty project in Orchestrator to work in.
-
Navigate to Orchestrator from the left sidebar:
-
Click the +Create button in the top right of the page, and fill in the Create new application pop-up:
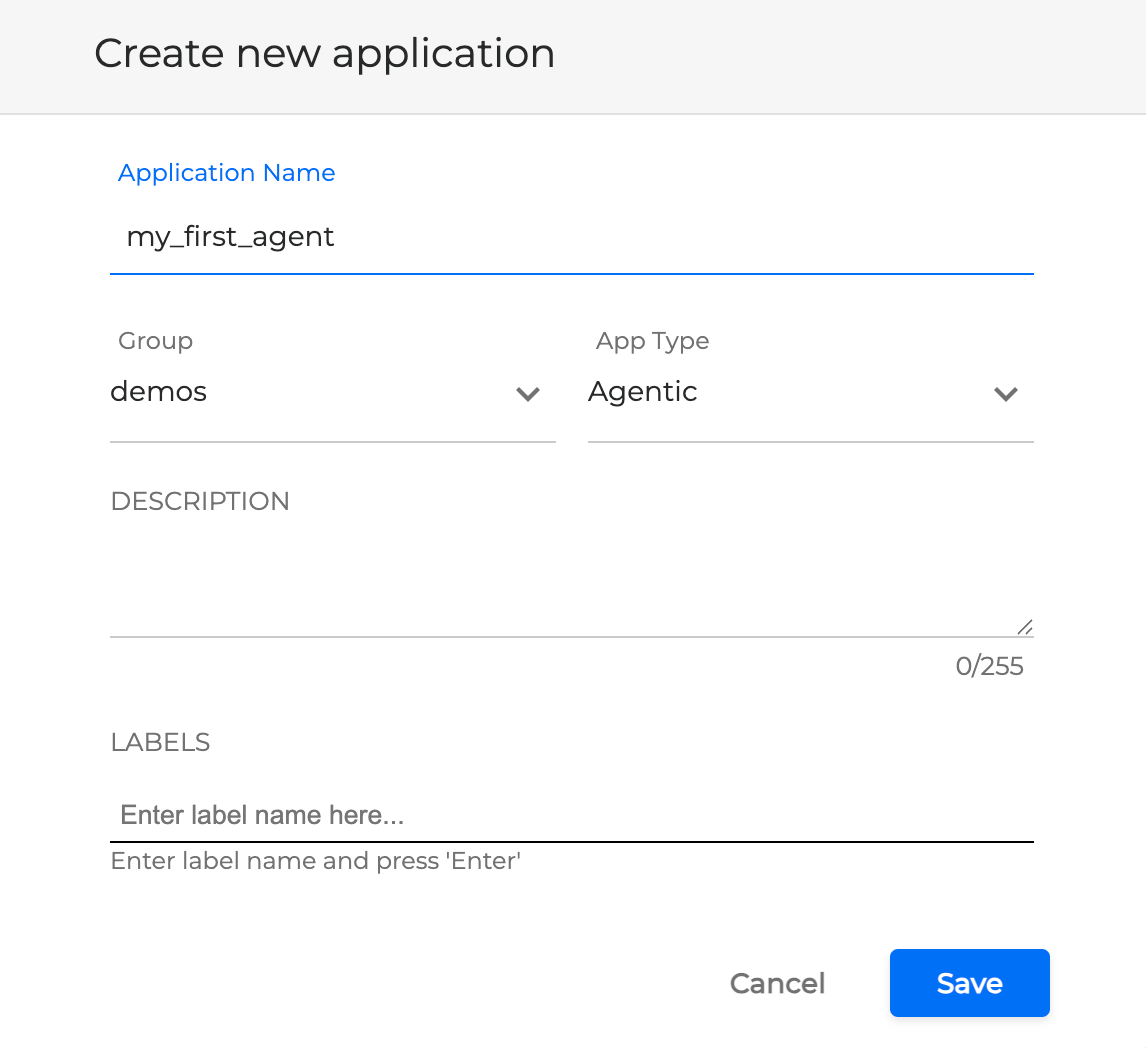
Application Name and Group, and App Type are mandatory fields. Select the Agentic application type to create an Agentic Application
-
Name it something obvious, like My_First_Agent, and click Save.
Your first Application has been created! Now you can go to the search box on the right side of the OCP Console, find your application name, and click it.
The same Application can be accessed throughout other groups within your Organization.
You have now completely set up a project from scratch, ready to build your first routing Agent in the next section.

2. Creating Your First Concierge Agent
The Concierge Agent is the routing agent and the customer’s first point of interaction with the contact centre; this Agent decides where to direct every customer's call.
Quick & Easy: Build It with CoPilot (Recommended)
The following steps would take only a few minutes to complete:
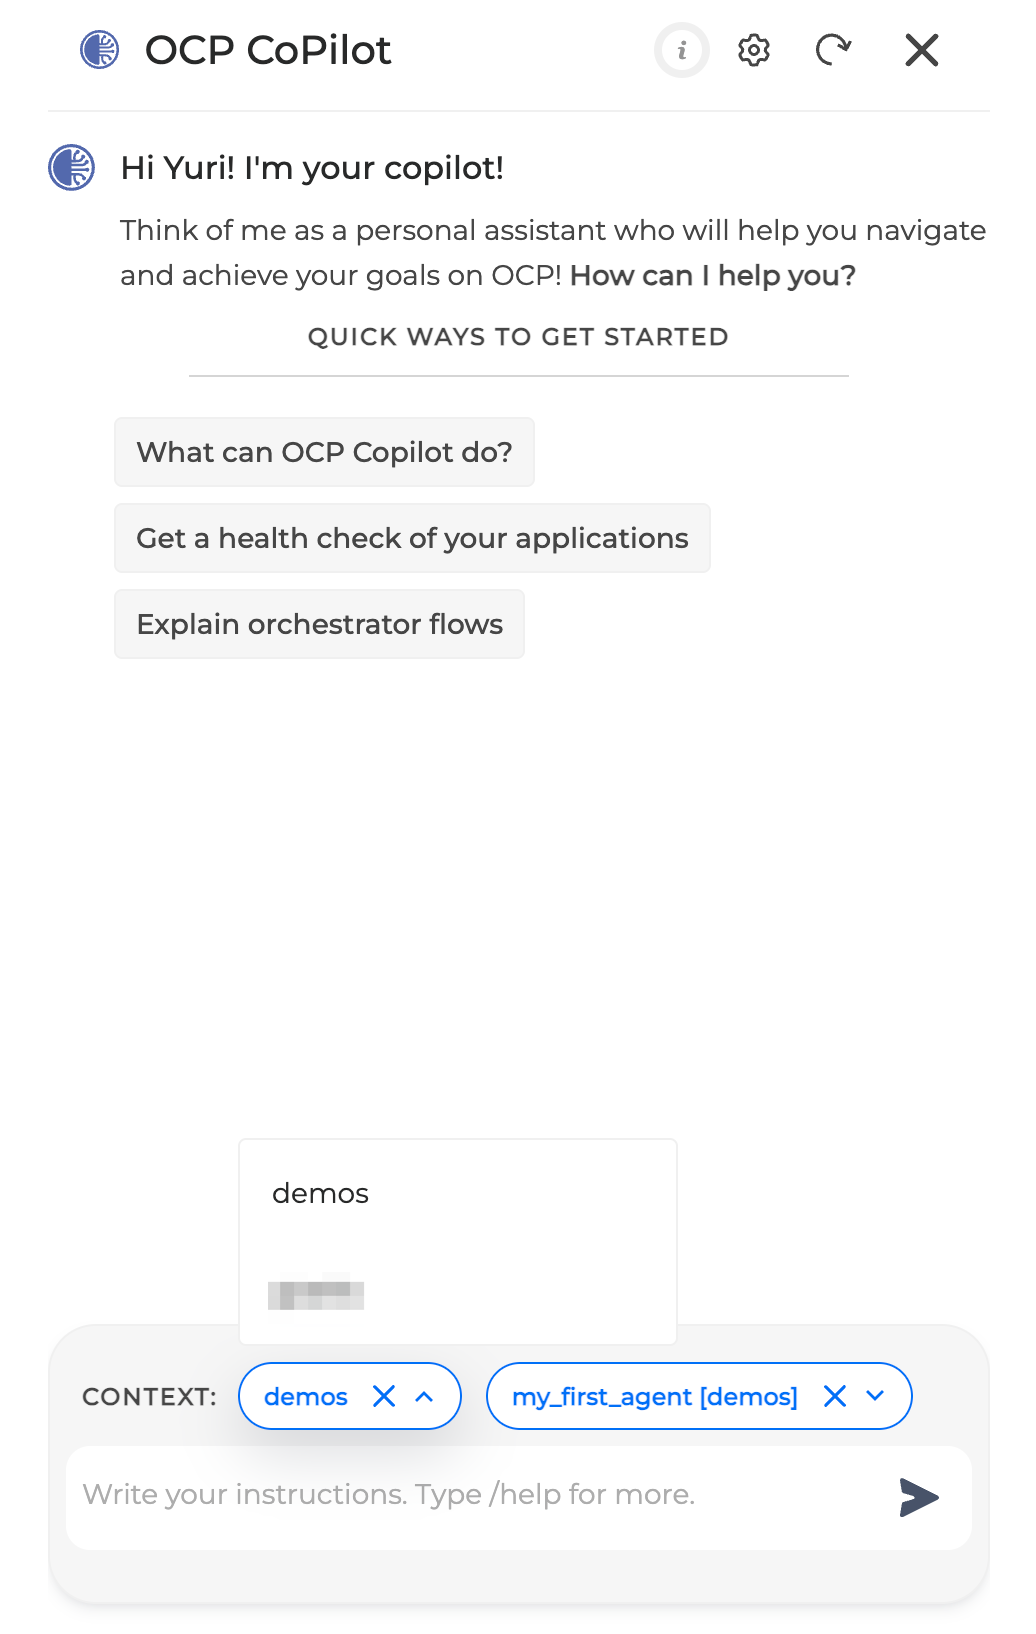
Set the Right Context in CoPilot (Important!)
Open the CoPilot chat and tell CoPilot exactly which group and project to work in by using the respective drop-downs:
|
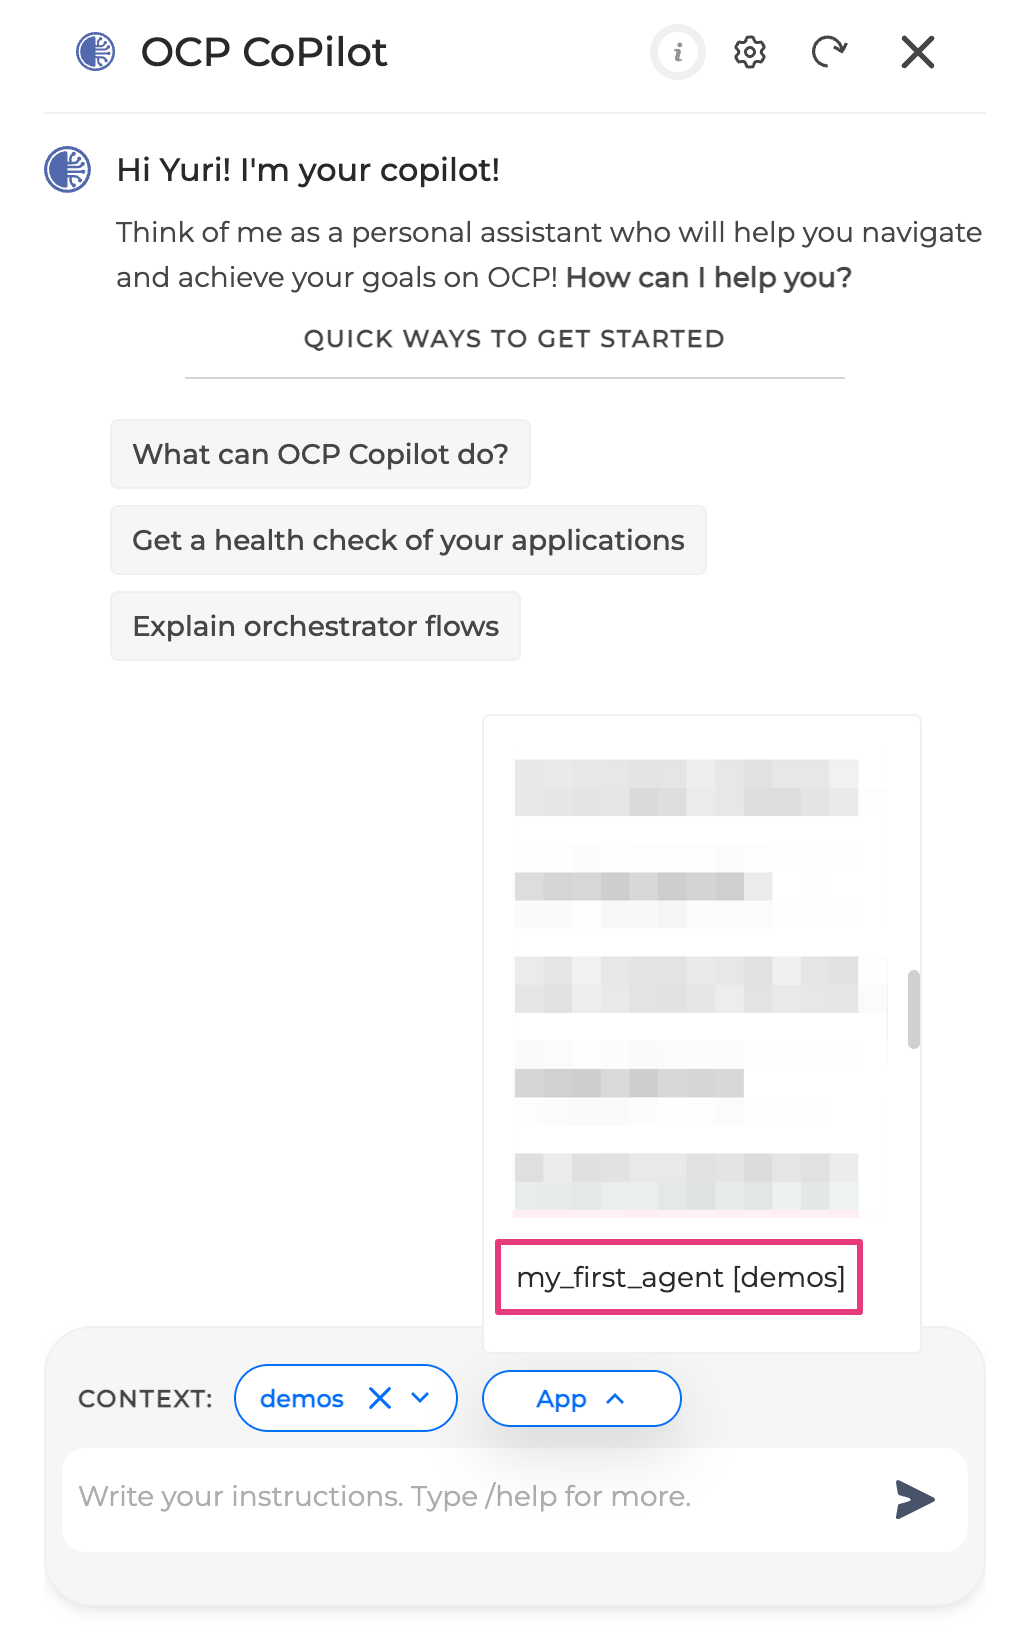
|
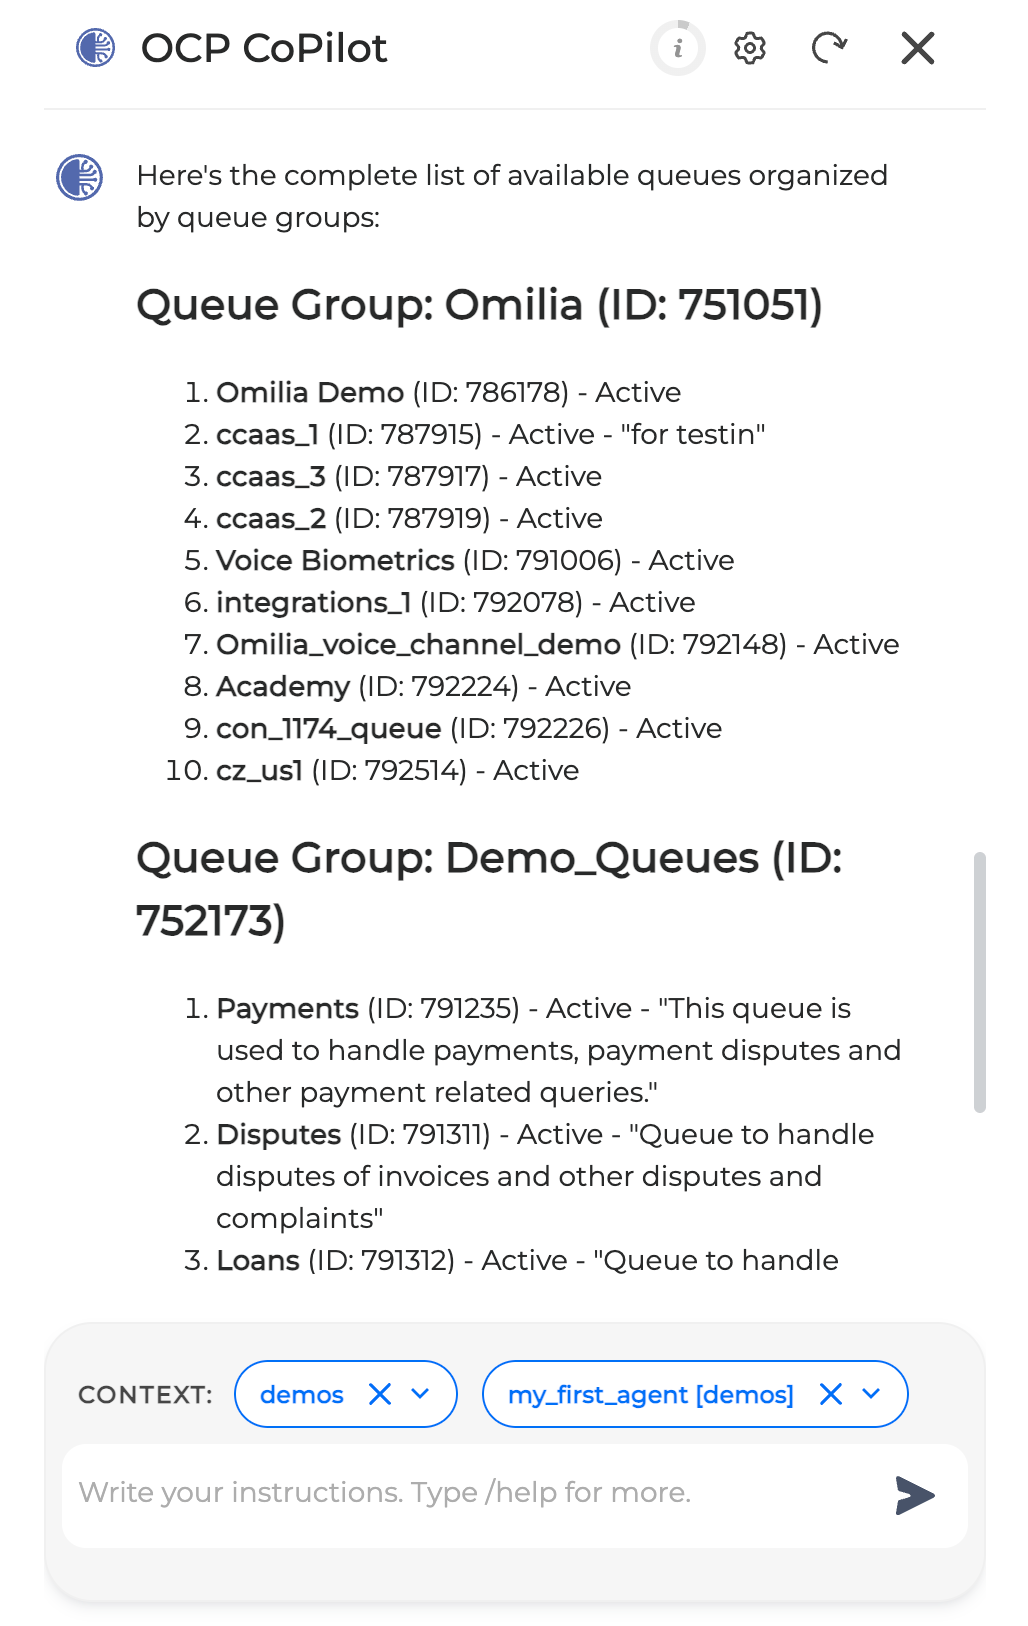
Ask CoPilot to show your real queues (this also serves as proof of all components being connected). Type and send:
Show me the complete list of available queues
You should see your actual queues listed (Payments, Disputes, Technical Support, etc).
Build Your Concierge Agent in One Click
Type or copy and paste into CoPilot the exact prompt as shown below:
Create a concierge agent based on the "Demo_Queues" group. Name this concierge "My_First_Concierge_Agent" and add it to the current application
If you only want to use certain queues, you could say, for example:
“Create a concierge agent but only use the queues: Payments, Disputes, Technical Support, and Default.”
Press Enter and watch the magic:
-
CoPilot will think out loud; this means that you’ll see all the reasoning and action steps as they happen.
-
It will create the agent, wire all the queues, and drop it on your canvas.
.png?cb=fd77516a01798ebb93e36d8f423d1eef)
CoPilot may request some permissions on the way. Click the Approve button to let CoPilot continue.
.png?cb=d66e79556bbffce04319e8b6ccf5c83a)
Refresh & Find Your New Agent
Sometimes your newly created agent will appear in the Agent tab of your Orchestrator with a short delay. Just hit F5 or the refresh button in your browser.
You should now see a new box on the canvas labeled "Concierge Agent” (or similar).

Open and Explore the Agent
Double-click the Concierge Agent block to access the Agent menu. Scroll through the tabs to see what CoPilot made for you:
Instructions tab
CoPilot already wrote a solid set of instructions. Some examples of what you should see:

You can edit this at any time to match your exact tone or policies.
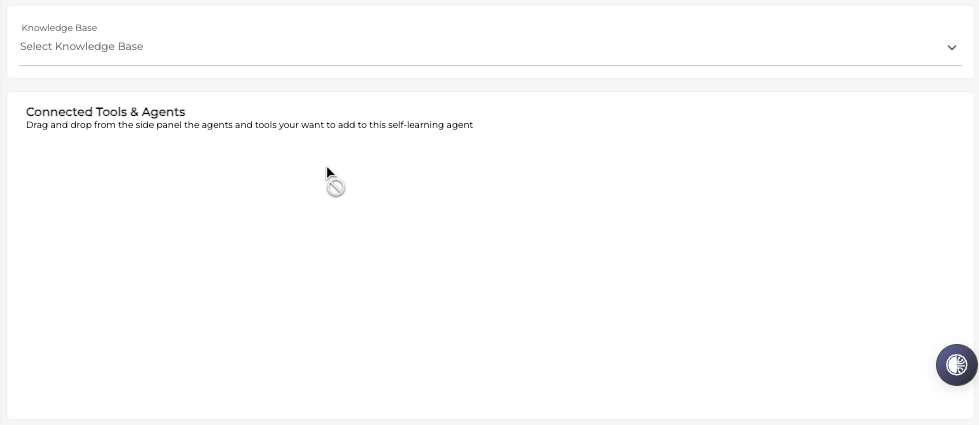
Knowledge Base and Connected Tools
The section is empty for now - this will change after we add PDFs/websites or when we add MCPs and APIs
See sections Creating General Inquiry AI Agents Using PDFs and Websites and Creating Task Agents, respectively.
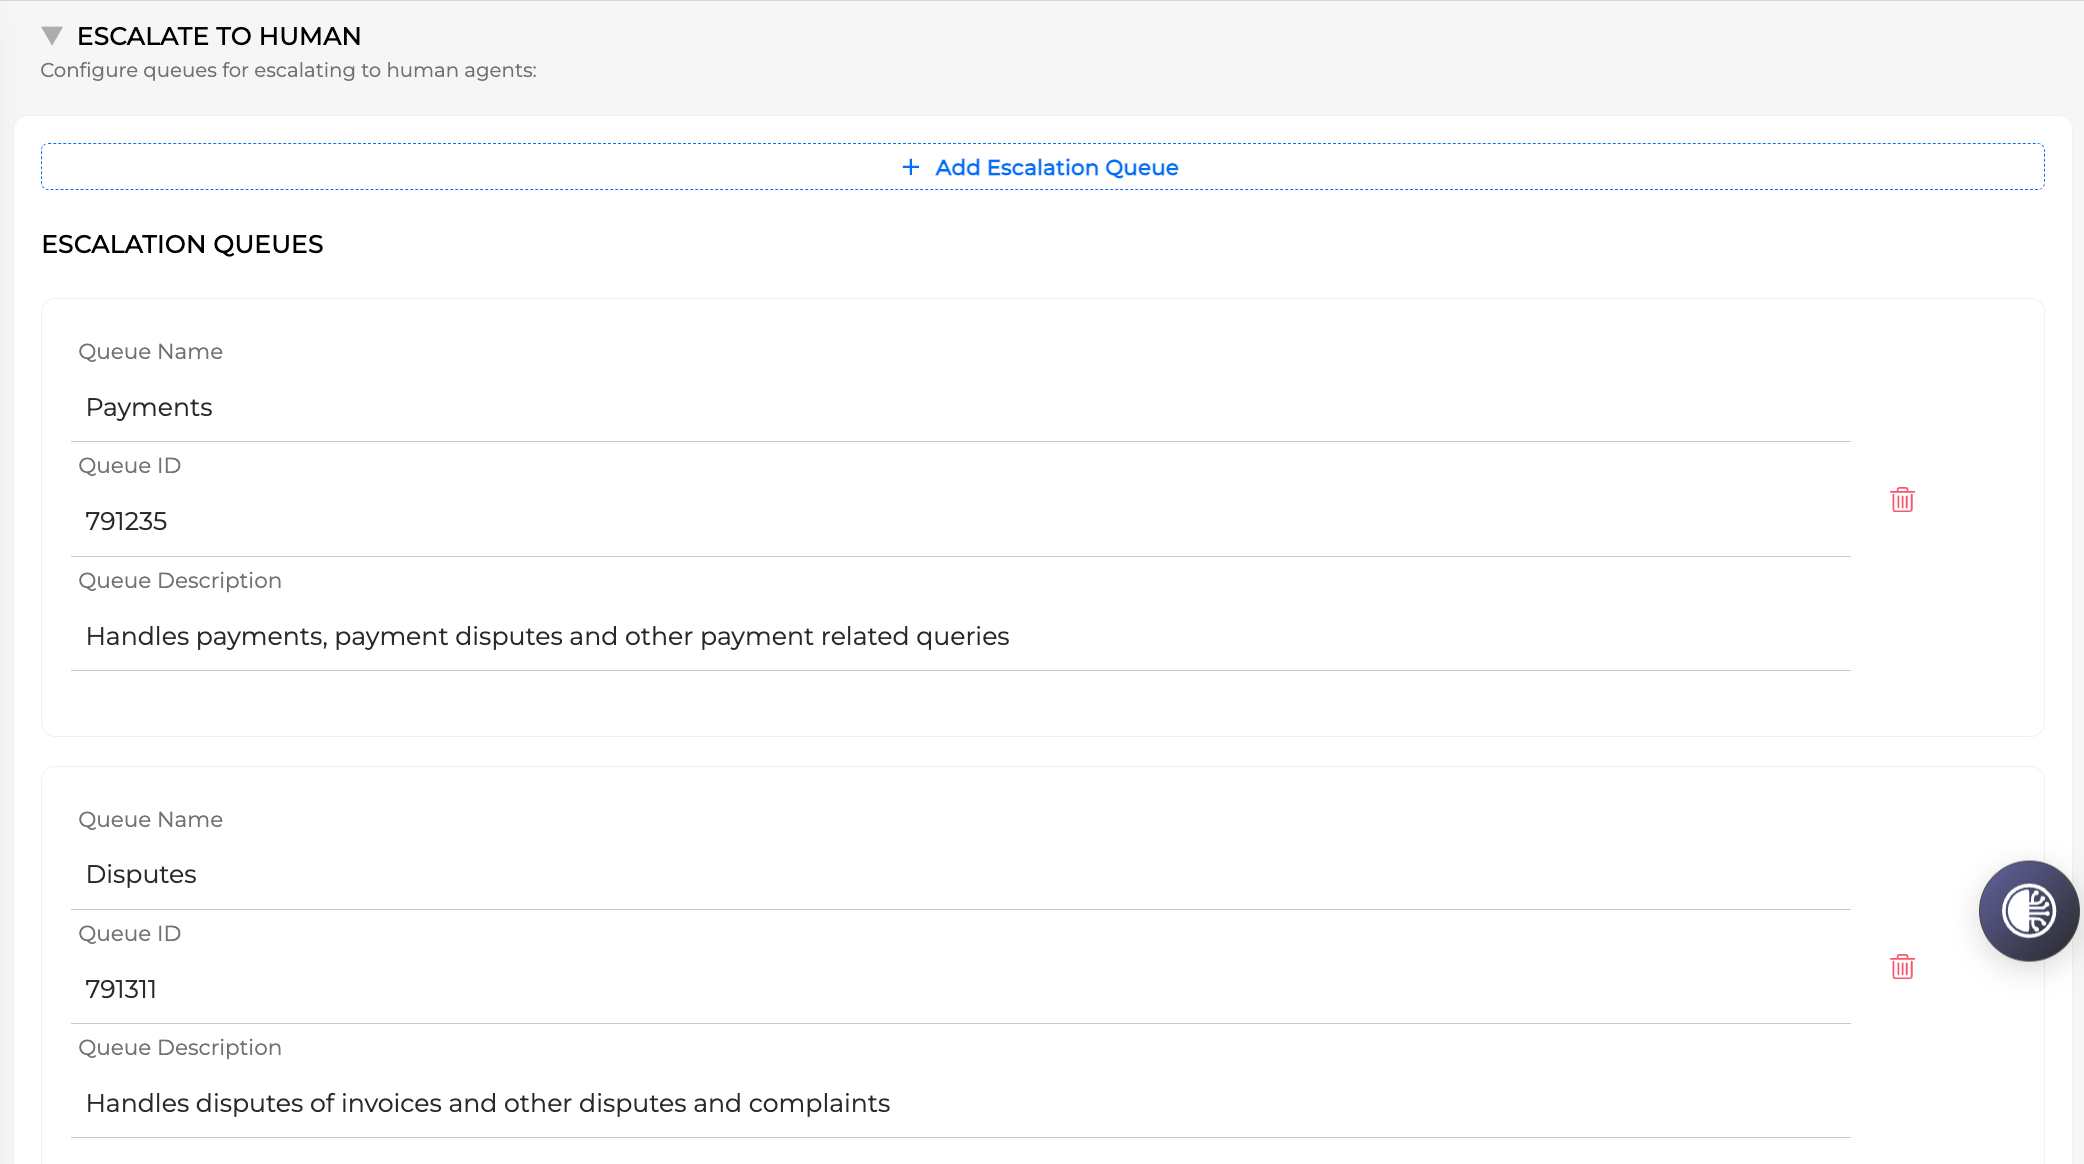
Escalate to Human
You’ll see all your actual queues already listed and connected automatically. No manual work needed!

Welcome Prompt
This controls the very first thing the caller hears, for example:
Hi! Thank you for calling my first AI Agent. My name is Alex. How can I assist you today?

You’re done! You now have a fully working, routing (Concierge) agent.
Build Your Concierge Agent Manually
Building your Agent manually gives you full control of the Agent’s setup.
For a detailed user guide for creating an Orchestrator Agentic Application, please visit Orchestrator | Agentic Flows.
Deploying Your Agent
Before you can test your agent, you need to deploy it.
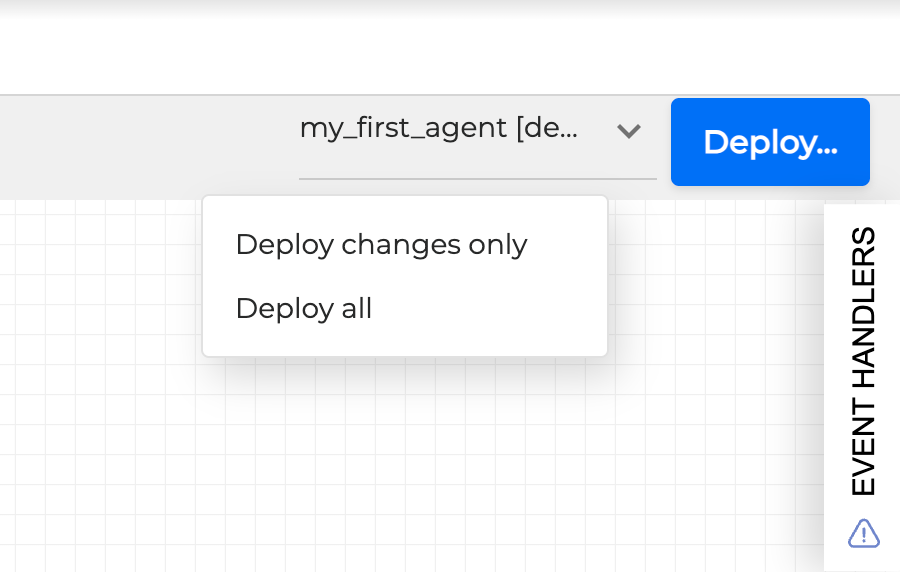
Click on the Deploy button in the upper right corner and select Deploy All.
After a successful deployment, you are ready to chat with your Agent using the chat simulator button in the bottom right corner ![]()
To test your Agent with voice, see section Testing, Monitoring & Improving Your AI Agents.
3. Creating General Inquiry AI Agents Using PDFs and Websites
Fast Path: Let CoPilot Create It for You
-
Go to CoPilot. Make sure the context is set up correctly. (Group, Application)
-
Ask CoPilot to create a knowledge base, based on a URL, and make it available to the Agent created in the Creating Your First Concierge Agent using this prompt:
Create a knowledge base based on this URL: {{URL}} and add it as a tool to the Concierge Agent.
-
CoPilot will reason and act until it creates the knowledge base, then CoPilot will add it as a tool to the concierge agent.
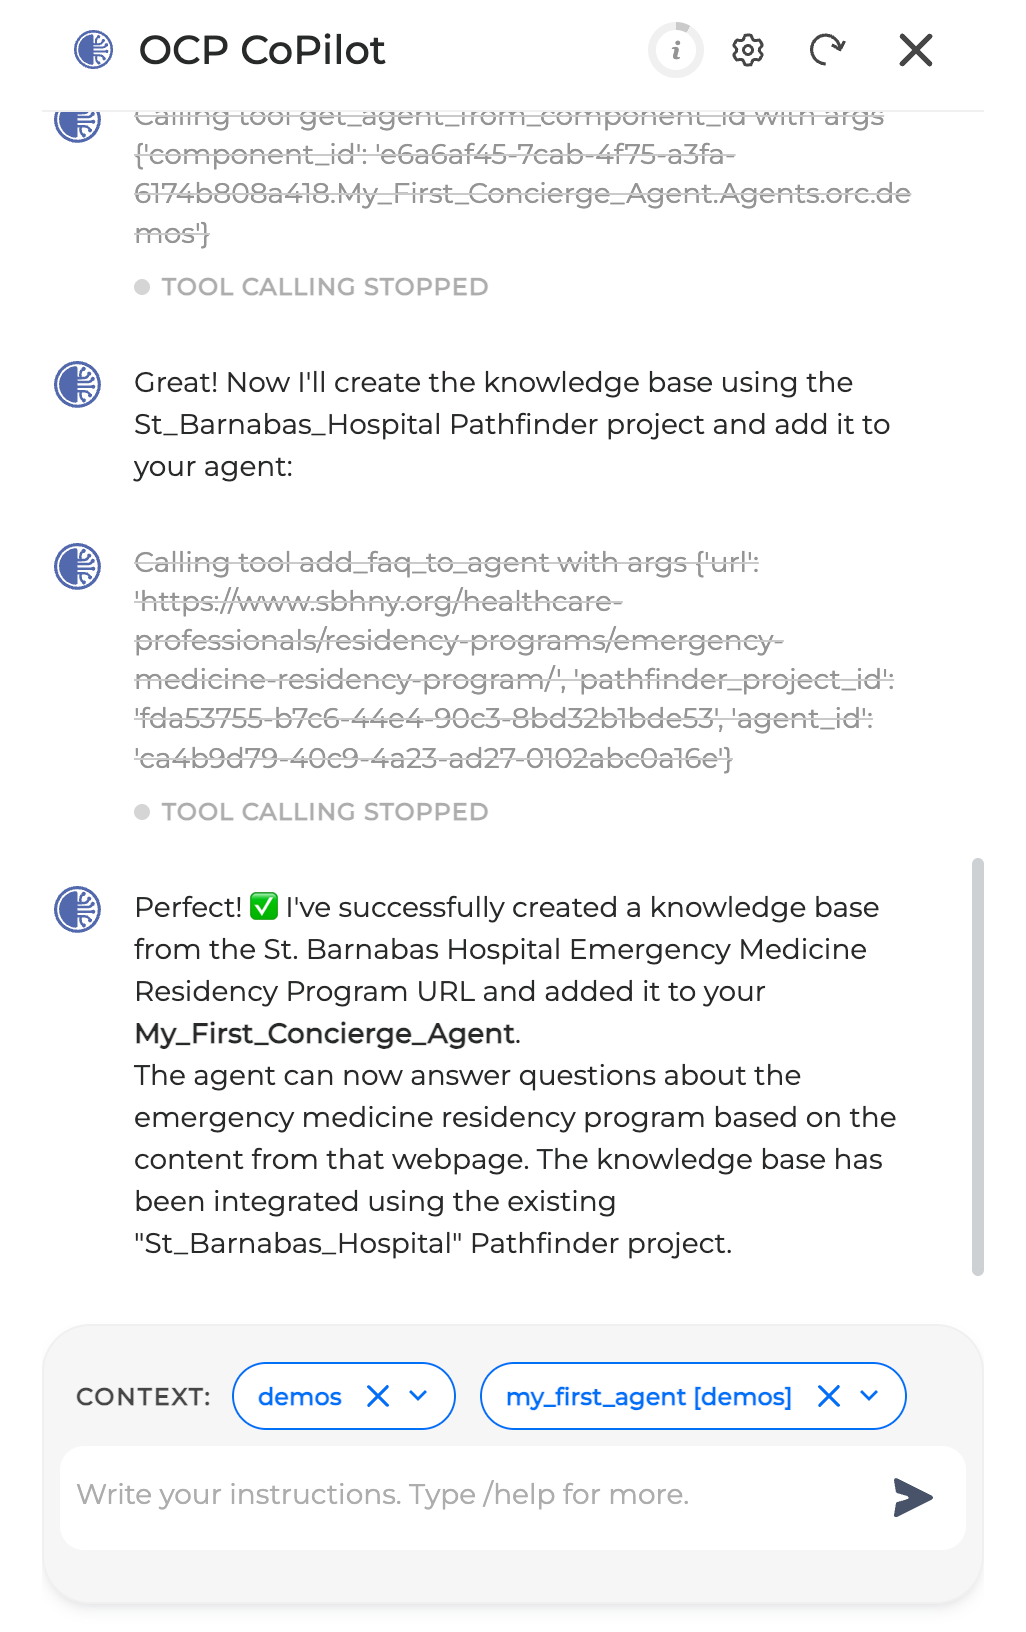
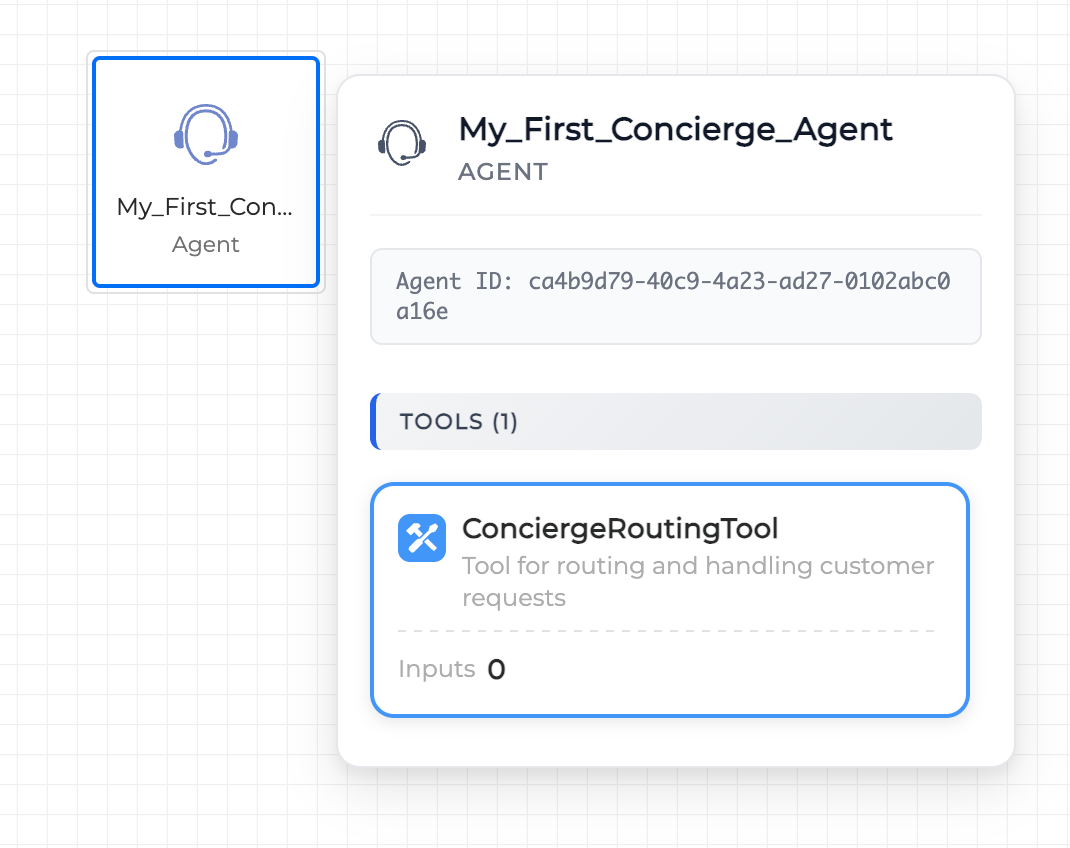
Your canvas should be updated, and the knowledge base should be visible as a Concierge Tool:
Hands-On: Build It Manually from Scratch
To create a knowledge base manually, you need to navigate to the Pathfinder tab in the menu on the left. We will build a new knowledge base using a PDF this time.
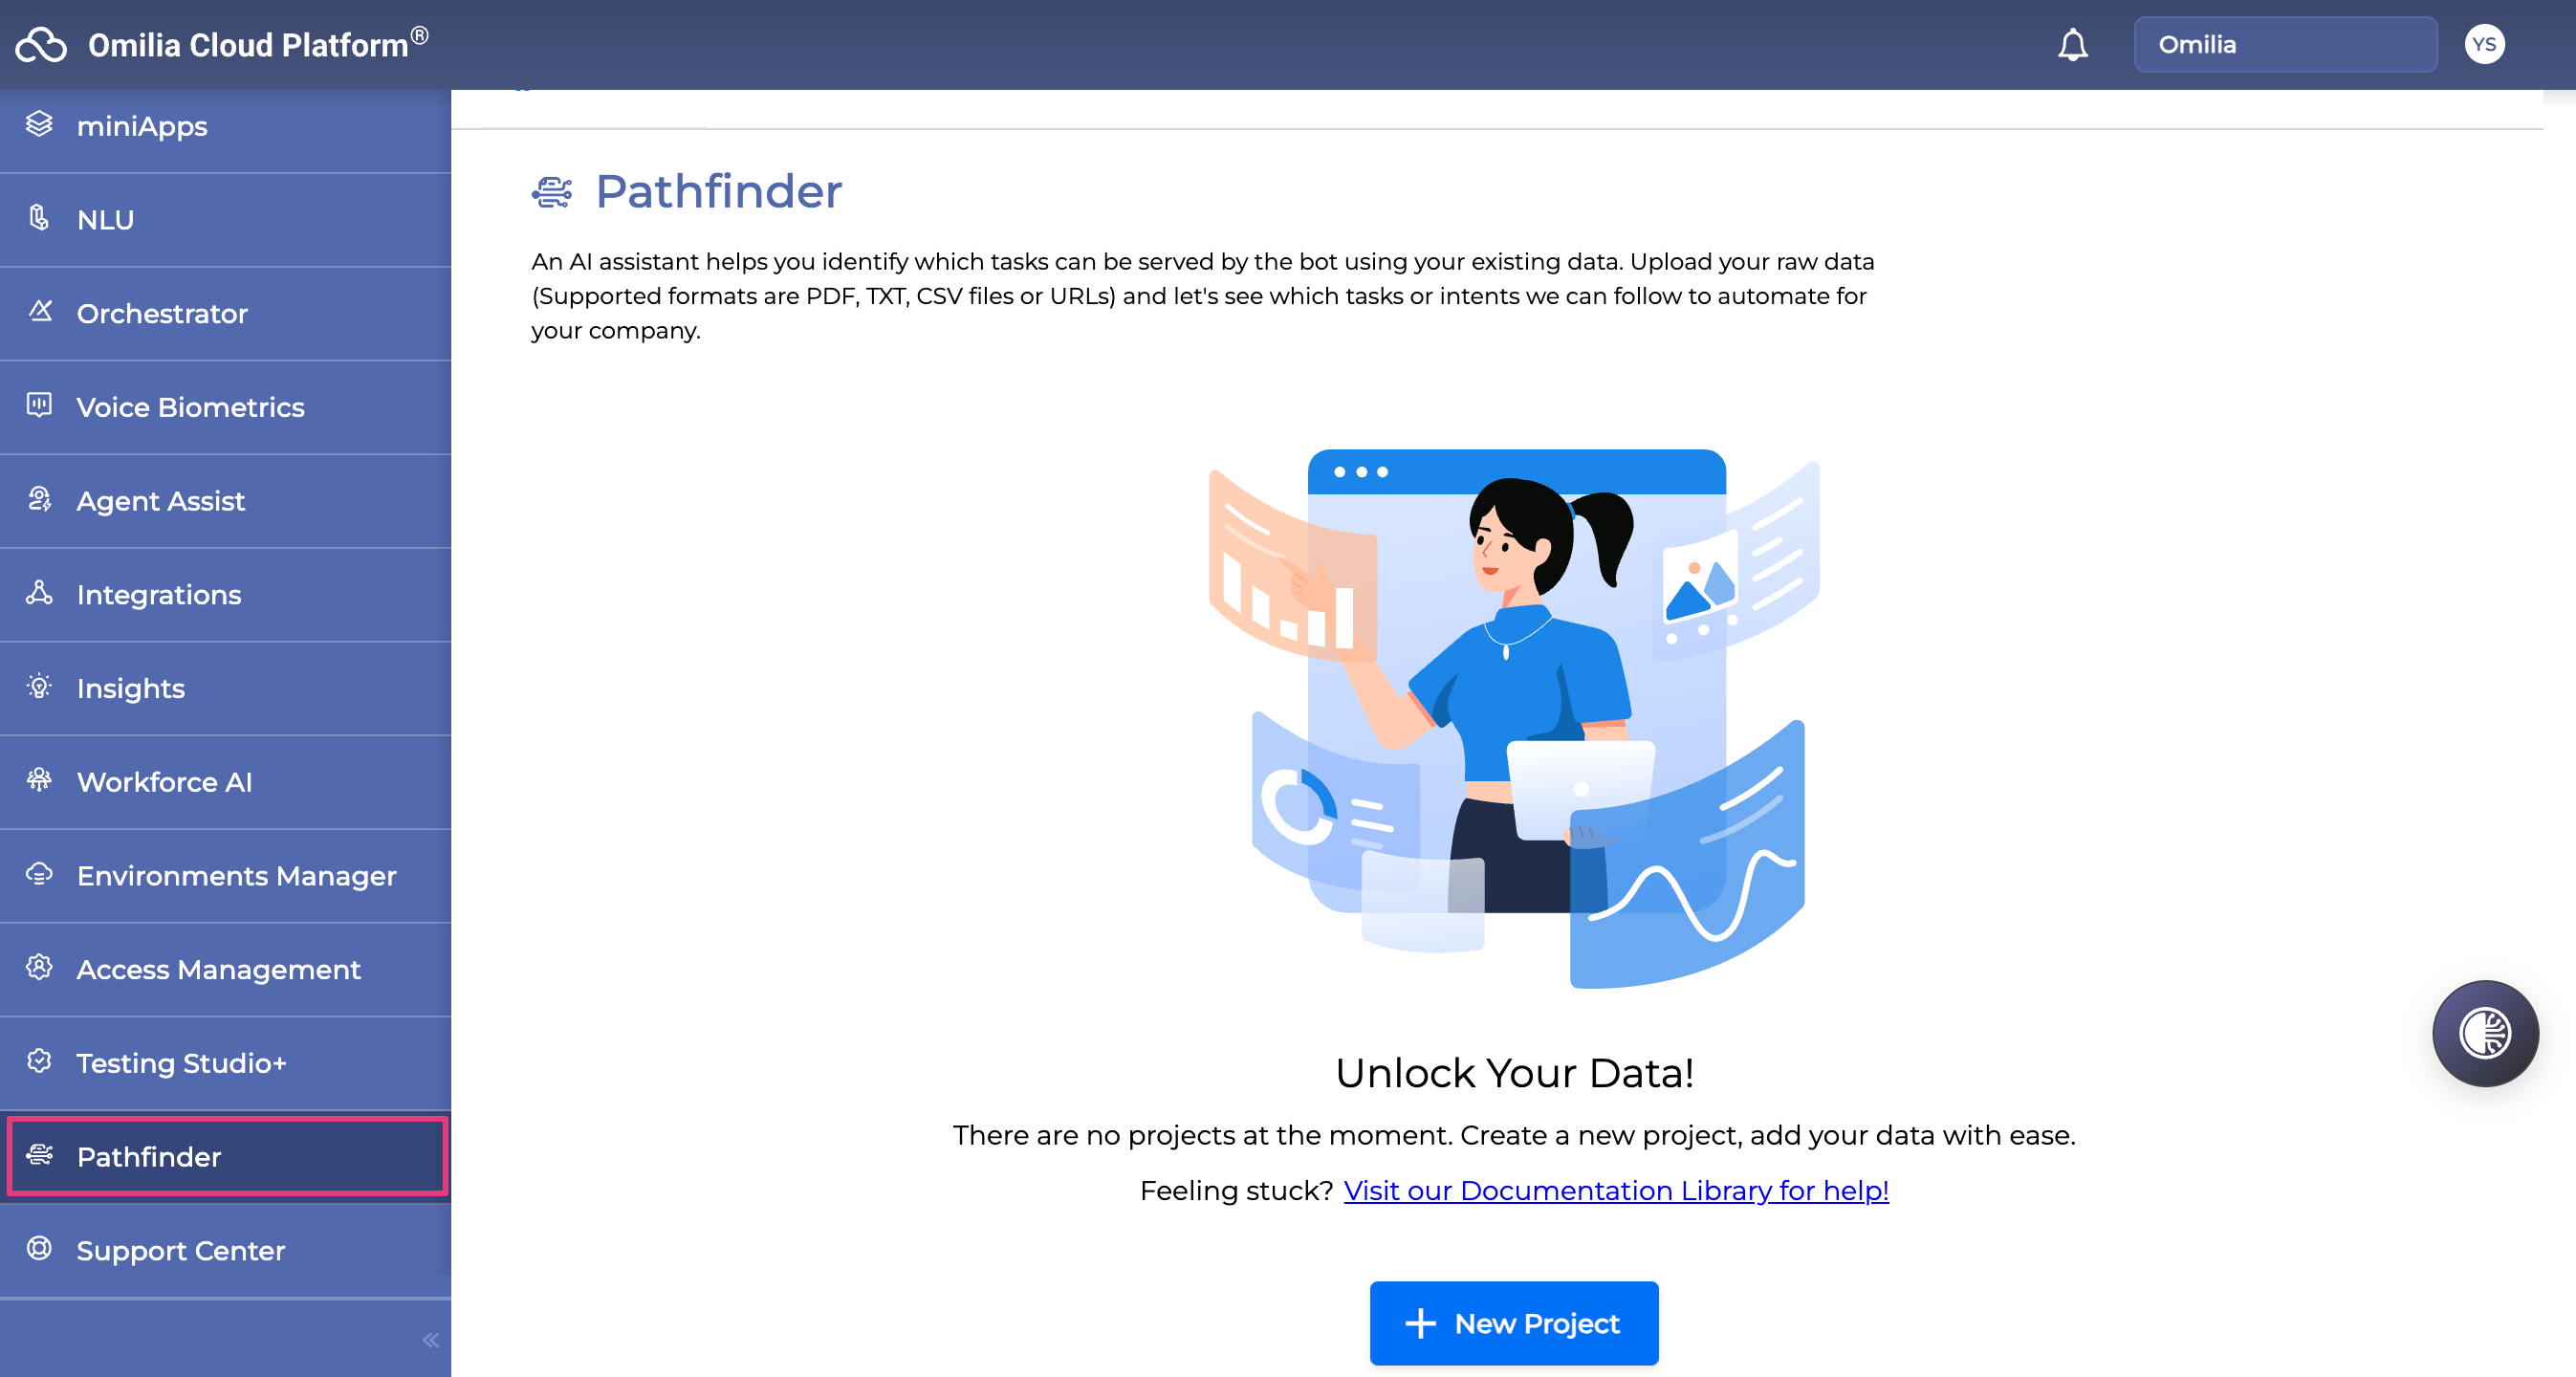
Create a New Knowledge Base
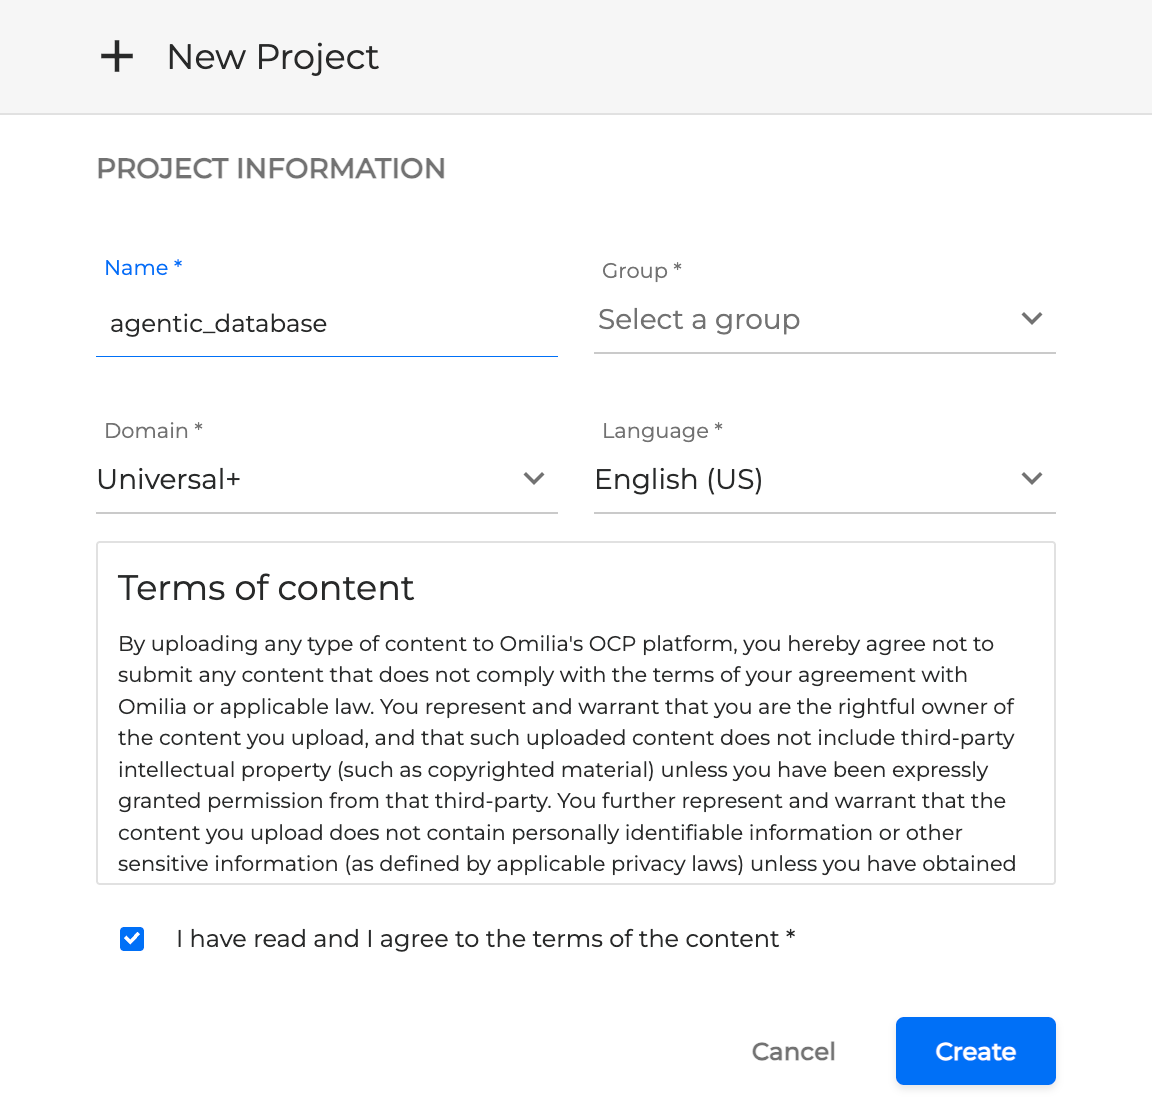
Click the + New Project button in the Pathfinder tab.
This will open the new project pop-up, where you need to provide:
-
A name for the knowledge base.
-
The OCP group where the knowledge base will live.
-
The Domain (select one of the Domains if applicable, or select Universal if you cannot find your specific domain. The latest version of the universal domain is Universal+).
-
Select the Language/Locale so OCP can leverage the best performing models for this Locale and Domain.
-
Accept the terms and conditions.
Press Create, and your new knowledge base project should be created without any problems.
Upload/Provide Your Source Data
Now select the PDF file(s) that contain information that will help the AI Agent address general inquiries.

You can also use the section below the browse button to add one or more URLs.
Once you add your sources (PDF or URLs), click the Upload and Continue button in the upper right corner.
Observe the Discovery Phase
Now is when OCP needs some time to:
-
Upload or fetch data
-
And then process, prepare, augment, and store the data
Depending on the amount of data, this could take up to several minutes. You will be able to see the progress in real time with newly discovered topics (Intents) appearing in front of you.
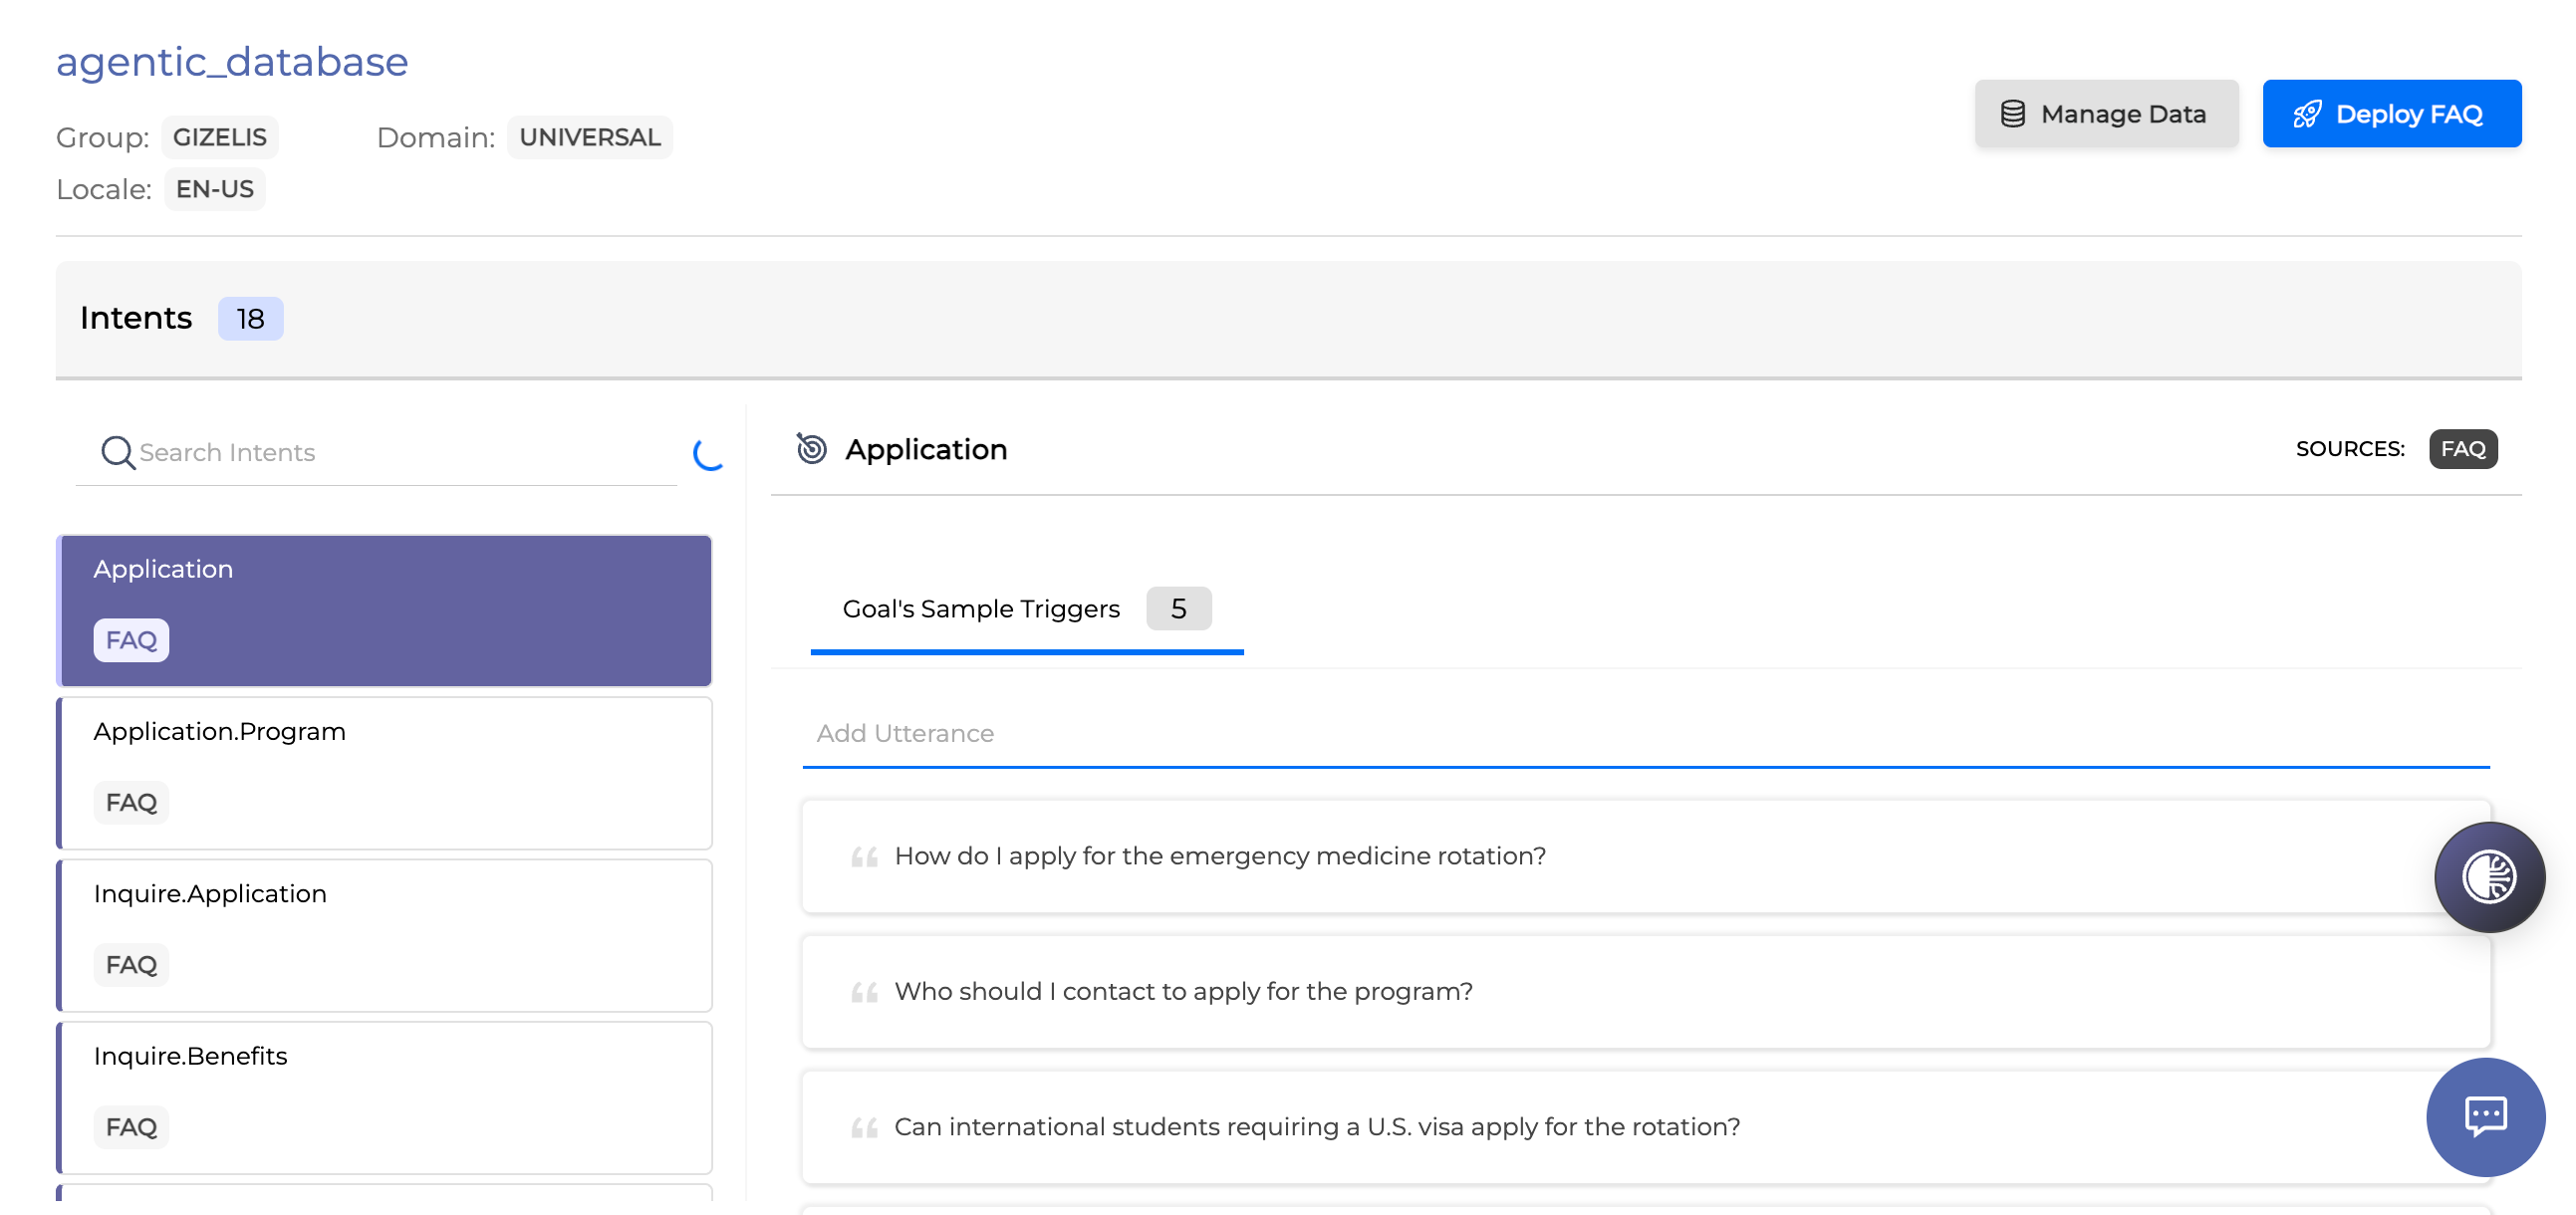
Once the spinner near the search bar stops, your knowledge base is ready.
Testing Your Knowledge Base
You can directly go and plug it into your AI Agent as a tool, or you can perform a sort of testing of your knowledge base to see how it works before you plug it in.
To test your knowledge base, use the chat button in the bottom right corner.
The chat simulator in the Pathfinder tab is not the same as the chat simulator in the Orchestrator tab:
-
One is for simulating/testing your knowledge base in a standalone mode.
-
The other is for simulating/testing your Agents (whether using the knowledge base or not).
Deploy Your Knowledge Base for Production (Optional)
In the top-right corner of your project, you’ll see a button called Deploy FAQ.
You only need to press Deploy FAQ when you are 100% finished building and testing, and you’re ready to put your agent (or knowledge base) into real production with live customer calls.
While you’re:
-
Building your first agents
-
Testing in the simulator or with test calls
-
Adding PDFs, websites, or improving responses
…just leave the Deploy FAQ button alone. Everything works perfectly in the draft mode with no extra steps.
You can find more information about creating Pathfinder projects in the Pathfinder User Guide.
Adding the Knowledge Base to Your AI Agent as a Tool
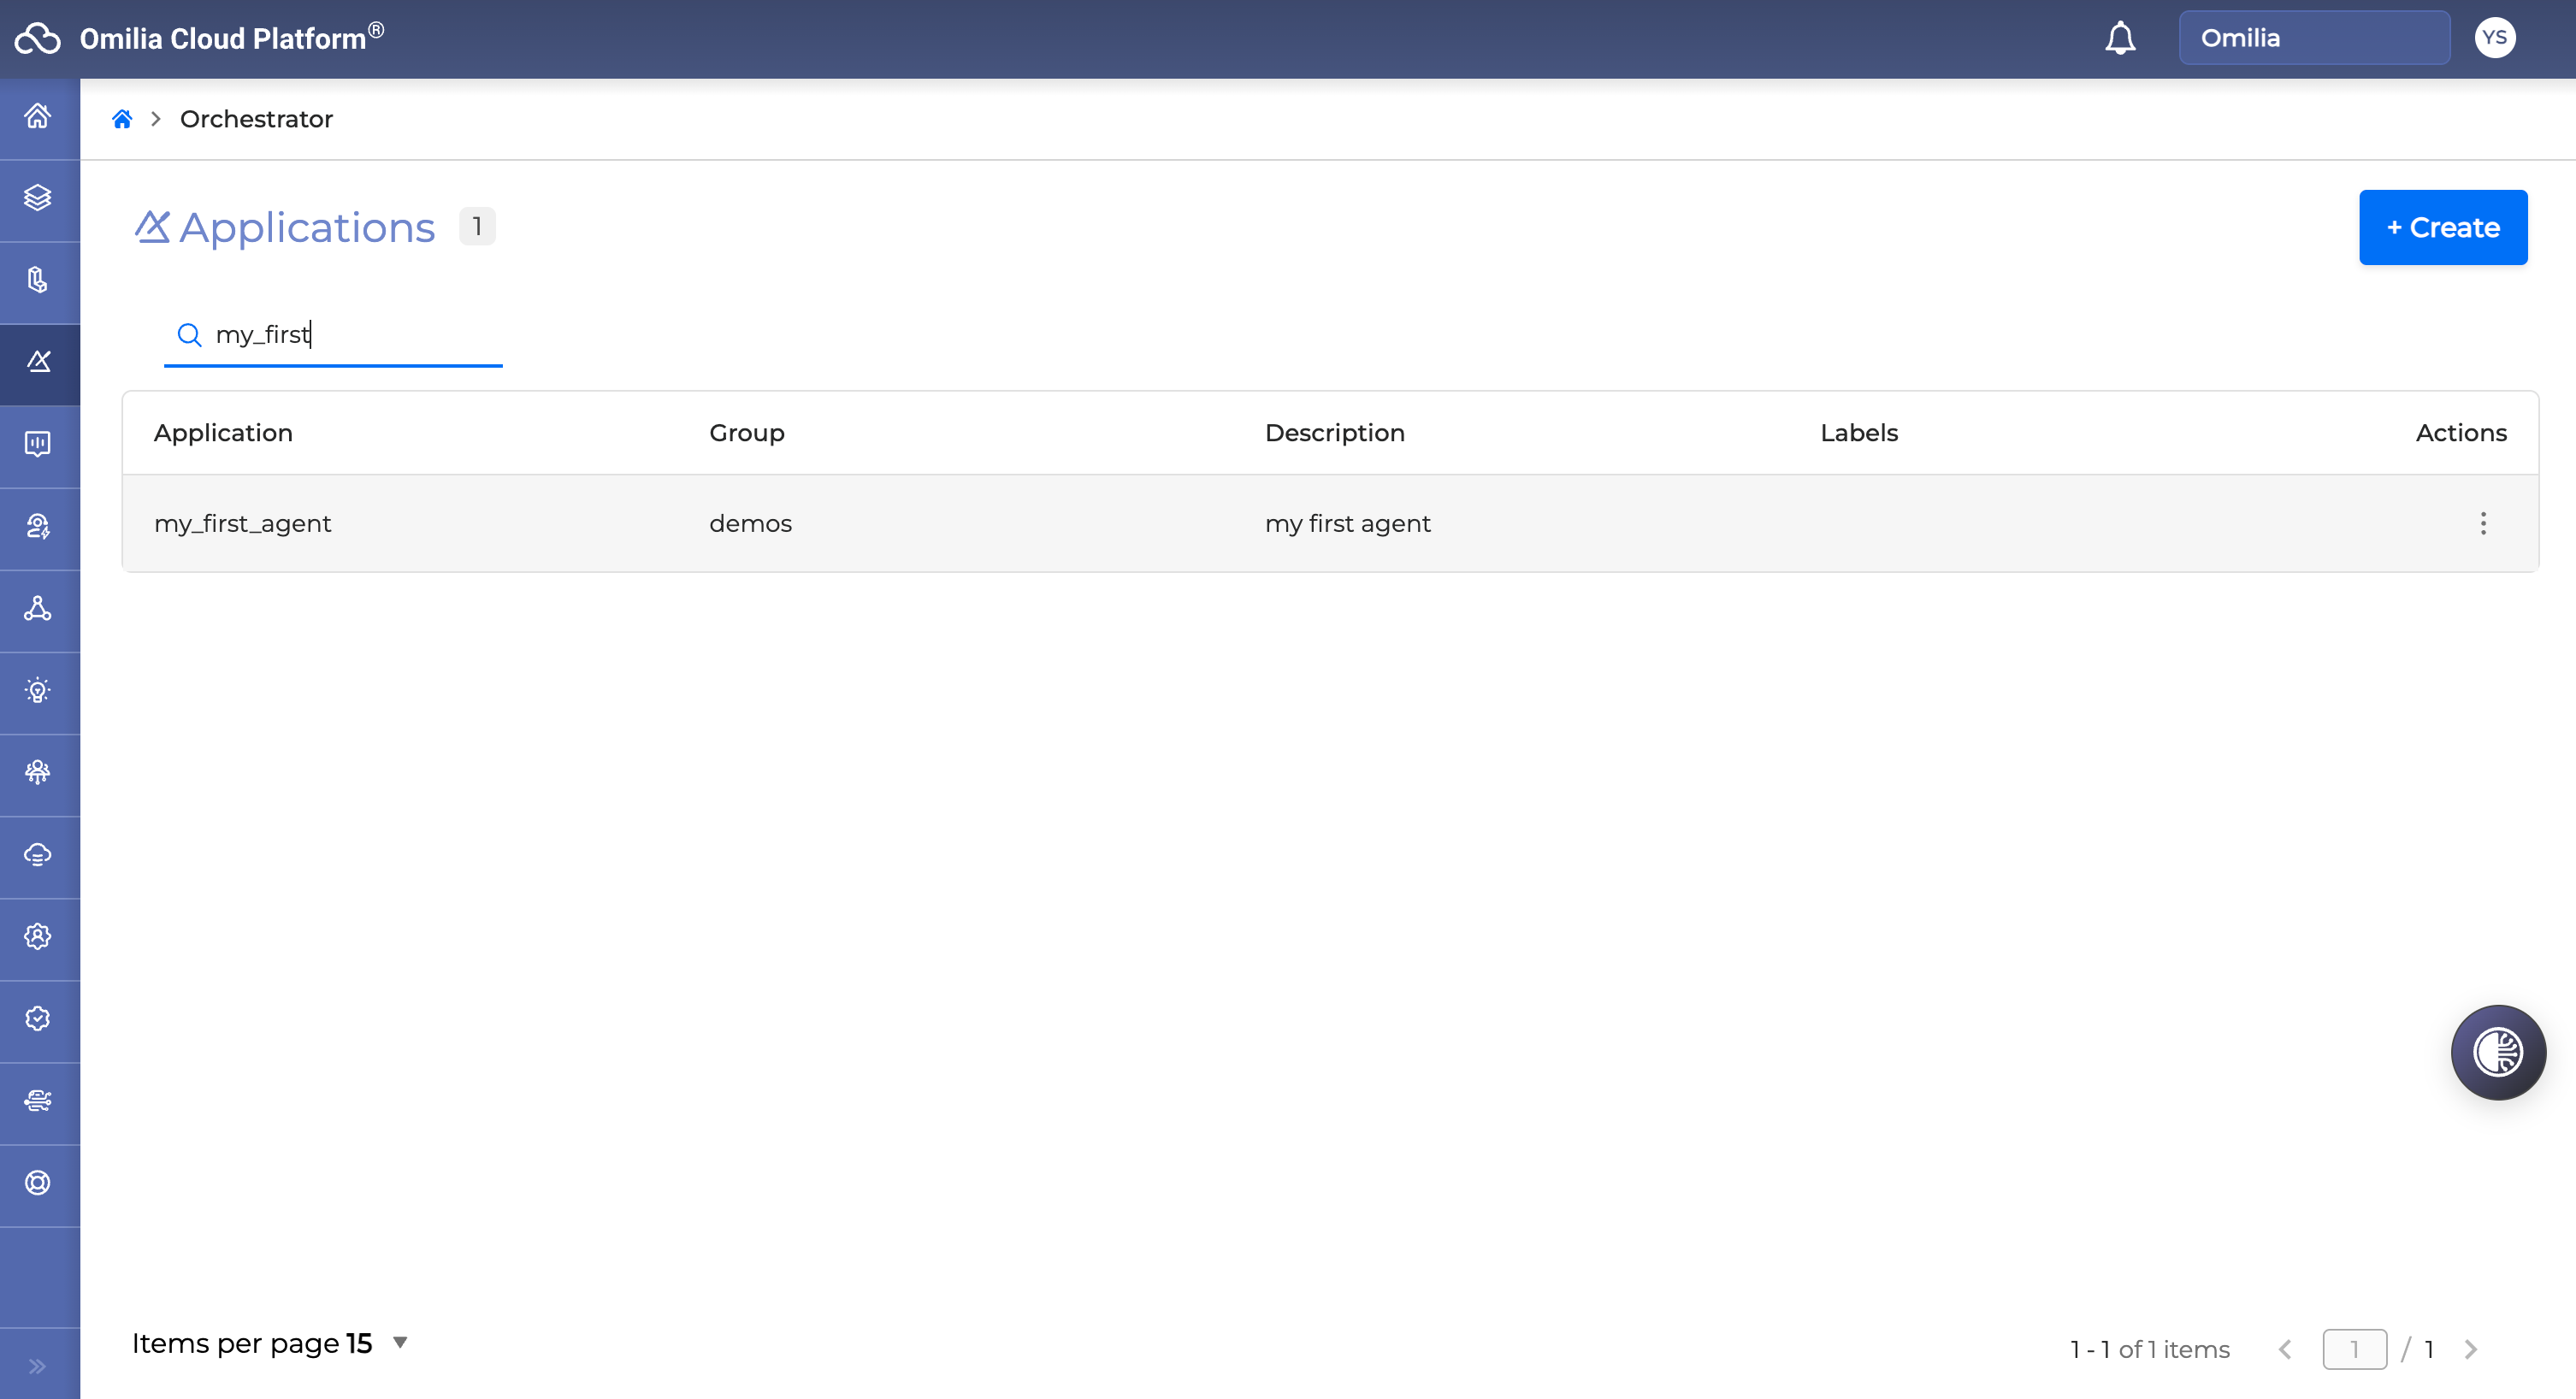
Navigate back to Orchestrator.
Type in the search box the name of your application, for example, My_first_Agent, and select the application you are looking for:
In the Agents tab, double-click the Concierge Agent created in Creating Your First Concierge Agent.
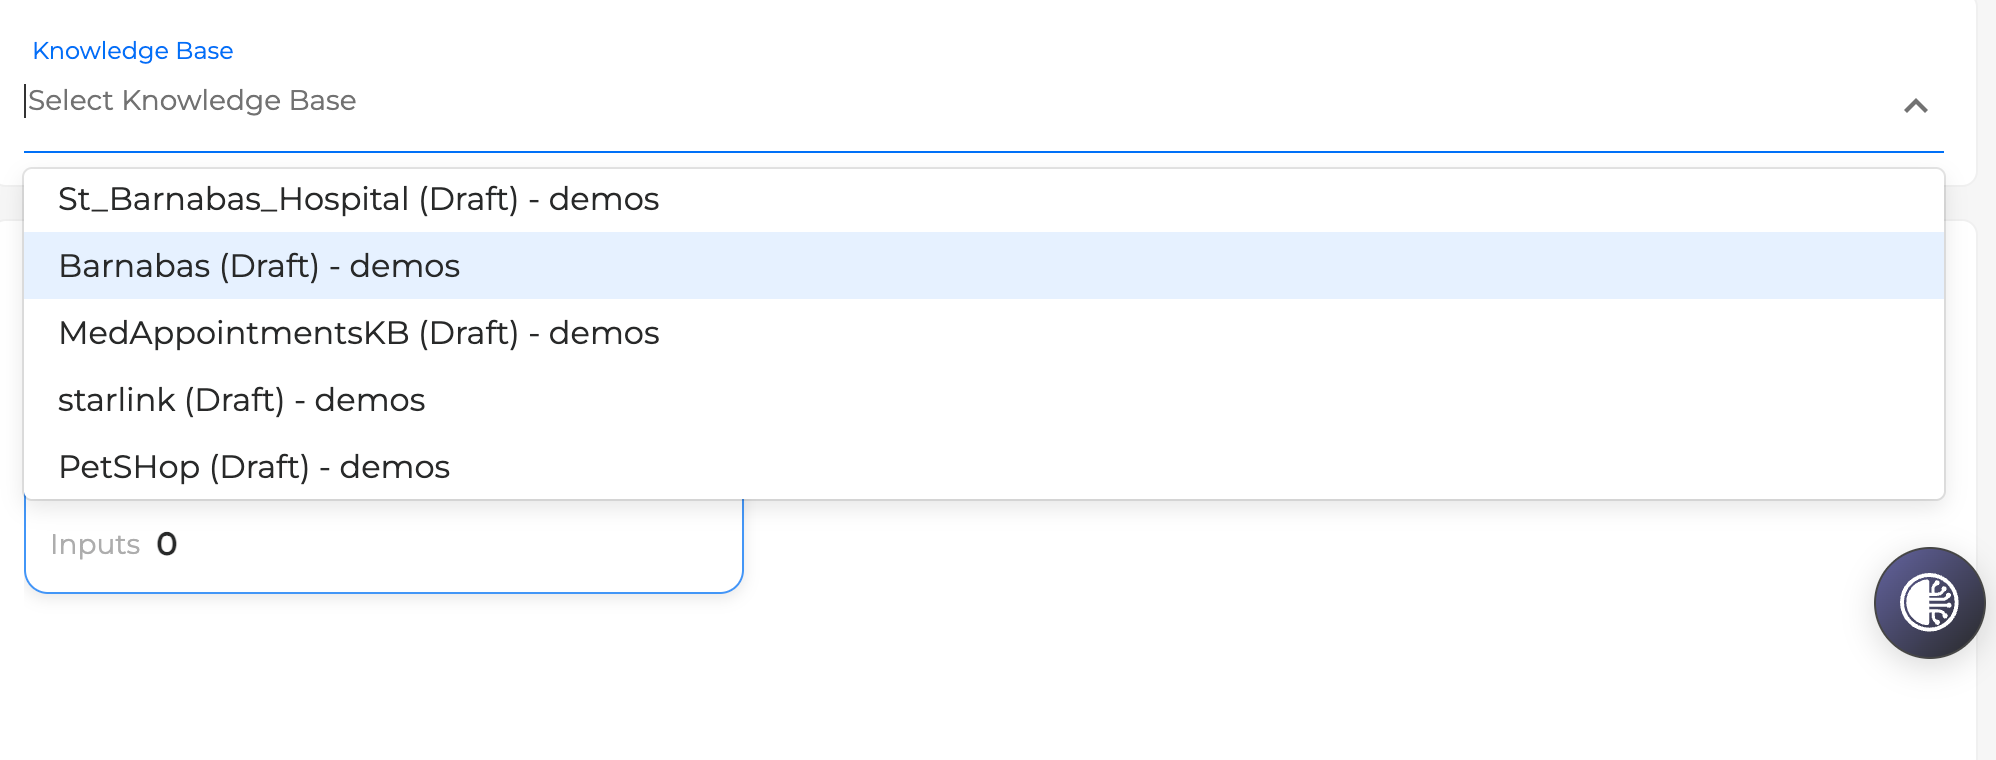
In the Knowledge Base section, select the knowledge base you have just created from the dropdown menu.
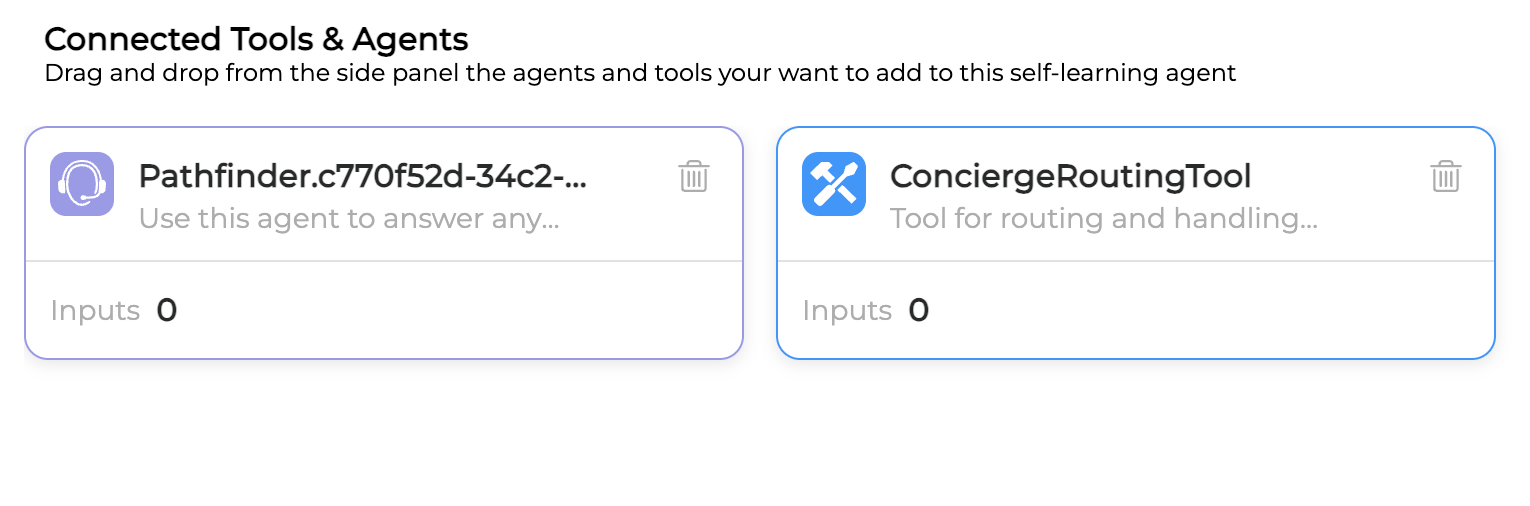
After that, the knowledge base will appear connected in the Connected Tools & Agents section.
Scroll up and save the changes to your Concierge Agent. Click the Back to App button to return to the Orchestrator canvas.
Final Step. Deploying Changes to Your AI Agent and Testing
Once in the Orchestrator canvas, use the Deploy button to redeploy your Agent with the latest updates.
Click the chat simulator icon in the bottom right corner and test your Agent. Now your Concierge Agent can respond to general inquiries based on the knowledge base and also route to the proper queue if needed.
Hint: It is very common to build/test your knowledge base manually, and once ready, ask CoPilot to plug in the knowledge base as an agentic tool of your Concierge Agent. Just make sure to point to the right context (group, application)
and say to CoPilot, for example:
Can you add the St Barnabas Knowledge Base as a tool to my Concierge Agent?
Let CoPilot do the magic of plugging the newly created knowledge base into your AI Agent as a tool by reasoning and acting.
4. Creating Task Agents
Task Agents are autonomous, goal-oriented AI components designed to execute complex workflows with minimal human intervention. They use multiple tools (webservice miniApps, MCP servers, etc) to achieve a specific goal, which is normally multi-step and complex (for example, making a payment, making a reservation, etc).
How to Create Task Agents?
Just like creating general inquiry / FAQ agents, use CoPilot to help you create Task Agents.
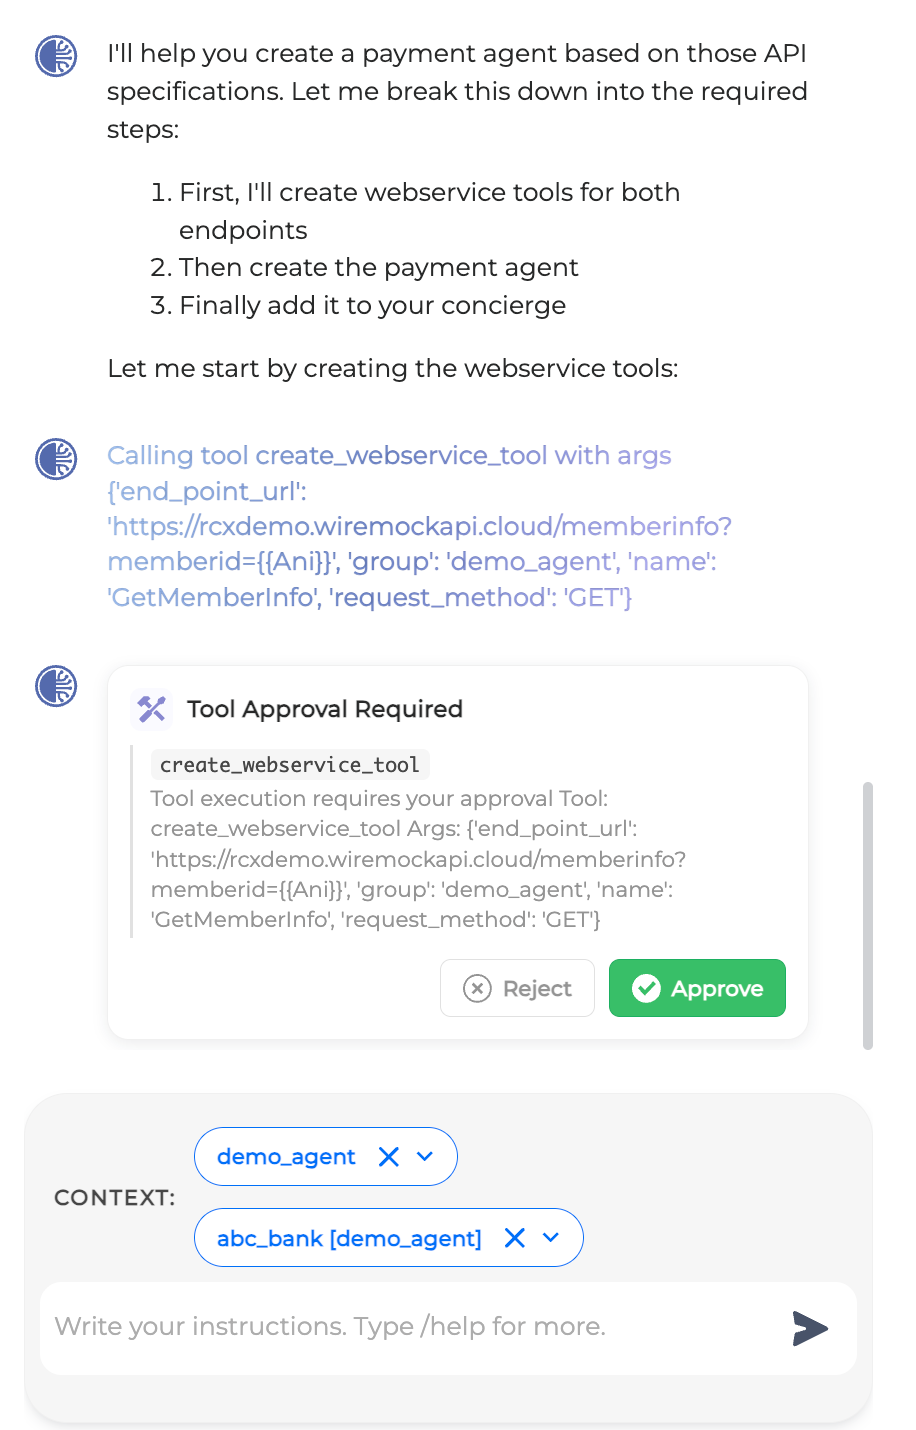
A good example of a Task Agent would be the Payment Agent: CoPilot understands the need to create tools. You can provide some raw OpenAPI specifications, and it will start generating tools.
Ask CoPilot:
Can you help me create an Agent that handles payments?

|
|
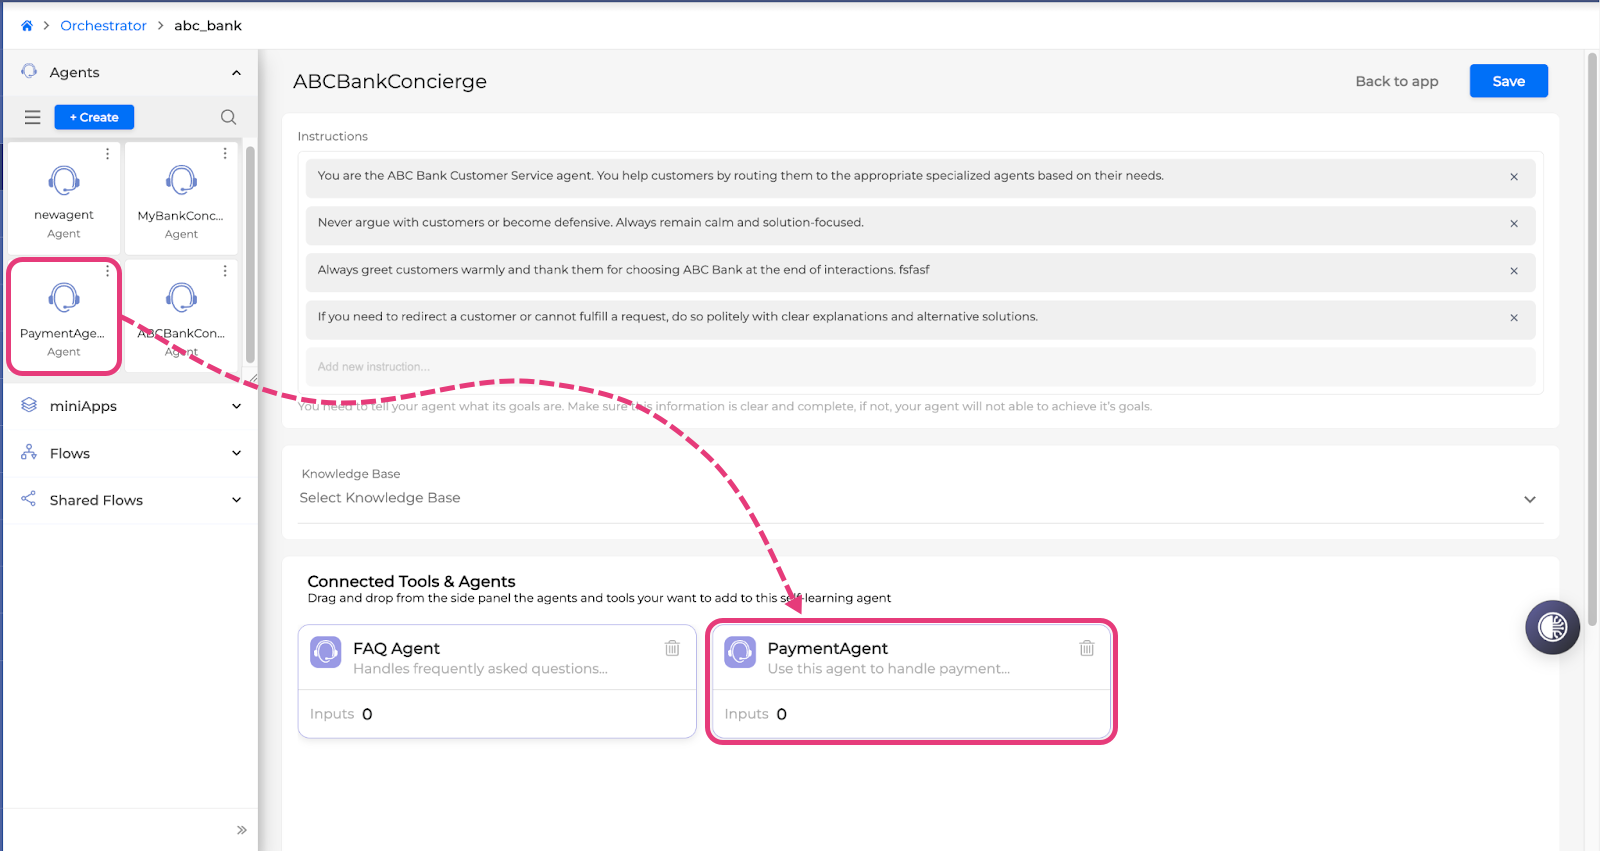
If CoPilot does not add your agent to your concierge automatically, just drag and drop the agent to the Connected Tools & Agents area. This will allow the concierge to route calls to this agent for resolution.
5. Testing, Monitoring & Improving Your AI Agents
Prepare Your Test Suite for Testing Your AI Agent
You have successfully deployed your agents, and you can now test them all together as one unified experience that your customers will likely have.
Test Suite Starter Pack:
-
Mock dialog scenarios-cases: These are utterances that a caller would use in each dialog scenario that you want to test.
-
Expected system response or action: What your application should ideally do in each dialog case to be considered successful ('the golden dialog').
Ways to Prepare Your Routing Agent Test Suite:
-
Gather your queues that would be tested:
Open the CoPilot chat (make sure to select the group and application) and ask it: Can I get the list of available queues used in my application?
It should return your queue names, IDs, and descriptions as shown below, per group.
To assess the test results, you will later need to check whether the system routed the caller to the correct Queue ID, depending on the dialog scenario.
You can also manually navigate back into your Concierge Agent and take note of your automatically created escalation queues and specifically each Queue ID.
-
Generate likely dialog test cases for each desired Queue routing scenario:
Put together your tailored test suite by creating likely utterances (questions) a caller may ask, and which queue your routing agents should correctly direct them to. Keep a test set record that you would go through when running the tests and evaluating the results.
Optional: Now that you have gathered your queue info, you can ask CoPilot to create a test set for you using these queues in your group. Just type in:
Can you create a dialog test set for each of the queues in the Demo_Queues Group that I can use to test whether the app is routing calls correctly?
.png?cb=92719a78af0276e2e579e4d253417f8c)
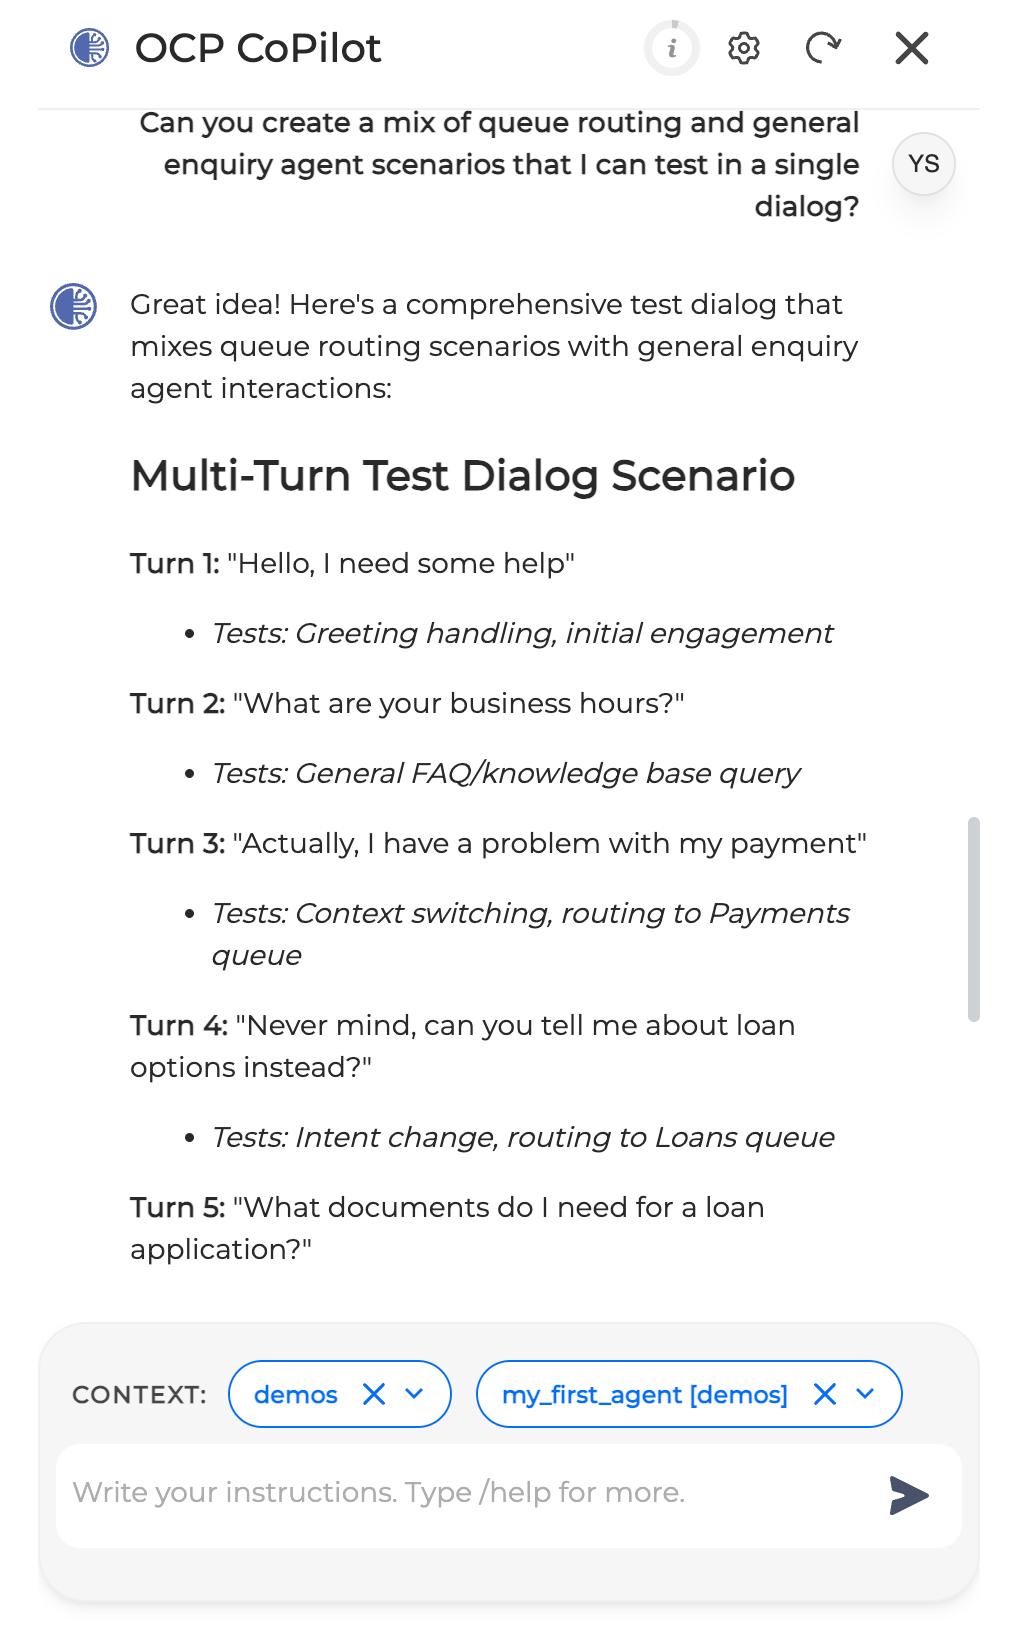
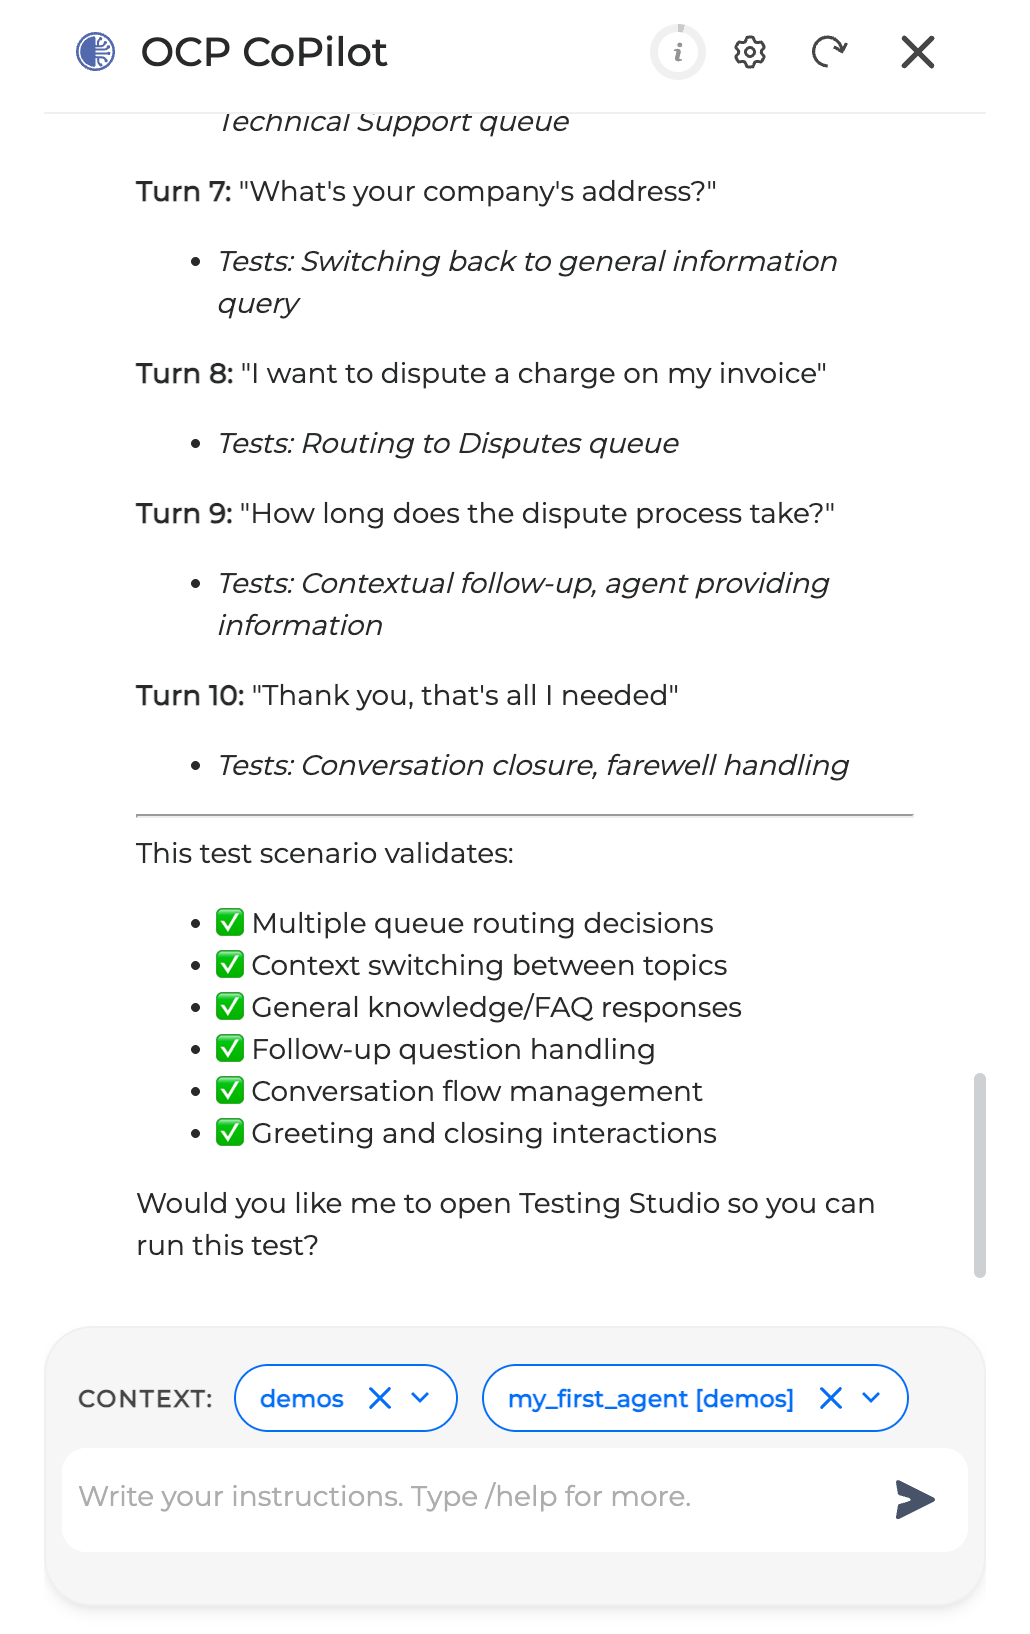
Similarly, you can prepare a test set for your General Inquiry Agent in combination with other Agents and so on. The most effective way is to create a mixed testing strategy, which involves combining different types of requests and actions within a single conversation, to validate whether your application behaves as expected end-to-end, both as a whole and as a combination of multiple agents.
Optional: You can ask CoPilot to generate a mixed testing strategy, for example:
Can you create a mix of queue routing and general enquiry agent scenarios that I can test in a single dialog?
Test Your Application and Agents Using Chat Simulator
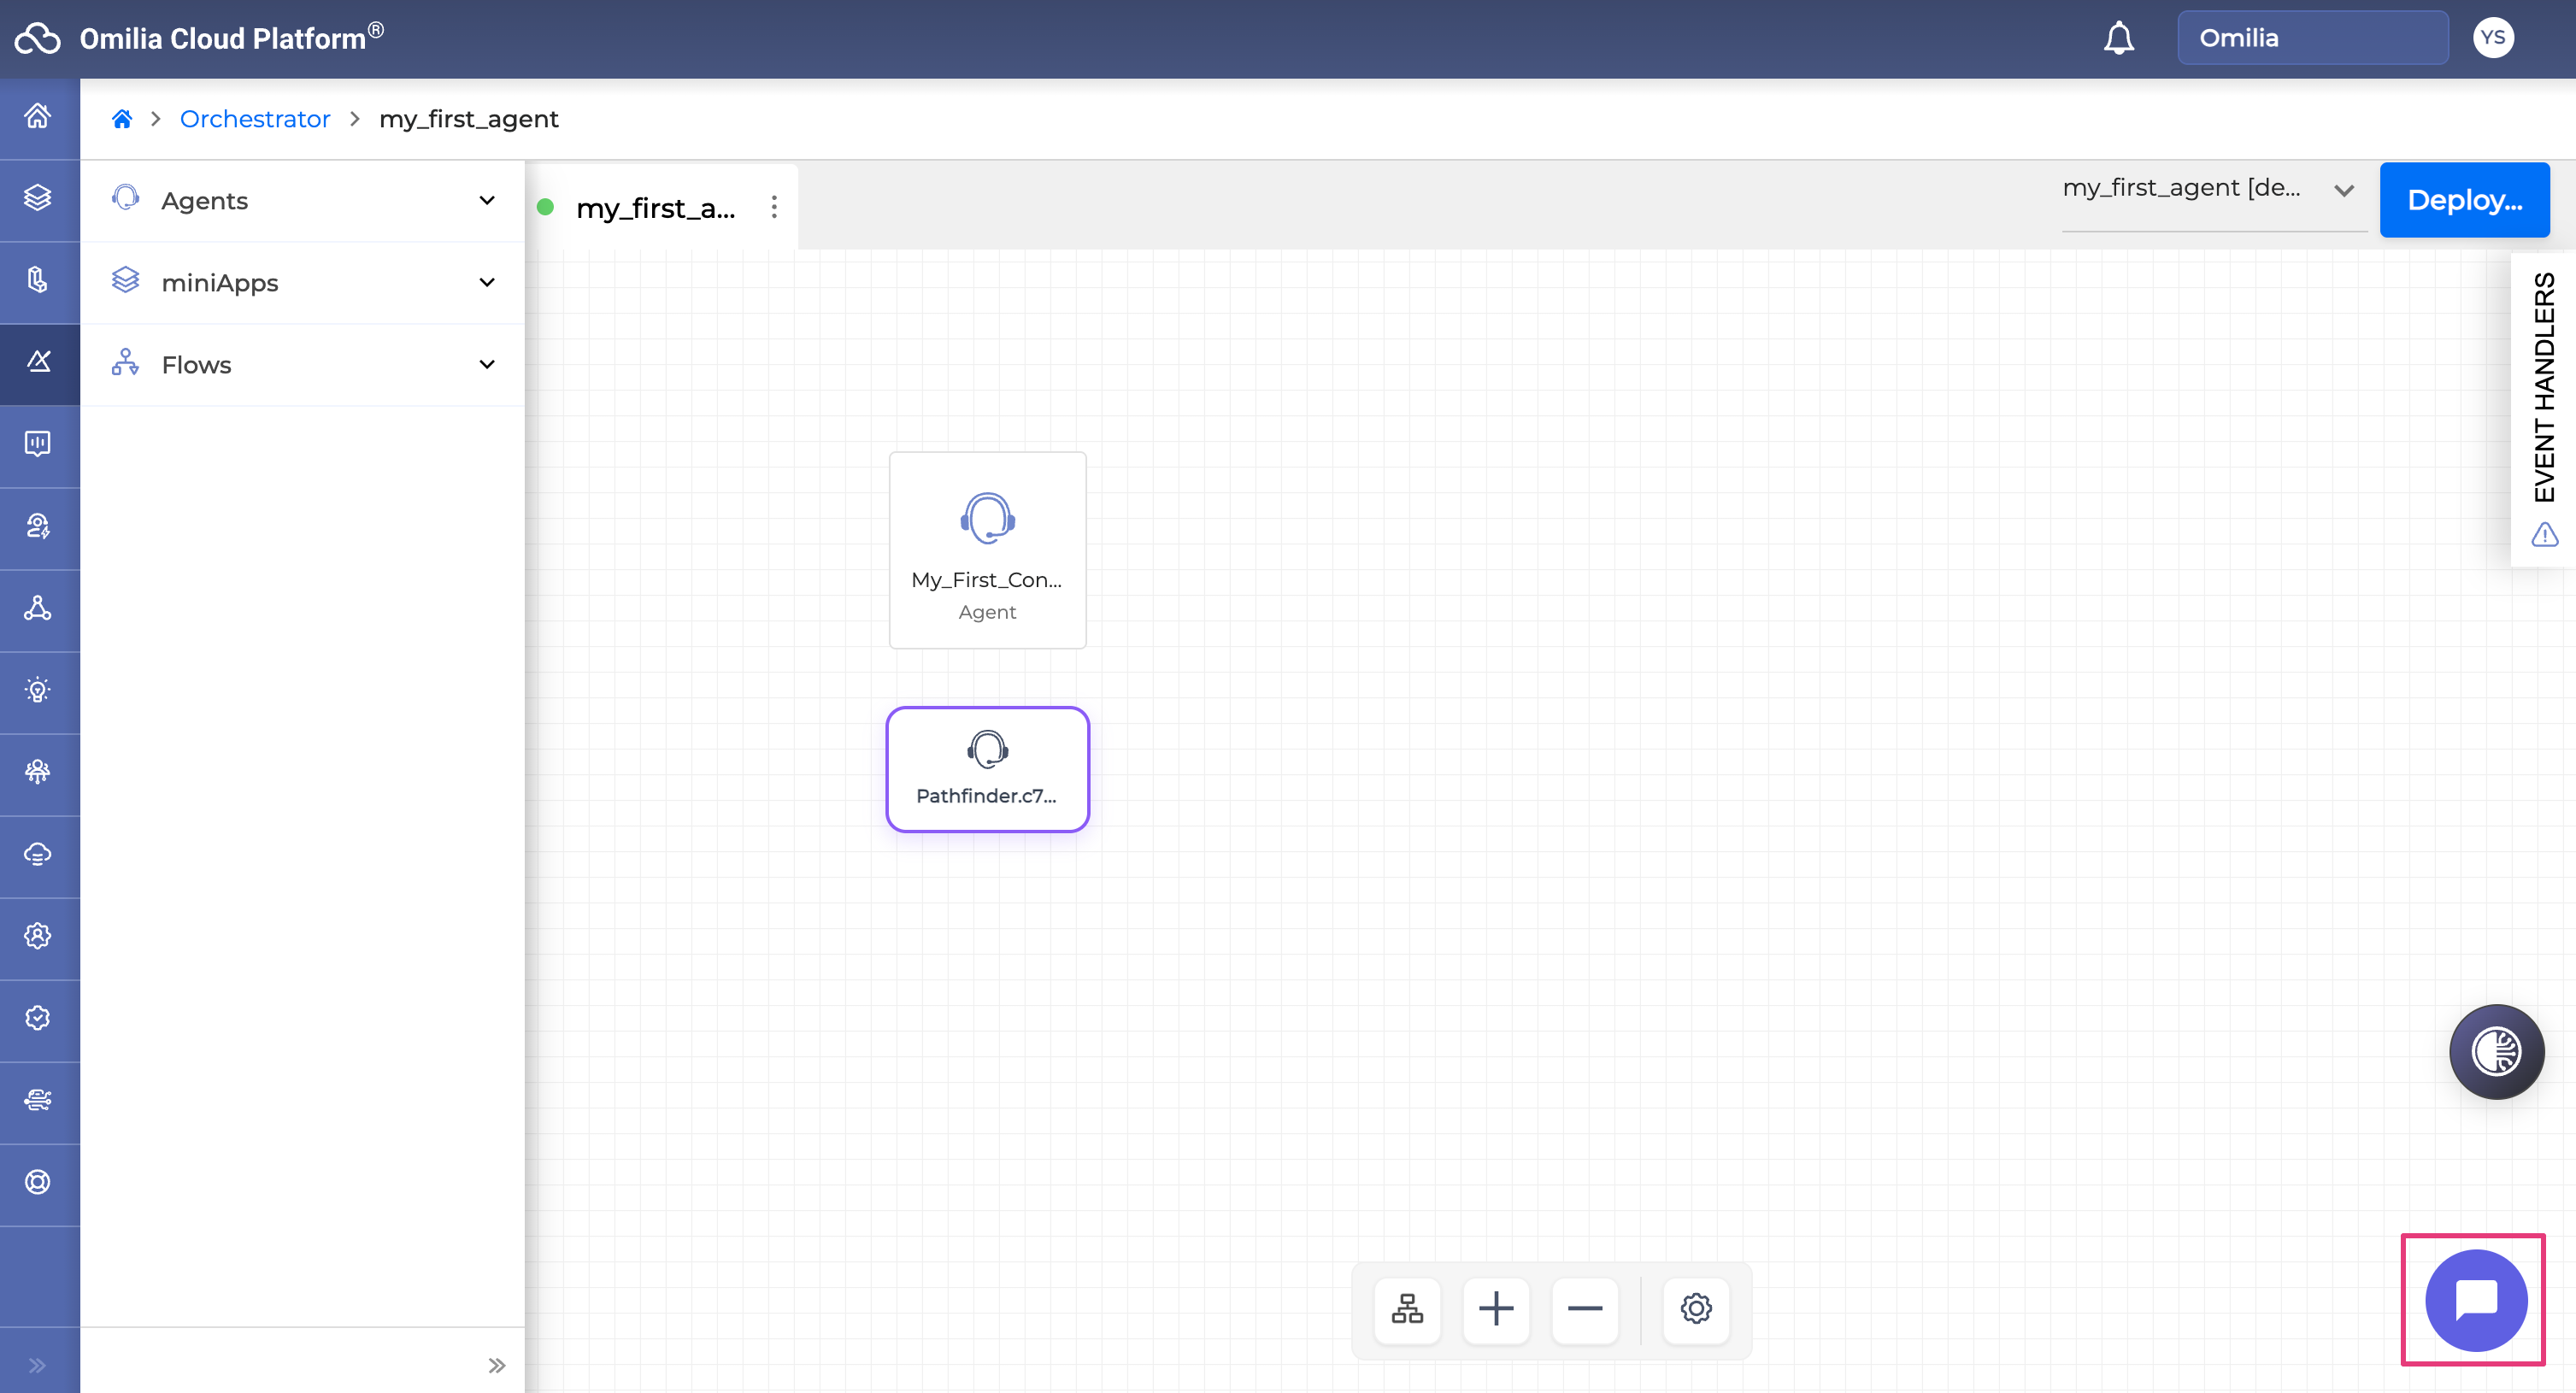
After successful deployment of your application and preparing your test set, you are ready to chat with your Agent using the chat simulator.
Note: Make sure you go back into Orchestrator, from the menu on the left, and select your project. You should have a similar view as shown below. Click on the chat simulator bubble in the bottom right corner and copy-paste or type in each of the utterances from your test set to simulate each dialog test scenario.
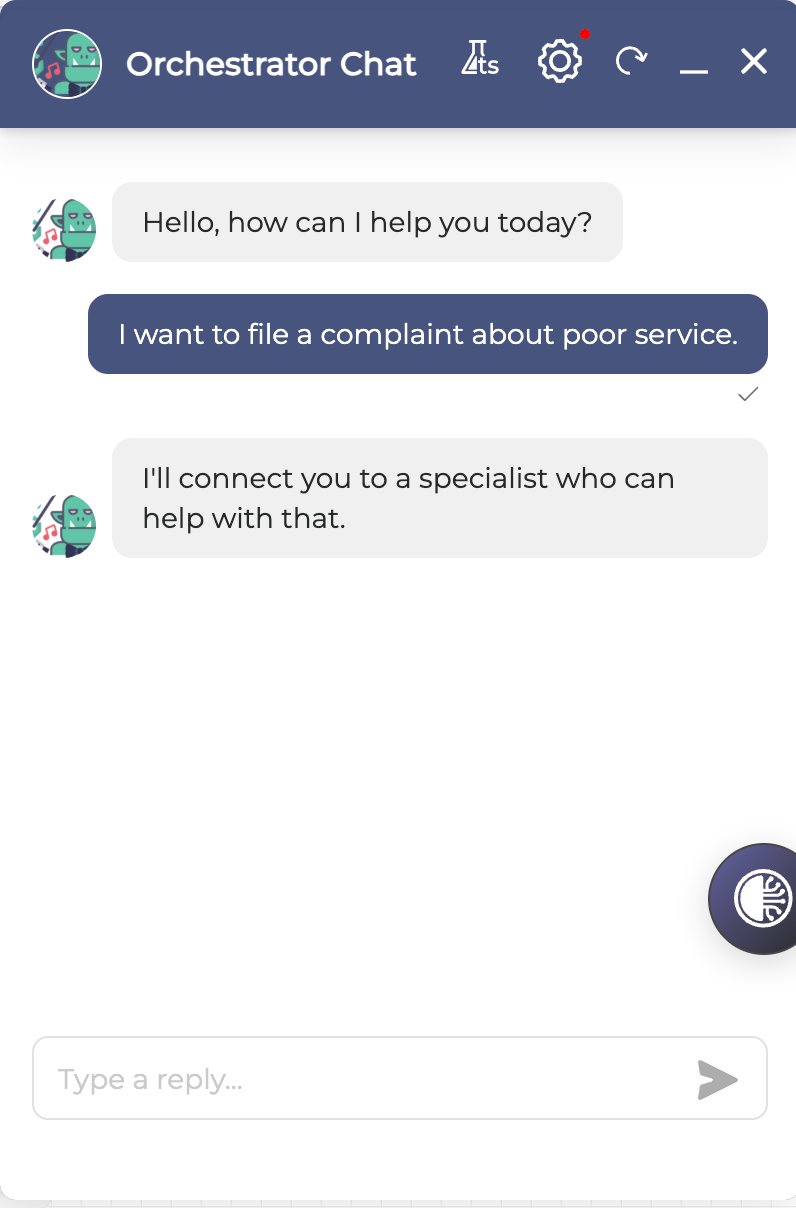
Example:
I want to file a complaint about poor service.
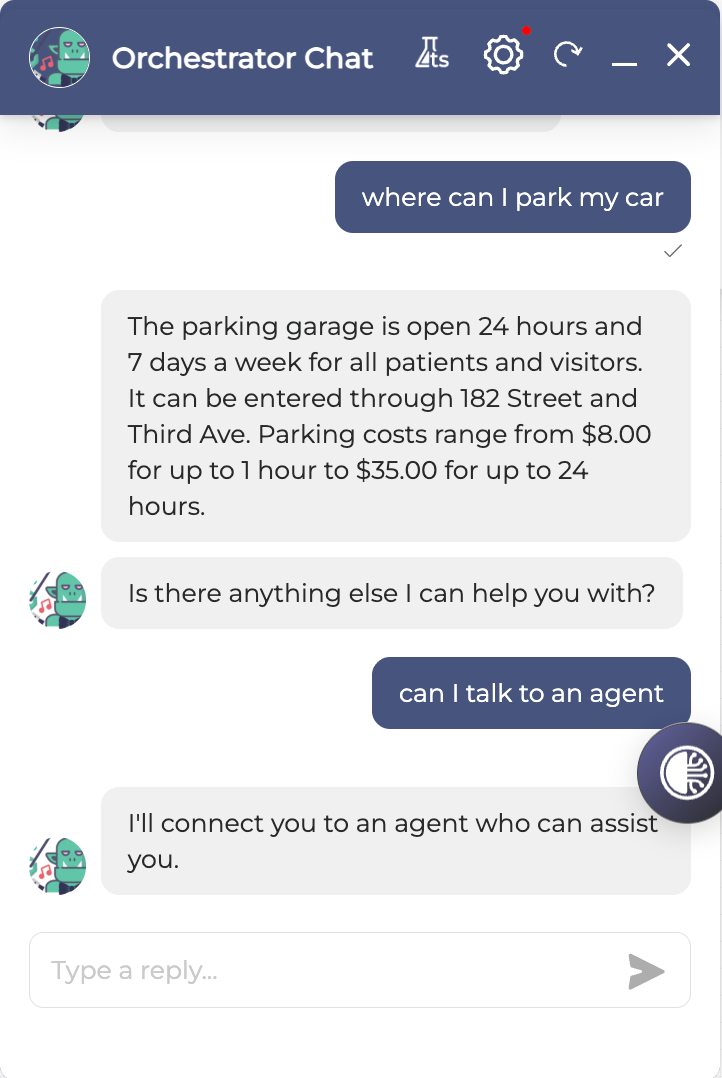
According to your test set, this corresponds to your Disputes Queue (ID: 791311), where the Agent should route your caller.
Already, you can see that your Agent mapped your caller’s request and routed them to a queue to take care of it. Success!
Navigate Monitoring Tool to Find and Review Your Call Simulations
Getting Around Monitor
Now that you have simulated a dialog in the chat simulator, you can find it and look into what your Agent is doing while having this simulated conversation.
From the menu on the left, navigate to the Insights tab and then to the Monitor tab. You should see a similar view to the one below.

For full information on Monitor, please read the OCP Monitor User Guide.
The Monitor tab is divided into three main components:
-
Search filter (top)
-
Dialog list (left)
-
Dialog review (right)
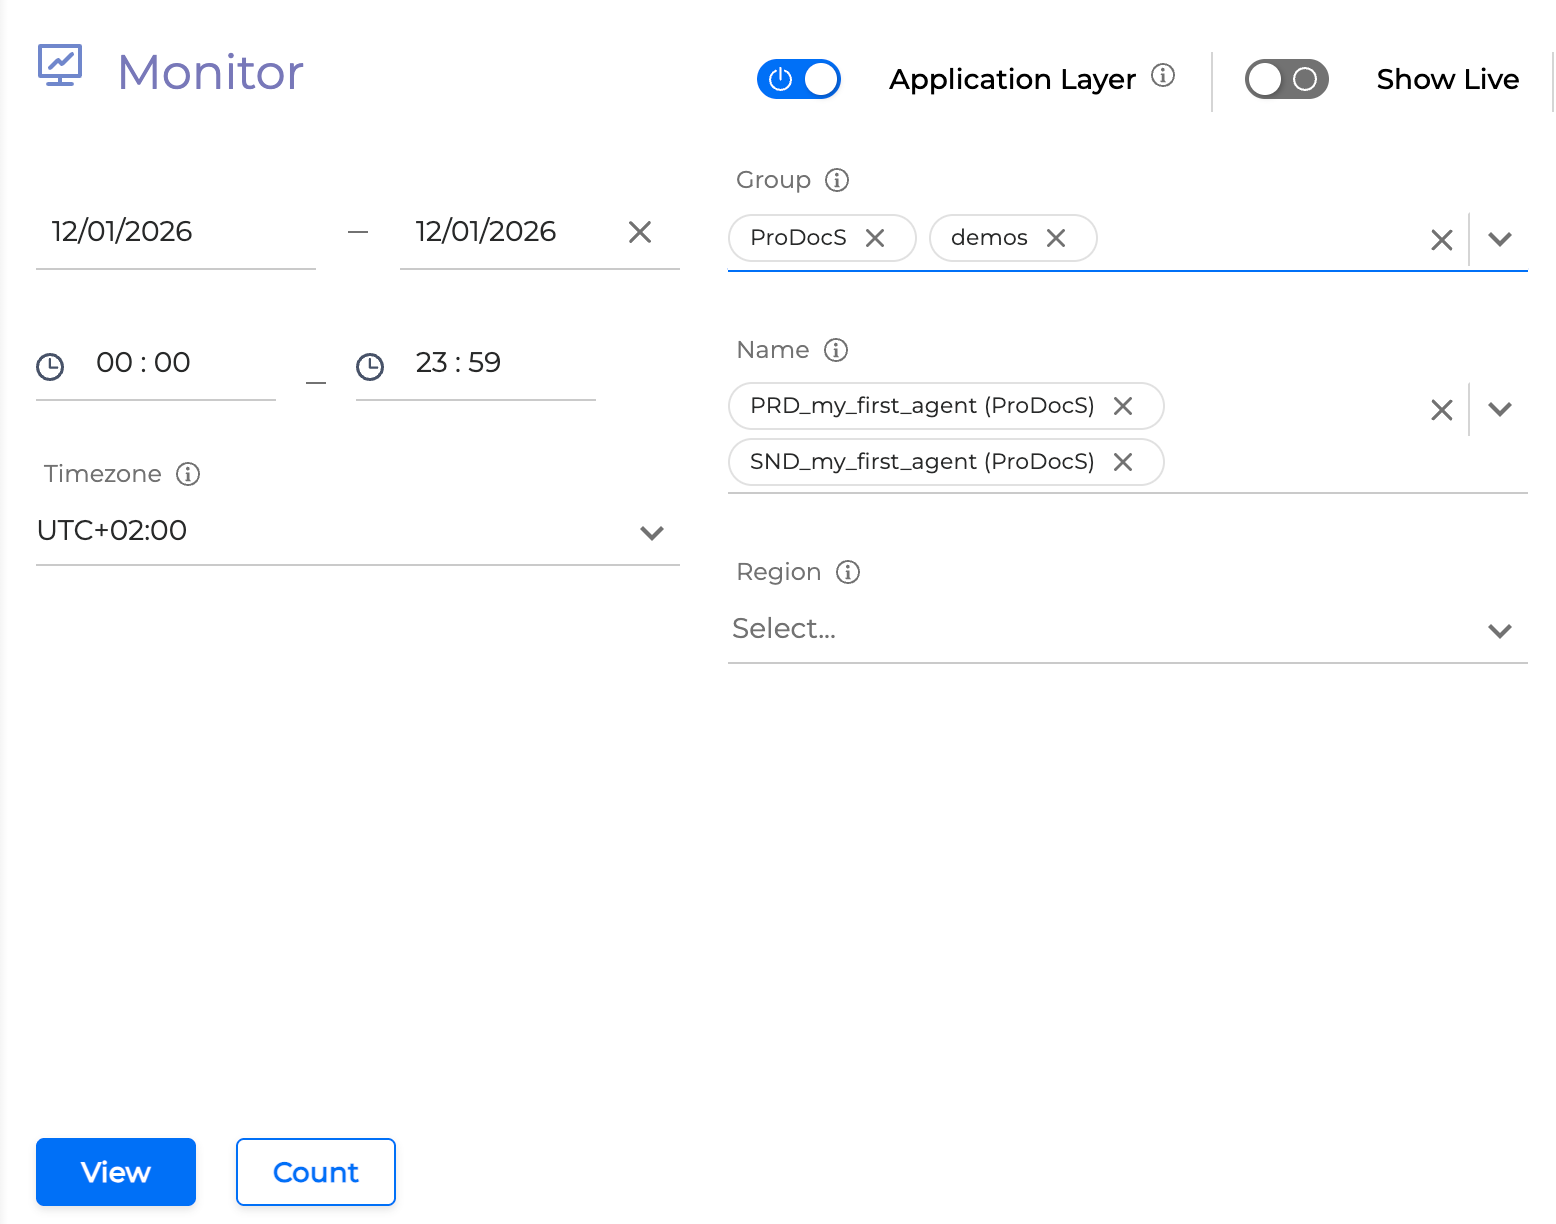
Filter to Find Your Dialog Simulations
Filter your view to only see a list of past dialogs, simulated and real, that correspond to your Agent application and group.
-
Click the filter icon

-
Search and select your Group from the drop-down, for example: Demos.
-
Optional: If you have many projects (applications), you can search and select the Name of your project (application). Example: My_First_Agent (Demos). Ignore the different prefixes “PRD” and “SND” for now and select both.
-
Hit the View button in the bottom left corner.
Review Your Dialog Simulations and Determine the Test Results
-
Start by finding and selecting your simulated dialog from the left pane, and click on it. You should be able to see the dialog steps and information in the right pane.
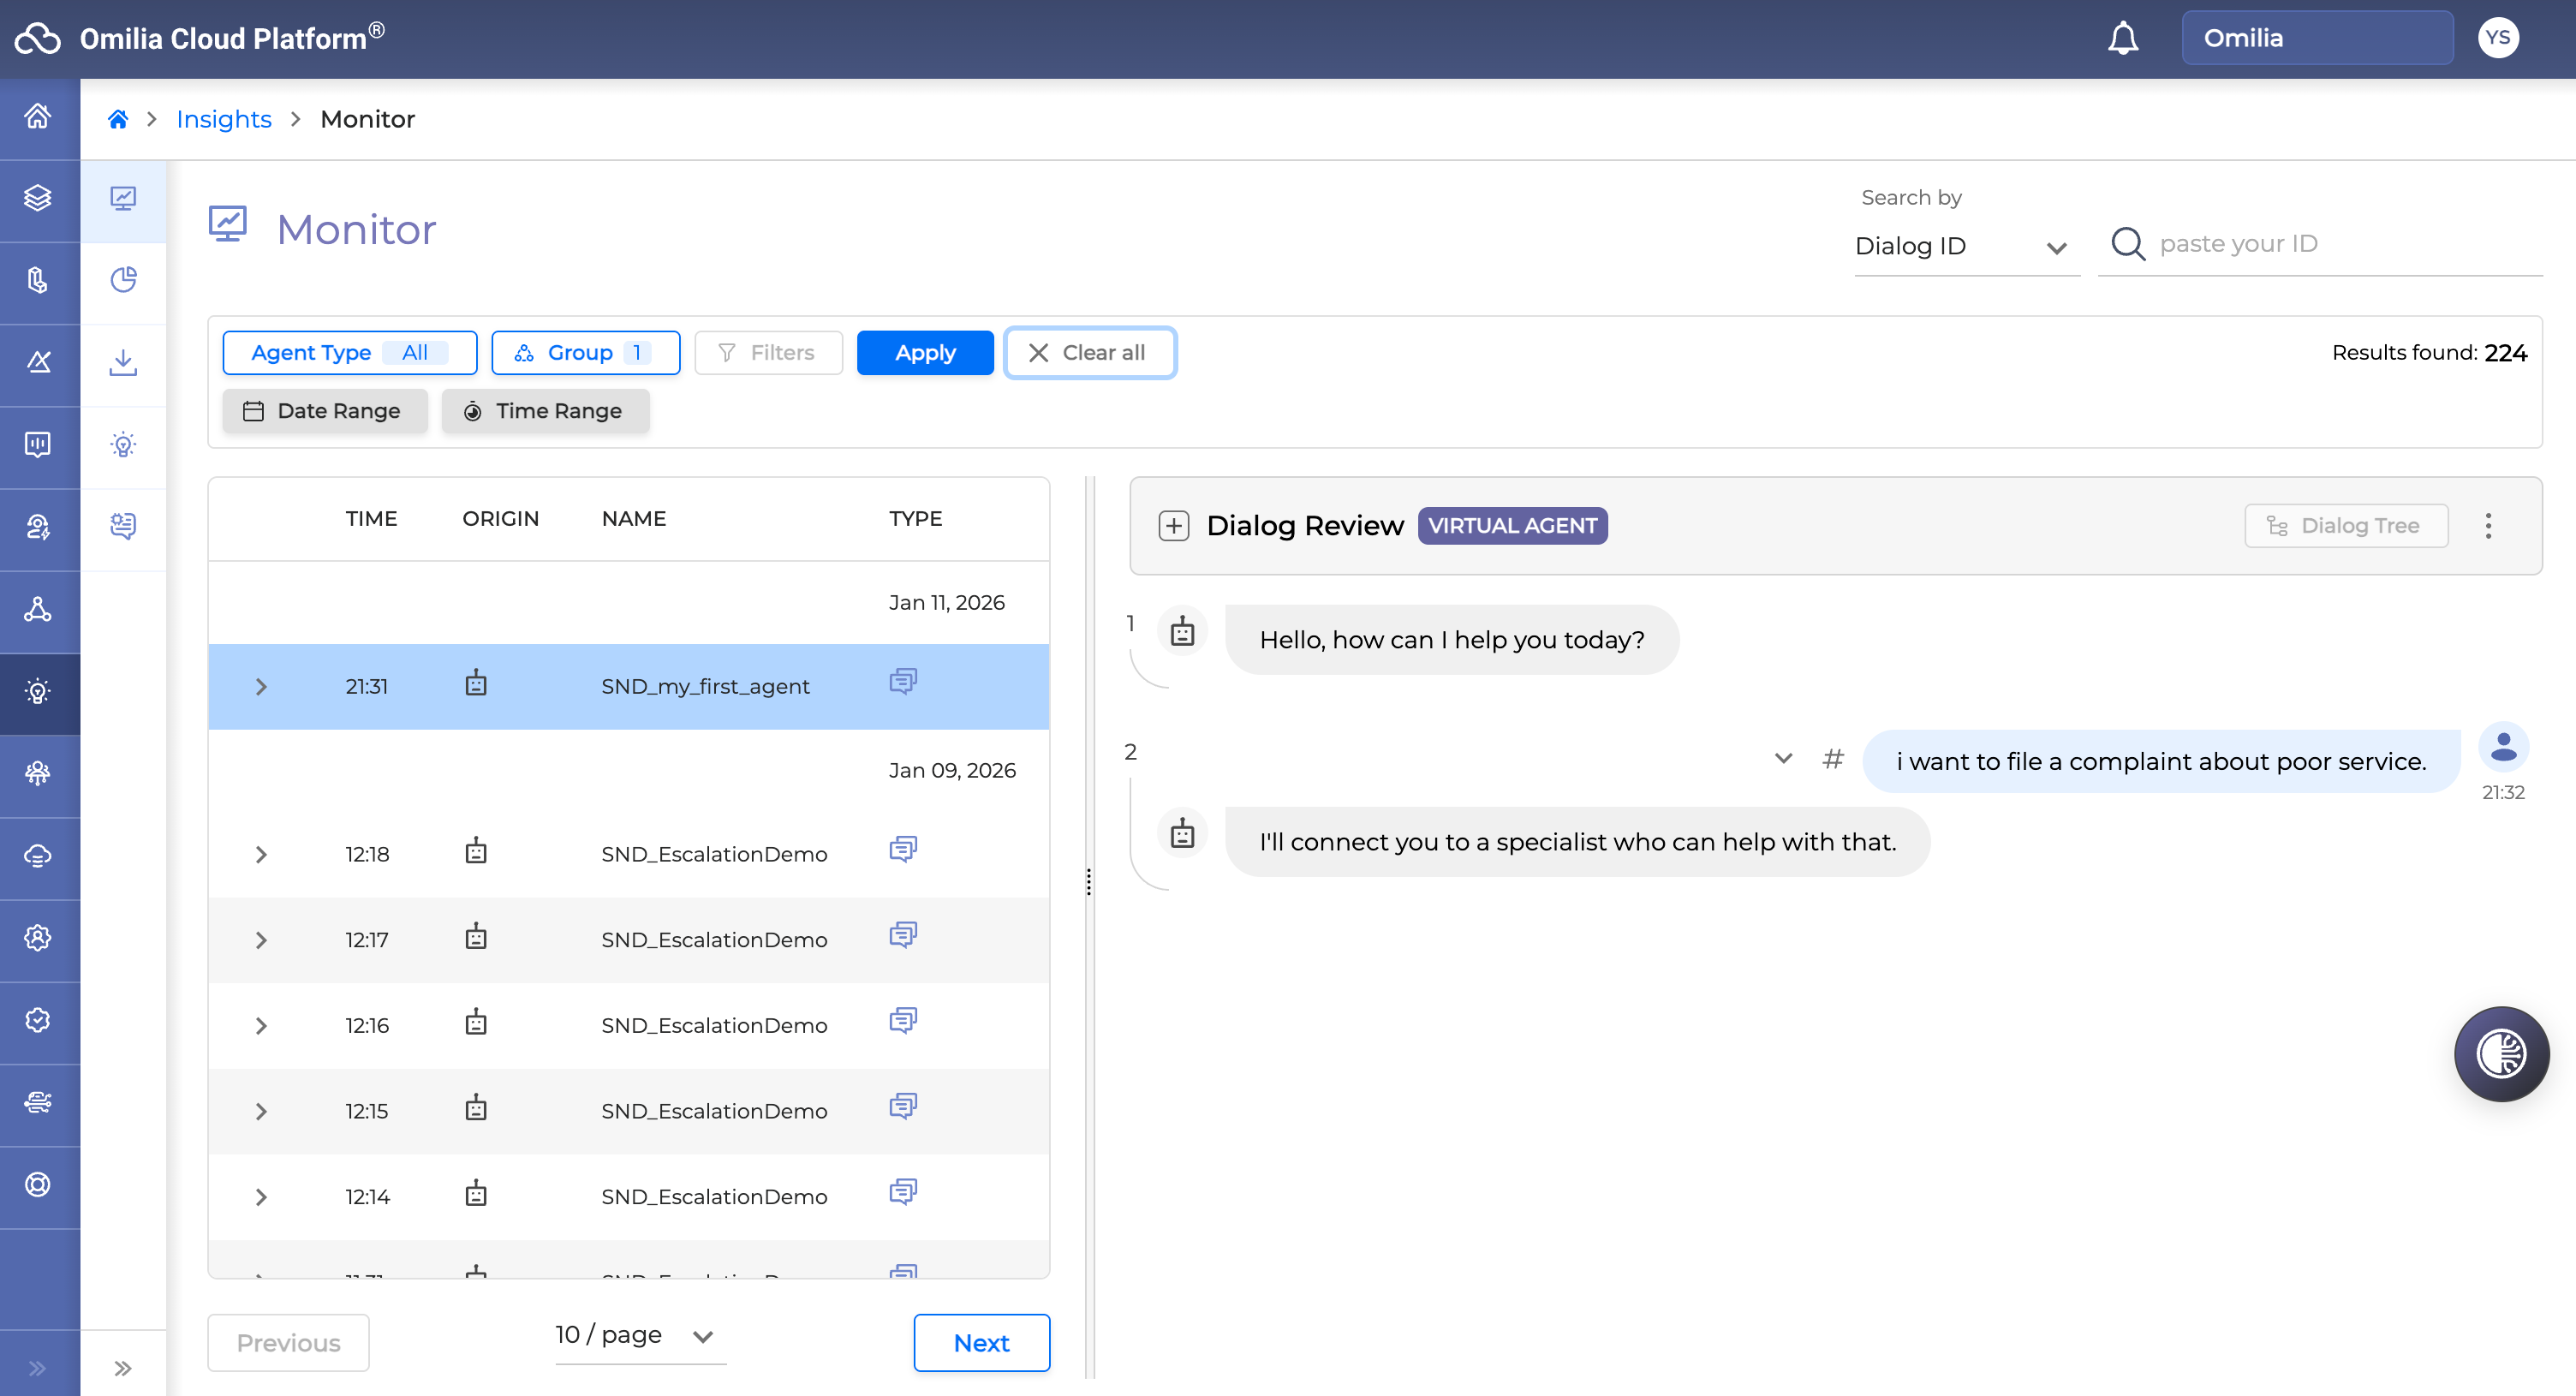
In our example, I want to file a complaint about poor service, with an expected routing to the disputes queue with the ID: 791311. -
Click the Log File icon on the right pane. A new browser tab will open featuring the DiaManT Logs, as shown below. These represent the background system steps, actions, and results that took place during a given dialog.
-
Scroll towards the bottom of the logs list and find the log “Extension value is:..”. This is your Queue ID.
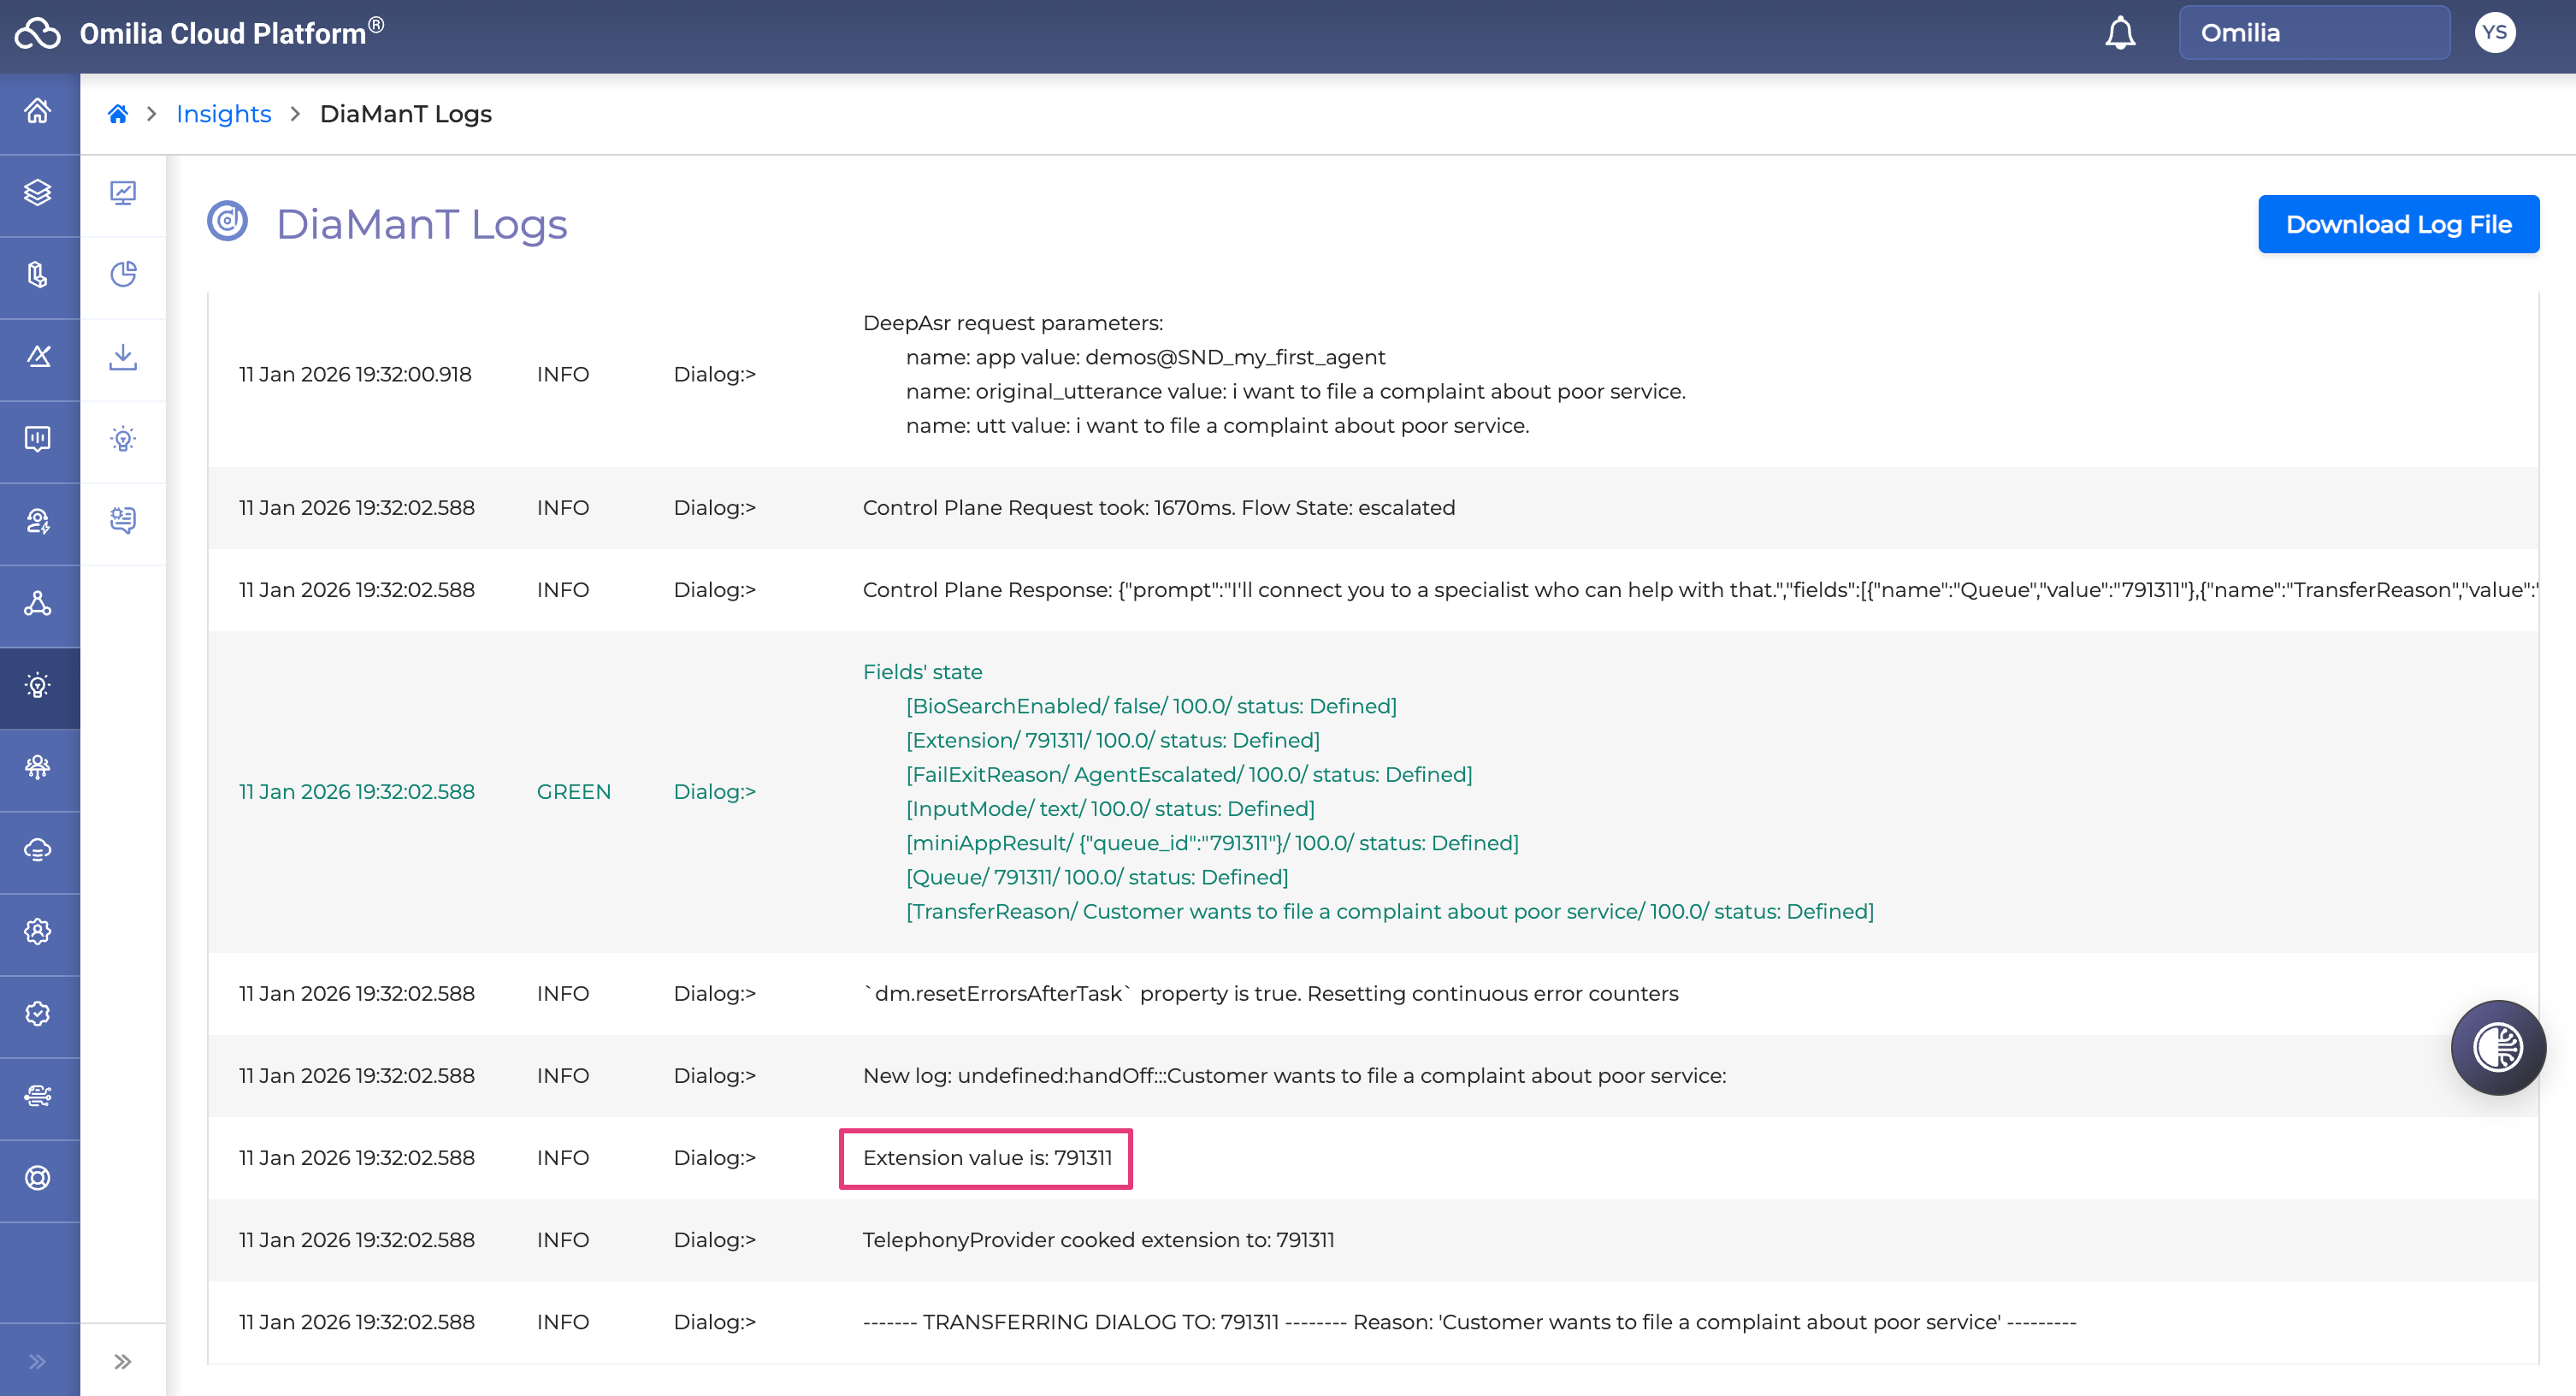
-
Validate whether the presented value of the Queue ID matches the expected value from your test set before. In our example, it is a success! This means that your Concierge Agent correctly routed your caller to the Disputes Queue with the ID: 791311.
In case it doesn’t match, then you can see which other queue it routed to (from the ID value) and investigate accordingly later. Take note in your test suite. -
For voice call tests: One more factor to consider is whether your agent correctly captured the utterances that the caller meant to say or not, before it selected a queue to route to, or any error. You can easily see this already from the Monitor Dialog Review tab by looking at the dialog transcripts.
Now, you can repeat for the rest of your simulations.
Test Your Application with Real-Time Calls (Voice)
In the same manner that you have been testing your application and agents using the chat simulator, you can test them by placing real-time calls from your phone or the VoIP system.
Make sure you are in a quiet environment and using appropriate equipment to allow for effective results when placing your call.
Navigate to the Integrations tab in the main OCP menu (on the left).
The Numbers control panel is a multi-task tool designed to streamline the management and configuration of your telephone numbers and number sets. The Numbers control panel is accessible under the Integrations tab.

When a number is attached to an application, the application will be used when this number is called. You just need to attach a number to your application and call it in to start testing.
If you don’t have a number, you will have to get one first, following the All Numbers Tab | Get Number guide.
-
Select a number you want to attach to an application and click the Attach/Re-Attach button. You can select multiple numbers.
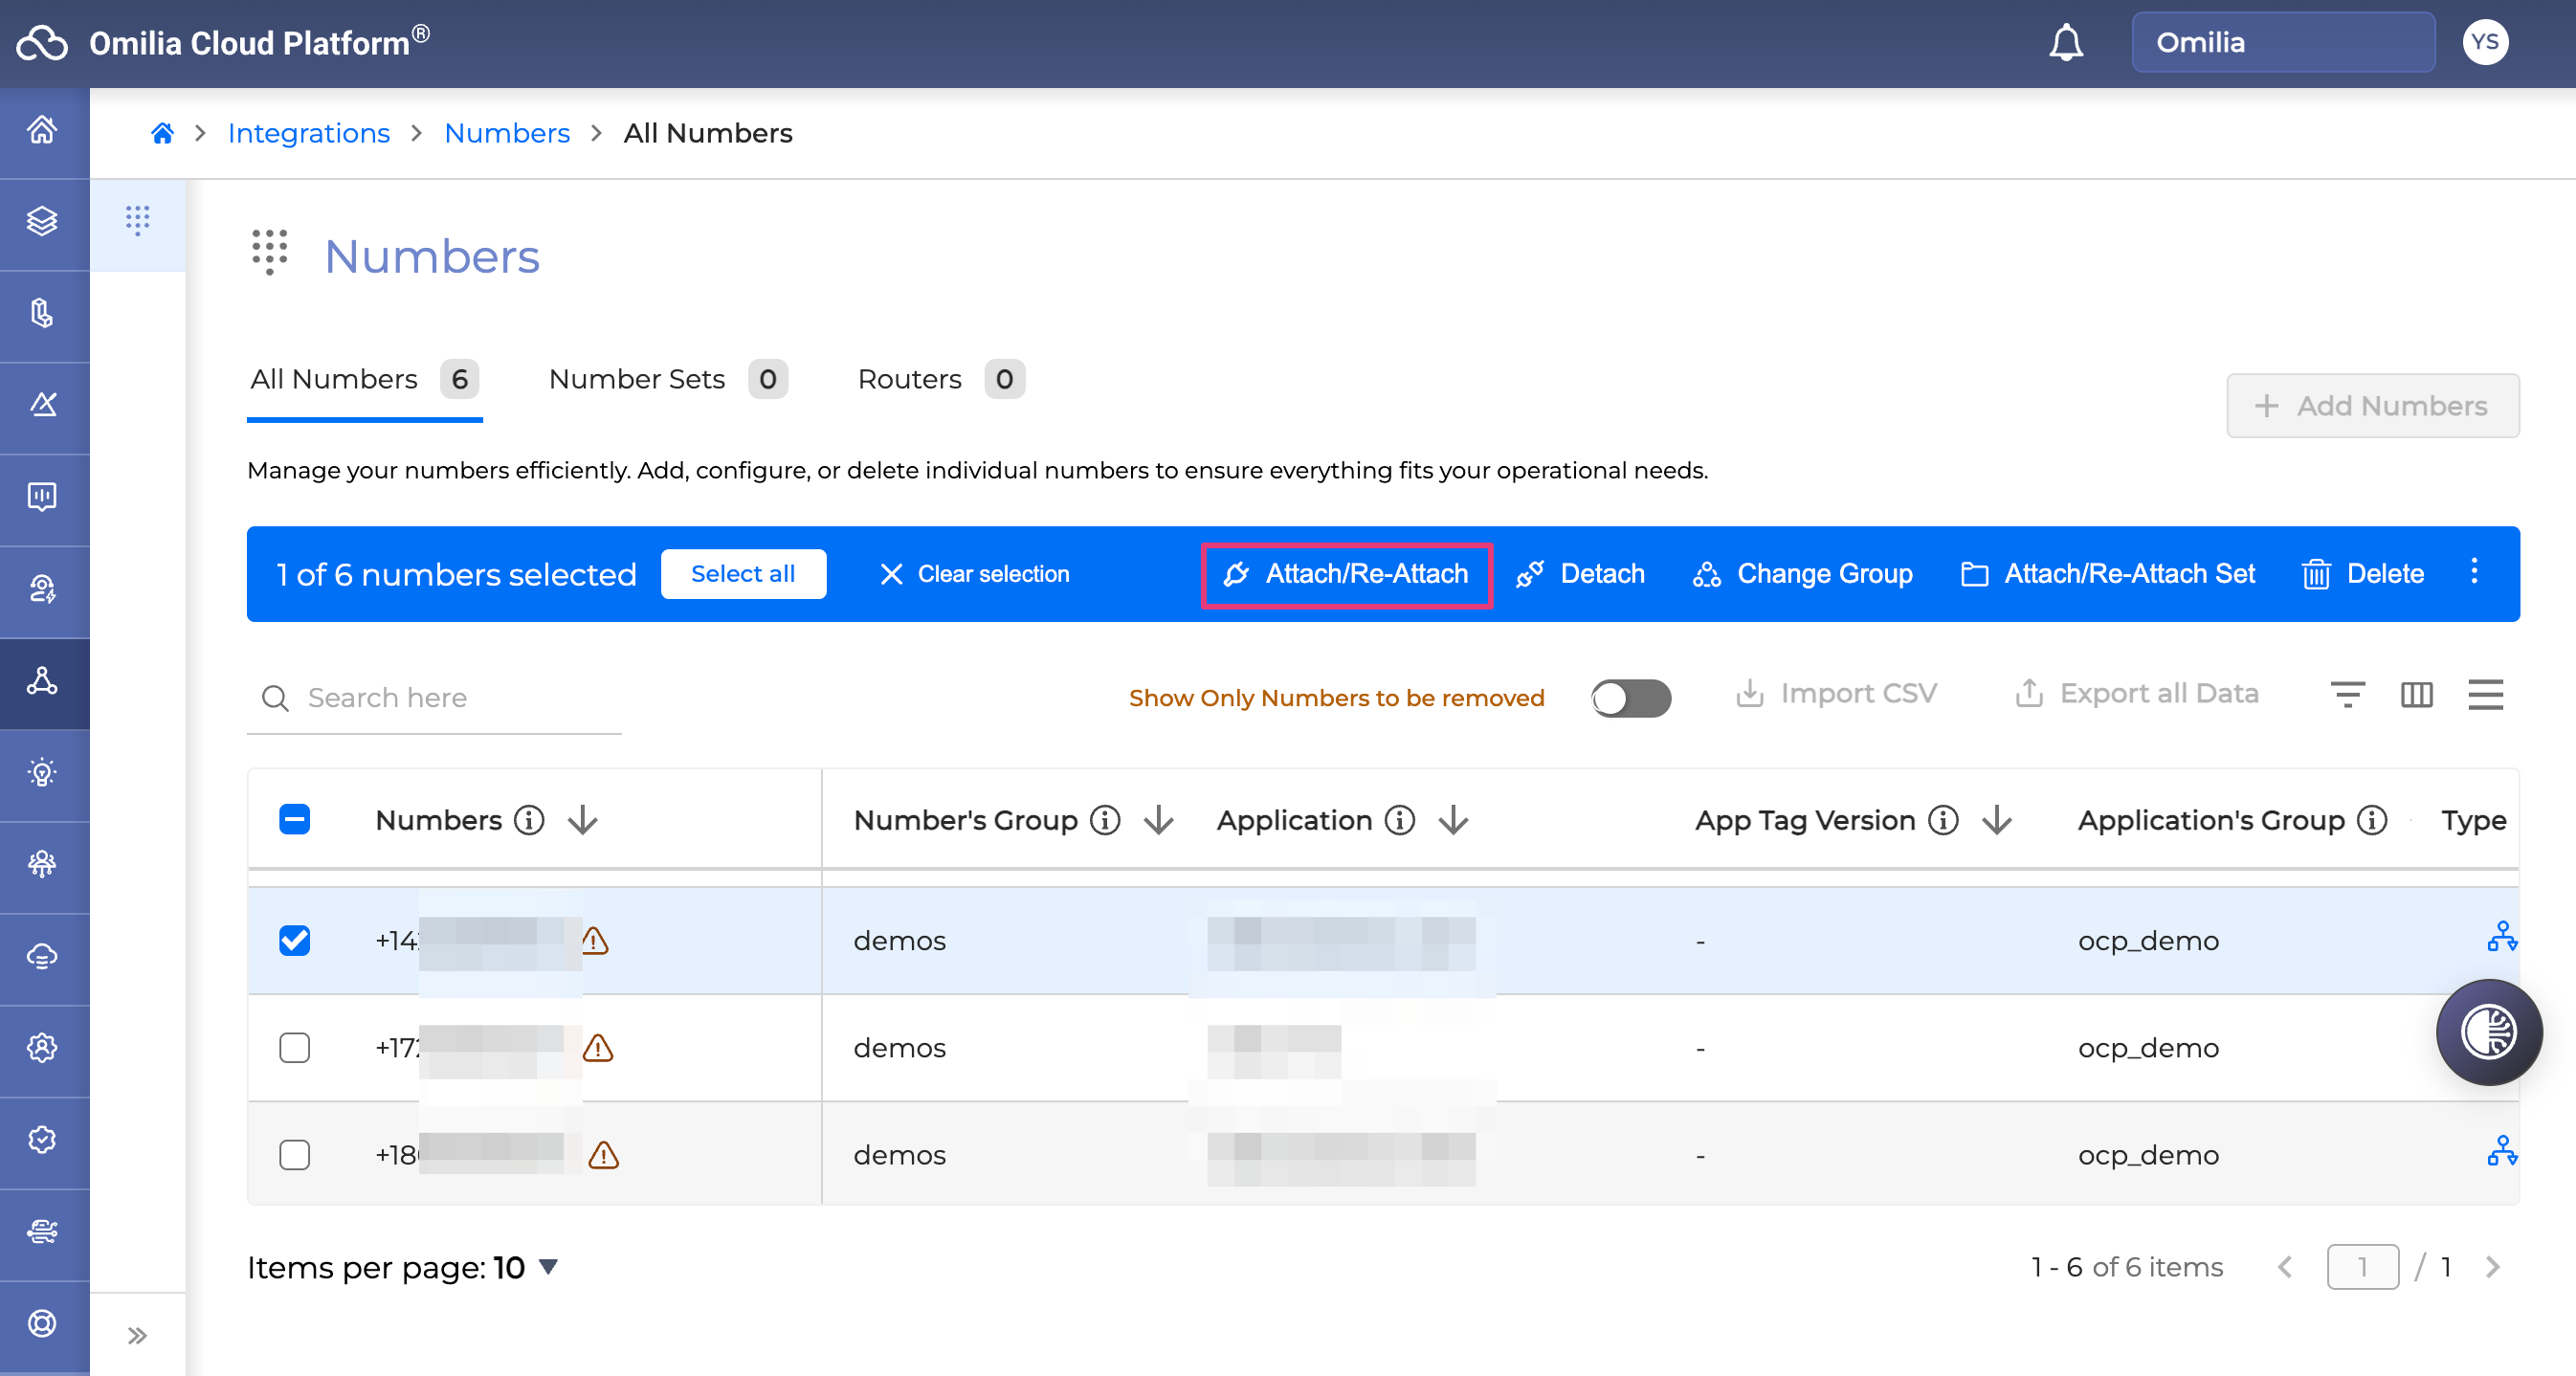
-
In the opened dialog box, fill in the fields as described below:
-
MiniApp: Select your application name from the dropdown list. (Example: My_First_Agent) Ignore the prefixes PRD and SND for the purposes of testing. These refer to sandbox (SND), meaning UAT, and production (PRD) environments where your agent application resides.
-
Tag version: Optional. Ignore it.
-
Locale: Please select applicable language and region (default example: en-US).
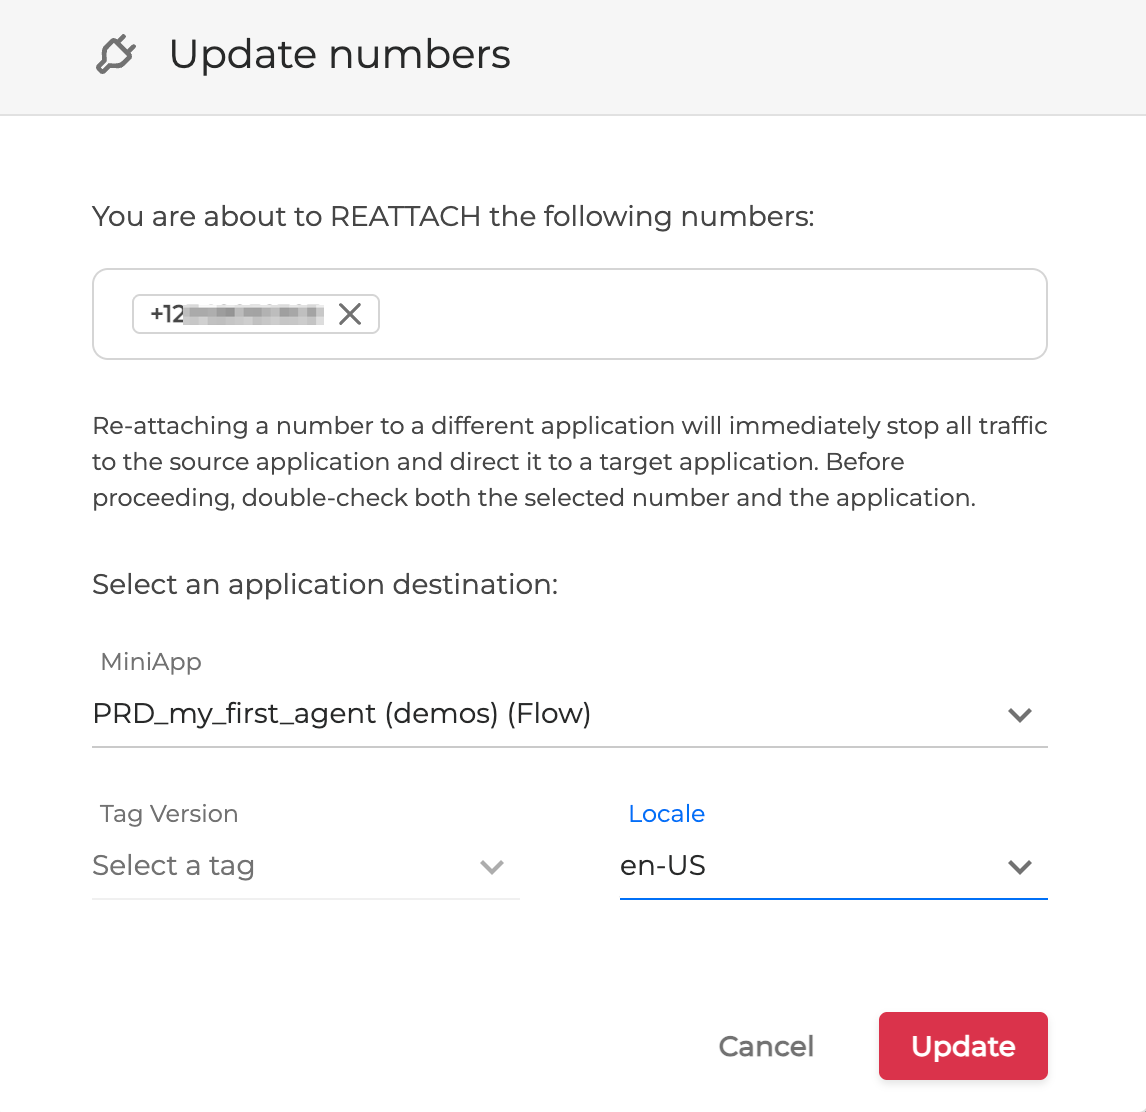
-
-
Click the Update button to complete the action. The selected number has been attached to the application. Refresh, and you are good to call this number and interact with your agent.
6. Automation Agents - Continuous Learning
OCP Automation Agents transform First Call Resolution into AI Agents. Our system continuously learns from your real customer interactions - either by listening directly in the contact centre or by processing uploaded audio - and turns that expertise into stronger AI agents over time.
OCP Automation Agents