Overview
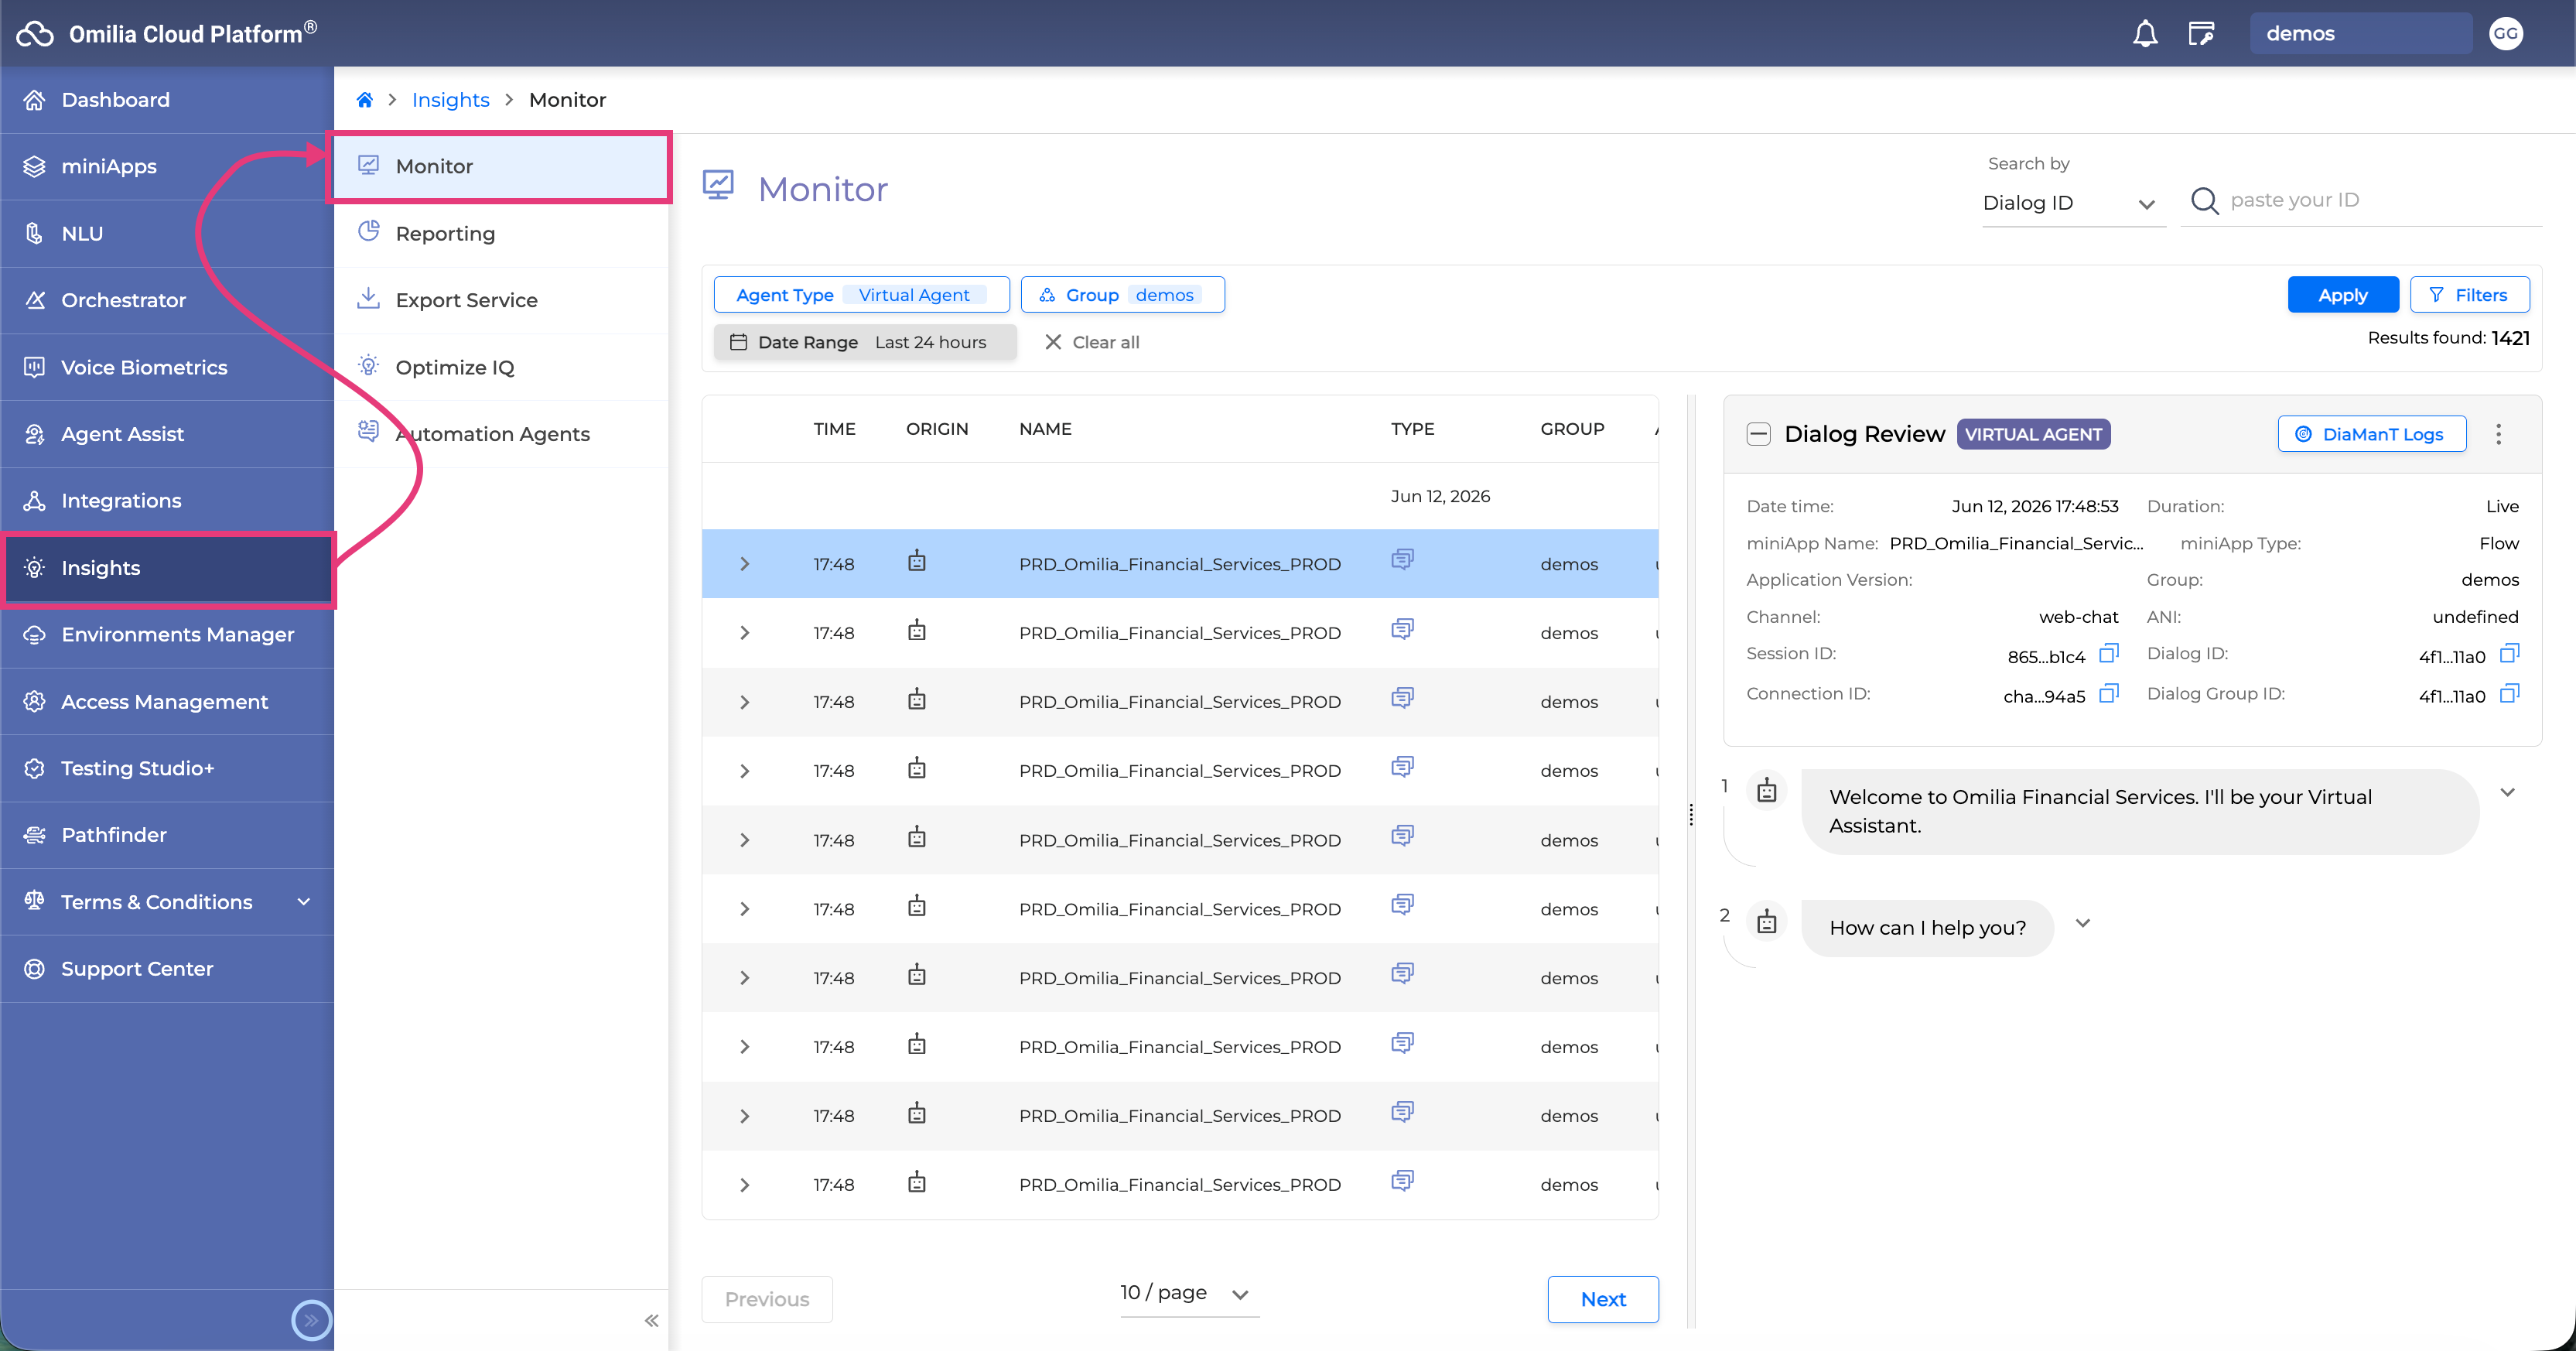
OCP® Monitor is the portal to understanding every detail of system-user interaction. This tool allows the user to drill down into any conversation occurring within an OCP® application. This involves Orchestrator application dialogs, Flows, and miniApp invocations originating from calls or web chats.
To access OCP® Monitor, go to Insights → Monitor in the side panel.
Monitor Components
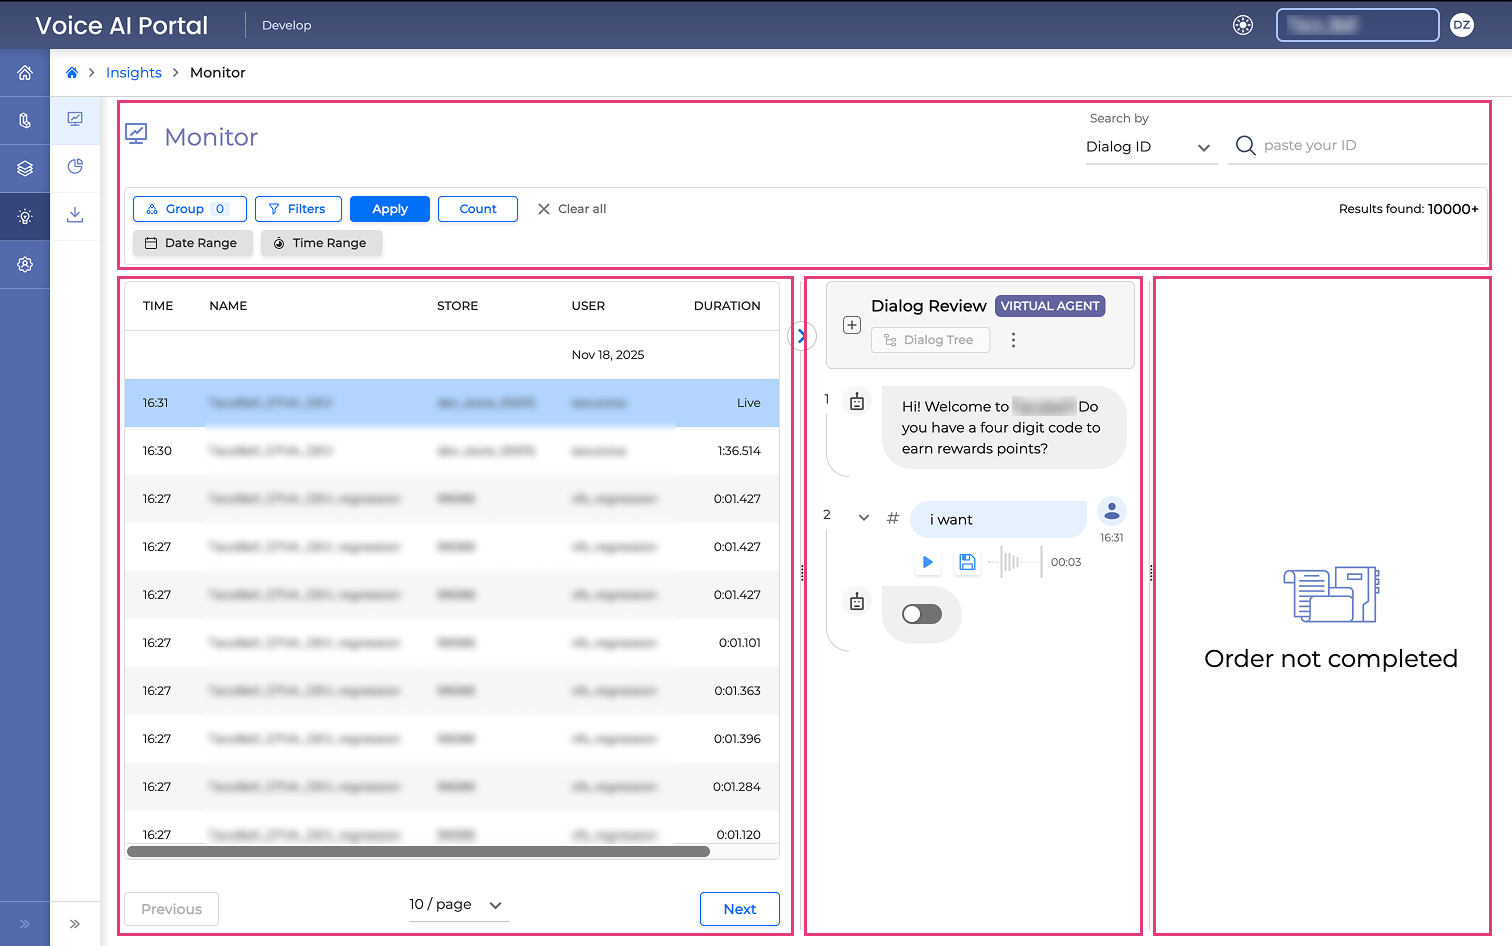
The Monitor tab is divided into three main components:
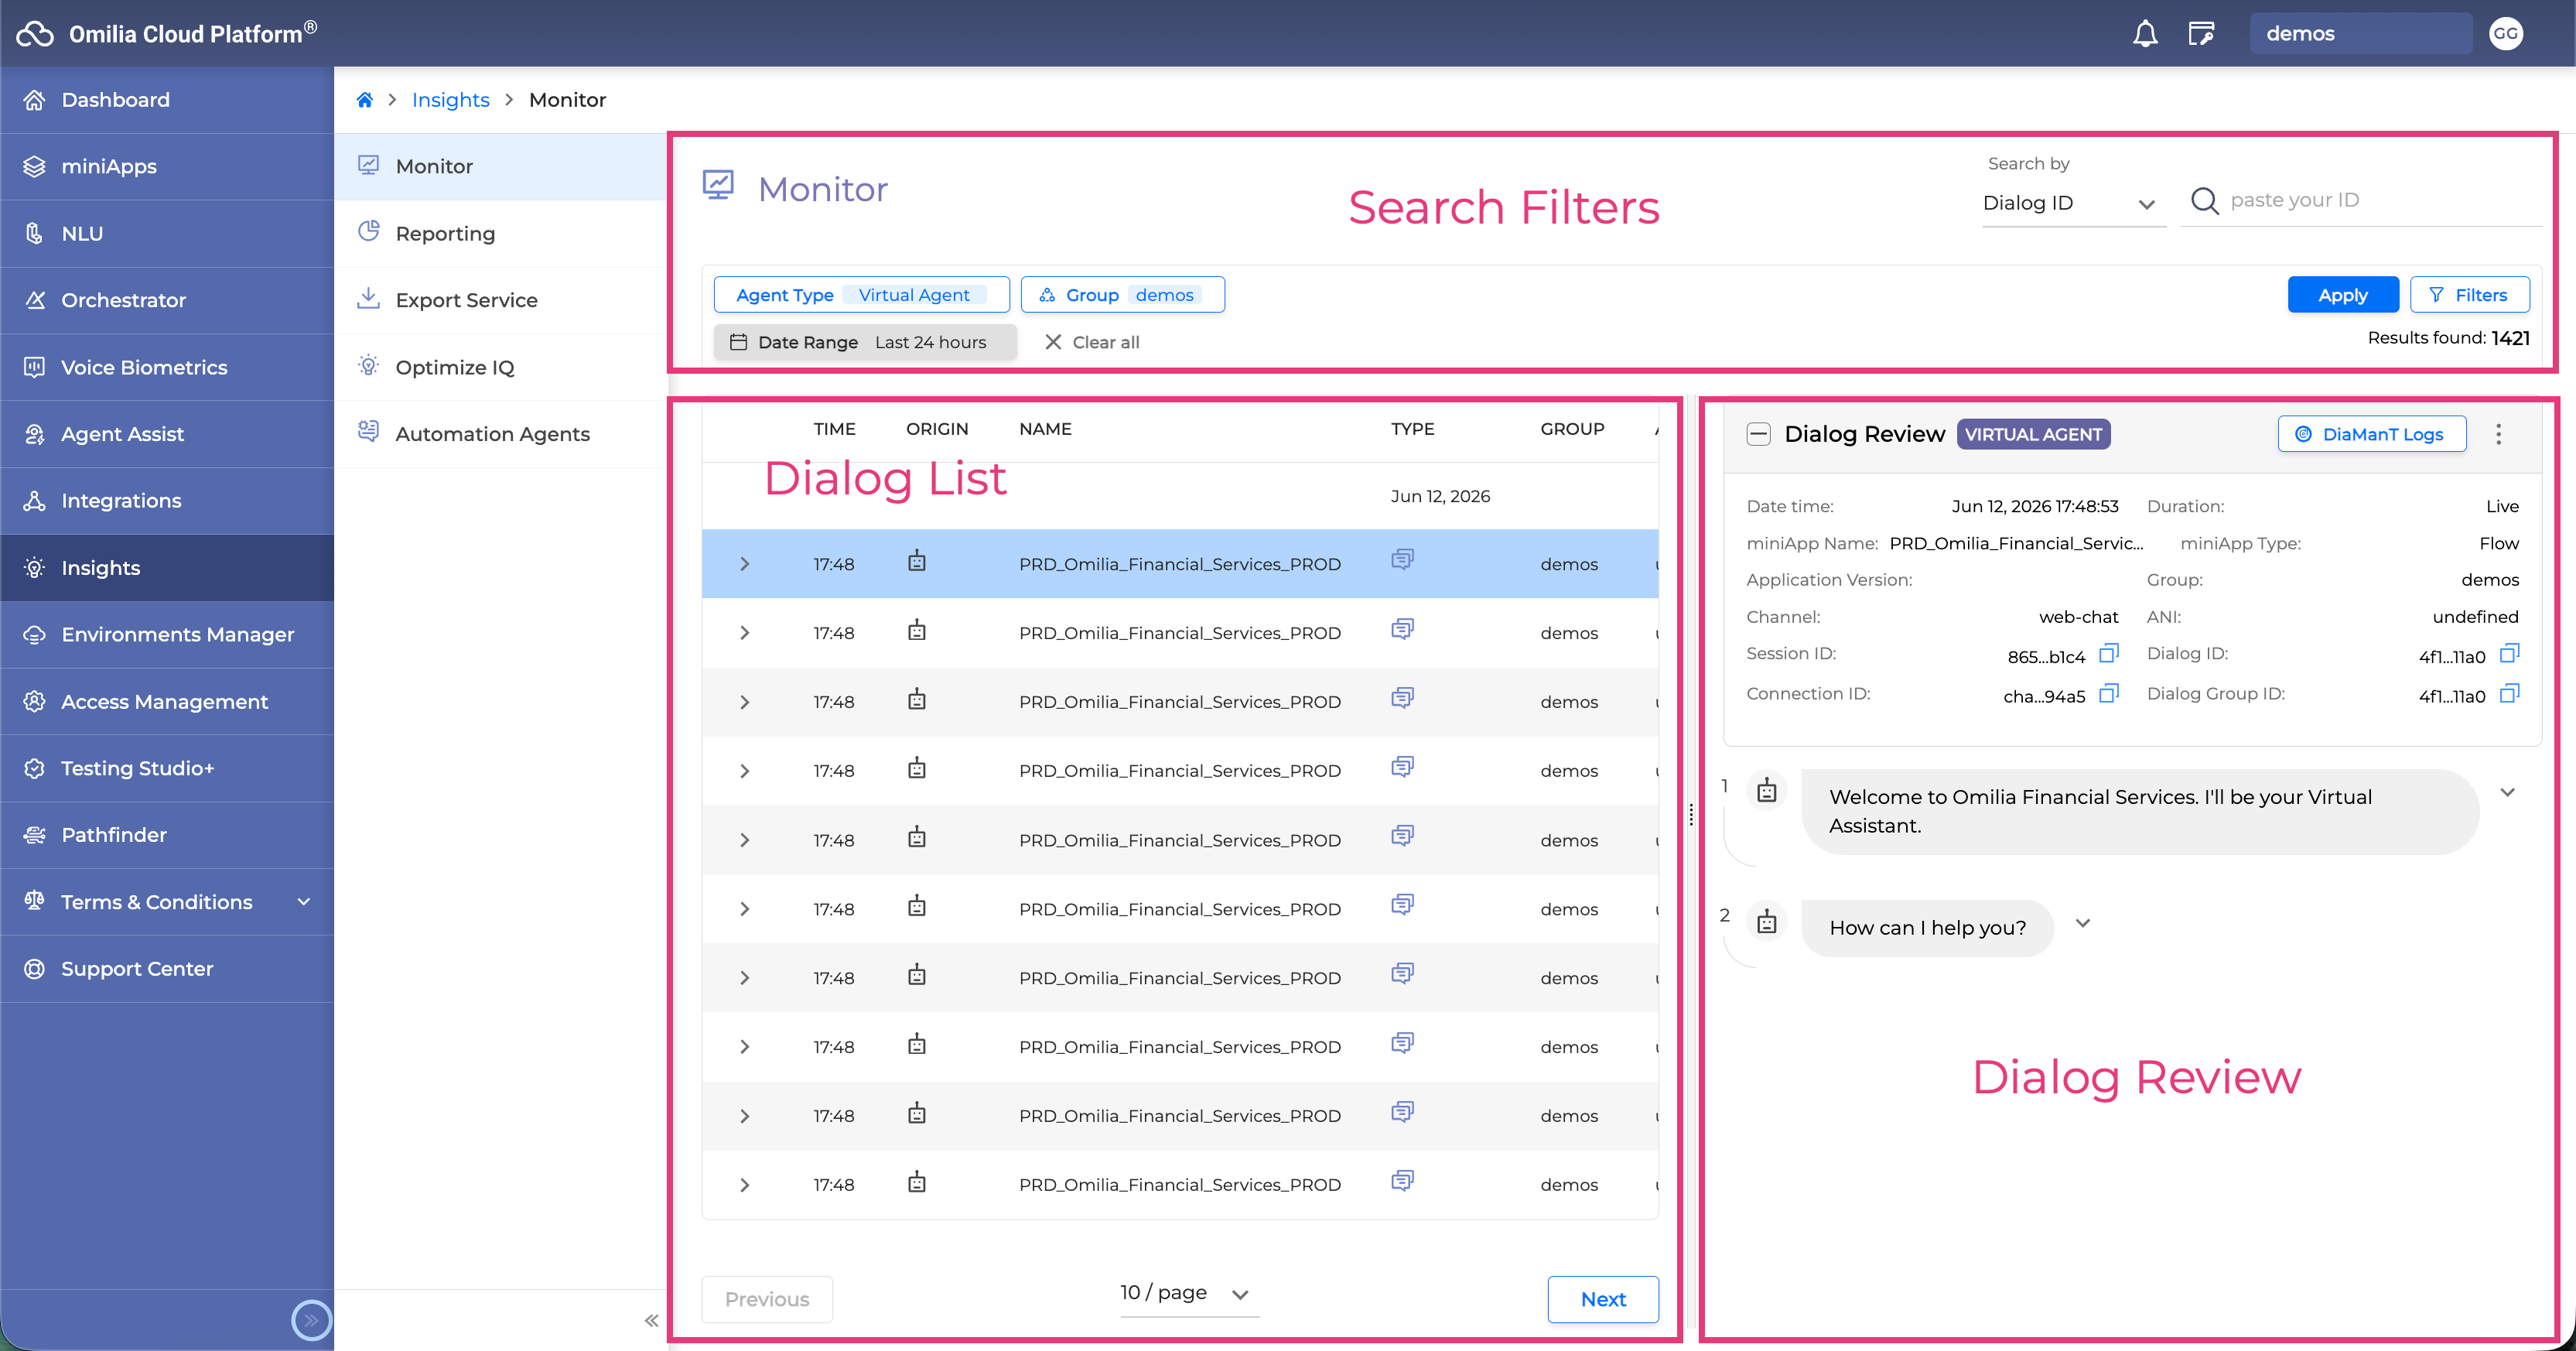
In the next sections, you can find detailed explanations for each of the components.
Search Filter
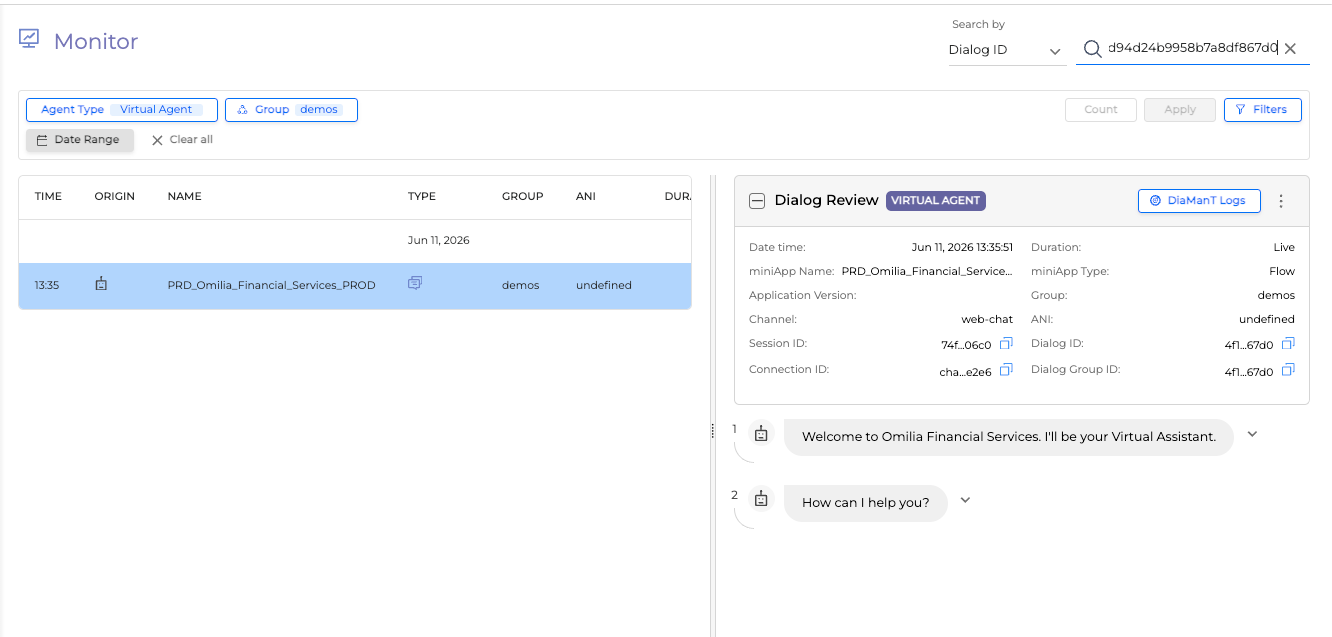
The search filter allows you to restrict and refine the dialog search according to the selected criteria.
It is possible to search for all the dialog sessions that match the selected criteria or to select one particular dialog session.
-
For a quick search, select one of the Search by criteria and paste its ID into the ID search field:
-
Dialog ID
-
Session ID (Available only for Virtual Agent)
-
Connection ID
-
Searching by Dialog ID, Session ID and Connection ID ignores all other filters if selected.
-
To search for all the dialog sessions that match the selected criteria, choose the criteria and click the Apply icon.
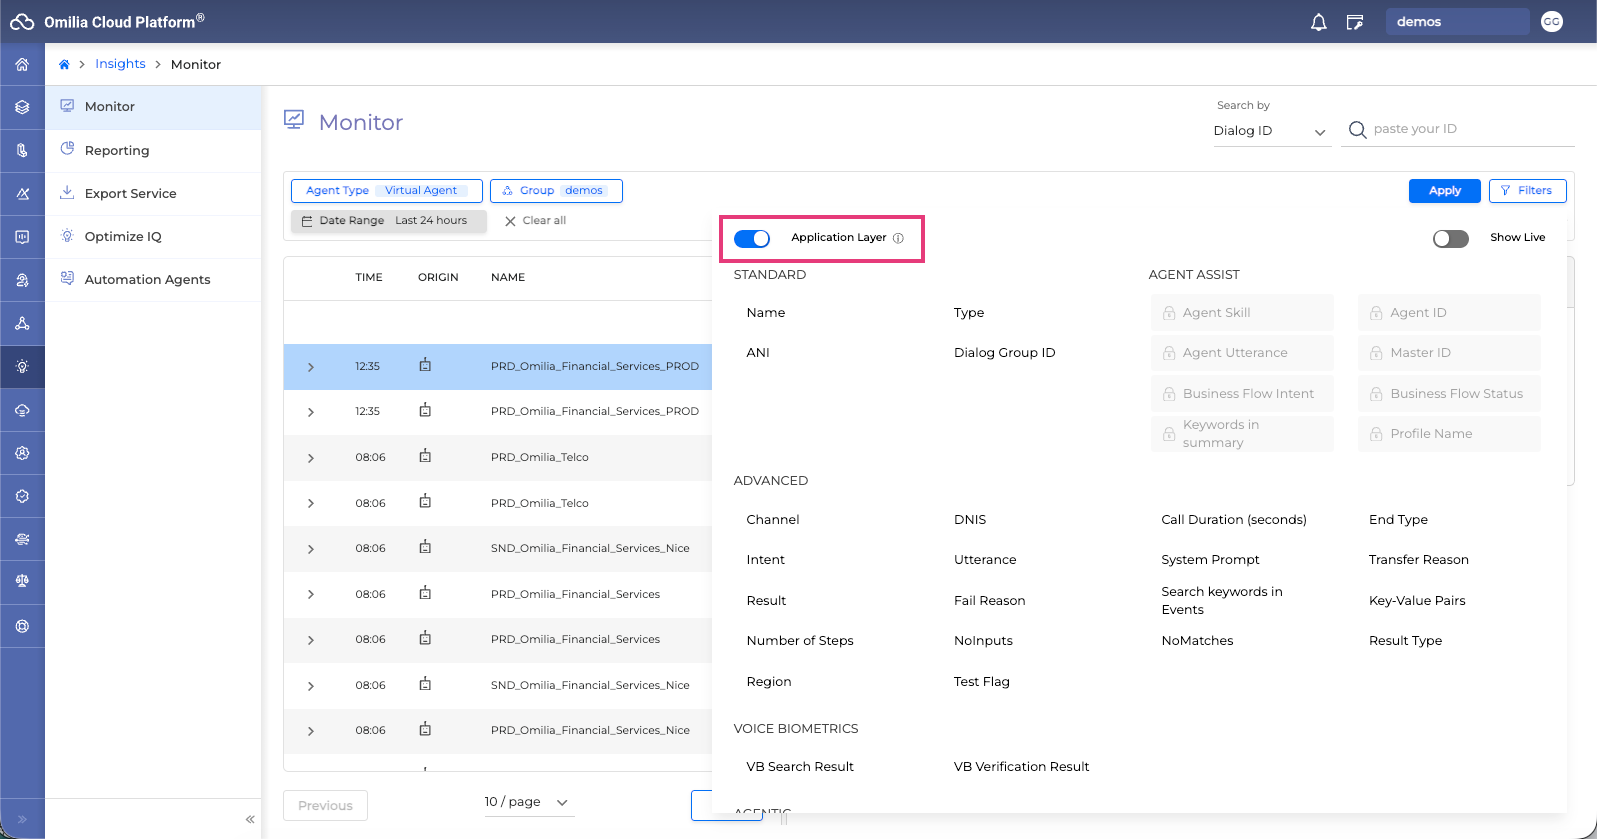
Application Layer
Application Layer allows you to view full end-to-end conversations only without the subcomponents, providing a clear high-level overview of each dialog in OCP.
Select an Agent Type and click the Filters button to access the Application Layer toggle button.
Once the Application Layer is activated, you can expand each Dialog Application and view its components by clicking the dropdown icon. However, if you apply the Search by filter using either Dialog ID, Connection ID, or Session ID, the hierarchical structure will not be displayed.
By default, the Application Layer is enabled.
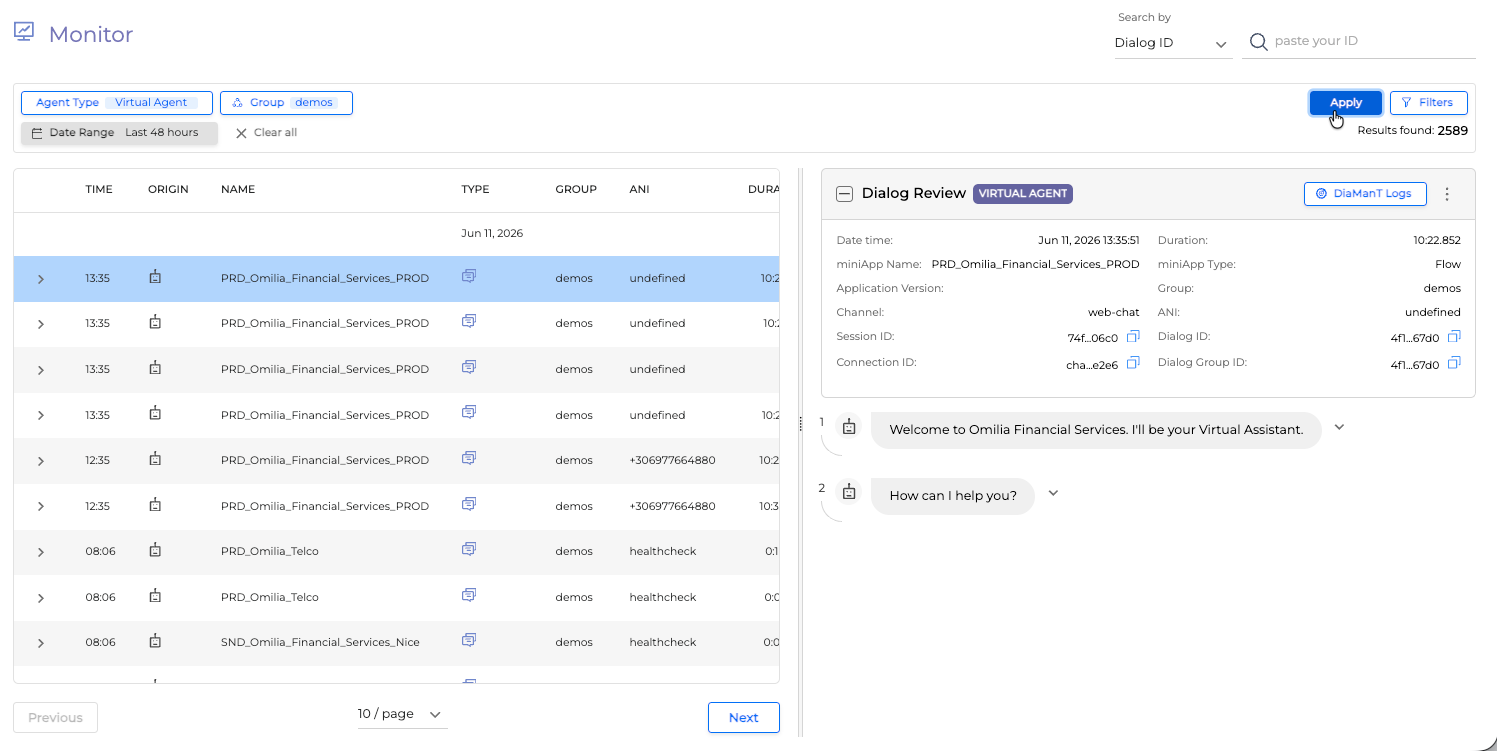
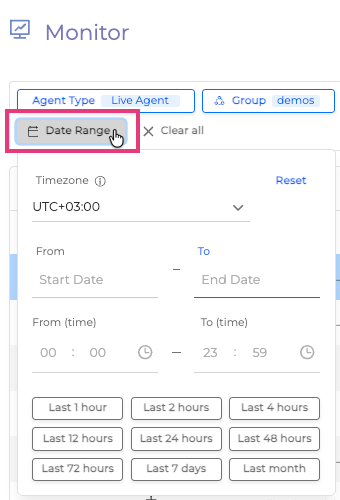
Date Range Filter
You can set your search within a specific Date/Time range using the Date Range filter. Set the Timezone, start and end dates, and start and end time, or select a specific time range to date, for example, Last 48 hours.
Advanced Search
To open the Advanced Search filters, proceed as follows:
It is recommended to disable the Application Layer for Advanced Search, especially if you are going to search for specific miniApps patterns.
-
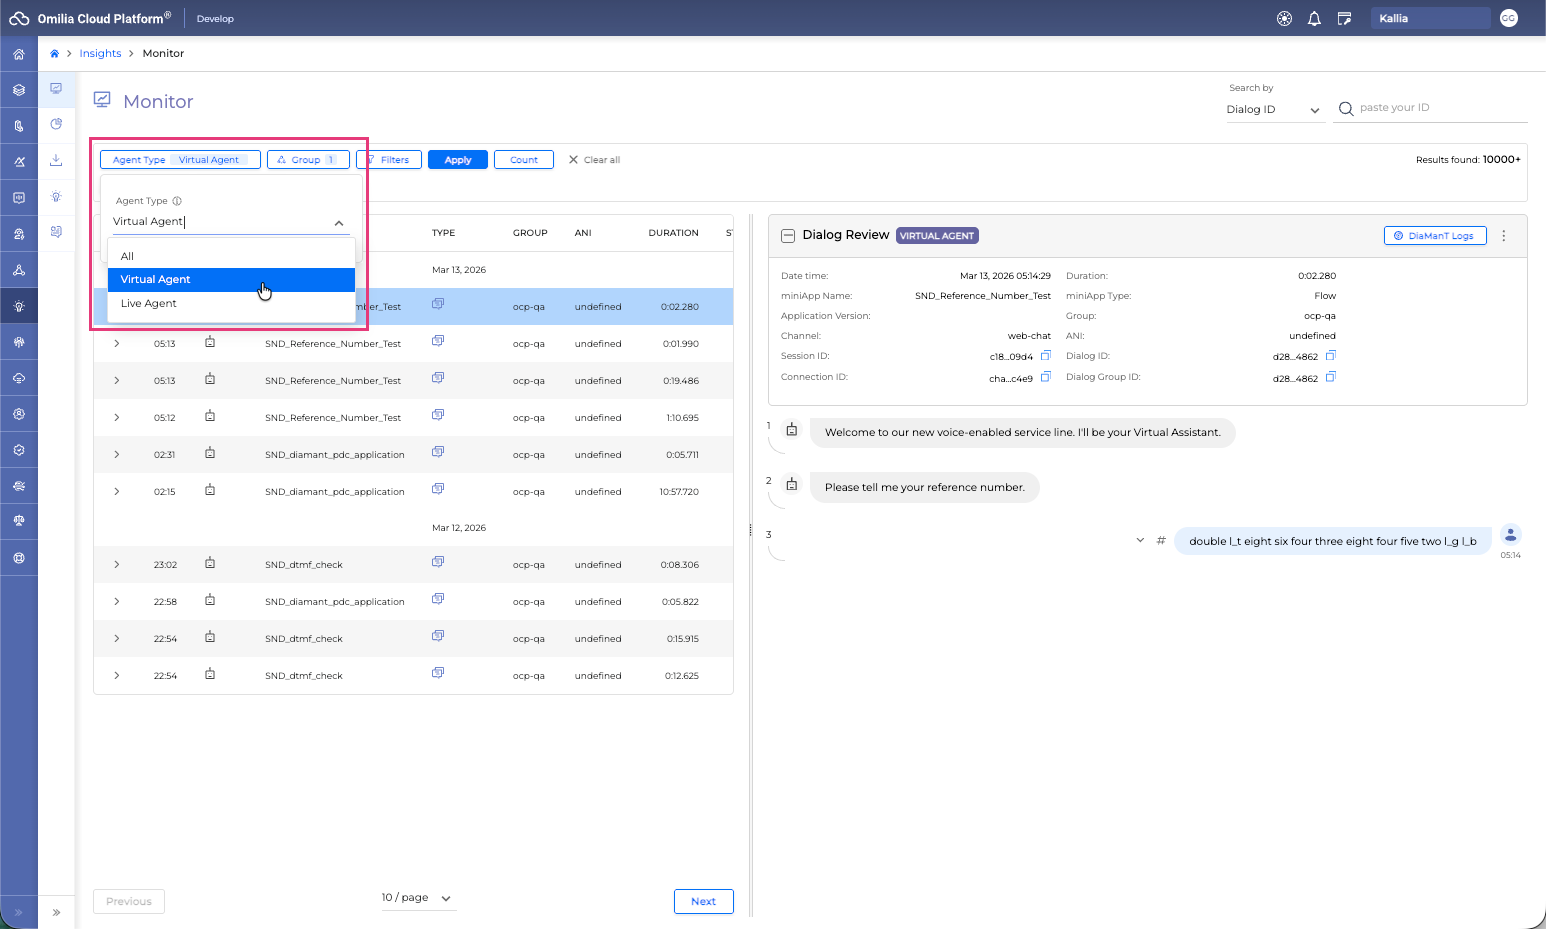
Select the Agent Type.
-
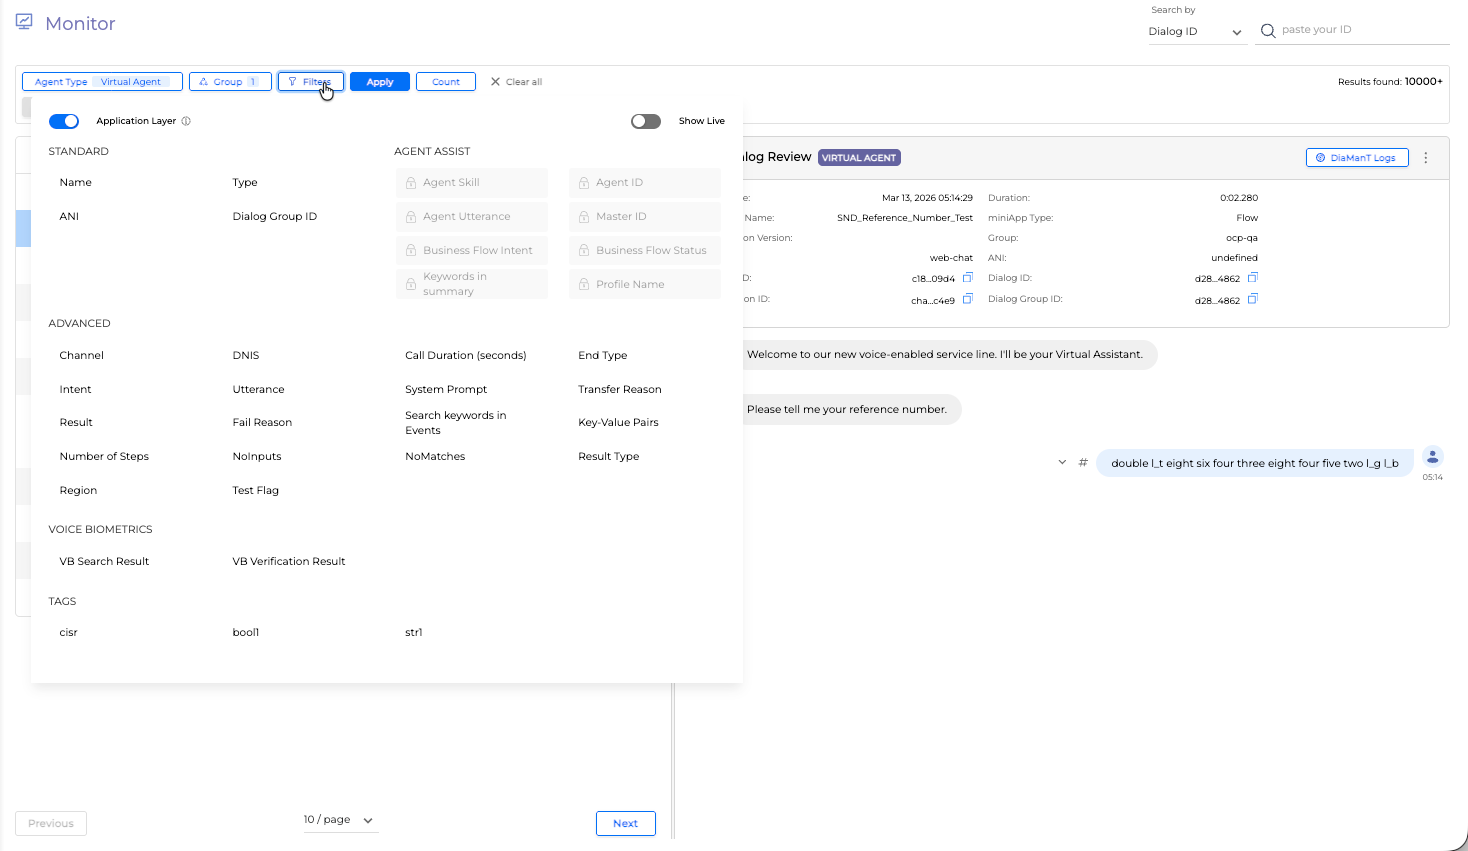
Click on Filters button.
-
The Advanced Search area opens.
-
Select the search filter fields. In the table below, you can find detailed information on each field.
-
To submit your search request, click the Apply button.
-
Go to each filter and add the required value or select from the drop down list.
-
The dialogs that match your selected criteria are shown in the Dialog list.
Applied filters are indicated below the Filters bar

To clear the search filter fields, click the Clear all button.
Search Filters Description
Initial filters available in the Default Filters area include:
|
|
Description |
|---|---|
|
Agent Type |
Filters by the type of agent, such as Virtual Agent. |
|
Group |
The resource group that miniApps or Flows belong to. It is possible to select multiple groups. |
|
Date Range |
Select the specific date/time period you are interested in by indicating start/end dates. |
The following filters are available upon clicking the Filters and selecting specific type of agent:
|
Filter Name |
Description |
Virtual Agent |
Live Agent |
|
|---|---|---|---|---|
|
Standard Filters |
||||
|
|
Name |
The application name. This value can be multiple. |
✓ |
|
|
|
Type |
The miniApp type. Select Flow from the dropdown list to review only Flow dialogs. |
✓ |
|
|
|
ANI |
The caller's phone number. |
✓ |
|
|
|
Dialog Group ID |
Alternative to Session ID to fetch all Dialog IDs requested by the same Orchestrator Application. |
✓ |
|
|
Agent Assist Filters |
||||
|
|
Agent Skill |
Filters by the skill group assigned to the human agent. |
|
✓ |
|
|
Agent ID |
Filters by the unique ID of the human agent. |
|
✓ |
|
|
Agent Utterance |
Searches the text typed by the human agent during the interaction. |
|
✓ |
|
|
Master ID |
The master ID for the Agent Assist session. |
|
✓ |
|
|
Business Flow Intent |
Filters by the specific agent-side business flow intent. |
|
✓ |
|
|
Business Flow Status |
Filters by the status of the agent-side business flow. |
|
✓ |
|
|
Keywords in summary |
Searches for keywords within the agent's summary notes. |
|
✓ |
|
|
Profile Name |
Filters by the associated agent profile name. |
|
✓ |
|
Advanced Filters |
||||
|
|
Channel |
The session channel of the user such as Chat, miniApps, Voice, Web chat. |
✓ |
✓ |
|
|
Intent |
Allows searching for the dialogs using multiple intents. For example, all the dialogs where the intents Balance and Payment were identified. |
✓ |
✓ |
|
|
Result |
Allows to sort by success or fail results. |
✓ |
|
|
|
Number of Steps |
Indicates the number of steps within the session. Insert a number by using Less than or equal and Greater than or equal fields. |
✓ |
|
|
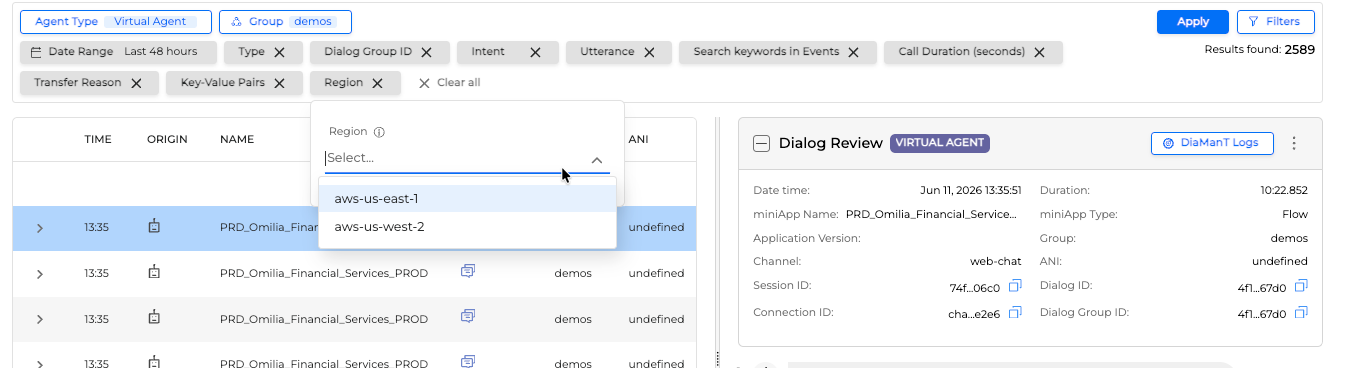
|
Region |
The OCP Environment origin region. This filter is available on specific environment configuration setups only. |
✓ |
|
|
|
DNIS |
The Destination URI. |
✓ |
|
|
|
Utterance |
The caller input, such as specific keywords or phrases. |
✓ |
✓ |
|
|
Fail Reason |
Allows to filter sessions by a specific error that caused the session failure, as set up in miniApps or Orchestrator for a Flow. |
✓ |
|
|
|
NoInputs |
Indicates the number of [no_input] values within a dialog. Insert a number by using Less than or equal and Greater than or equal fields. |
✓ |
|
|
|
NoMatches |
Indicates the number of unidentified user inputs (for example, due to noise in the background or in case of out-of-domain requests). Insert a number by using Less than or equal and Greater than or equal fields. |
✓ |
|
|
|
Test Flag |
Filters dialogs by whether the session is marked as a test or non-production interaction, True or False. |
✓ |
✓ |
|
|
Call Duration (seconds) |
The duration of the call provided in seconds. Insert a number by using Less than or equal and Greater than or equal fields. |
✓ |
✓ |
|
|
System Prompt |
Omilia application system prompt. Allows searching through system responses (the gray bubbles in the Dialog Review of what the application said to the user during the call). |
✓ |
|
|
|
Search keywords in Events |
Events that happen within a dialog session. Can be used to query dialogs based on custom loggings or other identifiers. |
✓ |
|
|
|
Key-Value Pairs |
Allows searching for custom loggings as configured in Orchestrator. |
✓ |
|
|
|
End Type |
End type of the dialog (for example, NEAR_HUP, FAR_HUP, TRANSFER, SYSTEM_ERROR). |
✓ |
|
|
|
Transfer Reason |
Filters by the reason provided for a call transfer. |
✓ |
|
|
|
Result Type |
Filters by the specific category of a success or failure result. |
✓ |
|
|
Voice Biometrics Filters |
||||
|
|
VB Search Result |
Voice Biometrics search result options, including NO_USER_FOUND, FOUND_ONE, FOUND_MANY, FOUND_TOO_MANY. Indicates if any Voice Biometrics enrolled users were detected in the call. Read more in the Voice Biometrics section. It is also possible to add a custom search result option by clicking the + Create new button within the dropdown. For this filter field we perform a prefix match, meaning the search is executed for values that start with the given text. For example, if the user searches for FOUND_MANY/1, we will return results matching FOUND_MANY/1, FOUND_MANY/10, FOUND_MANY/100, and so on. |
✓ |
|
|
|
VB Verification Result |
Voice Biometrics verification result options. Read more in the Voice Biometrics section. It is also possible to add a custom verification result option by clicking the + Create new button within the dropdown. |
✓ |
|
|
Agentic Filters |
||||
|
|
Agentic App Name |
Filters dialogs by the name of the Agentic application used during the session. |
✓ |
✓ |
|
|
Agentic Type |
Filters dialogs by the type of Agentic application used during the session. |
✓ |
✓ |
|
Tags related filters |
||||
|
|
CISR |
Concept Identification Success Rate. Read more about the available values in the CISR section. |
✓ |
✓ |
|
|
Custom Boolean Tag |
It is possible to set the Custom Boolean Tag to true or false when reviewing utterances. This filter allows searching for true or false utterances previously reviewed and tagged correspondingly. |
✓ |
✓ |
|
|
Turn Detection Breakdown |
Filters dialogs by the turn-detection outcome category, such as correct_take_over, correct_pause_handling, incorrect_take_over, incorrect_pause_handling, late_take_over, unclear, or previous_turn_answer. Available values depend on the environment configuration and are mainly used in VFO environments. |
✓ |
✓ |
|
|
Custom Tag |
Allows searching for a Custom Tag keyword that was set when reviewing utterances. |
✓ |
✓ |
The available tags (CISR, Custom Boolean Tag, and Custom Tag) depend on the environment configuration. Additional tags are available in specific environments.
Dialog List
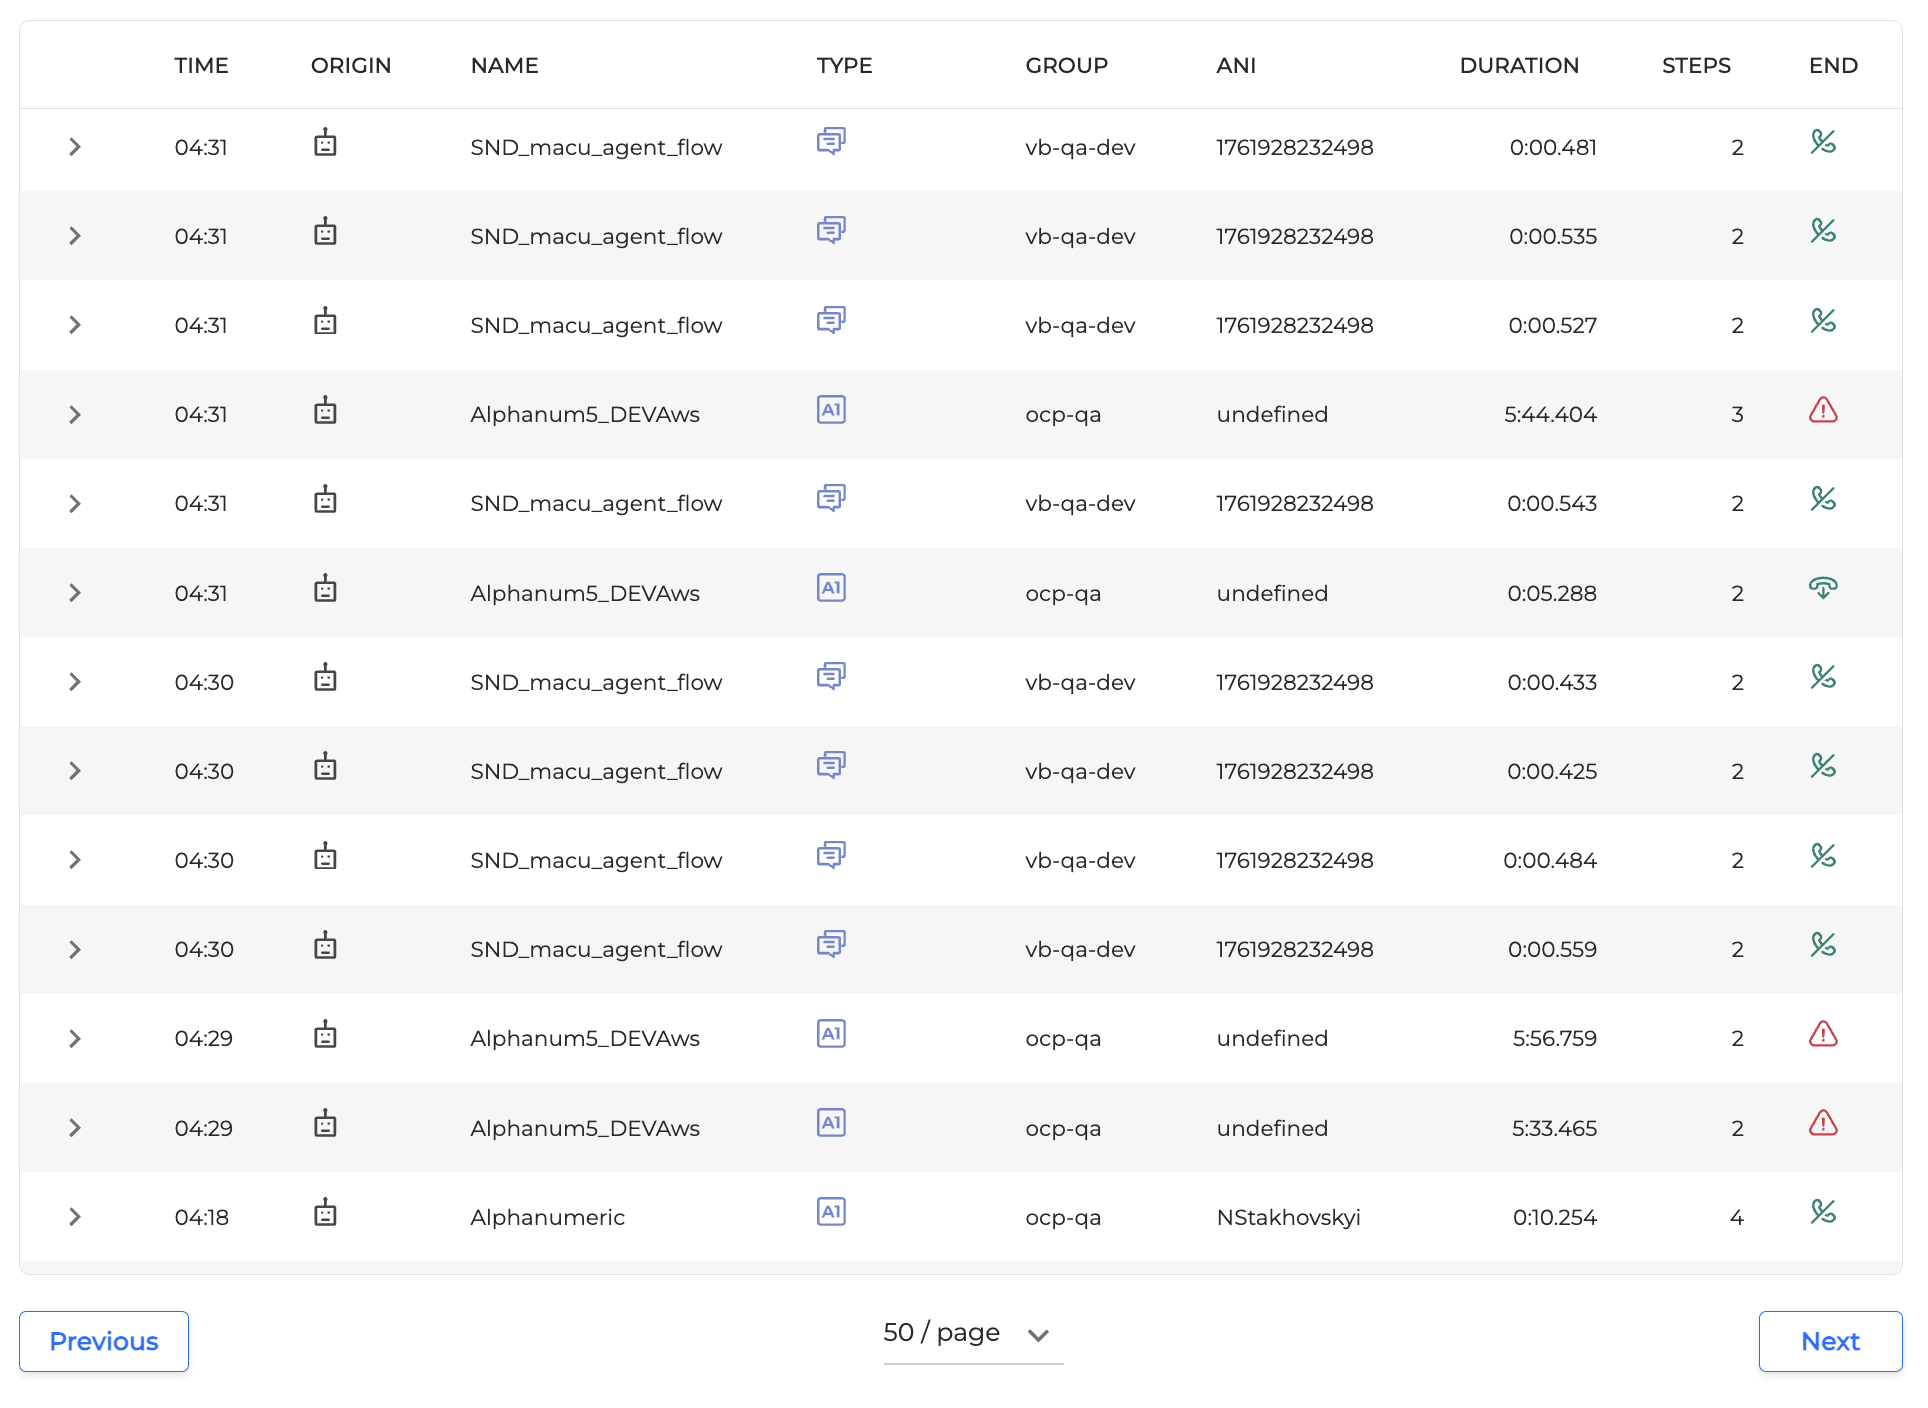
The Dialog List presents all the dialog events that meet the criteria of the Search Filter section. Every column contains information regarding the dialog.
-
TIME: The time when the dialog started.
-
ORIGIN: The origin of the voice of the dialog (Virtual / Live).
-
NAME: The name of the application.
-
TYPE: The type of the application.
-
GROUP: The group that miniApps or Flows belong to.
-
ANI: The caller’s phone number if available.
-
DURATION: The length of the dialog session.
-
STEPS: The number of steps in the session. This is the total number of system prompts and the user utterances, as well as one step added per the dialog ending, such as [hup], meaning hang-up, or transfer to an agent. The [no_input] values are not counted.
-
END: The way the dialog ended. Hover over the icon to see the tooltip with details.

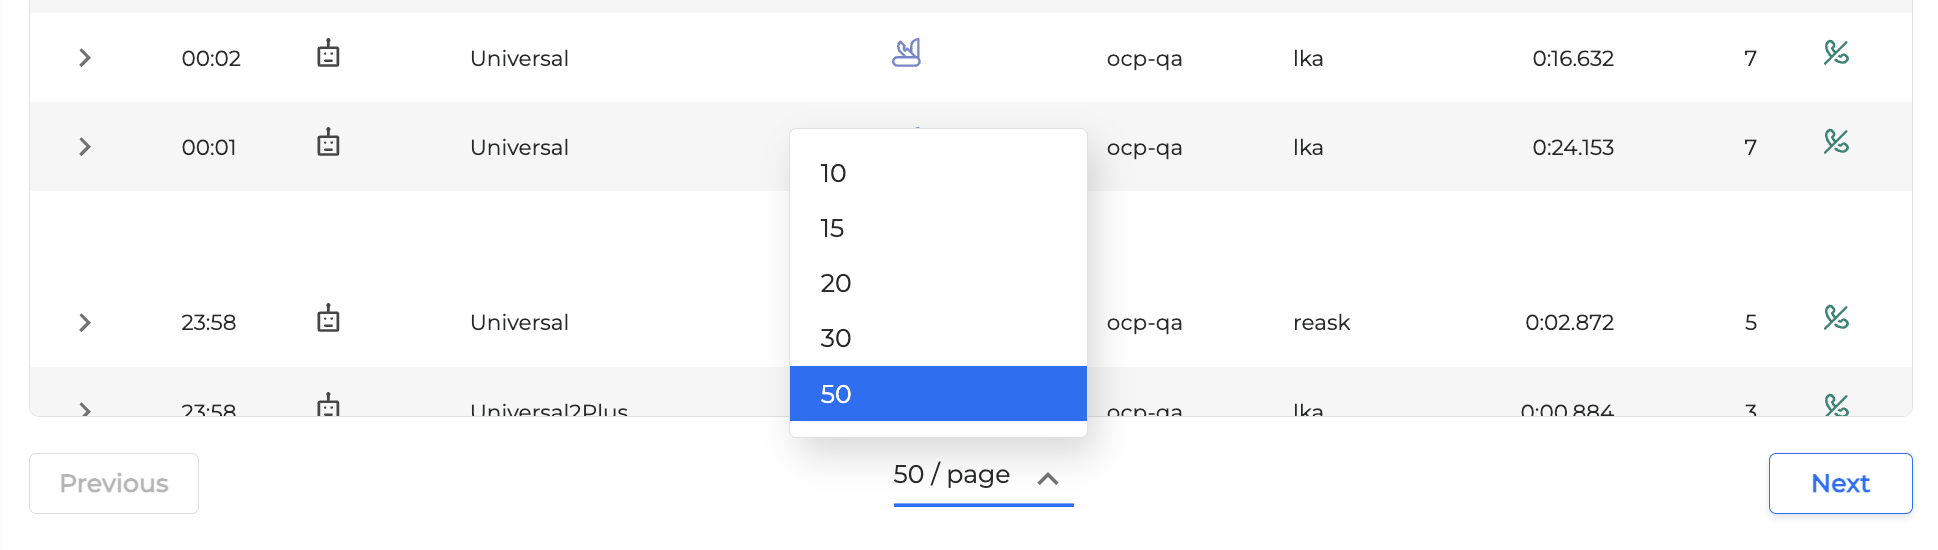
By default, 50 dialogs per page are presented. However, you can change this setting by clicking the 50/page button and selecting the desired value. To navigate through the dialog list, click the Next button.
Click on a particular dialog to get detailed information in the Dialog Review area.
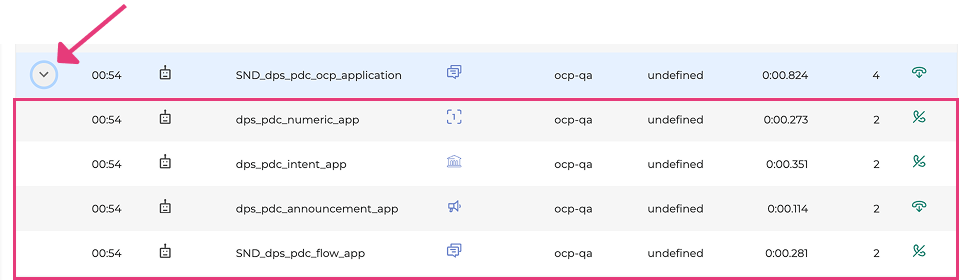
You can click the dropdown arrow on the far left of a main application's row to expand it. This will reveal all the component miniApps that were run as part of that single conversation, showing you each sub-dialog and its corresponding details.
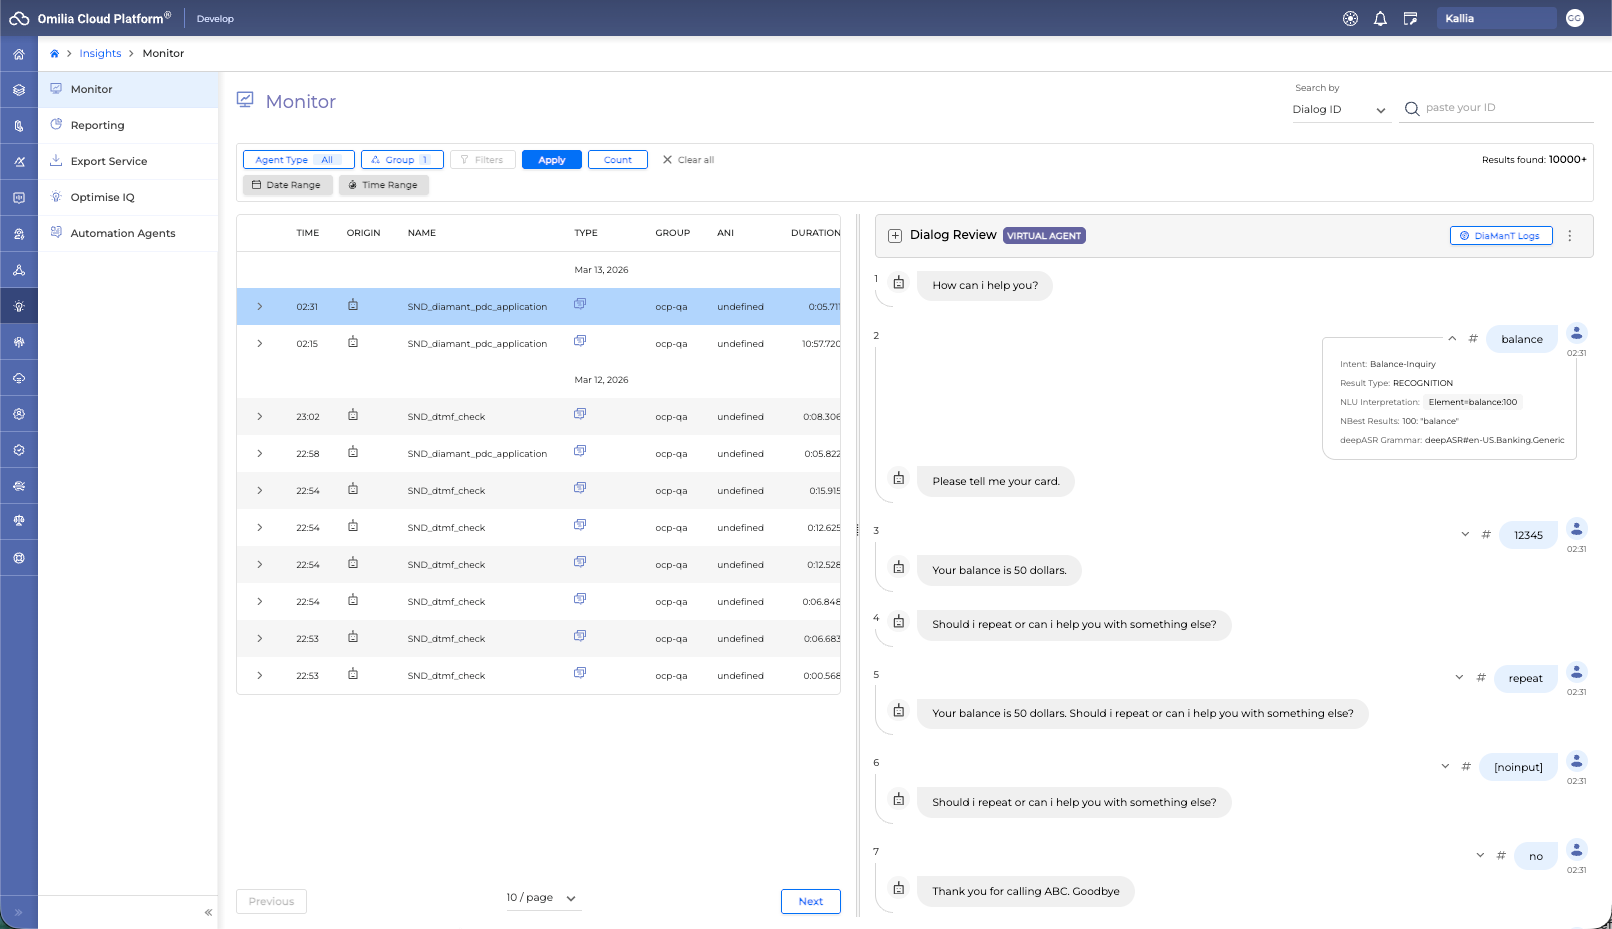
Dialog Review
The Dialog Review component contains all the detailed information about a single, selected conversation. When you click on a specific dialog from the Dialog List, the Dialog Review pane will open.
The content of the pane is collapsed by default; click the expand icon (a + symbol) next to the Dialog Review title to see the details.
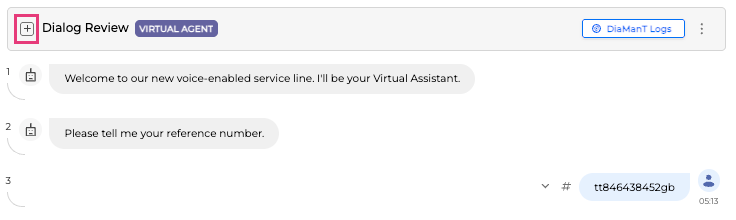
Next to the title, you'll see a tag indicating the agent type for the session, such as VIRTUAL AGENT or LIVE AGENT. The information and options available will change depending on this type.
The pane is split into several key areas:
Dialog Header (Metadata)
This top section displays key metadata about the conversation. You can click the Copy icon next to any ID to copy its value to your clipboard.
The fields displayed change depending on whether you are viewing a VIRTUAL AGENT or a LIVE AGENT session.
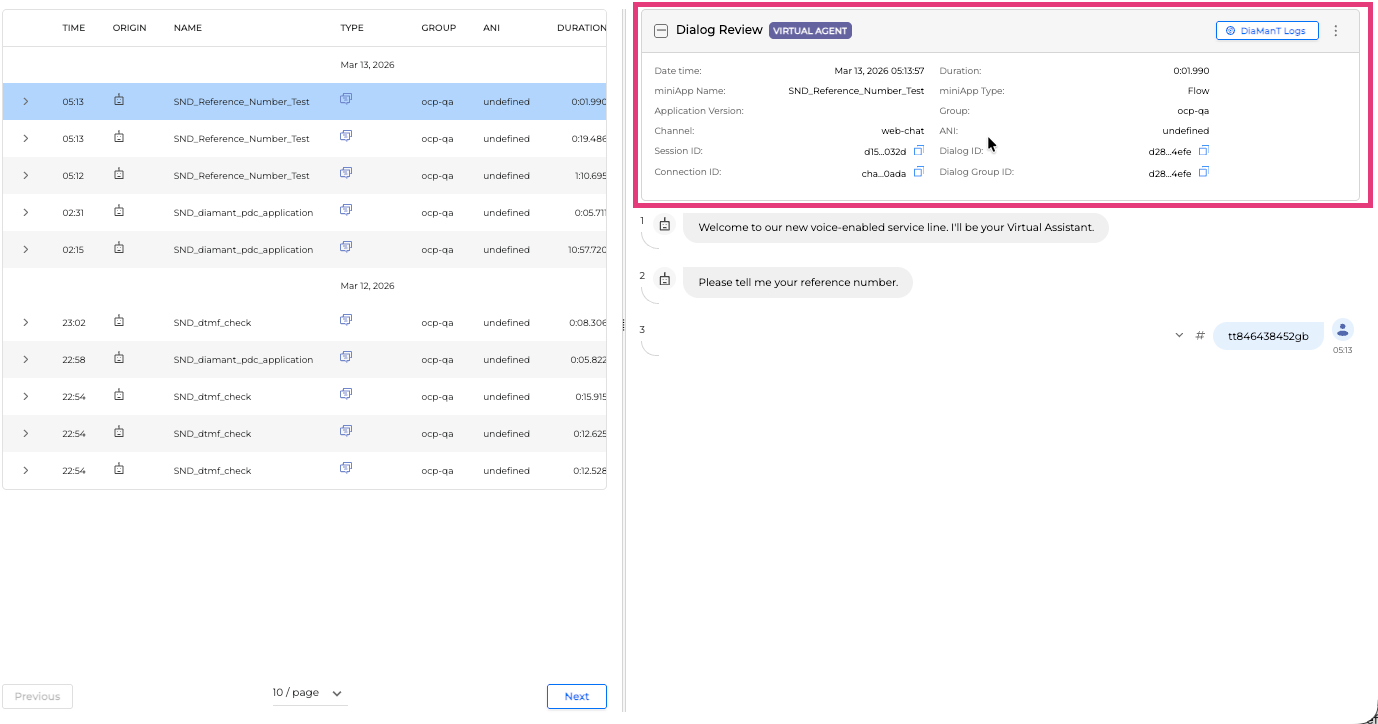
Virtual Agent View Fields
-
Date time: The date and time the dialog took place.
-
Duration: The length of the dialog session.
-
miniApp Name: The name of the miniApp used for the selected dialog.
-
miniApp Type: The type of the miniApp used for the selected dialog.
-
Application Version: The publishing version of the Application.
Navigate to the Orchestrator Application Options Menu guide to learn more about publishing. -
Group: The group this Application belongs to.
-
Channel: The channel the user used for the session, such as
voiceorweb chat. -
ANI: The caller's phone number, if available.
-
Session ID: The identification number of the session.
-
Dialog ID: The identification number of the dialog.
-
Connection ID: The unique identification number of the connection.
-
Dialog Group ID: The identification number of a Flow application that consists of multiple miniApps.
Live Agent View Fields
-
Date time: The date and time the dialog took place.
-
Duration: The length of the dialog session.
-
Connection ID: The unique identification number of the connection.
-
Dialog ID: The identification number of the dialog.
-
Master ID: The master ID for the Agent Assist session.
-
CCAAS Provider: The Contact Center as a Service (CCaaS) provider handling the session (e.g.,
niceInContact). -
Agent ID: The unique ID of the human agent (e.g.,
agentId). -
Agent Skill: The skill group assigned to the human agent (e.g.,
vb_skill). -
AA Profile ID: The unique identifier for the Agent Assist (AA) profile being used (e.g.,
870..a1f9). -
AA Profile Name: The name of the associated agent profile (e.g.,
konan_with_vb_profile).
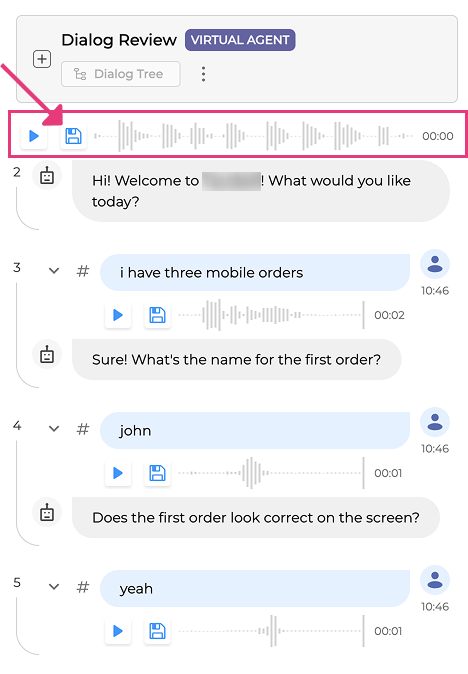
The miniApp bot icon indicates the prompt generated by the miniApp. The Agent icon indicates the prompt written by the Agent. The numbering on the left represents the step number.
Correspondingly, the utterances produced by the caller are indicated by the User icon.
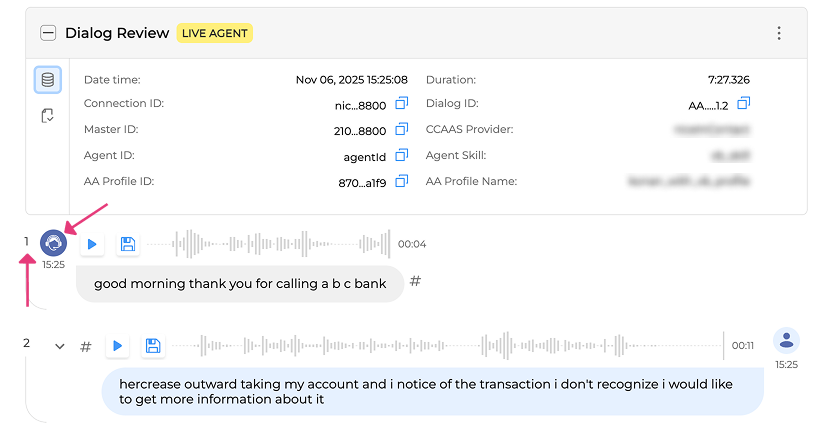
If this was a call, you can click the Play button next to the User icon to listen to the audio and check whether the system captured it correctly.

Click the Save button to download the utterance in WAV format.

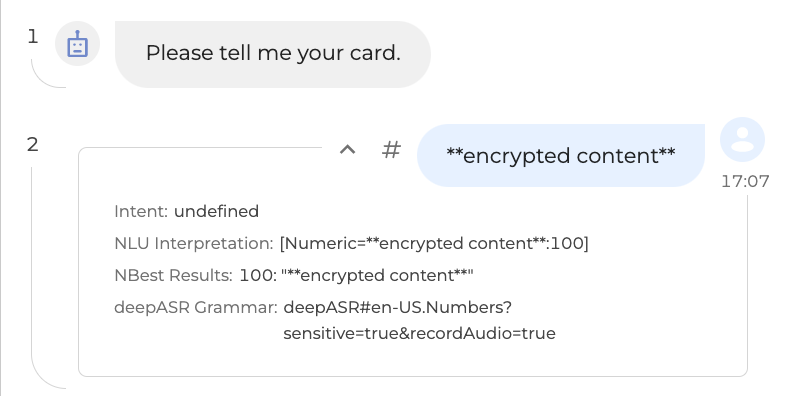
You can expand the user’s utterance by clicking the arrow to view the Intent interpretation. When expanded, the arrow will be pointing up:
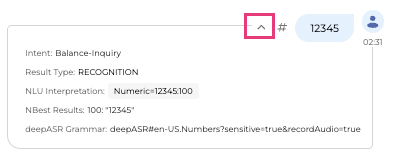
If there is sensitive data in the utterance, the details are not shown, and the message **encrypted content** appears instead.
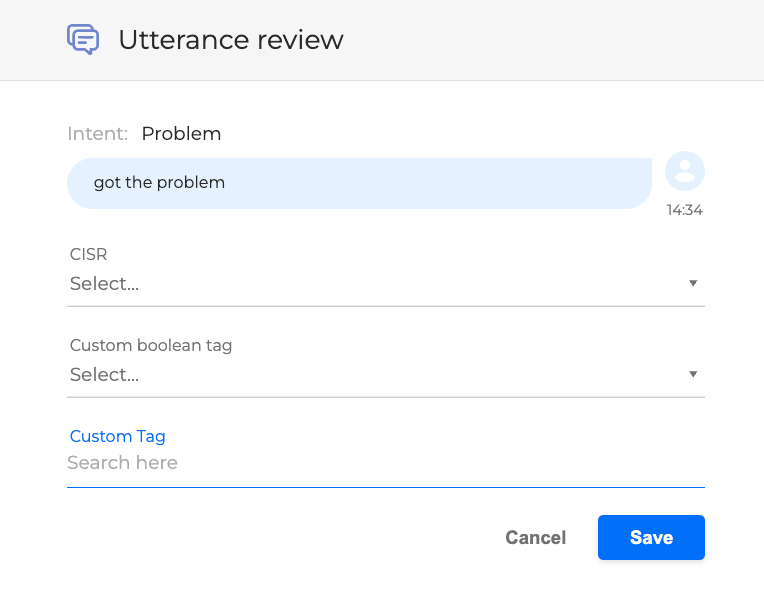
You can tag an utterance as correct or false, acceptance or rejection, or as a misinterpretation. To do so, click the # symbol and select the corresponding options in the pop-up window.
-
CISR: Concept Identification Success Rate. Select a value from the drop-down list.
-
correctAcc: The system correctly accepted the caller's input, which means that either the correct intent was extracted, or the expected input was correctly identified (for example, the caller answering yes or no when asked to confirm payment).
-
correctRej: The system correctly rejected something that is not within the application’s scope (for example, the customer utterance: I could call back if this is a bad time).
-
falseAcc: The system mistakenly confused something out of the application’s scope with something within scope.
-
falseRej: Mistakenly rejected an in-scope caller input (for example, I want to know my balance is not understood and is considered by the system to be irrelevant).
-
misinterpretation: Accepted with wrong understanding. A caller said I want the balance on card, and the system understood I want the balance on my loan. The system understood the utterance as related to the application, but it misinterpreted it by assigning the wrong intent.
-
-
Custom Field: Add a keyword to categorize the utterance.
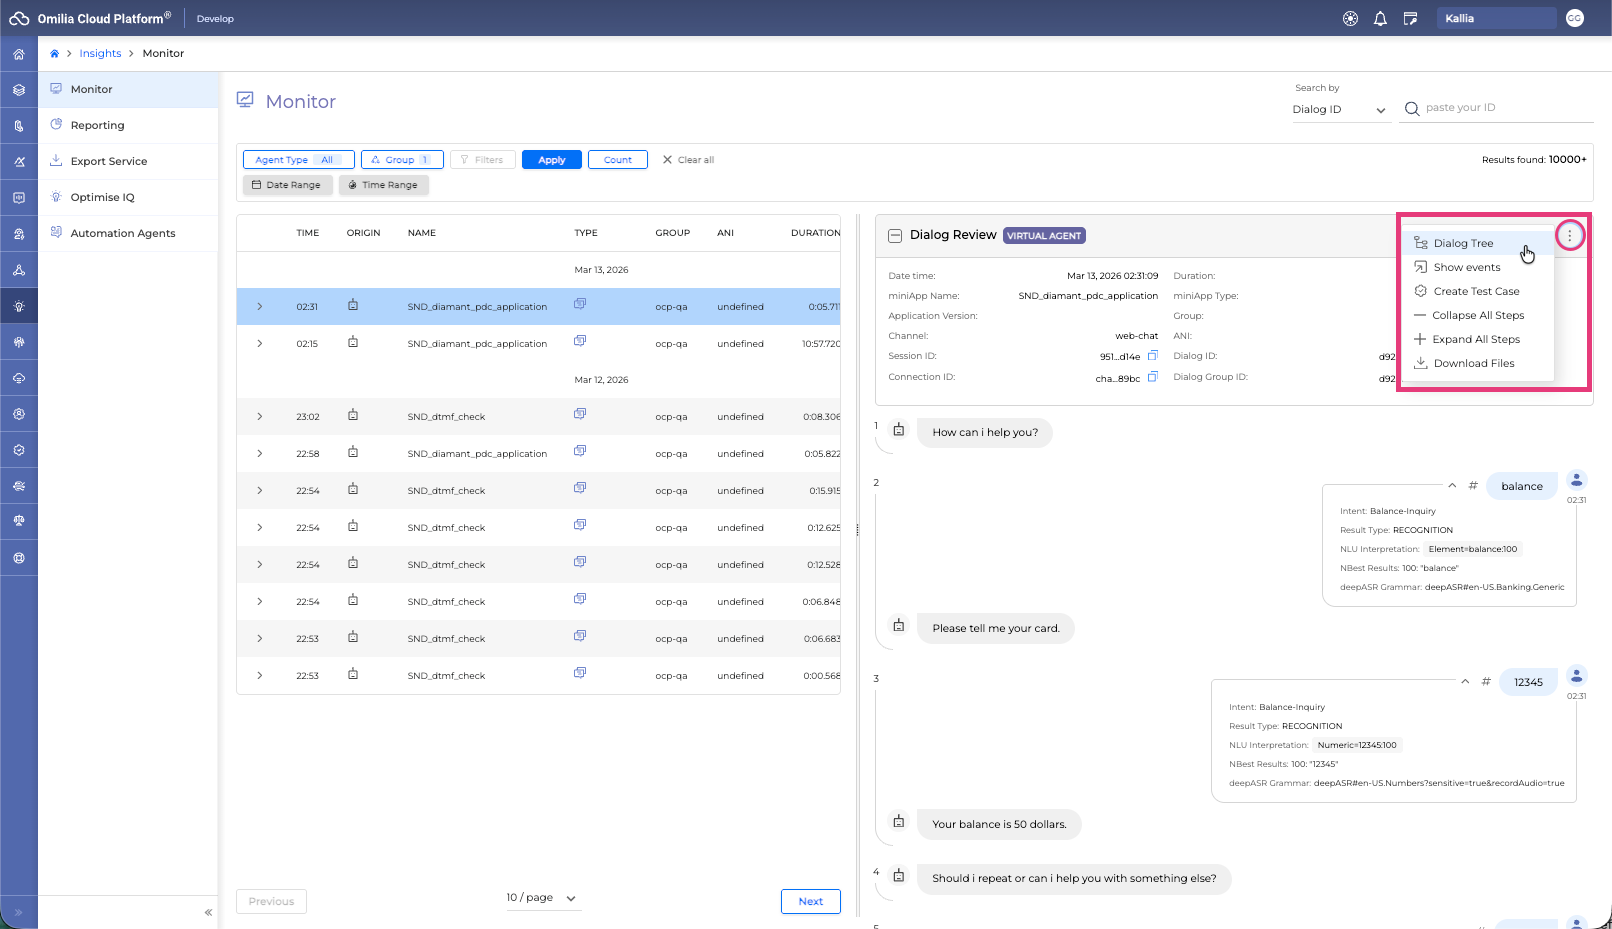
Dialog Options and Toolbar
At the top of the Dialog Review pane, you have several buttons to download data and analyze the dialog.
-
DiaManT Log File: Opens the DiaManT log file for the selected dialog.
-
Options menu: Clicking this icon opens a dropdown menu with more actions:
-
Dialog Tree: (Available in VIRTUAL AGENT view)
This window shows a tree-like hierarchical view of all the dialog components (miniApps, Flows, etc.) that were called during the session, in the order they were executed. You can click on any item in this tree to search for dialogs in that specific miniApp.|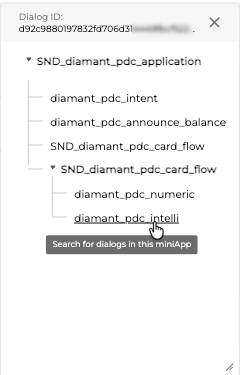
-
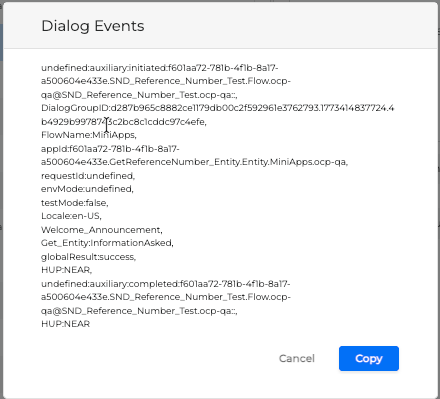
Show events: Retrieves system and/or custom loggings from the application. For more information, refer to the Events review section.
-
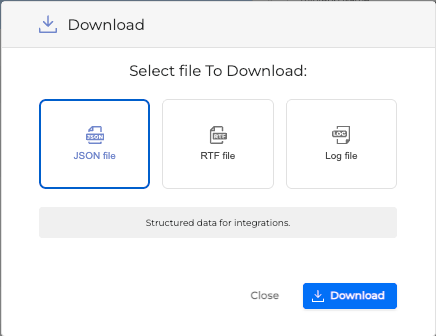
Download Files: Select the type of file you wish to download.
-
Download JSON: Downloads a JSON file containing all the information for that dialog session.
-
Download RTF: Downloads an RTF file (plain text) with the dialog session info.
-
Download Log File: Downloads the dialog's log file directly to your device in a
.txtformat.
-
-
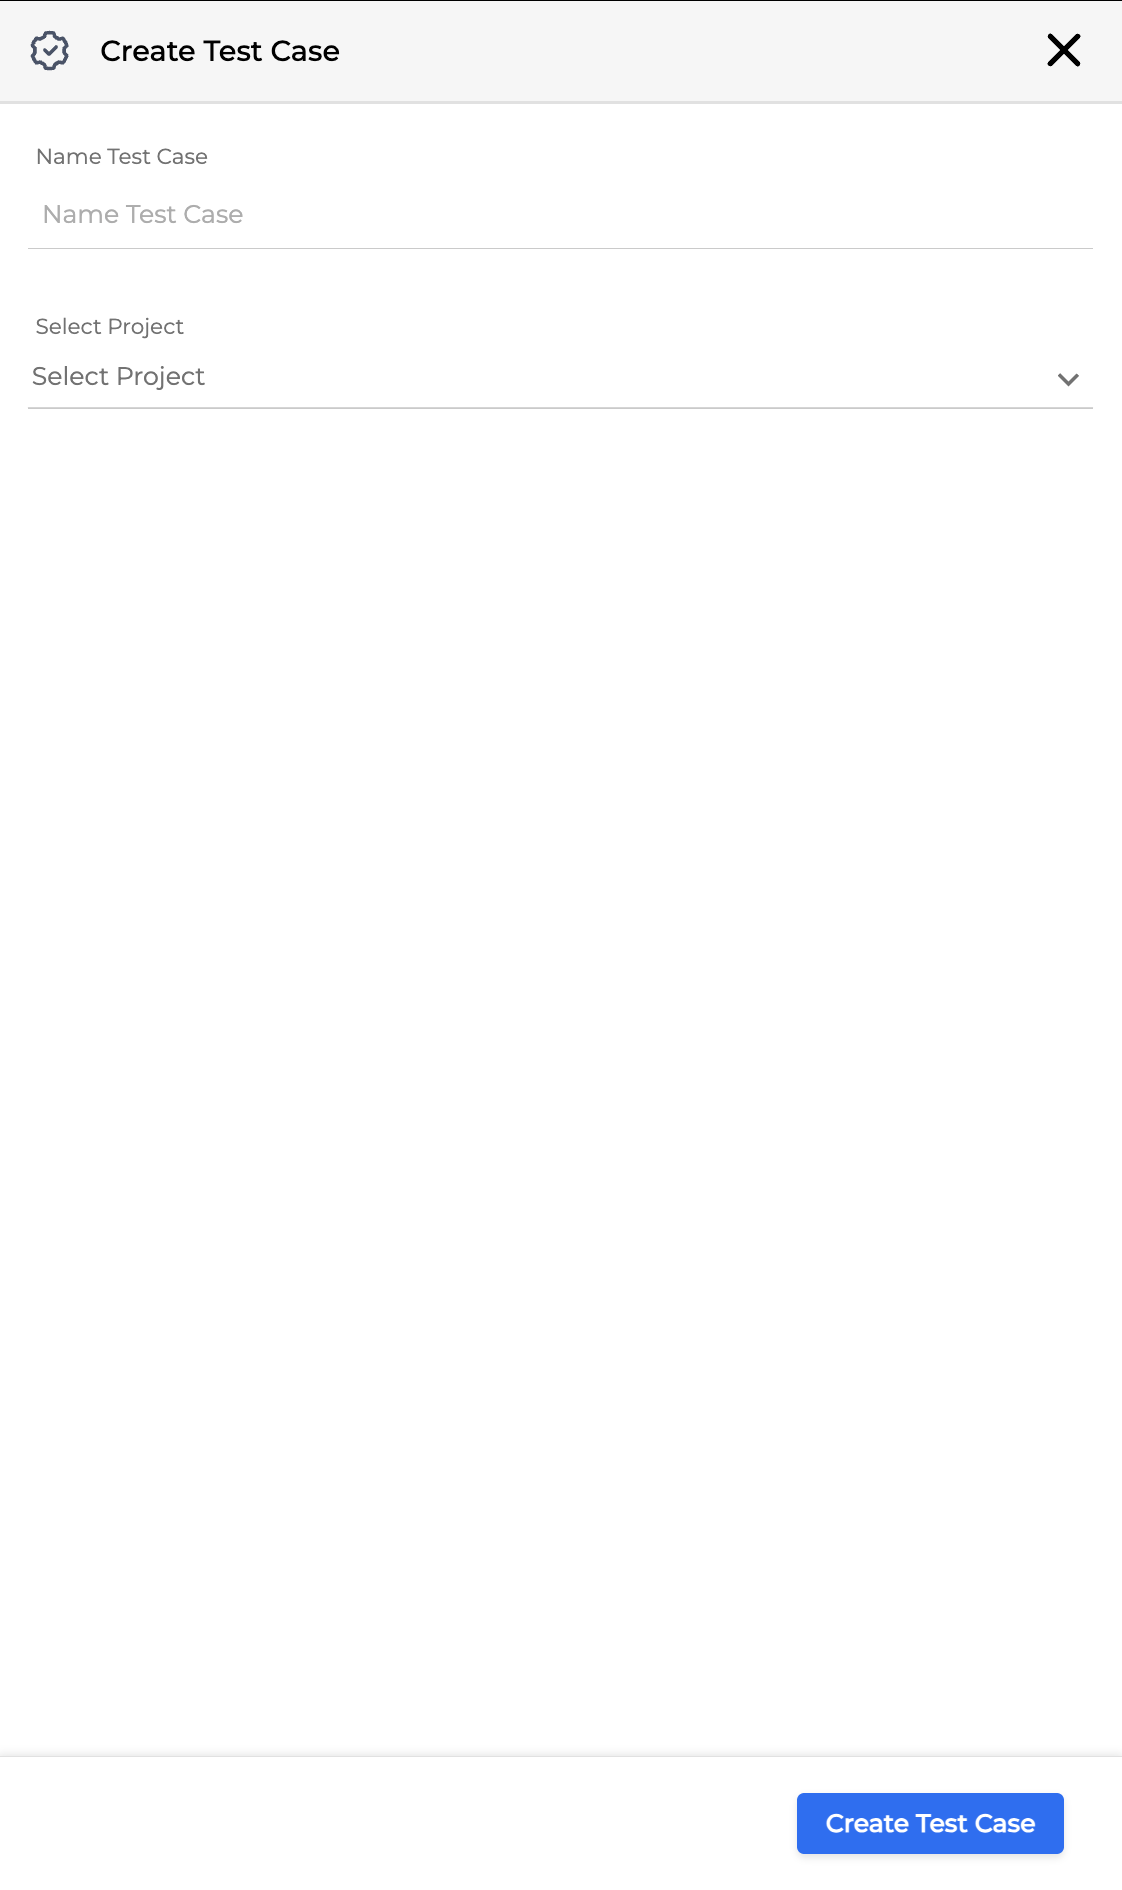
Create Test Case: This option allows you to save the current dialog as a new test case in OCP Testing Studio®.
-
Clicking this opens the Create Test Case window.
-
Enter a name in the Name Test Case field.
-
Select a destination project from the Select Project dropdown list. These projects are pulled from Testing Studio®.
-
Click the Create Test Case button.
-
A test case creation notification will appear, with a link to View in Testing Studio.
-
-
To create a test case, the dialog must be associated with a valid Testing Studio® project. If it is not, the Select Project dropdown will show "No projects found for this dialog".
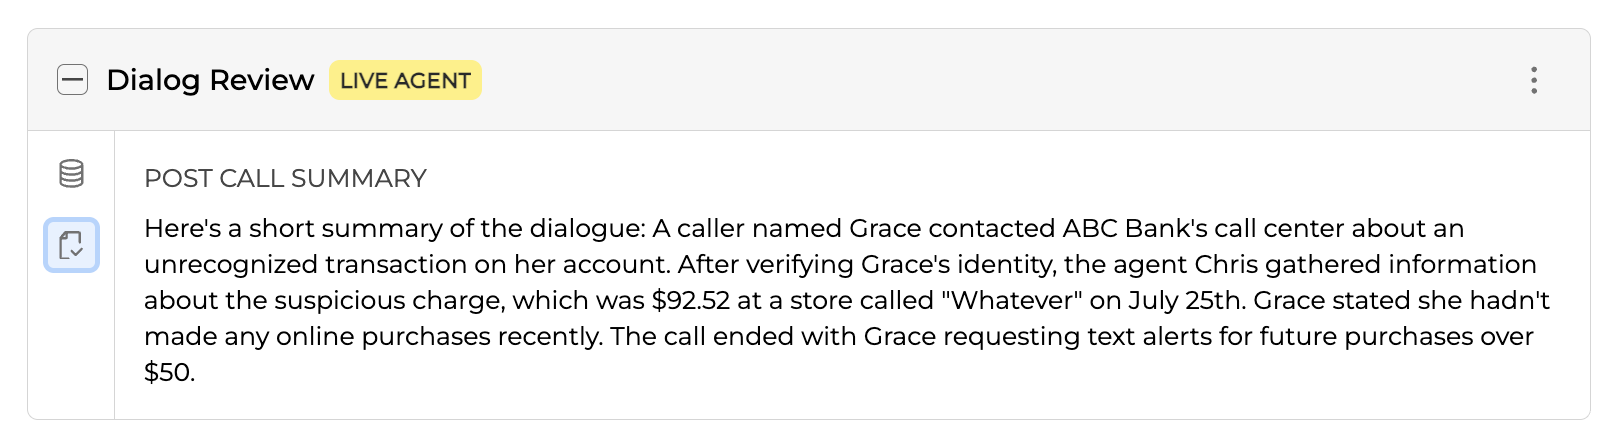
Post Call Summary
For interactions that include a LIVE AGENT, you may see a POST CALL SUMMARY. This section provides a brief, AI-generated summary of the dialogue, outlining the caller's intent, the agent's actions, and the call's outcome.
Text Matching
We use a Standard Text Matching analysis to process step’s prompts and utterances and an Events Matching Approach for dialog events. Both of them use a list of terms parsed from the text instead of the whole text, but in a different way to ensure the best accuracy.
The Standard Text Matching analysis:
-
matches all the words of the given text;
-
does not care about the words’ order;
-
matches all the given words anywhere in the text;
-
case insensitive.
Example
This text:
Welcome to our new voice-enabled service line. I'll be your Virtual Assistant.
will have the following matches:
-
“welcome” (single word match)
-
“welcome to our new“ (all words match)
-
“Welcome” (case insensitive)
-
“Welcome to our...” (ignores trailing punctuation)
-
“assistant service Welcome” (ignores word order)
and will not match the following:
-
“Hello welcome to our” (not all words match)
-
“come” (any random substring won’t match)
The Events analysis:
-
matches all the words of the given text;
-
cares about the words’ order (to avoid wrong matches, due to events string format);
-
matches consecutive words (phrases);
-
case-insensitive.
Example
This text:
“DialogGroupID:13188be3907c4f340d69479834b07b0a5fb64b6d.1712755163180.49a7bca9167e4d1eb1c2aceb8f3592d1,FlowName:MiniApps,appId:c958d295-9348-4899-9783-e09a5e8abcec.Card_GetAccessToken_WebService.WebService.MiniApps.ocp-qa,requestId:undefined,envMode:DEV,testMode:true,Locale:en-US,globalResult:fail:apiException,HUP:Custom FailExitReason,HUP:NEAR,endType:NEAR_HUP,billable:false”
will have the following matches:
-
“DialogGroupID” (single word match)
-
“dialoggroupid” (case insensitive)
-
“globalResult fail apiException HUP Custom FailExitReason” (all words match)
-
“globalResult:fail:apiException,HUP:Custom FailExitReason” (ignores punctuation)
-
“globalResult:fail:apiException” (fail with reason)
-
“globalResult:fail” (fail with no reason)
-
“13188be3907c4f340d69479834b07b0a5fb64b6d.1712755163180.49a7bca9167e4d1eb1c2aceb8f3592d1” (group ID match)
-
“Webservice” (other word from the list of tokens)
-
other IDs or app name/org which could be found in event string
and will not match the following:
-
“globalResult fail HUP FailExitReason” (words in order but not consecutive)
-
“FailExitReason DialogGroupID HUP” (random word order)
-
“group” (any random substring won’t match)
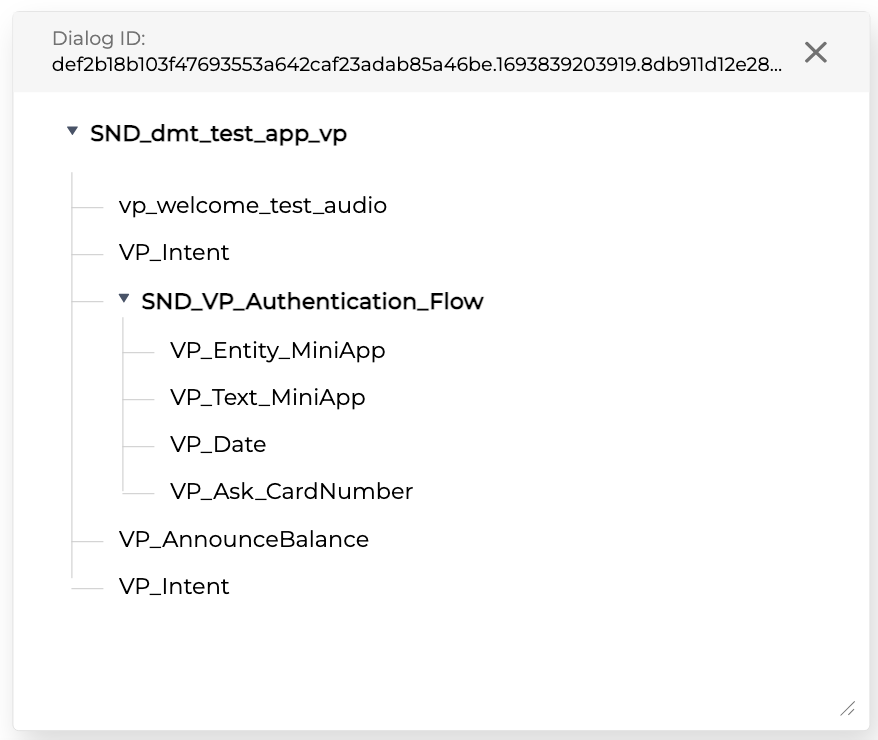
Path View
The Path View is a sequence of dialog session components (miniApps, Flows and so on), which represents the order of dialog steps that were called within the Application in a tree-like hierarchical view.
Path View is available only for Virtual Agent type.
To access the Path View, proceed as follows:
-
Navigate to Insights → Monitor and select a Dialog. In the Dialog Review section, click the Menu button and select the Dialog Tree.
-
Once clicked, the Path View opens with all the dialog steps components in the corresponding order.
It is possible to drag the Path View window for convenience to any part of the window. It is also possible to resize the Path View window by dragging the bottom right corner of the pop-up.
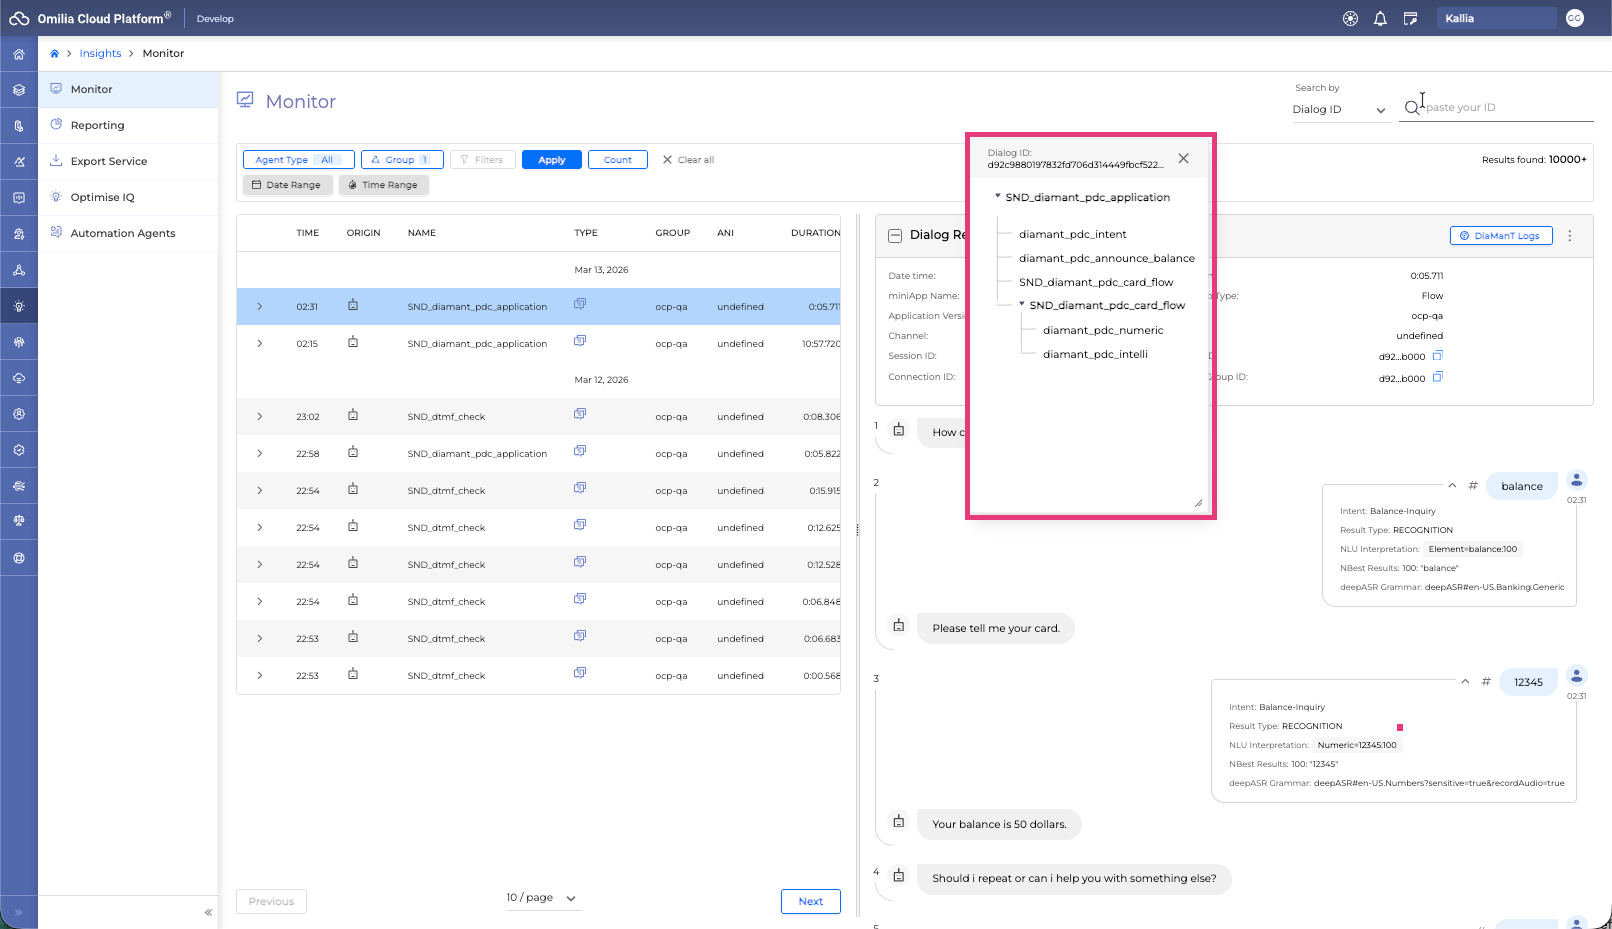
Every branch of the Path View window is expanded by default but collapsable, and it is possible to click each item of the tree to search for dialogs in the particular miniApp.
When the particular item is clicked, you’ll be redirected to the page with the more detailed information about this item.
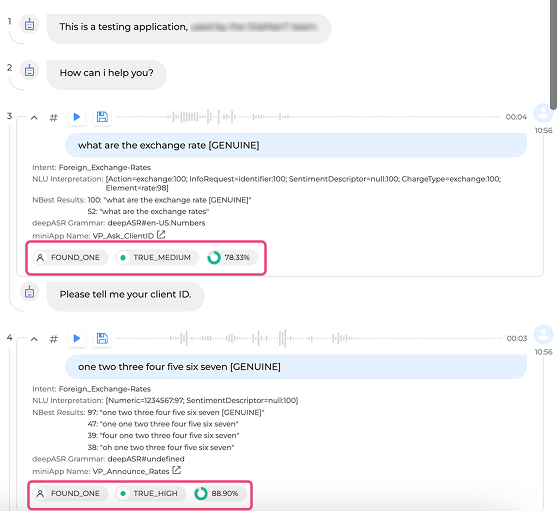
Monitor Voice Biometrics
You can view the report on each step of the dialog in terms of Voice Biometrics. This allows the user to assess the caller's identification level based on the following parameters:
|
Parameter |
Description |
Value |
|---|---|---|
|
BioSearch |
Result of a search by biokey(s) against the users of the database |
FOUND_TOO_MANY NO_USER_FOUND FOUND_ONE FOUND_MANY |
|
BioResult |
A verification label that corresponds to a span of bioscores. |
NO_DATA LOW_DATA ERROR FALSE_HIGH FALSE_MEDIUM FALSE_LOW TRUE_LOW TRUE_MEDIUM TRUE_HIGH |
|
BioScore |
A similarity score generated after comparing two voiceprints, measured in matching percentage. |
0-100% |
Only applicable for IVR applications with Voice Biometrics enabled.
Read more about Voice Biometrics in the Voice Biometrics section.
Voice Food Ordering (VFO) View
Voice Food Ordering (VFO) is available for specific environments only.
You can use OCP Groups to correspond to different stores in VFO environment.
When VFO functionality is activated for the particular environment, there are some additional features available in the Monitor tab, including an additional Order Summary component near the Dialog Review:
The standard and advanced Filters options are the same as for standard environments, with Agent Type filter excluded. The Advanced Search options contains VFO-specific filter dropdown in addition to the standard options:
-
Step result (success/fail)
-
Fail area (ASR, VAD, NLU, menu, integration)
-
NLU breakdown (entity_identification_menu_item, entity_identification_assistive_annotation, entity_identification_faq, reasoner_correction, reasoner_repetition, reasoner_disambiguation, reasoner_other)
-
ASR breakdown (misrecognition, missed_word, low_confidence, background_speech, background_noise, volume)
-
VAD events (interruption, speak_over, no_trigger, interruption_hes_ending, false_trigger, late_end trigger)
-
Order output (success/fail)
-
Sentiment (negative)
-
Turn detection breakdown (correct_take_over, correct_pause_handling, incorrect_take_over, incorrect_pause_handling, late_take_over, unclear, previous_turn_answer)
-
Comments (applicable comments if available)

The Dialog List component contains the same elements as standard environment.
Besides the default elements within the Dialog Review component, you can also access the Full Call Recording feature under the Show events button. You can listen to the whole dialog at once and download the full call recording by clicking the Save button as shown on the screenshot below.
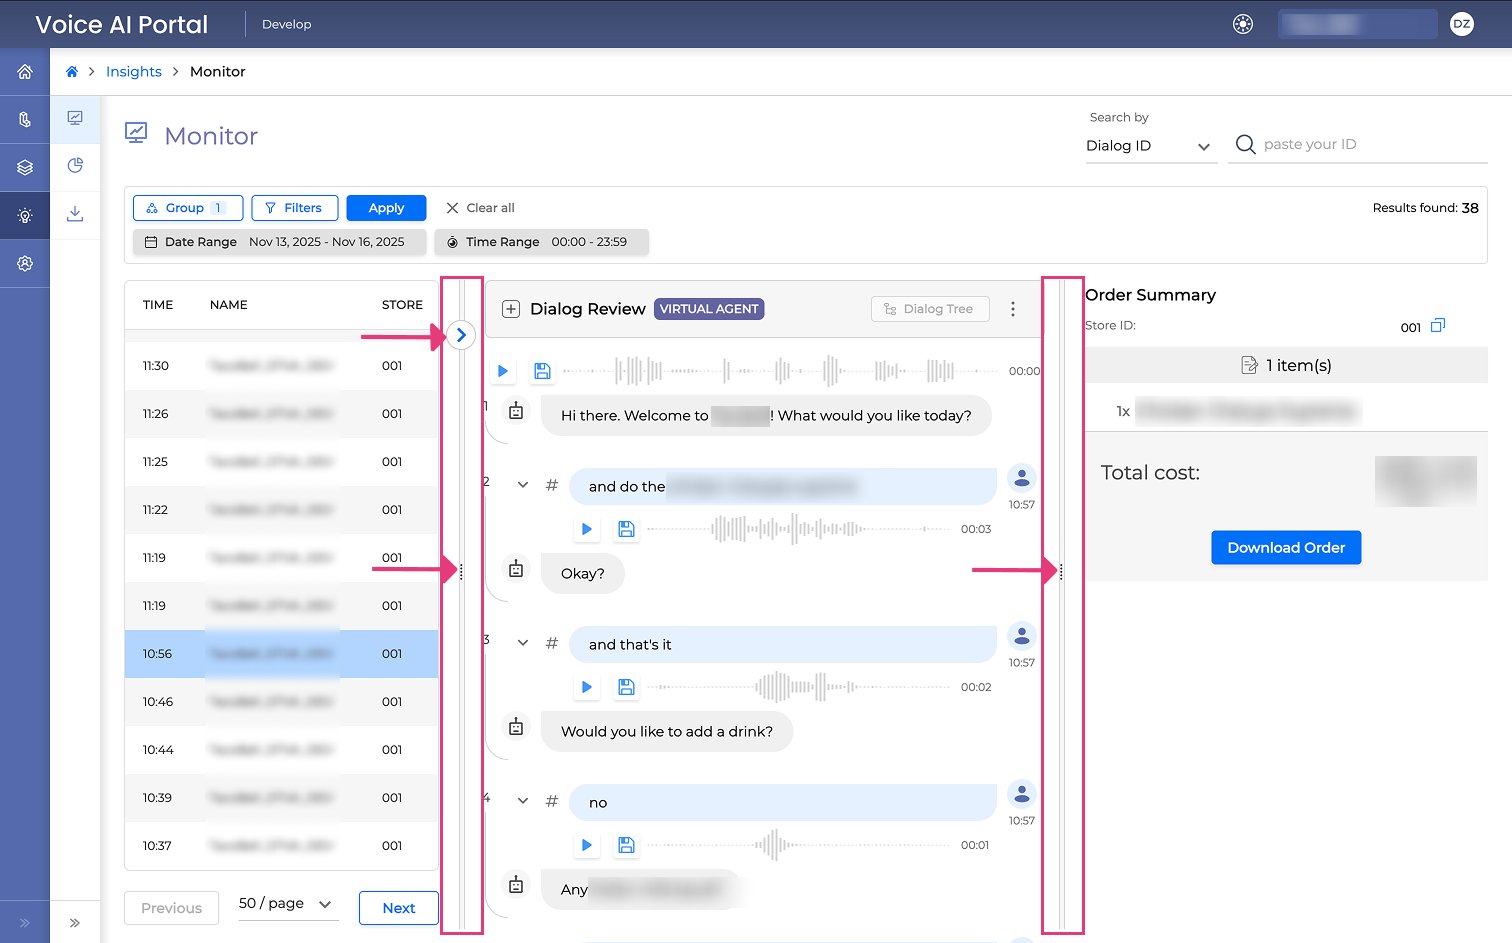
To the right to the Dialog Review, you can also see the VFO-specific Order Summary component containing all the items ordered by the user within the dialog you’re viewing.
You can adjust the components' width for better visibility by dragging horizontal borders to the left or to the right as shown on the screenshot below.
To collapse the currently open dialog, click on the > icon near the Dialog Review heading. This will return you to the Select Dialog component being shown on the full screen.
Order Summary
The Order Summary component contains the following information:
-
Store ID - the ID of the store where the order was processed. You can copy the ID by clicking on the Copy icon to the right.
-
Number of items - the total number of items ordered.
-
Order list - a list of all the items ordered. If there’s any addition to the item (for example, a dip), it will be displayed as a subitem with the ^ icon showing the expanded view.
-
Total cost - the total cost of the order in the currency you set.
-
Download Order - a button to download the order details in a JSON format.
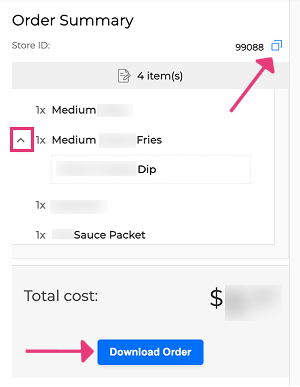
If a customer asked to add/remove some ingredients for a specific item, this information will be visible in the Order Summary under the modified item.
