.svg)
Non-Intent OCP miniApps®
About this guide
This document explains how to configure and use the Omilia OCP miniApps®, which allows you to create any of the following miniApps types:
Alpha
Alphanumeric
Amount
Date
DateRange
Numeric
Text
To configure the Intent OCP miniApps® check out Intent OCP miniApps® Configuration.
Configure the OCP miniApps®
Prompts tab
Welcome Announcement
The welcome announcement is the initial prompt responsible for establishing the interaction with the system, thus providing a more natural feel.
You can configure whether the prompt should be triggered or not during repeat requests by clicking on the corresponding checkbox.

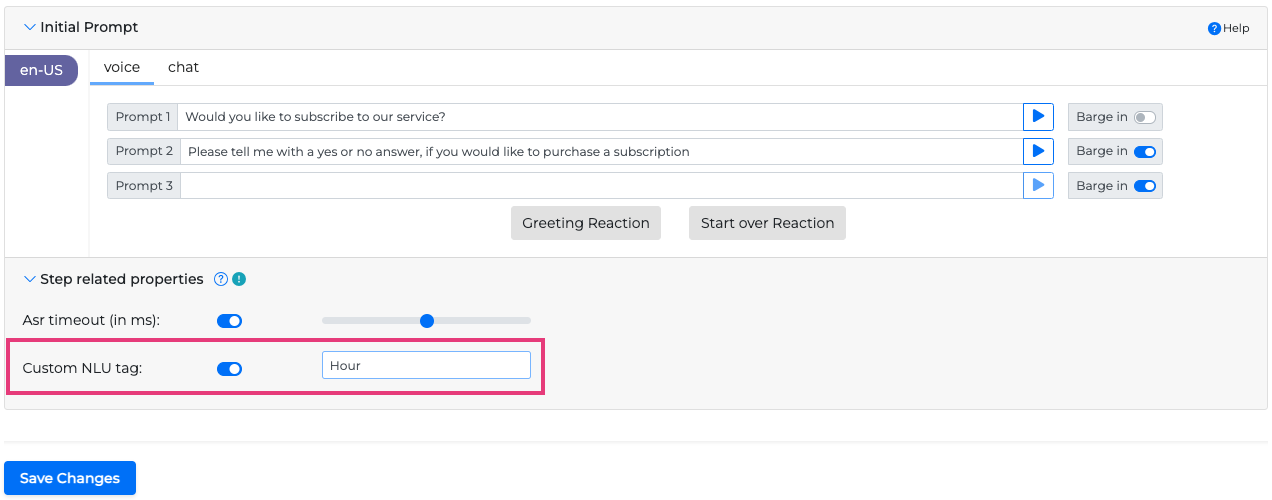
Initial Prompt
OCP miniApps® allow you to fully configure three custom initial prompts depending on the error level of the initial system prompt:
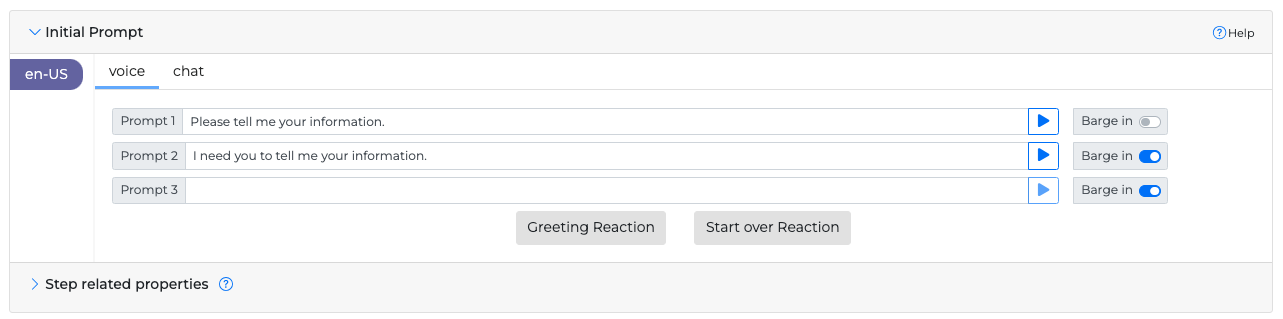
Prompt 1: Initial System Prompt that handles the initial prompt to be played to the caller
Prompt 2: Rephrase after 1st error (No Response, No Interpretation), it handles cases where you want to re-prompt to the caller, for example, if there was a
No Responseor aNo Interpretationevent.Prompt 3: Rephrase after 2nd error (No Response, No Interpretation), it handles cases where you want to re-prompt for a second time to the caller, for example, if there was a
No Responseor aNo Interpretationevent.
Greeting Reaction
Sometimes, when prompted for input, a caller may first greet the application instead of giving the input directly. For these cases, it is possible to configure a Greeting Reaction, which will trigger in conjunction with the initial prompt resulting in a more human-like experience.
To set up a greeting reaction, proceed as follows:
Navigate to the Initial Prompt section.
Click Greeting Reaction. The pop-up window opens.
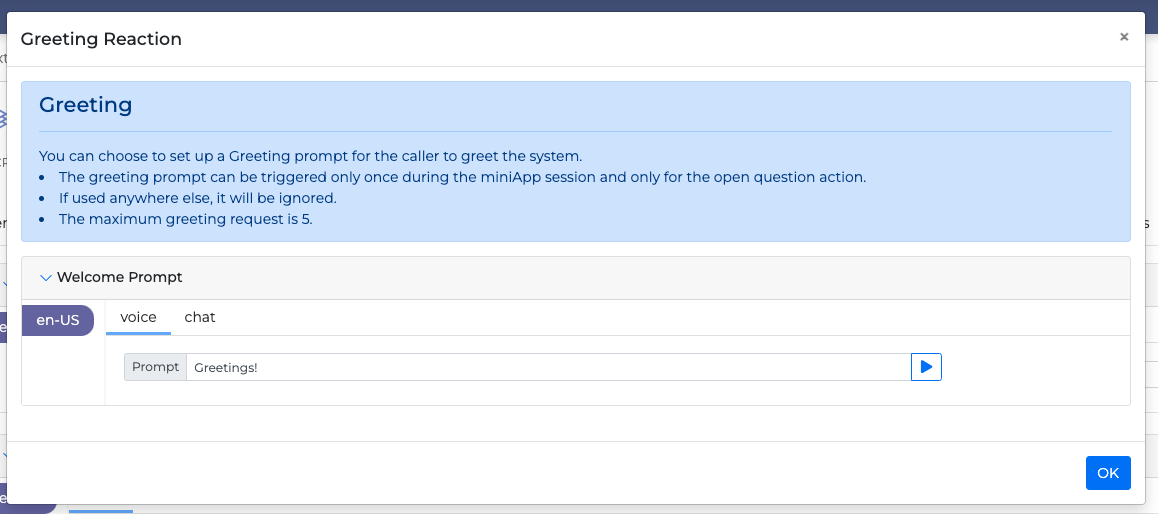
Insert the greeting text into the input field.
Click OK to save changes.
Barge-in option
If you want to activate barge-in for each step, use the toggle on the right side of each initial prompt:
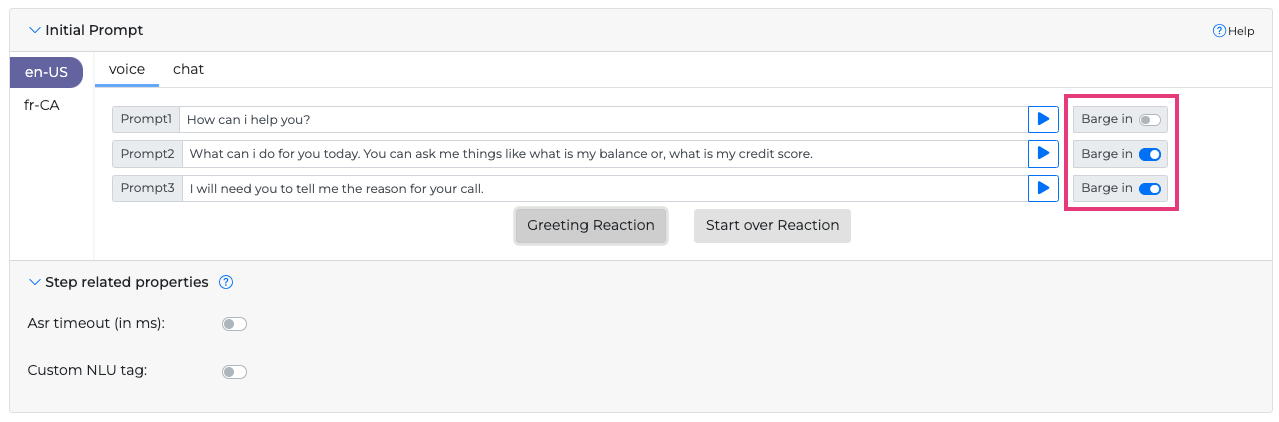
Currently the barge-in option works for the whole action, not for each individual prompt. This will be supported in a later version of the OCP miniApps®.
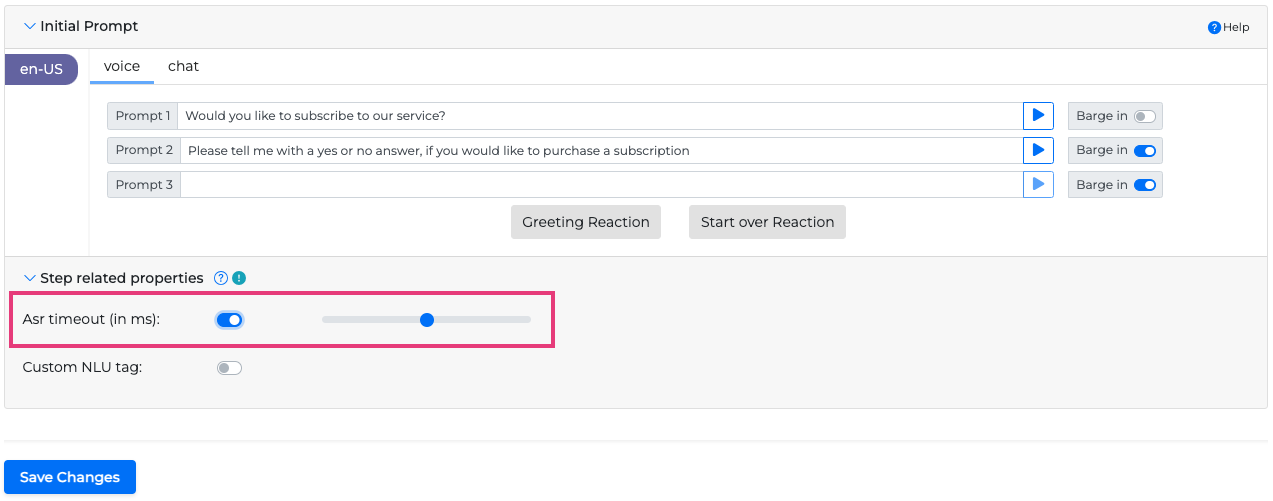
ASR timeout
You can also adjust the ASR timeout range slider to specify how long the system waits to trigger a NoInput event.
Custom NLU tag
Apart from the selection of an NLU model in the Understanding tab, it is possible to add a custom tag value in the corresponding text box, used to define a more specific context. Tag Hour for example. Under that tag context, a number input, for example, four, will be marked and understood as the time of the day from the system (four o’clock). So in general tags help differentiate and define a more specific meaning from user inputs.
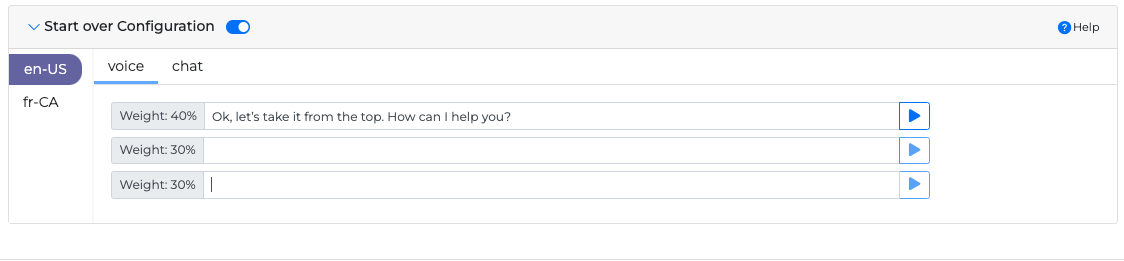
Start Over Reaction
Can only be triggered with the help of a Flow application, so should not be used in standalone miniApps. More info can be found in Event Handlers section Repeat Handlers function.
This functionality allows you to specify Start Over prompts that will be used after the user requests to start over. For instance, the following conversation may take place:
System: How may I help you?
User: I want to get information about my account.
If for some reason the system takes the wrong path here, the user might be inclined to interrupt with something like “no no, can we please restart”. In that case, in your Flow you can specify that upon hearing the word “restart”, the system will enter this miniApp with the specific Start Over prompt, like “Ok, let’s take it from the top. How can I help you?” as in the screenshot below.
To set up a Start over Reaction , follow the steps:
Navigate to the Initial Prompt section.
Click Start over Reaction. The corresponding pop-up window opens.
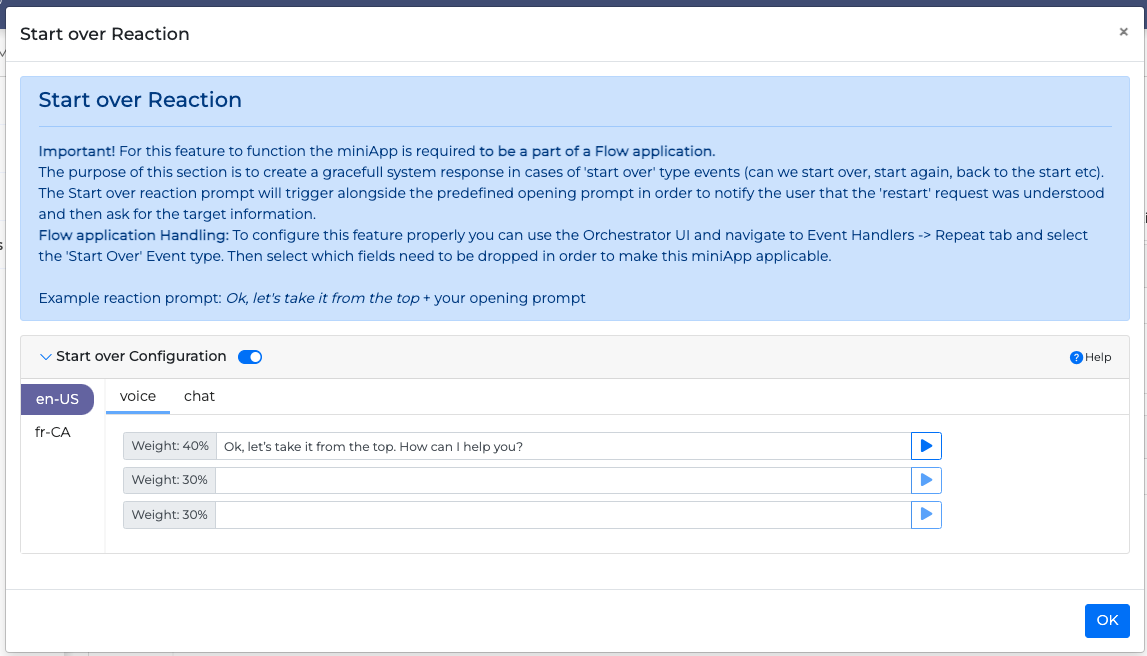
Enable the Start over Configuration.
Enter the text you wish to be played as a restart prompt. For example, “Ok, let’s take it from the top. How can I help you?”.
Press OK to save save the changes.
If you decide to use this functionality, you can additionally inform the user about which words will trigger the Start Over functionality by making the following announcement:
“Welcome to our service. At any point you can say 'start from the beginning' to take it from the top.”
After you configure the prompts, click Save Changes.
Validations tab
Please check the Validations Tab page.
Amount Settings tab
The Amount Settings tab is only available for Amount type miniApps.
The Amount Settings tab has the options to configure the amount settings. The selection defines the understanding of the miniApp regarding the amount the caller states.
It is mandatory to always have an Amount Type and Amount Unit declared. This will help service cases where the caller provides a plain amount input with no reference to the type or unit (for example, “I want to pay twenty”).
Available options are:
Amount Unit: Set the unit the amount is measured (USD, EUR, CAD, AUD, UAH, %, or No unit)
The No Unit option is designed to interpret quantitatively expressed numbers that aren't linked to monetary values or percentages. This feature is particularly useful in scenarios where the context involves quantities of items or entities. For example, counting the number of physical locations, such as the total number of stores, determining the quantity of discrete items, like the number of packages, assessing the size of a group, such as the total number of personnel in an organization.
By using the No Unit option, these numeric expressions can be accurately understood and processed without being mistakenly categorized as financial or percentage data. This enhances the ability to manage and utilize such data in various contexts effectively.
Amount Type: Set the amount type (monetary, percentage)

Date Settings tab
The Date Settings tab is only available for Date and DateRange type miniApps.
The Date Settings tab has the options to configure the date settings. The selection defines the understanding of the miniApp regarding the date the caller states and the way it is stored.
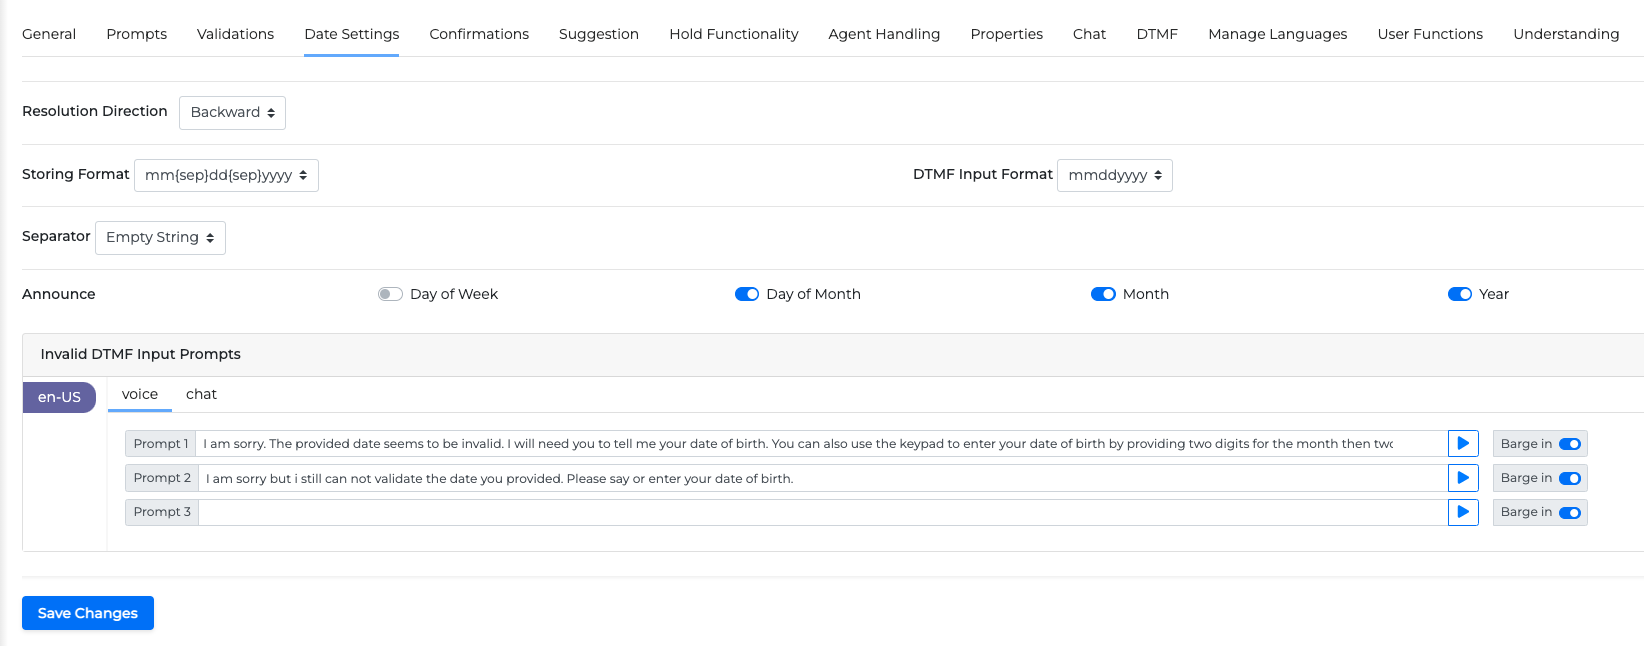
Resolution Direction: Select from the dropdown list Forward or Backward to define the time direction for completing an incomplete date value. Your selection will determine whether the auto-resolution algorithm will look for a date in the past or in the future in case the complete date is not mentioned. For example, if you are trying to confirm when a payment was made, it makes sense to use the ‘backward' value. In that case, a user input like “on the 25th”, which does not explicitly include a year or month input, will force the system to resolve the year and month value to the closest matching date in the past. The default value is set to 'backward’.
Storing Format: Stores the date provided in a specific selected format from a dropdown list (for example, month/day/year).
The Storing Format is used to provide an option to store the callers' input in a specified format in the miniAppResult object field under the input_value field. These fields and their values are intended for usage from CCaaS applications.
DTMF Input Format: When using DTMF to input the date, the system expects it in a specific format (for example, 0522 translates to May 2022 if we want to ask a credit card expiration date). In case the caller fails to provide a correct format, the system will announce back a related prompt explaining the correct input format.
Separator: Uses a specific separator for the provided date that is configurable by the user. (For example, month/day/year).
Date Announcement Options: During confirmation, the system can announce back the day of the week provided, the day of the month, the month and the year. The users can choose which of these values they want to be played back to the caller.
Invalid DTMF Input Prompts: You can set up to three prompts to be played when the user does not provide a valid DTMF date input. It is suggested to guide the user through the correct format with this prompt.
Confirmations tab
In the Confirmations tab you can manage and control whether you will confirm the caller’s provided data. To enable or disable the confirmations, use the Confirmation toggle.
Confirmation behavior can be customized to either ask every time ("standard") or based on a confidence threshold ("dynamic"). To further enhance the customer experience, the confirmation module features an additional mechanism that, when enabled, adds short pauses between a long piece of information being read back to give time to the caller to verify it ("slow confirmation"). To resemble the legacy confirmation behavior of DTMF systems, the confirmation module also allows the caller to accept or reject using keys instead of natural language ("DTMF confirmation").
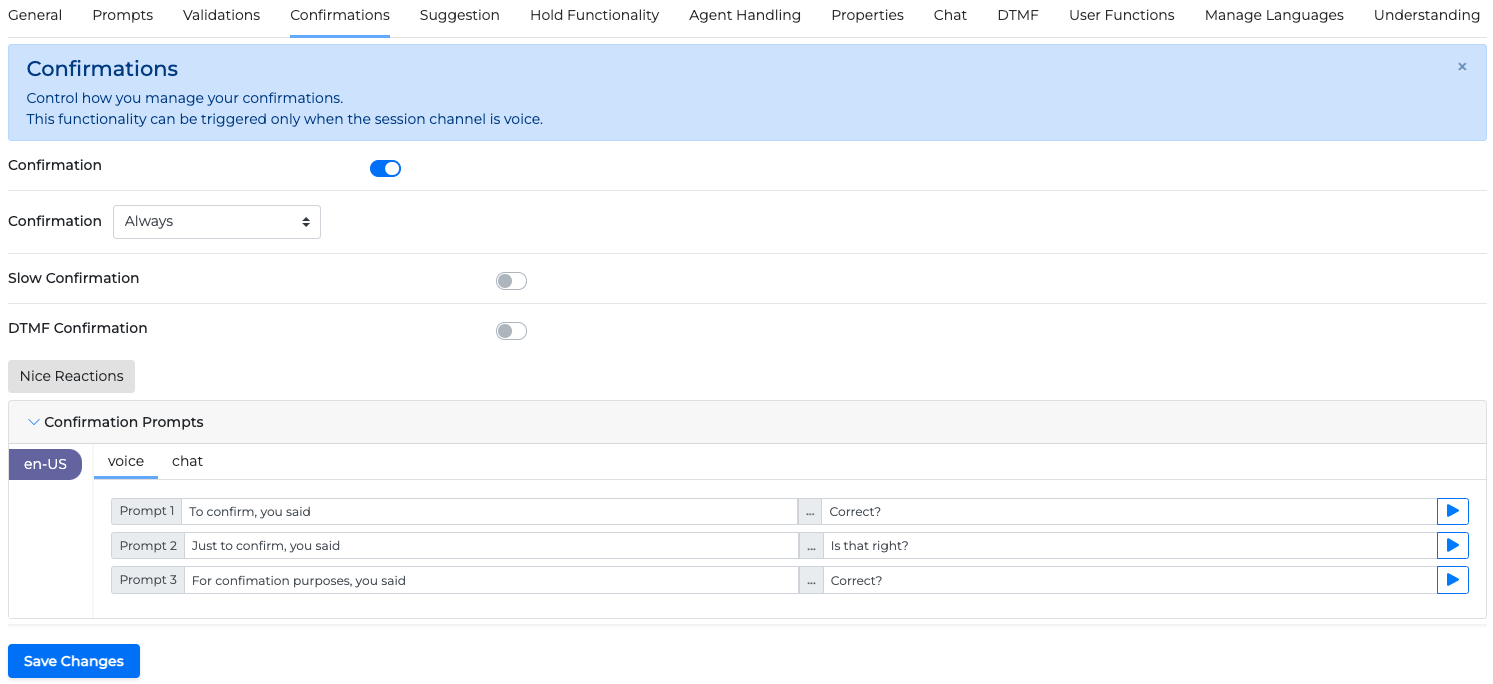
Trigger Confirmation
To control whether the confirmation will be always triggered, or below a certain confidence percentage, use the Trigger Confirmation drop-down menu and select one among the following options:
Always
If confidence below 95%
If confidence below 90%
If confidence below 85%
If confidence below 80%
Slow Confirmation
To add a pause between the system understood characters, use the Slow Confirmation toggle.
DTMF Confirmation
To enable DTMF Confirmation, use the DTMF Confirmation toggle. When enabled, you provide the caller the option to confirm or disconfirm the system understood characters by pressing a preset key.
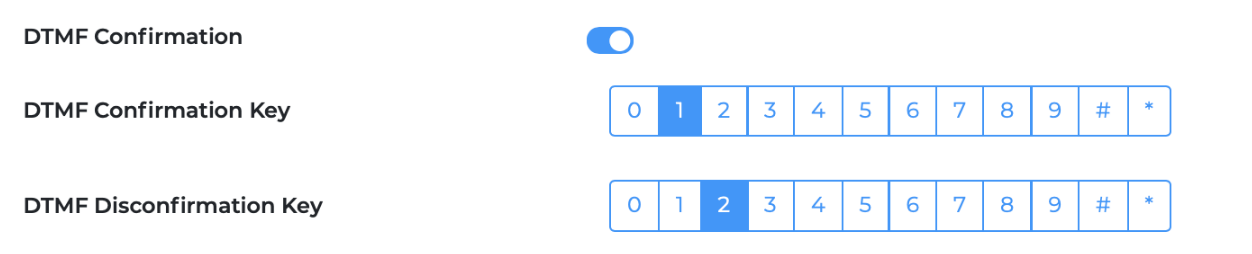
DTMF Confirmation in OCP miniApps®
Nice Reactions
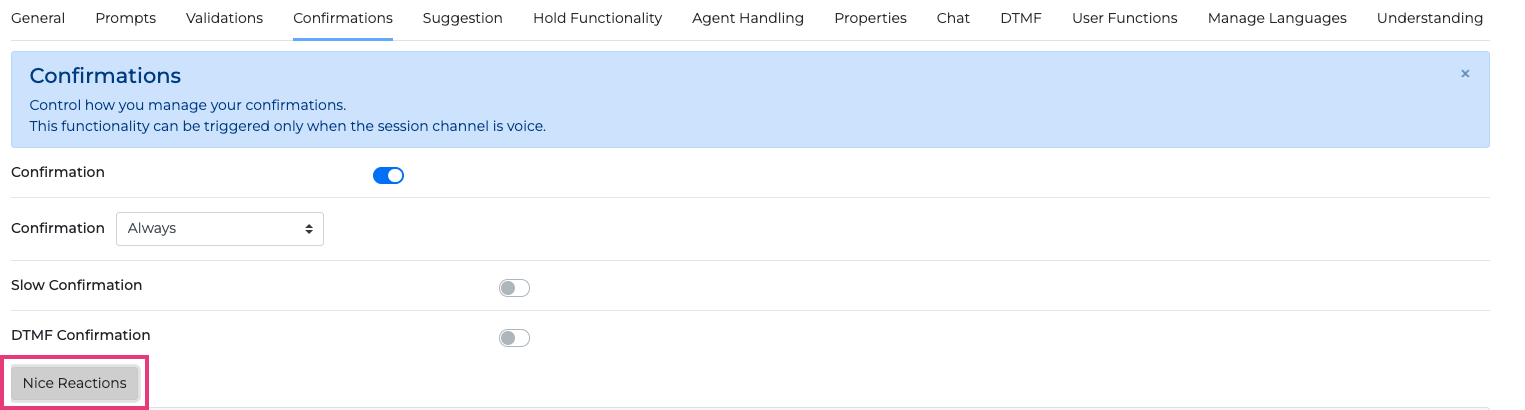
To add nice reactions, click the Nice Reactions button and a window will pop up, where you can configure them.
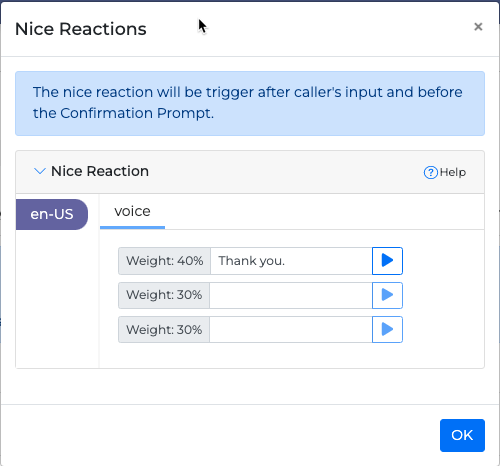
In the Nice Reactions window, you can optionally set nice reactions. Whenever the application identifies a caller confirmation, it randomly throws a nice reaction according to weight, before the confirmation or disconfirmation prompts, to make the dialog sound more conversational.
Confirmation Prompts
You can fully configure three custom confirmation prompts depending on the error level of the initial system prompt:
Prompt 1: Initial System Prompt that handles the initial confirmation prompt to be played to the caller.
Prompt 2: Rephrase after 1st error (No Response, No Interpretation), it handles cases where you want to re-prompt to the caller, for example, if there was a
No Responseor aNo Interpretationevent.Prompt 3: Rephrase after 2nd error (No Response, No Interpretation), it handles cases where you want to re-prompt for a second time to the caller, for example, if there was a
No Responseor aNo Interpretationevent.

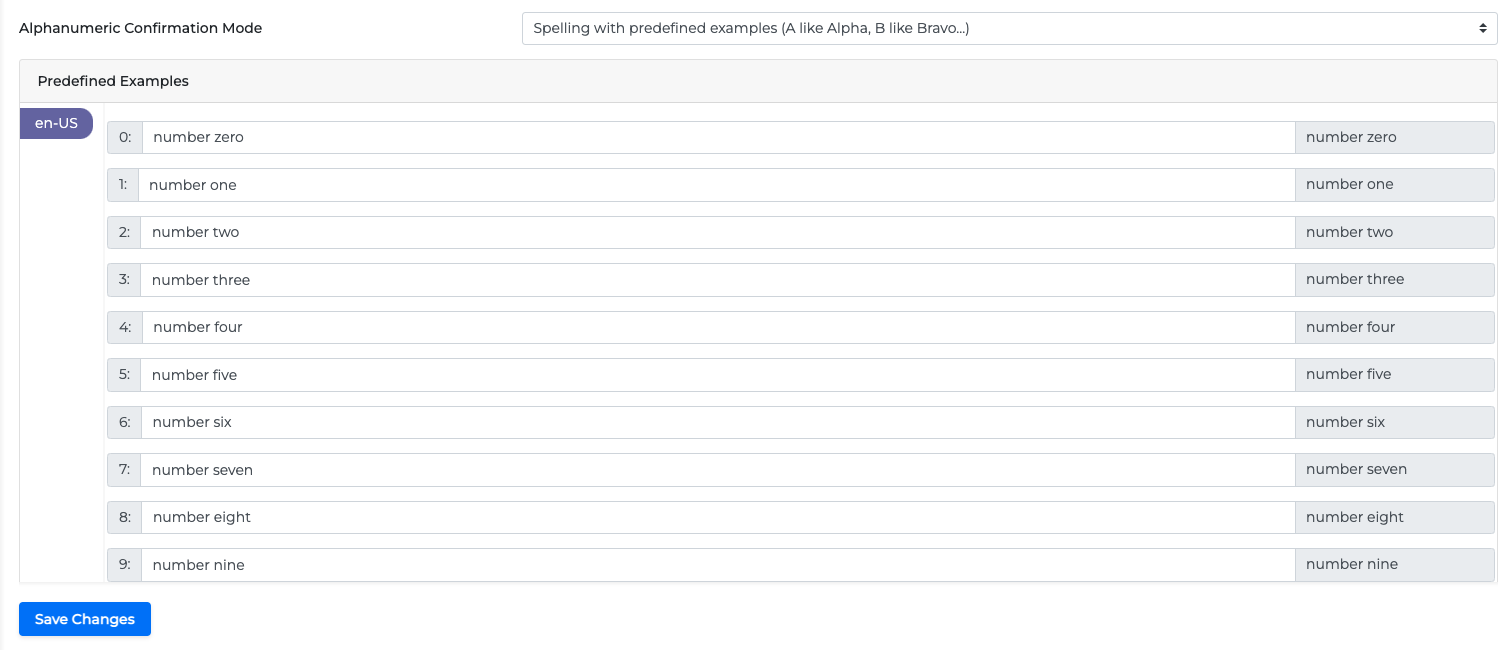
Only for the AlphaNumeric type, you can choose a predefined alphanumeric confirmation mode from the following drop-down list:
Spelling without examples (ABC123)
Spelling with predefined examples (A like Alpha, B like Bravo…)
Spelling with caller examples (A like Apple, B like Boston…)
Disconfirmation Prompts
You can fully configure three custom disconfirmation prompts depending on the error level of the initial system prompt:
Prompt 1: Initial System Prompt that handles the initial disconfirmation prompt to be played to the caller.
Prompt 2: Rephrase after 1st error (No Response, No Interpretation), it handles cases where you want to re-prompt to the caller, for example, if there was a
No Responseor aNo Interpretationevent.Prompt 3: Rephrase after 2nd error (No Response, No Interpretation), it handles cases where you want to re-prompt for a second time to the caller, for example, if there was a
No Responseor aNo Interpretationevent.

When you are done, select Save Changes to apply the new configuration changes.
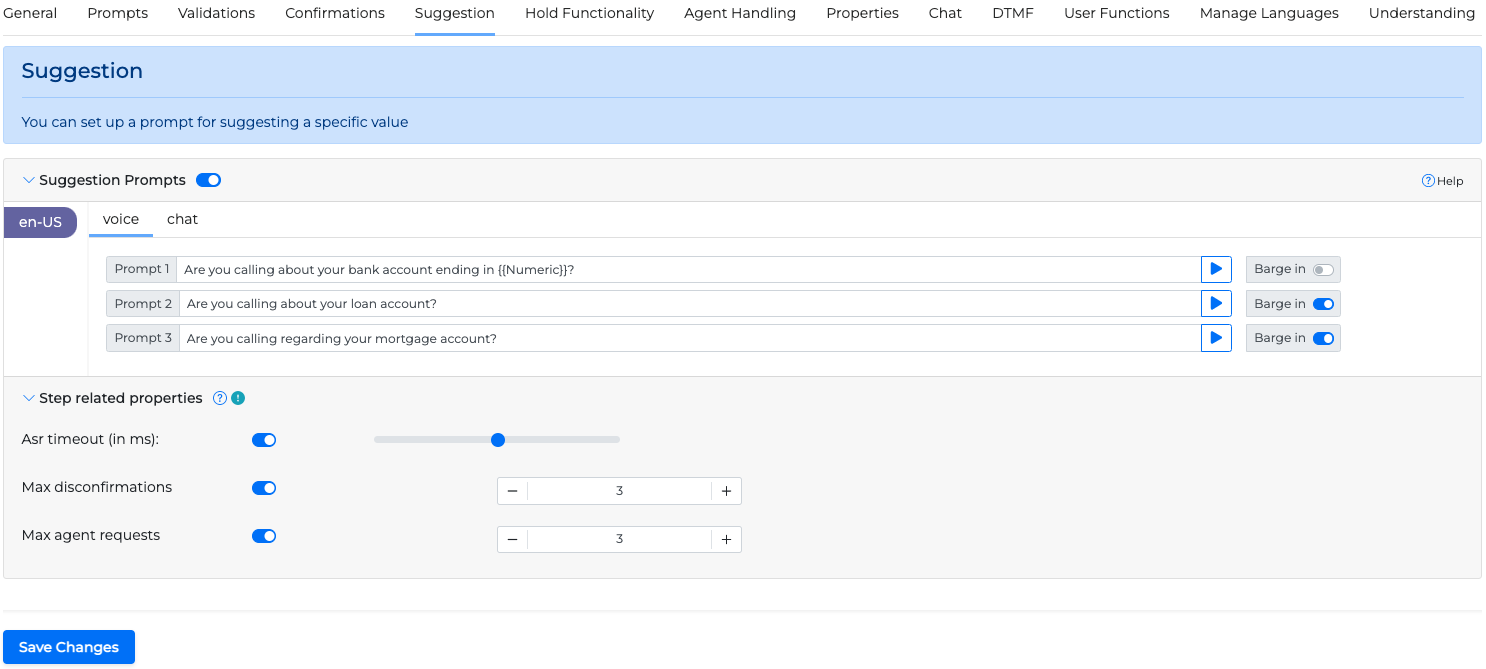
Suggestion tab
The Suggestion feature, when set, can make suggestions to the caller in order to make the dialogue quicker and to the point.
In the Suggestion tab, you can set up the desired suggestion prompts. To use the suggestion feature you must set the Orchestrator application accordingly, and connect a Set field to the corresponding miniApp. For more info read the corresponding article in Orchestrator User Guide.
In addition you can set this step’s related properties, ASR timeout, maximum number of disconfirmations, which will set the maximum number the caller will not agree with the suggestions made, and Max agent requests.
To enable or disable the suggestions, use the Suggestion Prompts toggle.
Hold Functionality tab
OCP miniApps® have a fully configurable hold functionality. This functionality can be turned on/off, and allows you to set up your own prompts according to the step of the flow and record a specific hold music.
In this tab, you can control and manage the hold functionality.
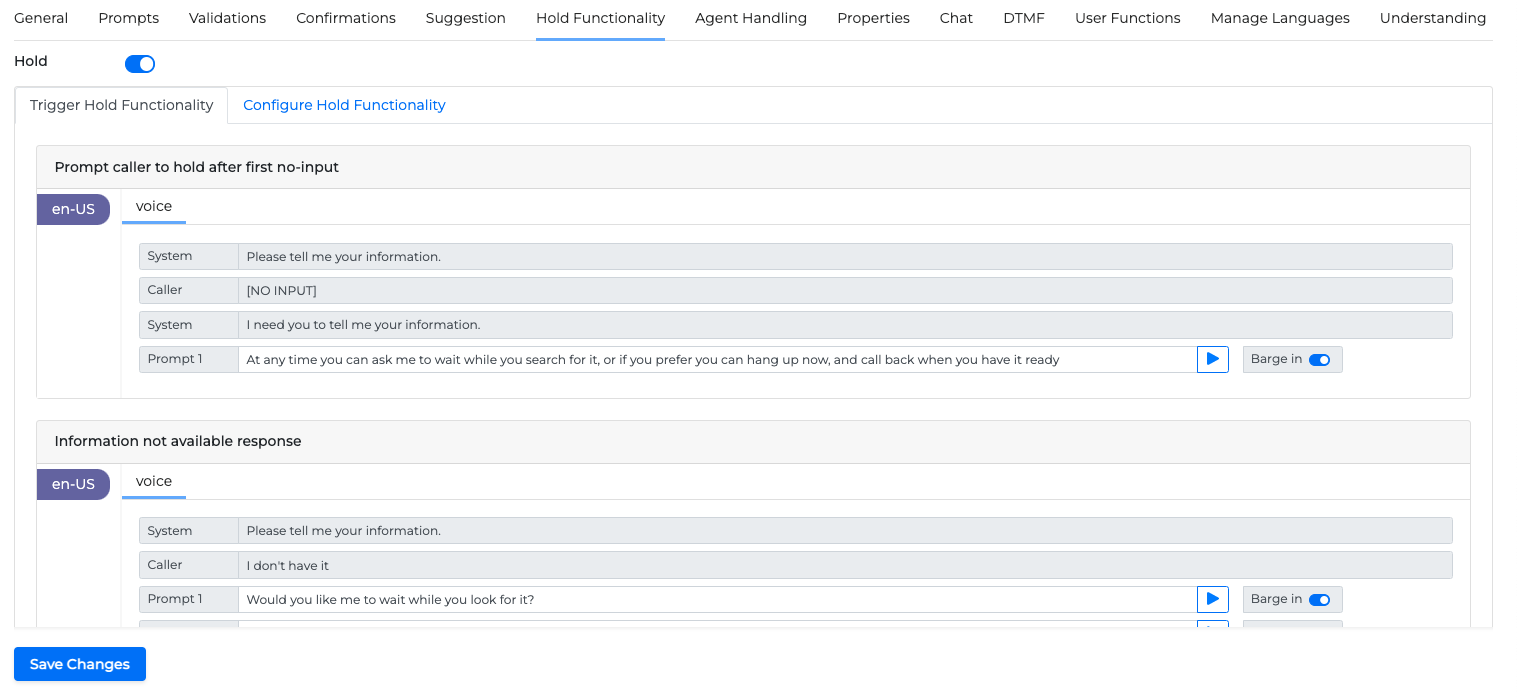
To enable the hold functionality, use the Hold toggle. Once enabled, you can control when and how the hold functionality will be triggered, and once triggered, you can configure the dialog evolution and exit.
Trigger Hold Functionality
Select Trigger Hold Functionality to control when and how the hold functionality will be triggered. You can trigger the hold functionality under three different scenarios:
Prompt caller to hold after first no-input

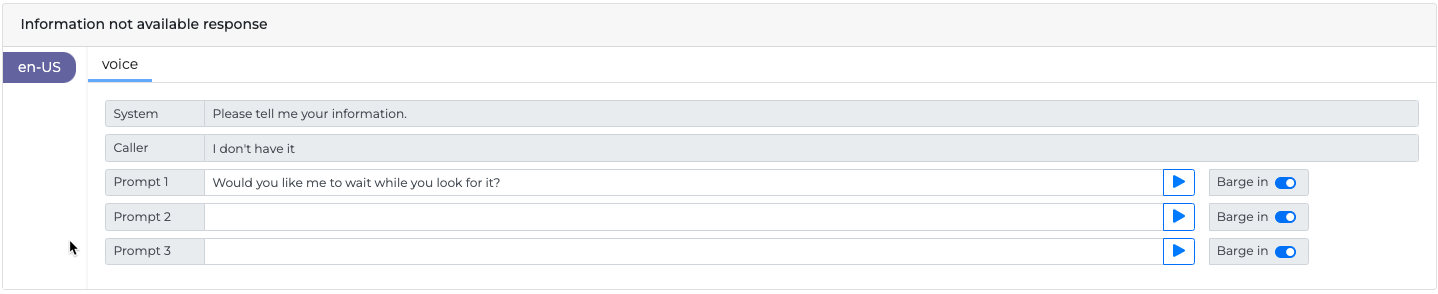
Information not available response
Prompt caller to hold after invalid information

Configure Hold Functionality
Select Configure Hold Functionality to configure the dialog evolution and exit.
Hold dialogue evolution configuration
Exit Hold functionality
Set a DTMF button to exit the hold state.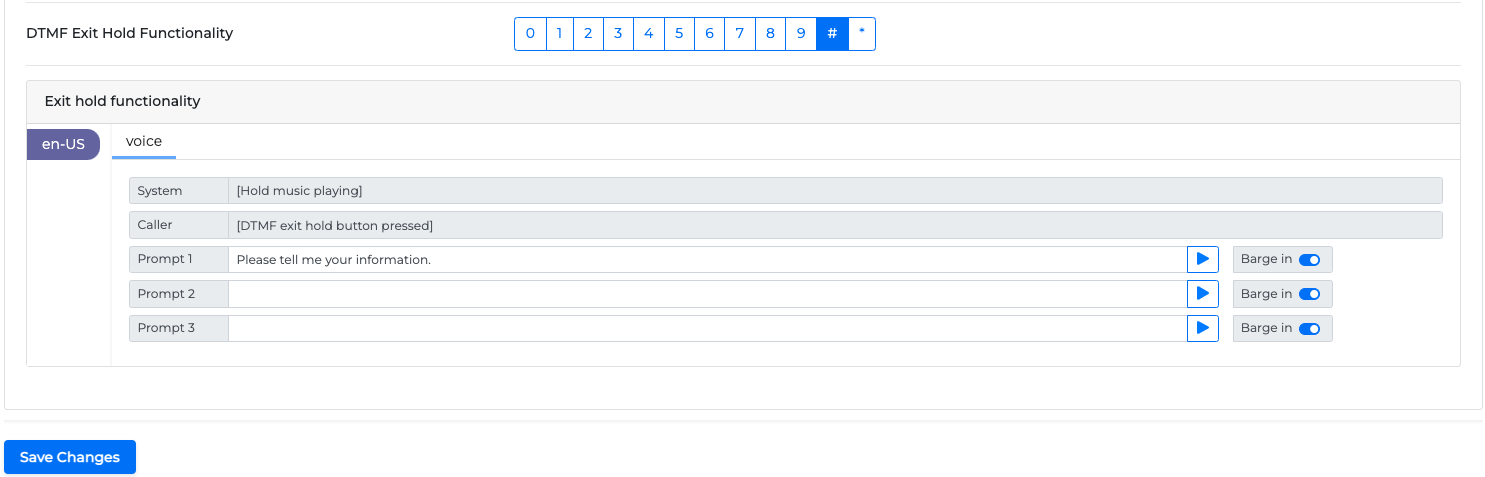
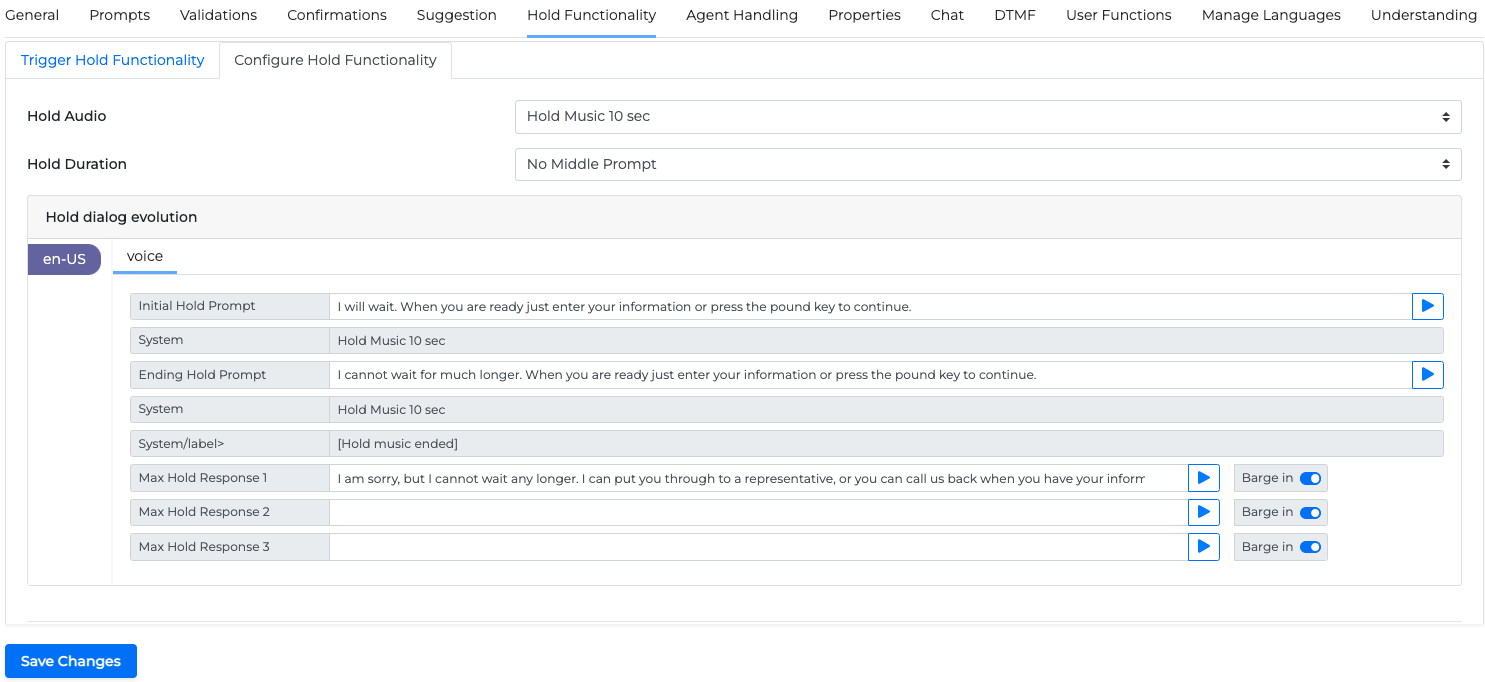
Hold Audio
Use the Hold Audio drop-down menu to select a pause or hold music for 10, 20, or 30 seconds.
Hold Duration
Use the Hold Duration drop-down menu to select a middle prompt, two times or three times a middle prompt, or no middle prompt.
Hold dialog evolution
In this pane, you can see the dialog evolution, depending on your options in the Hold Audio and the Hold Duration drop-down menus.
DTMF Exit Hold Functionality
In the DTMF Exit Hold Functionality, you can select which key the caller can press to exit the hold.
Exit hold functionality
In the Exit hold functionality pane, you can configure how the system will respond to exiting from the hold.
When you are done, select Save Changes to apply the new configuration changes.
Understanding tab
The Understanding tab feature is not available for trial accounts.
In the Understanding tab, you can select the NLU you wish to use to get the entity from.
Toggle the activation button from off to on to activate the required NLU from the list of available NLUs.
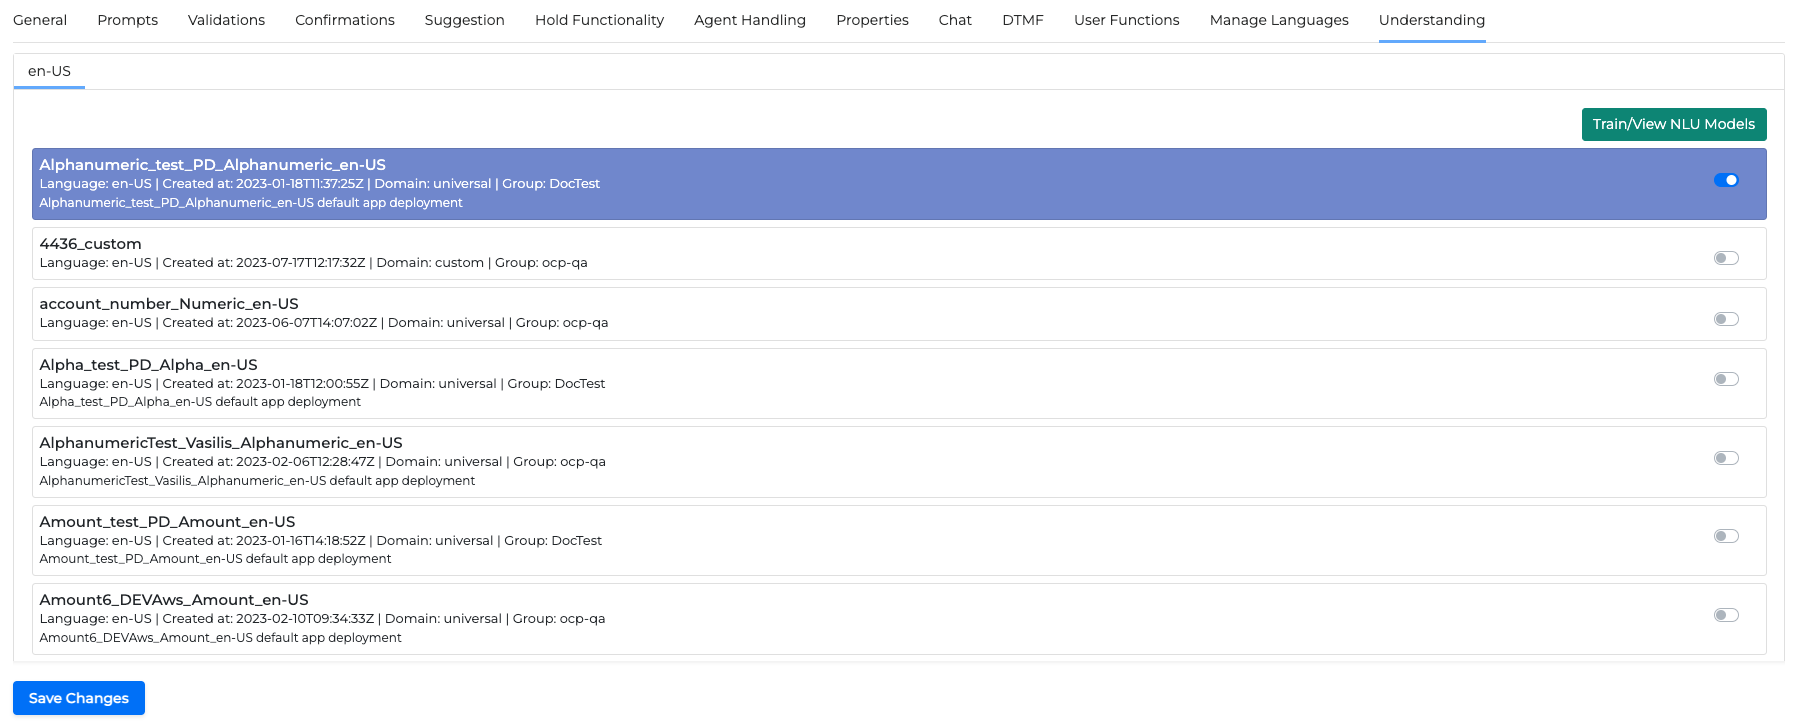
If none of the available NLUs is appropriate click the Train/View NLU Models button to be transferred to the NLU → NLU Models area in Console where you can create, modify and deploy NLU models. For more information read the OCP Conversational Natural Language® User Guide.
Agent Handling tab
To see the details on how to configure the Agent Handling tab, check out this article.
Properties tab
To see the details on how to configure the Properties tab, check out this article.
Chat tab
To see details about the Chat tab, check out this article (section 1).
Manage Languages tab
To see the details on how to configure the Manage Languages tab, check out this article.