.svg)
Understanding OCP Conversational Natural Language®
OCP® Conversational Natural Language® is the OCP component you use to build, train, evaluate, deploy, and test Natural Language Understanding (NLU) models.
An NLU model analyzes text and extracts meaningful intents, entities, entity features, and other syntactic elements. Your dialog applications use the deployed model to understand what a caller or a chat user wants and to drive the conversation flow.
A model combines two sources of understanding:
-
Rule-based (RB) understanding, delivered out of the box by the pre-tuned deepNLU® xPacks from Omilia and selected through the model domain.
-
Machine learning (ML) understanding, which you build yourself by adding custom intents and utterances and training the model.
You can use either source on its own or combine both. When both are used, an Intent Selection Policy decides which result wins.
Key concepts
|
Term |
Definition |
|---|---|
|
Intent |
The goal or purpose a user expresses in an utterance—the action the user wants to perform. |
|
Utterance |
One of the many phrasings a user can use to express the same intent. |
|
Entity |
A value extracted from the conversation that helps resolve the user query—a keyword or piece of information you want to capture. |
|
deepNLU® xPack |
The pre-tuned rule-based pack from Omilia that supplies out-of-the-box intents and entities for a given domain and language. Pre-built intents are labeled RB-XP and cannot be deleted, only disabled. |
|
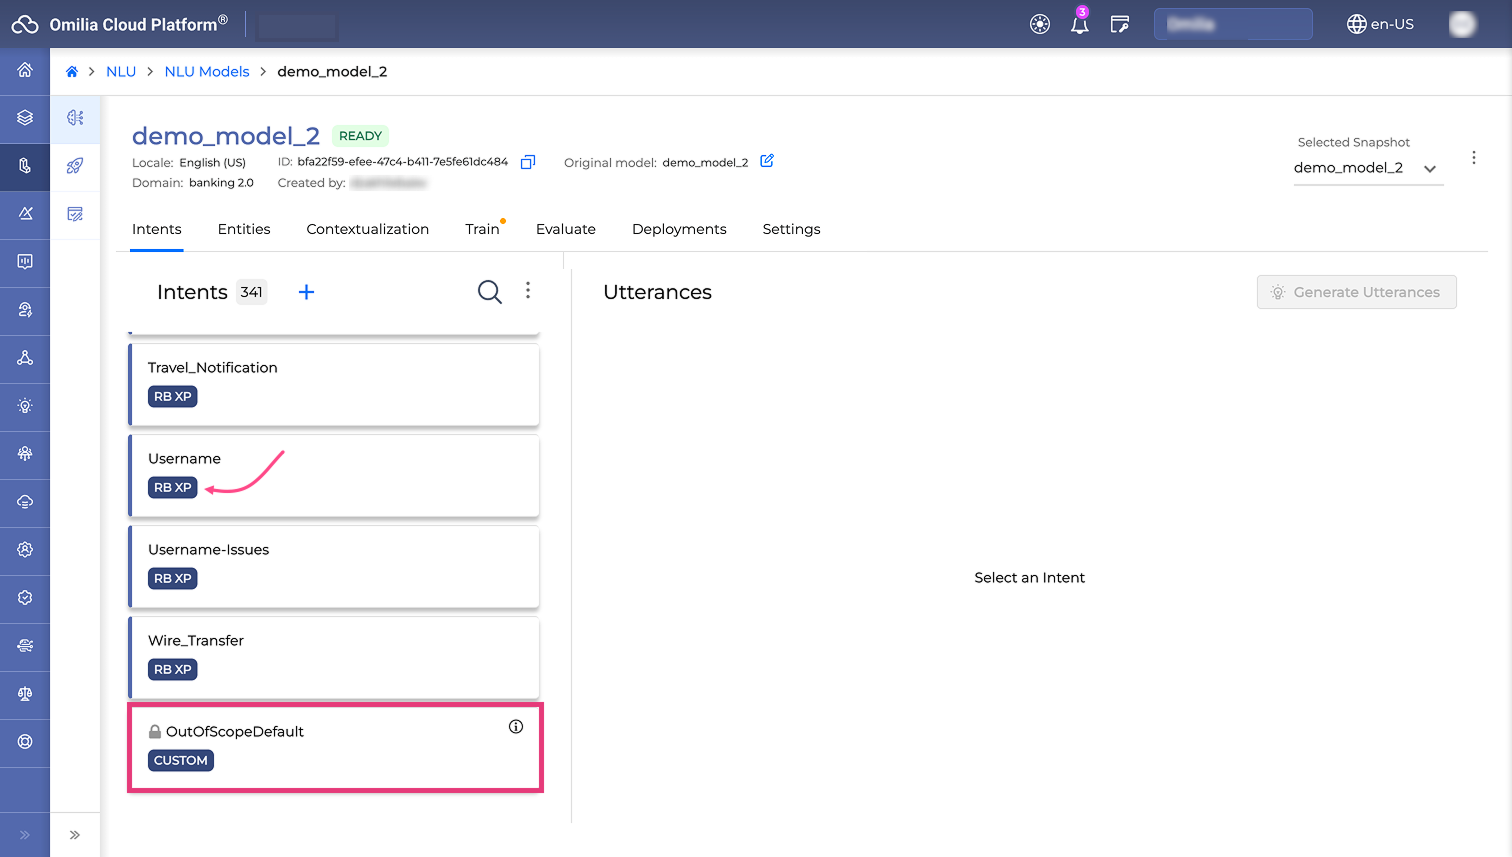
OutOfScope Default intent |
A fallback intent created automatically in every model, regardless of domain. It collects the utterances the model ignores, so that the model selects only explicitly defined intents. |
|
Snapshot |
A saved version of a model at a point in time—its intents, entities, utterances, and logic. Snapshots support version control, experimentation, and safe rollback. |
|
Deployment |
A running instance of a model snapshot that your application calls. A deployment is either Testing or Production. |
A model reports one of four statuses: Not Ready (add and train custom data), Working (training in progress), Ready (the model can be deployed and tested), and Failed (training failed).
For the full lists of pre-built intents per language and domain, see Intent lists. For the tags that activate specialized parsing rules, see NLU Tags lists.
Building a model
Creating an NLU model
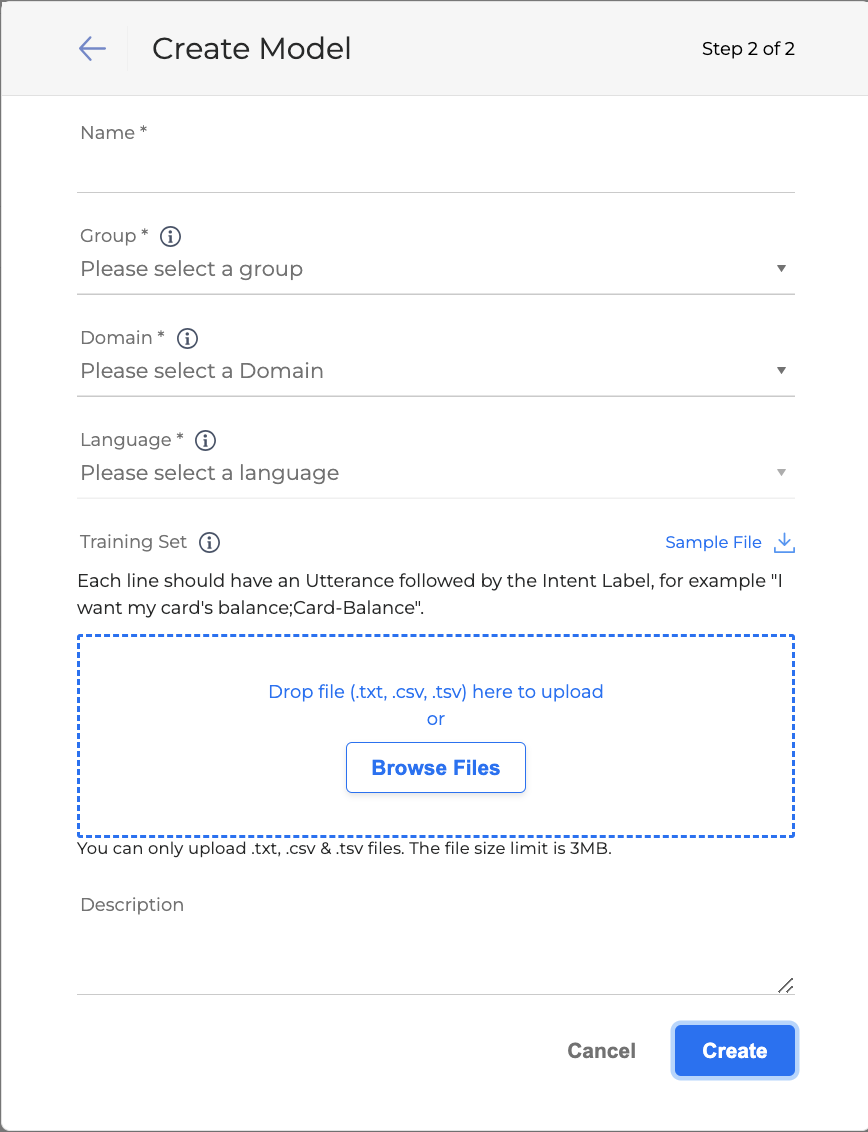
Create an NLU model by selecting a domain and a language. The domain determines what understanding the model gets out of the box.
|
Domain |
Out-of-the-box understanding |
|---|---|
|
Universal |
Pre-built entities only. Add your own intents to build intent understanding. Supports the UK Addresses add-on for en-GB models. |
|
Universal 2.0 |
Pre-built entities that are not tied to a specific domain, so the domain suits any use case. Supports the US Addresses add-on. |
|
Generic |
Pre-built intents covering multiple domains. Comes pre-trained and can be deployed as is. |
|
Banking 2.0 |
Pre-built intents for financial services. |
|
Car Retail |
Pre-built intents for the automotive sector. |
|
Energy |
Pre-built intents for the energy industry. |
|
Telecommunications |
Pre-built intents for communication services. |
|
Custom |
No pre-built understanding. Fully customizable by adding your own data and uploading your own custom NLU Logic. |
Regardless of the domain, you can extend the model with your own data using machine learning.
Additional options set at creation time:
-
Enable Multiple Intent Recognition—available for en-US and en-GB models. Turns on double intent recognition.
-
Training Set—optionally upload custom training data in TXT, CSV, or TSV. Select Sample File to download an example.
-
Group—the group of users who can access the model.
Double intent recognition
Double intent recognition handles inputs that contain more than one intention. For example, "I want to check my balance and pay minimum payment" resolves into two intents: Balance-Inquiry and Payment-Minimum_Payment.
Model versions and limits
The machine learning software version of a new model is always the latest, but you can import pre-trained models built on earlier versions. A model that is not on the latest version is flagged with an exclamation icon. The maximum number of models per environment is limited; when the limit is reached, remove unused models—see Deleting a model.
Adding custom data
Beyond the out-of-the-box resources, you can add your own intents and entities to extend the understanding of the model. For a Custom domain model, this is the only way to build understanding.
-
Upload intents in bulk—upload a TXT, CSV, or TSV file (UTF-8, Unix line breaks) from Context menu → Upload intents.
-
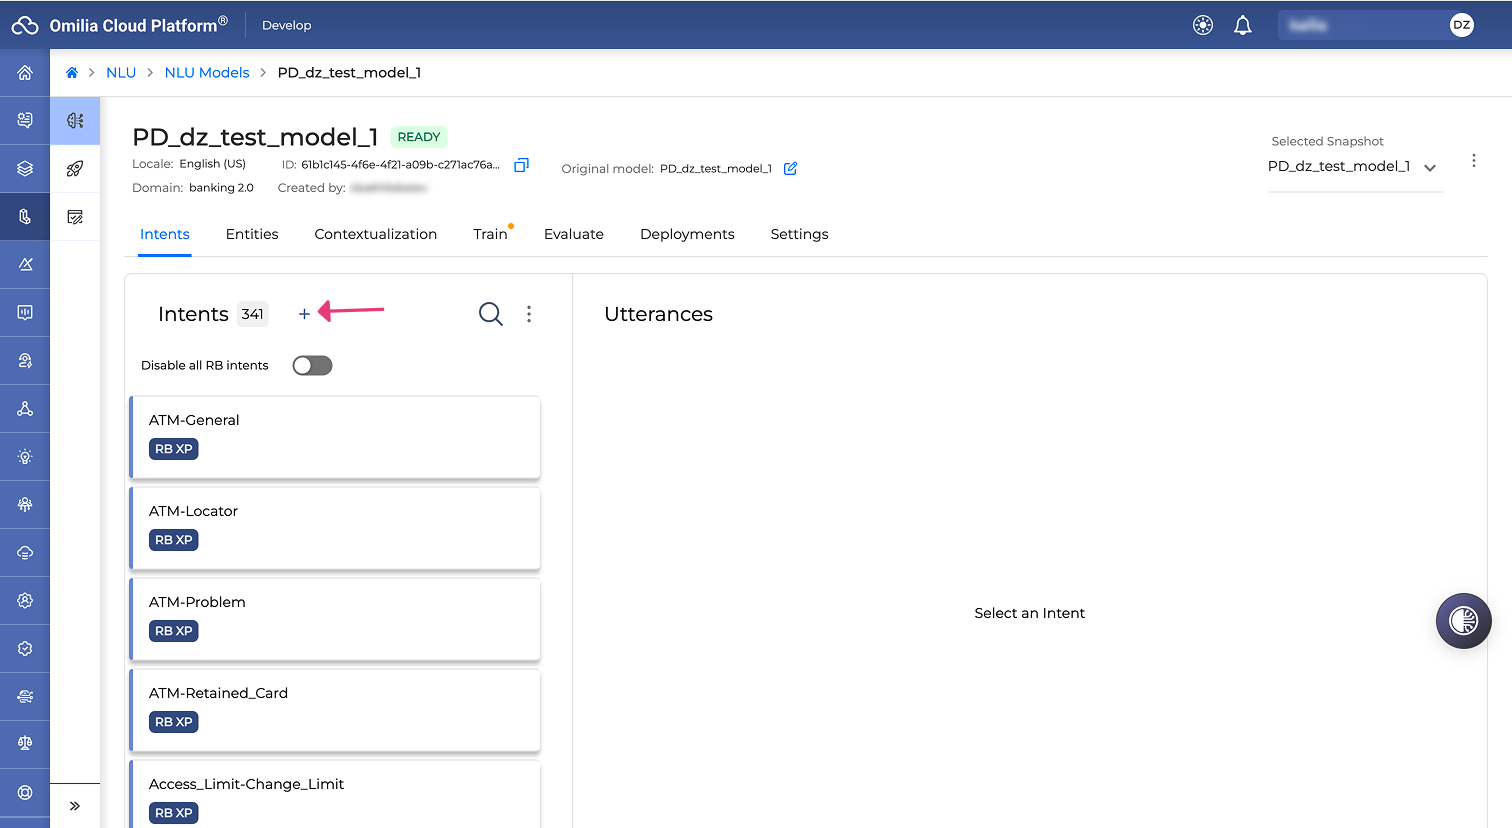
Add intents manually—on the Intents tab, add an intent, then add utterances to it.
-
Merge intents—combine several intents, out-of-the-box or custom, into one. Merged intents carry a Merged icon and can be edited or deleted later.
-
Disable pre-built intents—toggle individual RB-XP intents off, or use Disable all RB intents to rely exclusively on ML intents. The Disable all RB intents toggle is available for non-custom domain models only. Pre-built intents cannot be deleted.
-
Add entities—on the Entities tab, add custom entities with reference values and alternatives. Custom domain models do not support entities.
-
Upload an entity dictionary—populate an entity in one step from a CSV file of up to 1 MB, with one reference value and one global alternative per line.
-
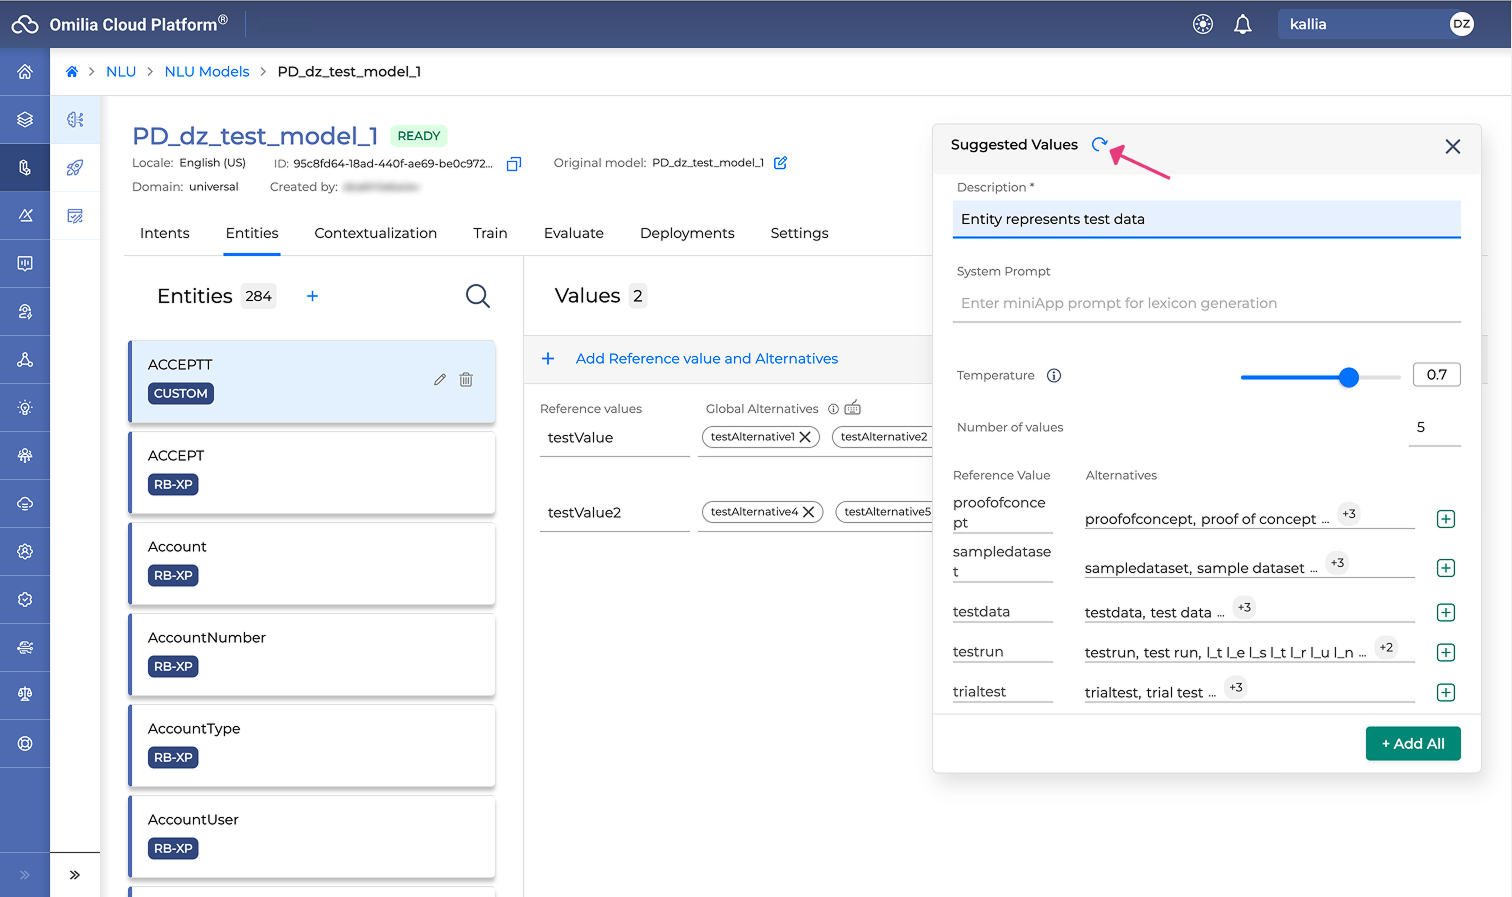
Generate values with AI—select Values Suggestions on an entity to open the Suggested Values dialog. Configure Description, System Prompt, Temperature (default 0.7), and Number of values (default five), then add suggestions individually or with + Add All.
-
Reference entities inside utterances—type
@to insert an entity, or@Entity.Valueto reference a specific value.
How many utterances per intent. Below five utterances an intent is flagged red and the model cannot be trained. Training requires 10 utterances per intent. For production-quality accuracy, best practices recommend at least 20 per intent, with intents kept balanced so that the largest intent has no more than twice the utterances of the smallest.
Validating the dataset
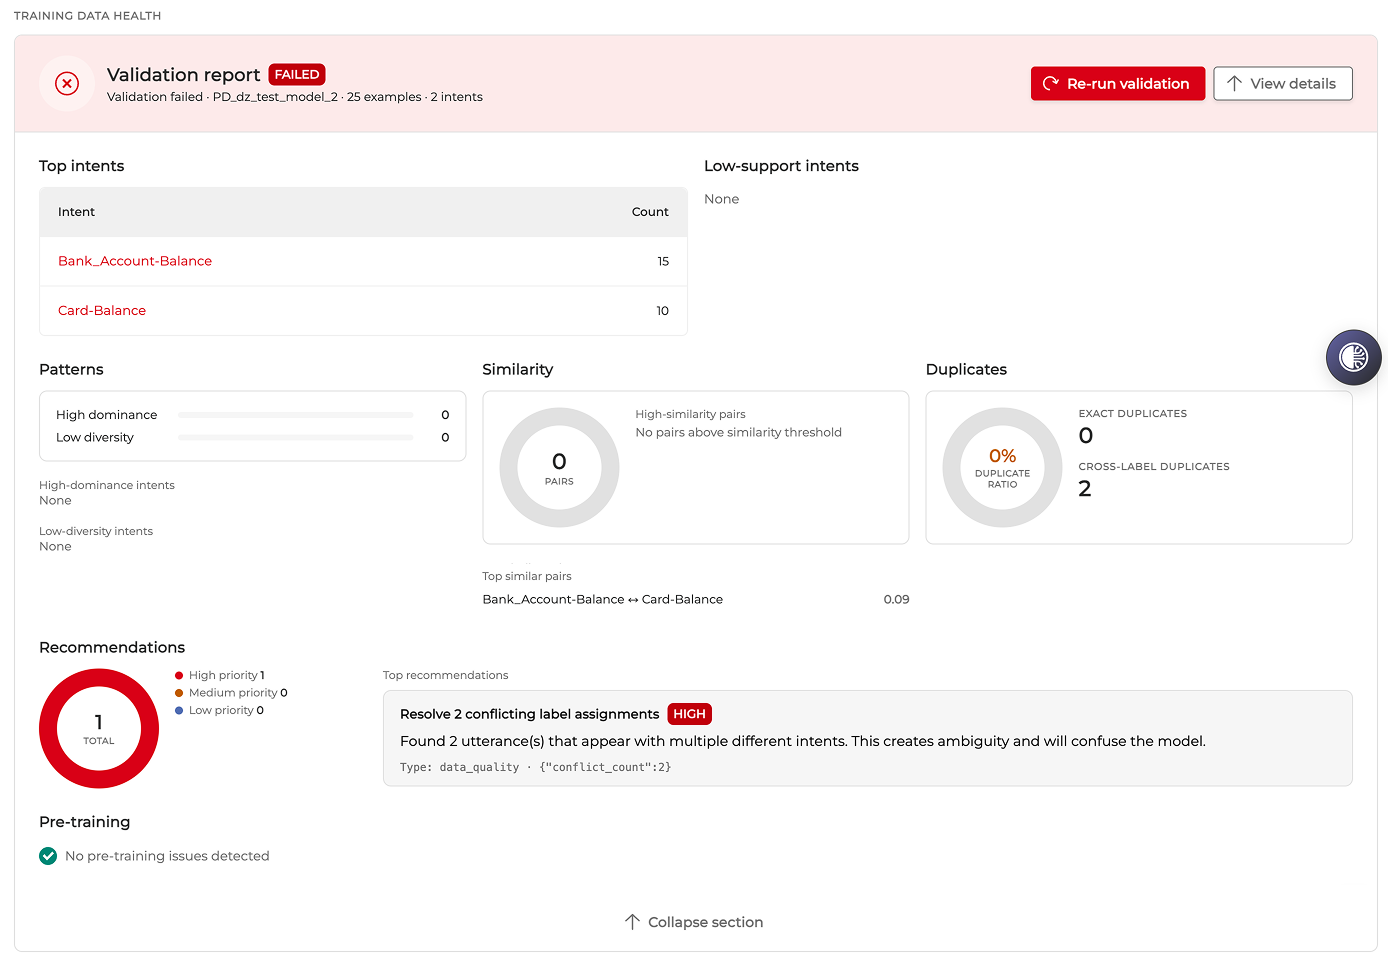
The Validation report block checks the health of your training data before you train. It appears as soon as the model has at least one custom intent.
Select Run validation to produce a report covering:
-
Top intents—intents with the highest utterance counts; problem intents are flagged in red.
-
Low-support intents—intents with too few utterances.
-
Patterns—high dominance or low diversity in the dataset.
-
Similarity—intent pairs similar enough to confuse the model.
-
Duplicates—exact and cross-label duplicate ratios.
-
Recommendations—actions to fix the data, prioritized as High, Medium, or Low. For example, the report identifies the same utterance assigned to two different intents.
-
Pre-training—any detected pre-training issues.
A failing report shows a FAILED status. Fix the issues and select Re-run validation.
Contextualizing the model
Contextualization lets you define context groups and context rules, so that the model resolves ambiguous input differently depending on the situation. For example, "credit" means debt in general, but means a card type in the context of "Is it a debit or a credit card?".
-
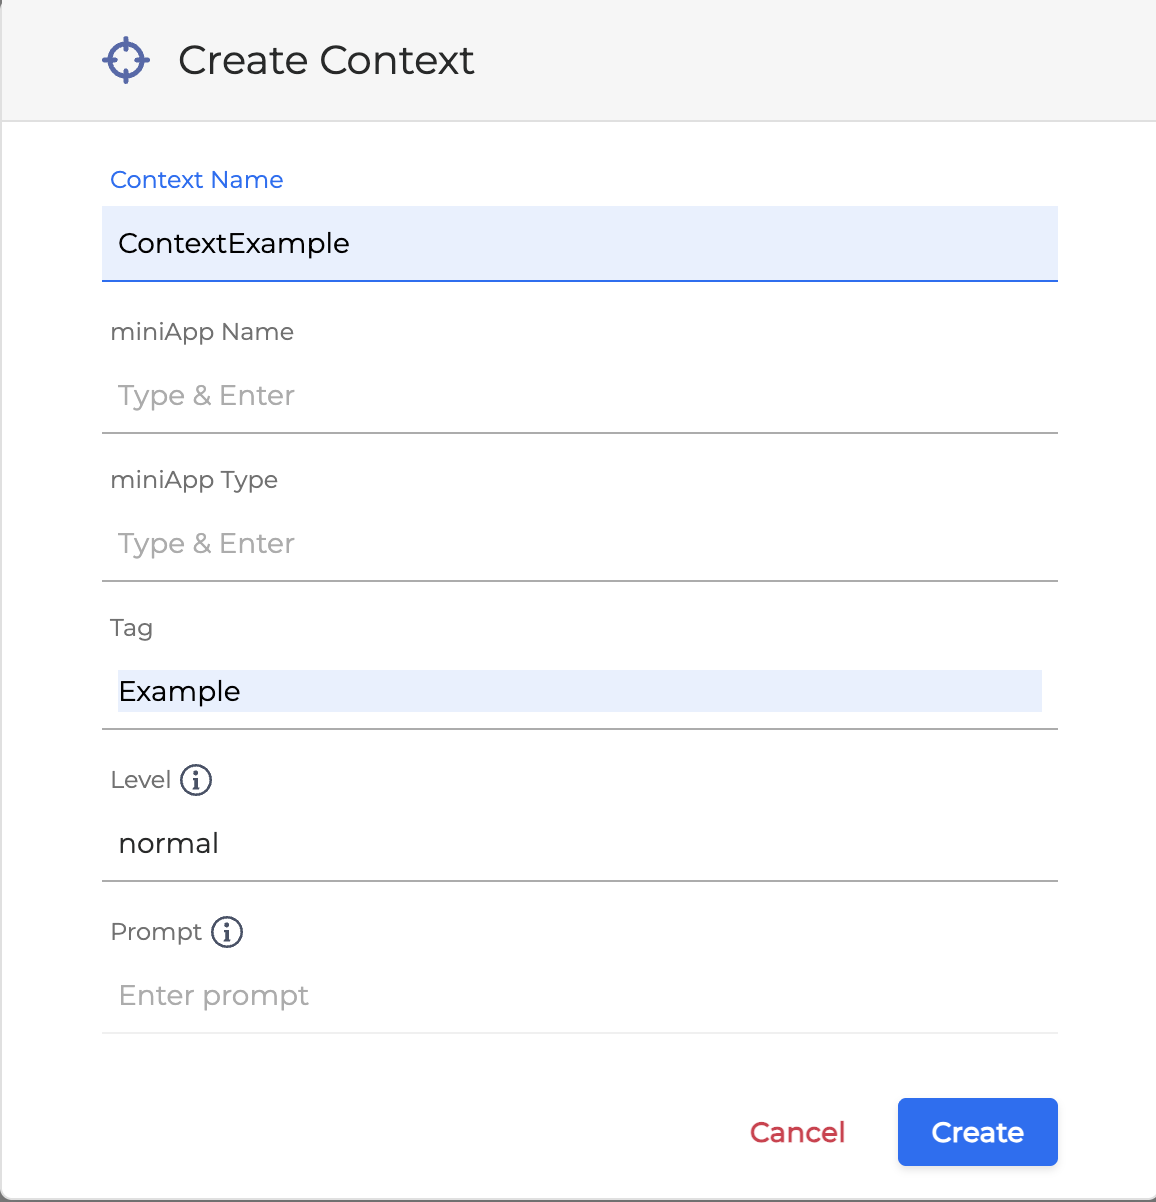
Contexts are created on the Contextualization tab. Use the Global context for system-wide defaults, or create your own.
-
A context is defined by Context Name plus at least one of miniApp Name, miniApp Type, Tag, Level, or Prompt.
-
Context rules pair a matching pattern with an action—marking an entity, unmarking it, or setting a feature value. Rules are ordered, and you can reorder them by drag-and-drop or through the Order drop-down list.
-
View the rules of one context with View Rules on its card, or all rules across contexts with View all Rules.
-
A context referenced by a rule carries a CONTEXT IN USE badge and cannot be edited or deleted until its rules are removed.
Training and evaluating
Training an NLU model
Training teaches the machine learning part of your model to understand your custom data. A model built purely on a pre-tuned xPack needs no training. A model with custom intents does, and so does a previously trained model to which you added new data.
Minimum requirements: at least two intents and at least 10 utterances per intent.
Deployed models are locked and cannot be trained or edited. They are available in view-only mode.
Before training: K-Fold cross-validation
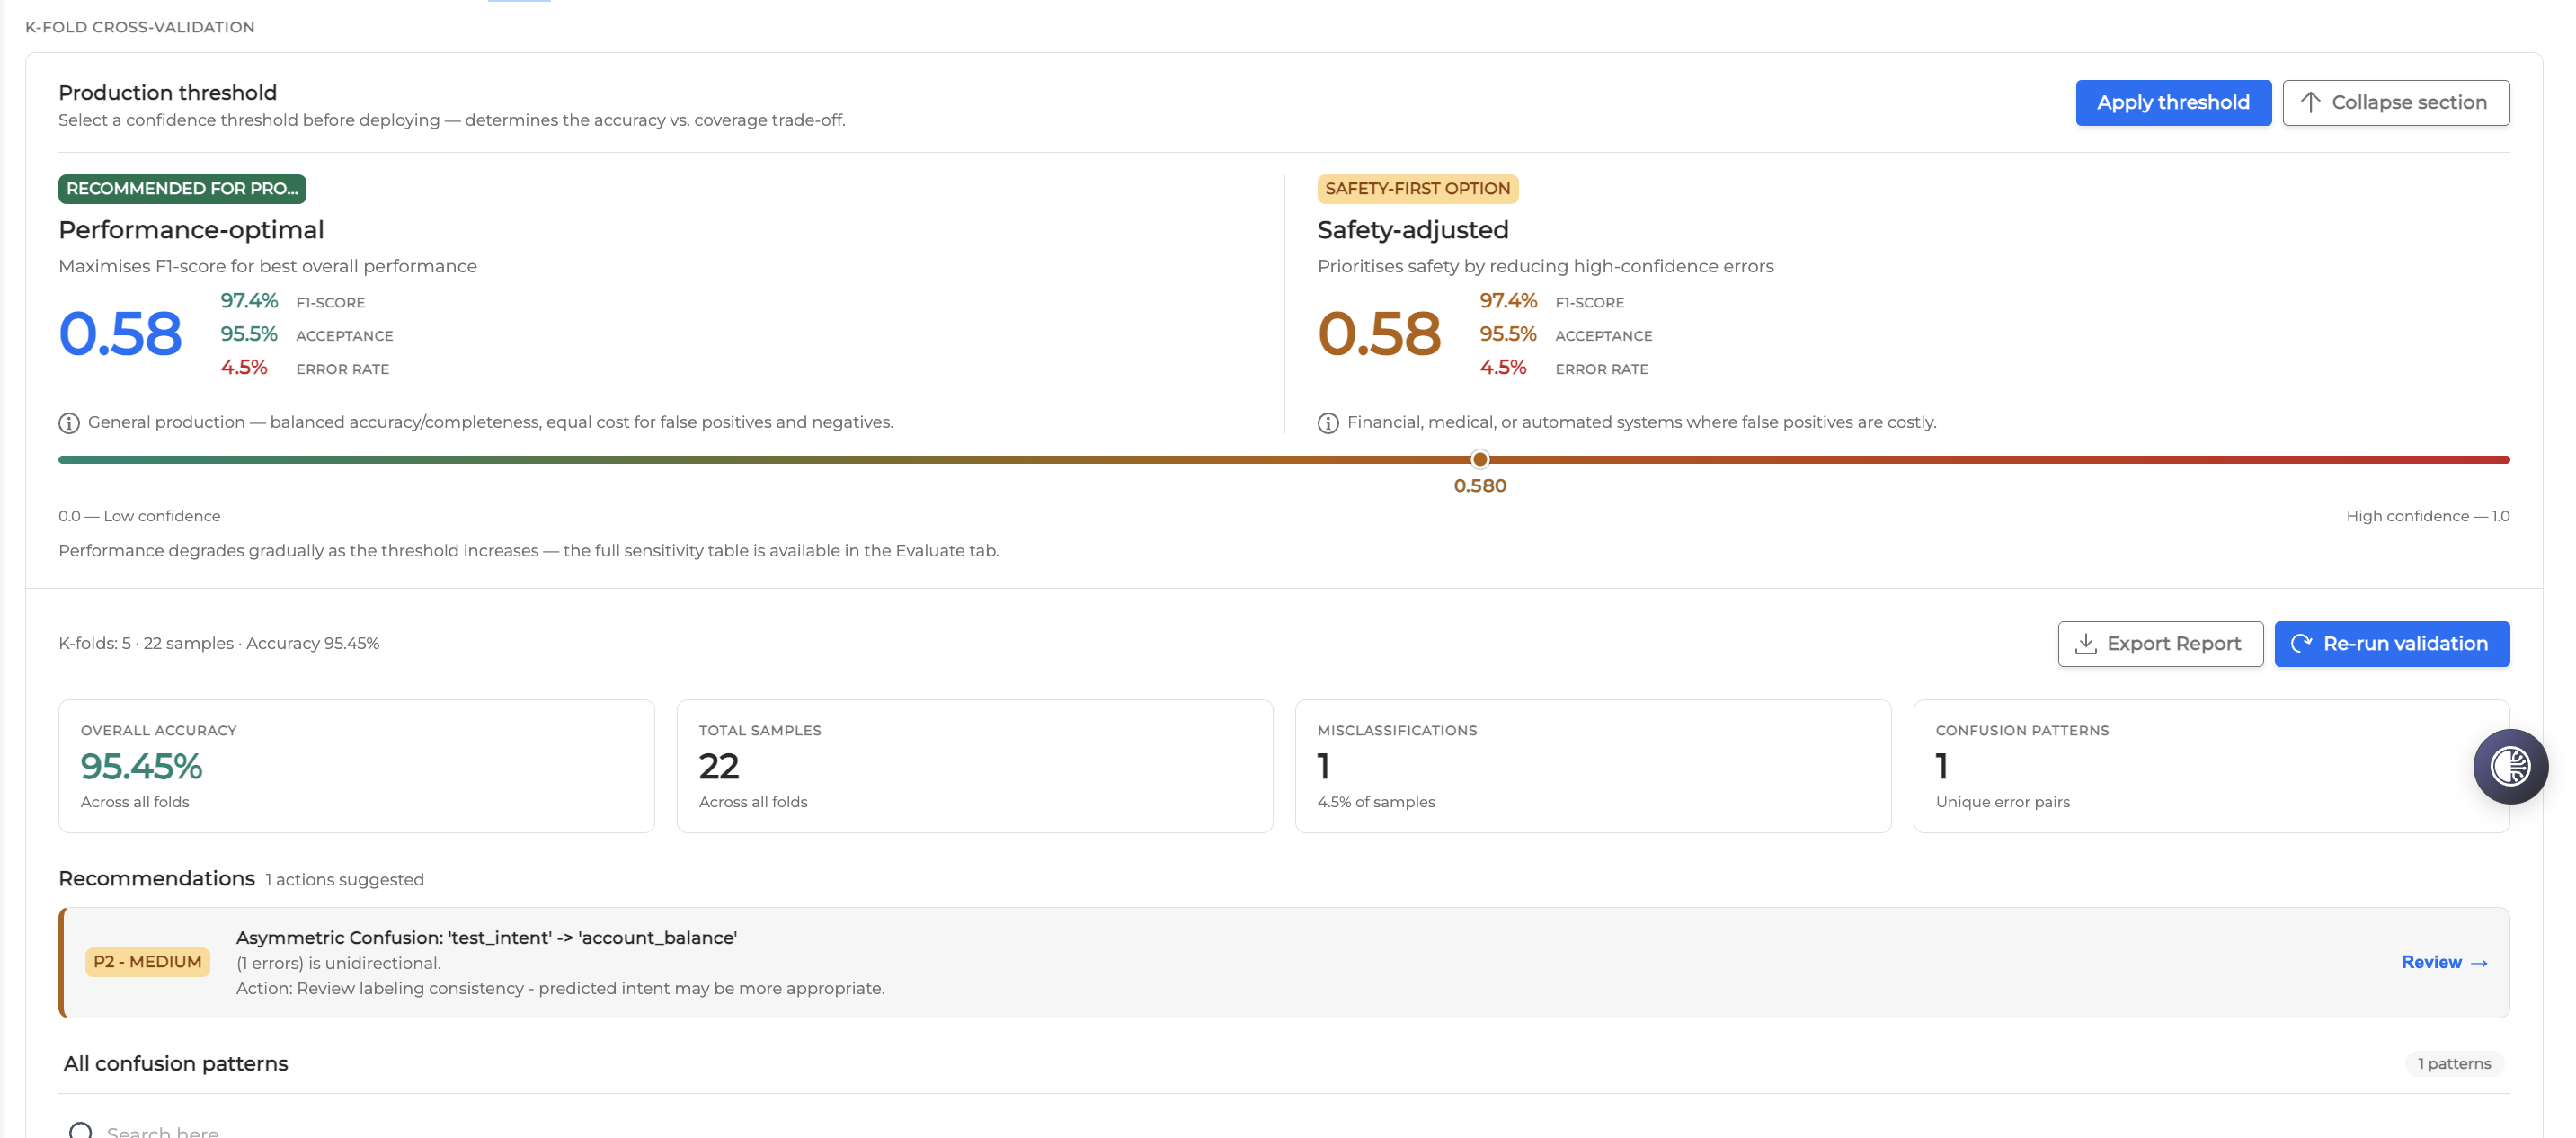
Run K-Fold cross-validation from the Train tab to find the optimal threshold. It requires at least two intents with seven or more utterances each. The results show the number of folds, total samples, and overall accuracy, plus recommendations and confusion patterns. Select Export Report to download the results, or Re-run validation to repeat the process.
Production threshold
Select a confidence threshold in the Production threshold section, trading accuracy against coverage:
-
Performance-optimal—maximizes the F1 score. Recommended for general production.
-
Safety-adjusted—reduces high-confidence errors. Use it where false positives are costly.
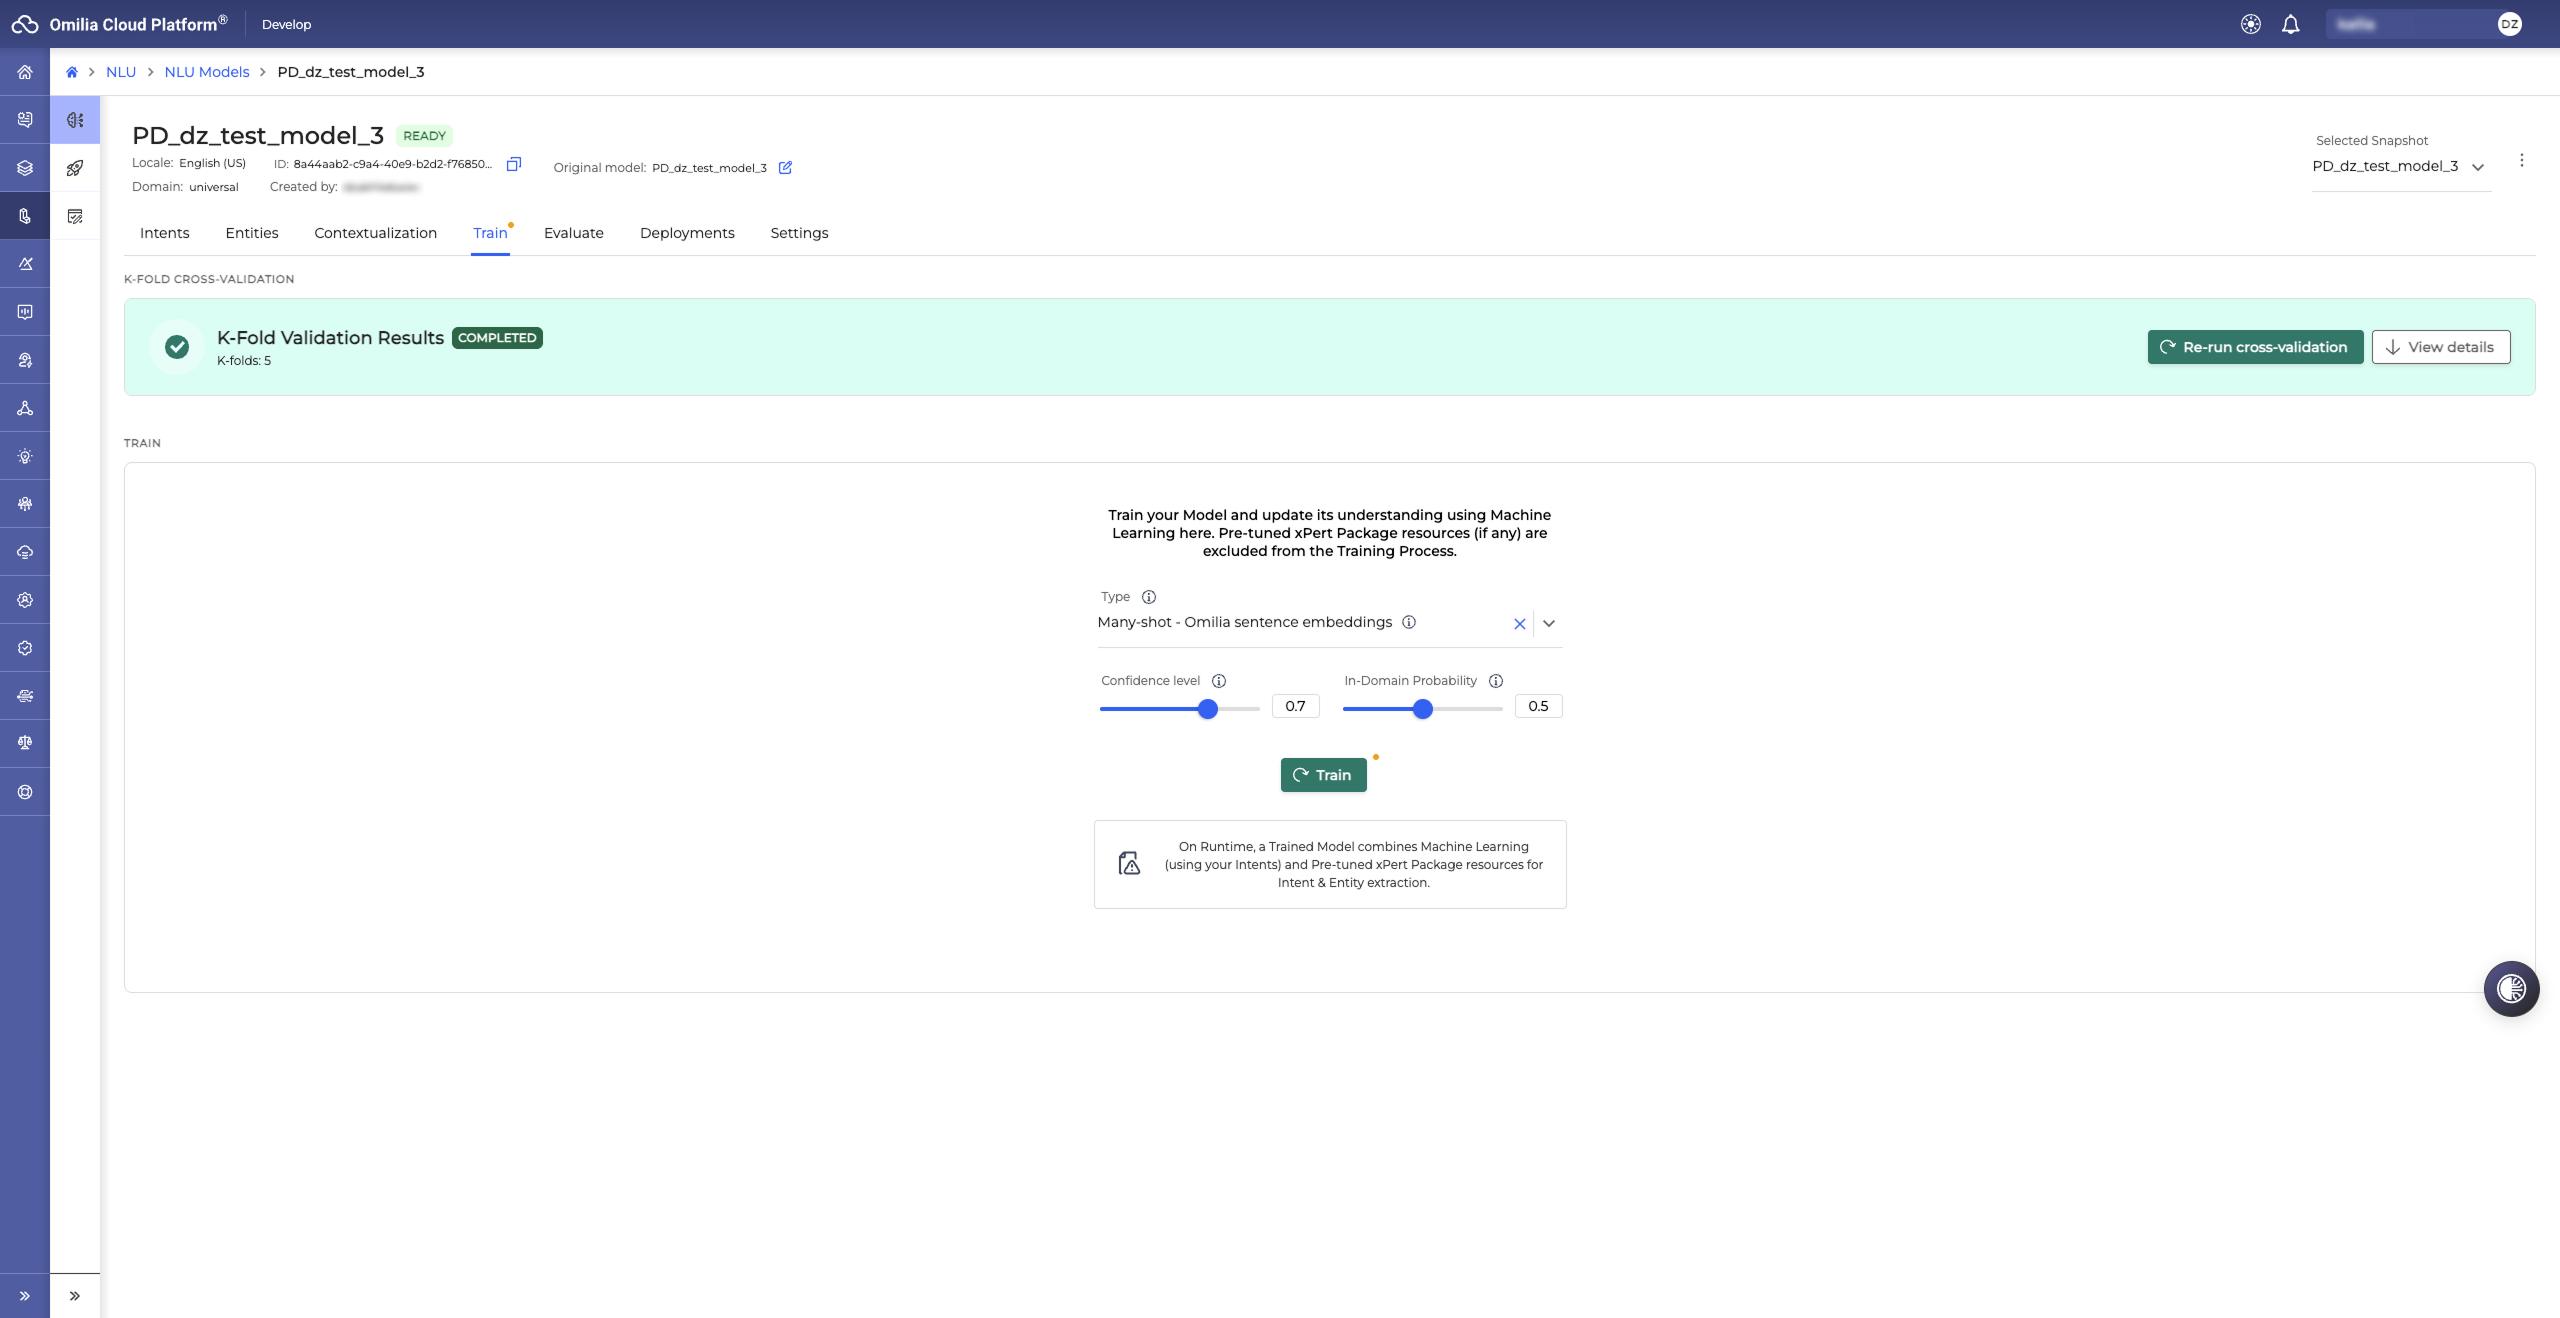
Training parameters
-
Type—the machine learning encoder:
-
Many-shot – Omilia sentence embeddings (English)—best for models built on an Omilia domain xPack, for example Banking 2.0, Energy, or Telecommunications.
-
Contextual Intent Recognition (English, ML Server v3.3.0 and later)—analyzes the whole conversation to identify the intent. Requires at least 10 utterances per intent.
-
Many-shot – Multilingual sentence embeddings—for all domains in languages other than English.
-
-
Confidence level—the accuracy required to assign an intent. Default 0.7. Use a higher value for small training sets.
-
In-Domain Probability—how strict the model is with unseen data at the domain boundary. Closer to 1 is stricter.
-
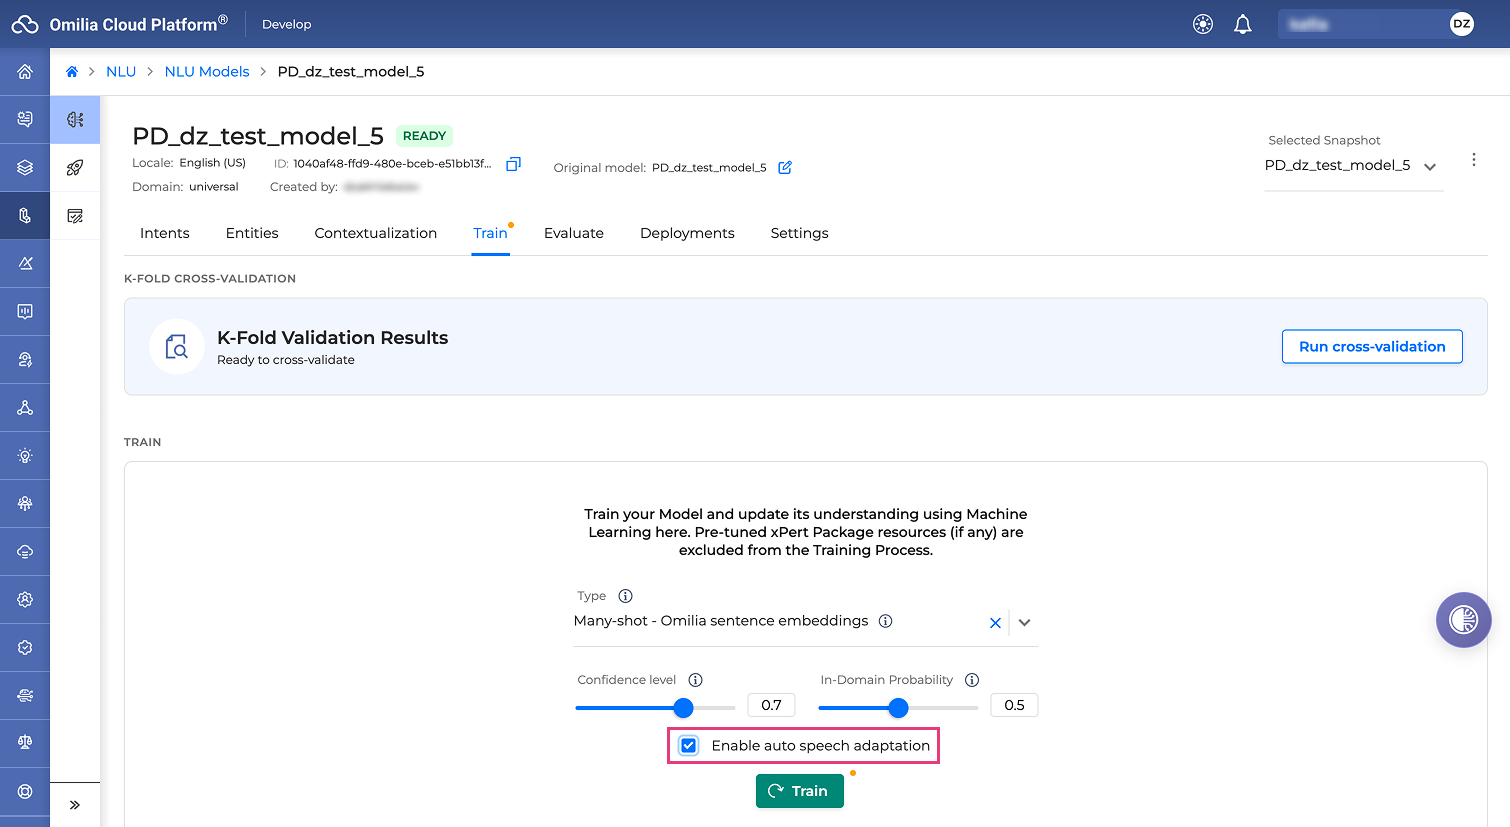
Enable auto speech adaptation—optional. See ASR adaptation below.
Select Train. The status changes to Working, and to Ready when training completes. To download your custom training data as a CSV, select the Options menu icon next to the selected snapshot → Download Custom Training Data.
ASR adaptation
ASR adaptation compiles a grammar-based ASR model from the same corpus that trains your NLU model, so that intent recognition and voice transcription stay consistent and domain-specific vocabulary is recognized more accurately.
Select Enable auto speech adaptation on the Train tab before training. After deploying the model, link it to a miniApp on the Manage Intents tab. If a custom ASR grammar exists, the system prompts you to link it, and the grammar then appears under Manage Languages → Custom Grammar.
Evaluating a model
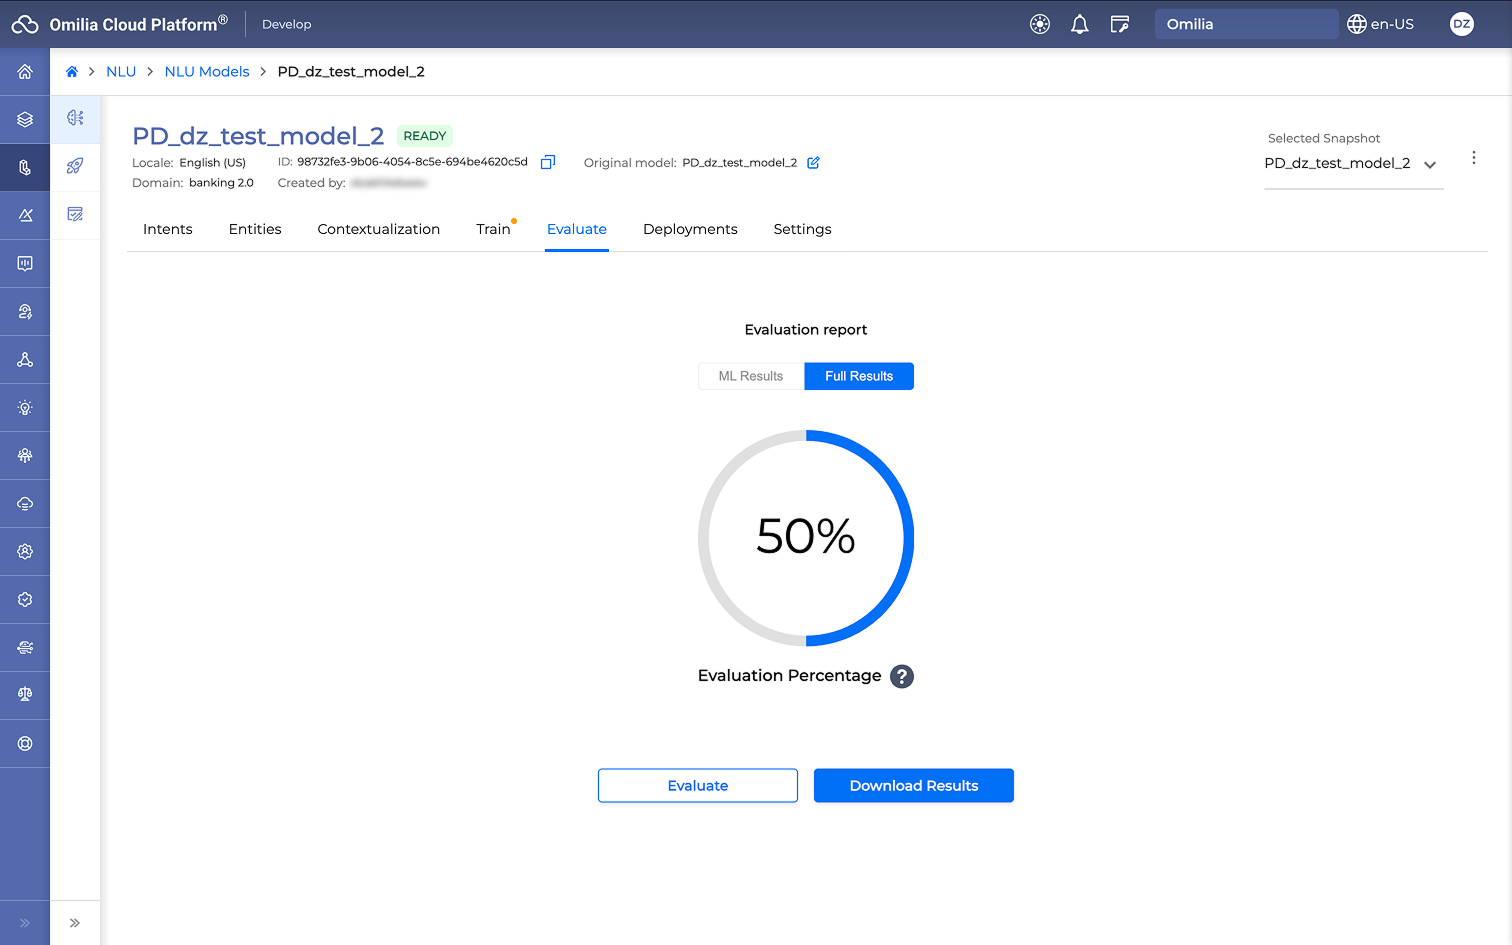
Evaluation measures how the model performs against a dataset you supply in TXT, CSV, or TSV. Two result sets are available on the Evaluate tab:
-
ML Results—detailed machine learning statistics: Accuracy (per model), Precision and Recall (per intent), and F1 score, a combined measure of precision and recall. Active only after the model is trained.
-
Full Results—a high-level Evaluation Percentage, the overall accuracy of the model. Always available.
Select Download Results to get a ZIP archive containing three TSV files with the detailed statistics.
Do not evaluate with the data you trained on. Use an evaluation set that the machine learning part of the model has not seen, that covers all built intents, that excludes xPack intents, and that is as balanced as possible. See Custom data and machine learning best practices.
Versioning and deploying
Managing snapshots
An initial snapshot is created when the model is created, and you can capture further snapshots as the model evolves.
-
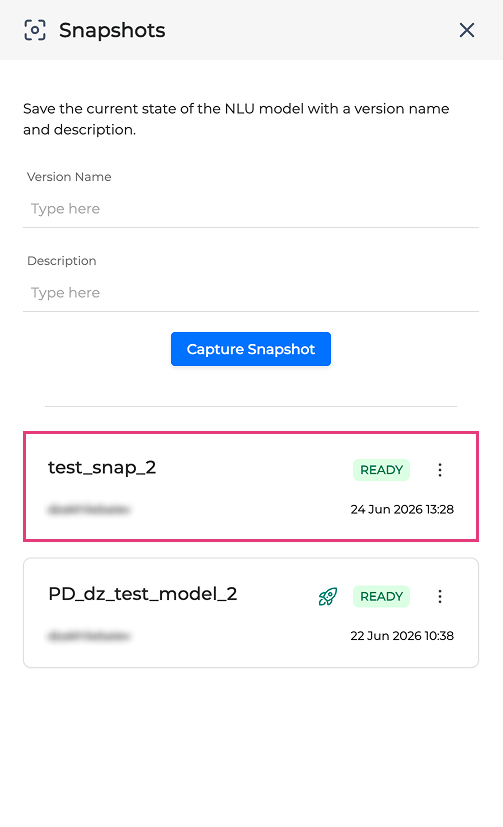
Create a snapshot from Options menu → Snapshots, giving it a Version Name and an optional description. A common convention is the model name plus a version suffix, for example
test_model_2.1. -
The Snapshots tab lists all versions chronologically with author, timestamp, and status. Load a version from the Selected Snapshot drop-down list to continue editing it or to deploy it.
-
Export a snapshot as a ZIP archive from its options menu. Export is available at snapshot level only, because each snapshot is a standalone versioned instance of the model.
Limits: a maximum of three snapshots per model. Snapshots are not immutable—the model can still be edited after a snapshot is taken. Deleted snapshots cannot be recovered. All snapshots share the same app_id, so switching between them requires no changes to linked miniApps.
Deploying a model
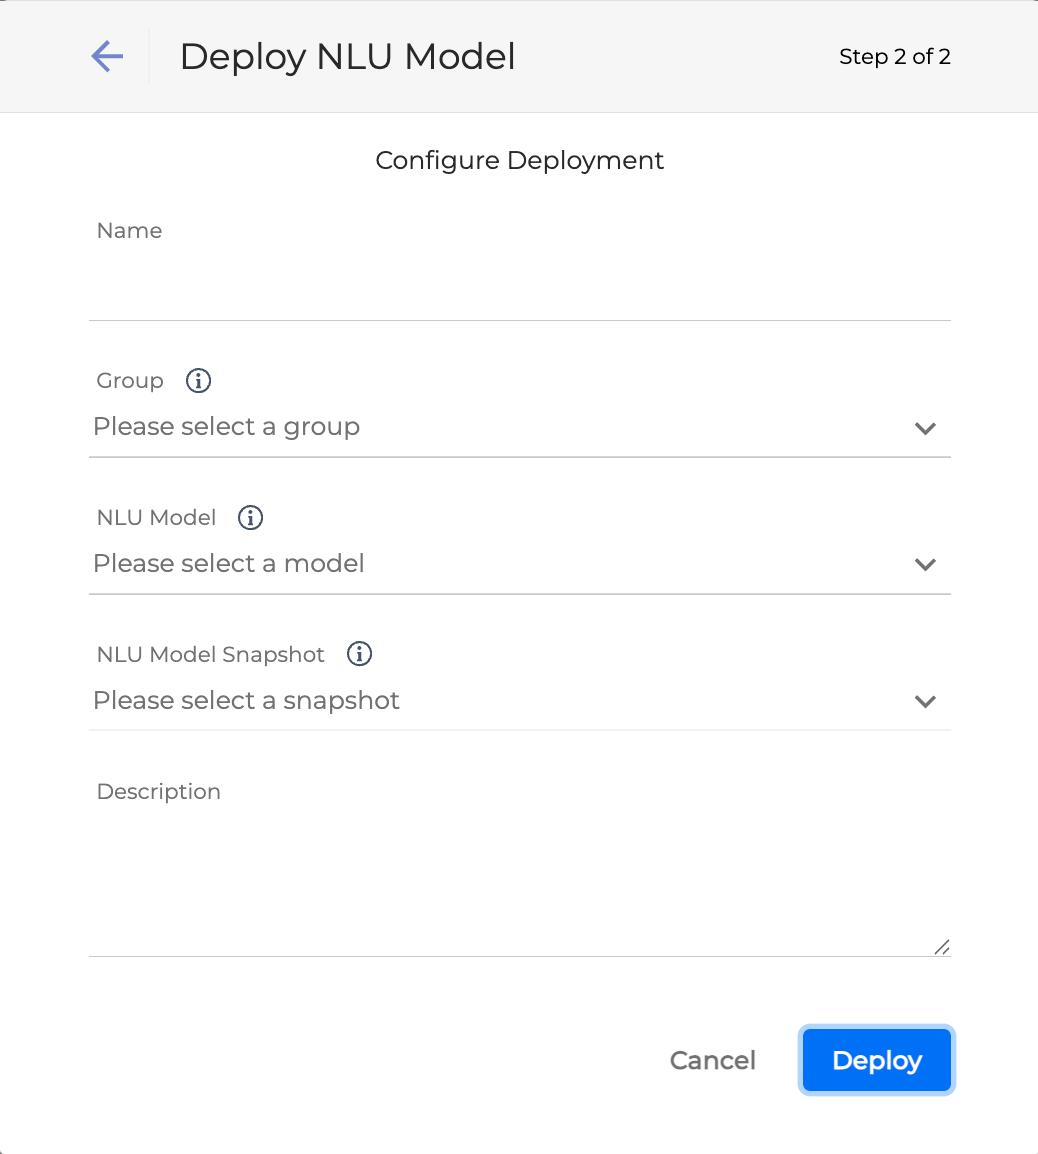
Deploy a model to make it available to your application. In NLU → Deployments, select Deploy, select the deployment type, then specify Name, Group, NLU Model, NLU Model Snapshot, and an optional Description.
-
Testing deployments carry a Bug icon.
-
Production deployments are the only supported option for live traffic.
Never use a Testing deployment for production. An artifact can be deployed only once—selecting a model and snapshot combination that is already deployed raises a warning.
Deployments stop automatically after a period that depends on the environment: by default seven days for production and three days for testing (two days on aws-dev, five on aws-staging). You receive service notifications 24 hours and two hours before a deployment stops. Testing deployments can also be stopped and started manually at any time. Deleting a deployment is permanent—see Deleting a deployment.
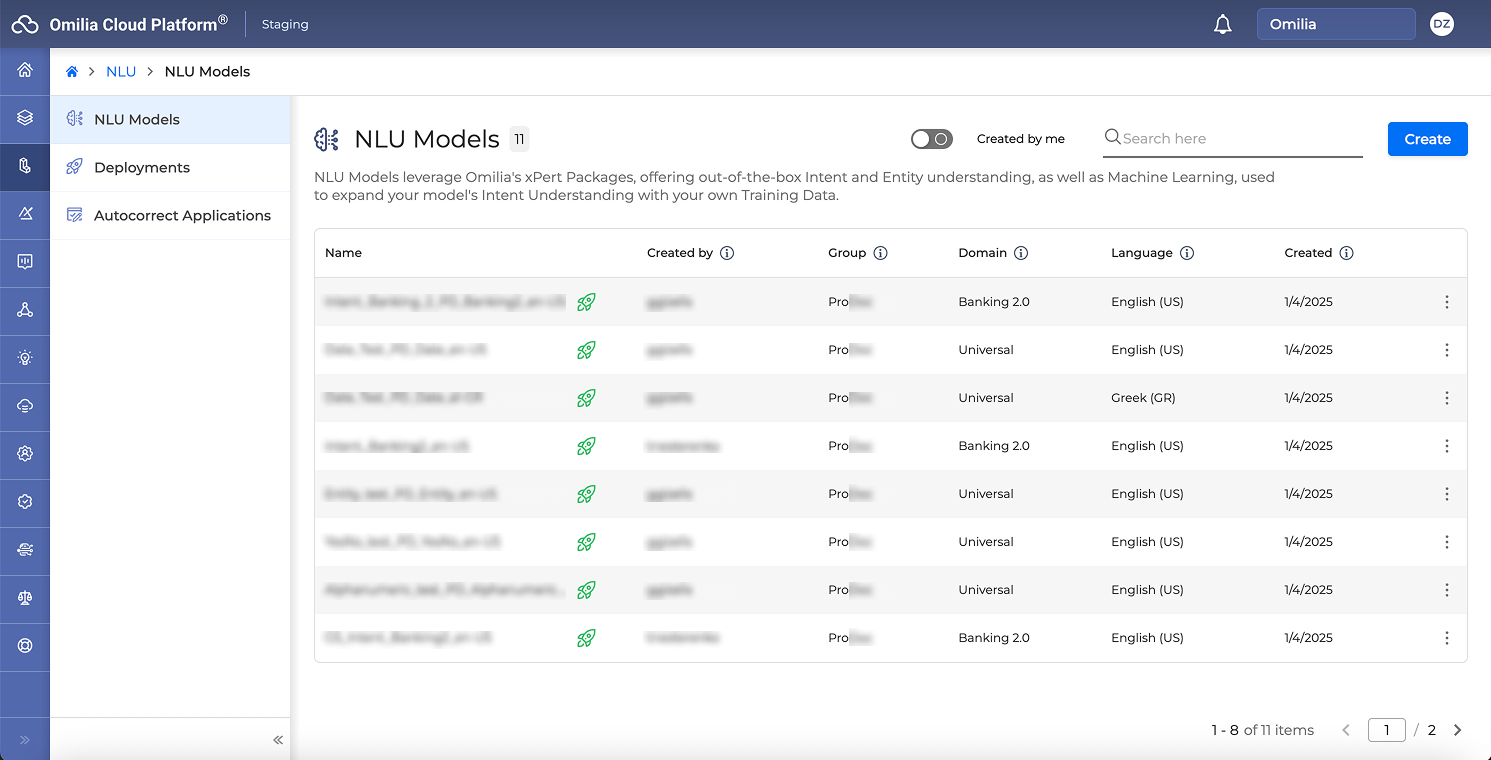
Deployed models carry a Rocket icon on the NLU Models tab.
Managing a deployment
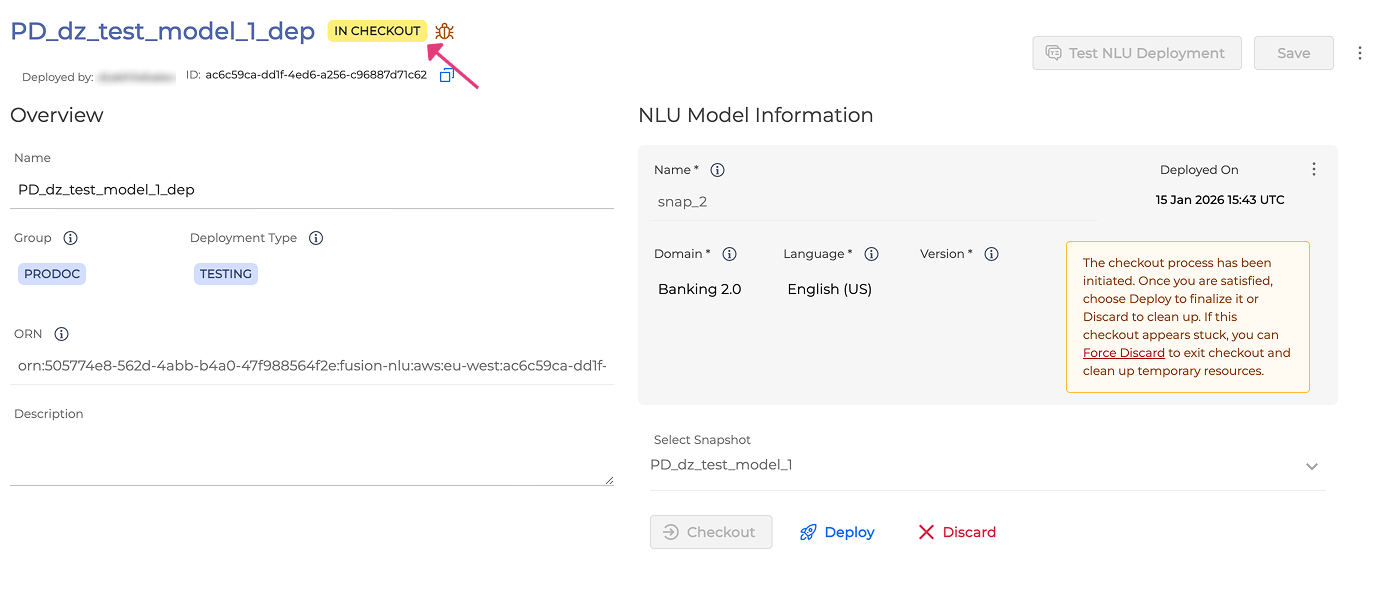
The deployment management page shows the Overview section (Status, Deployed by, ID, Name, Group, Deployment Type, ORN, Description) and the NLU Model information section (Name, Domain, Language, Deployed On, Version). Only Name and Description are editable.
Snapshot checkout
To validate a different snapshot before it goes live, select it in Select Snapshot and select Checkout. The deployment status becomes In checkout while live traffic continues to reach the currently deployed version. Test the checked-out snapshot, then select Deploy to activate it or Discard to revert. Force Discard is available if a checkout becomes stuck.
Updating a deployed model version
Two icons flag a deployment that is behind: an exclamation icon marks a deployment that is not on the latest version, and a Vertical arrow icon marks a deployment for which an in-place upgrade is available.
To upgrade, select Start Upgrade, test with Get results based on the latest version enabled, then select Complete Upgrade or Cancel Upgrade. Force Cancel is available if the upgrade becomes unresponsive. See Updating a deployed model version.
Do not skip the testing step before completing an upgrade.
Critical deployment
A deployment can be marked as critical, so that it runs on dedicated high-performance nodes with enhanced security and minimal downtime during updates. Marked deployments carry the Business critical label. A special permission is required — contact the Omilia Support Team.
Testing a deployed model
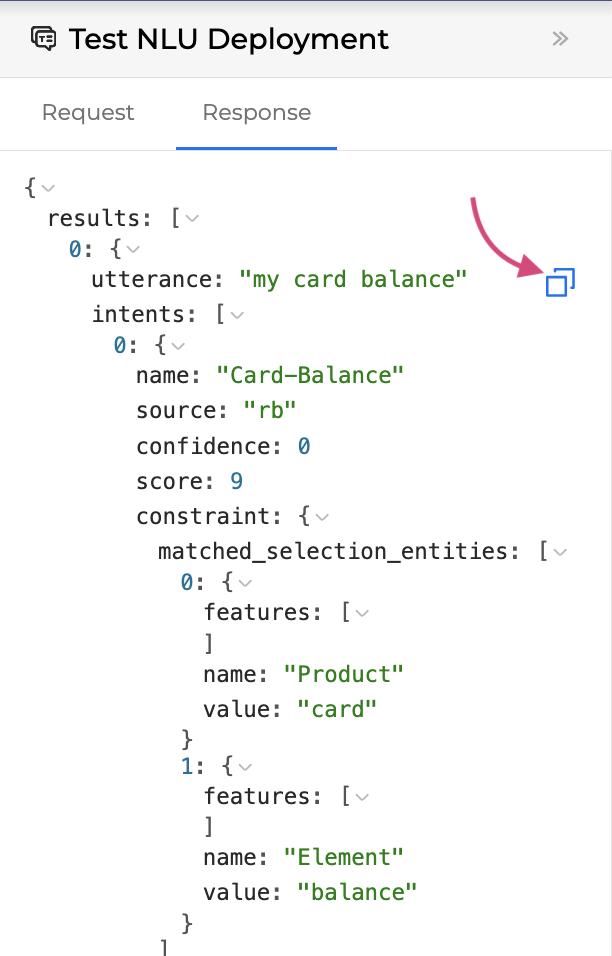
Test a deployed model directly from the console. On the deployment page, select Test NLU Deployment, edit the request values on the Request tab, and select Test. The response is returned as JSON on the Response tab and can be copied to the clipboard.
Only running models can be tested. For a stopped deployment the Test NLU Deployment button is grayed out.
When testing a snapshot that is In checkout or upgrading, enable the checkbox that returns results based on the latest version, so that you validate the new version rather than the live one.
For the full request and response property reference, see Testing a deployed model.
Beyond NLU models
Gen AI applications
A Gen AI application is a deployment created with the GenAi App toggle enabled in a NextGen-enabled group. It exposes xPack entities for use with Large Language Models (LLMs), which you can customize, add, upload in bulk (CSV or ZIP), or delete per application. You test it from the console with llm_context parameters.
Autocorrect applications
Autocorrect Applications normalize and automatically correct sentences containing spelling mistakes. Create and deploy one, then add it to a chat application.
Advanced configuration
-
Intent Selection Policy—upload an Extensible Markup Language (XML) policy on the Settings tab of the model to control how rule-based and machine learning results are fused into a winning intent. Without a custom policy, the default selects ML intents with confidence above 0.65 and falls back to RB intents. Uploading a custom policy replaces the default behavior entirely, including the built-in
OutOfScopeDefaultpolicy. A special permission is required. -
Custom NLU Logic—for Custom domain models, upload your own NLU file on the Upload Resources tab. You can reuse the NLU file from an exported OCP NLU model. Uploaded files appear in the Upload History list. The custom RB model reports Running, Working, or Stopped. If it stops, restart it from the Menu icon → Start.
-
Exporting / importing an NLU model—export a snapshot as a ZIP archive and import it into another application. On import you can upgrade the model to the latest version, which then requires retraining, or link the upload as a new snapshot of an existing model.