Intelli or Web Service?
Intelli and Web Service miniApps are quite similar. Both allow you to manipulate data. The key difference is that the Web Service miniApp can also pull the data you need from an endpoint of your choosing, whereas the Intelli only allows you to perform calculations on the data you already have.
For instance, in your Flow you might use a Web Service miniApp early on to get a JSON with particular data that you might or might not want to manipulate. But perhaps a few steps down the line you need to manipulate some data from the JSON you already have, without having to make a request to get it again. In that case, it would be appropriate to use an Intelli miniApp.
If you or your organization use restrictive firewall or proxy server settings, you or your network administrator may need to allow-list certain domains and IP address ranges to ensure OCP services work as expected. Please check IP addresses and domains for OCP products section.
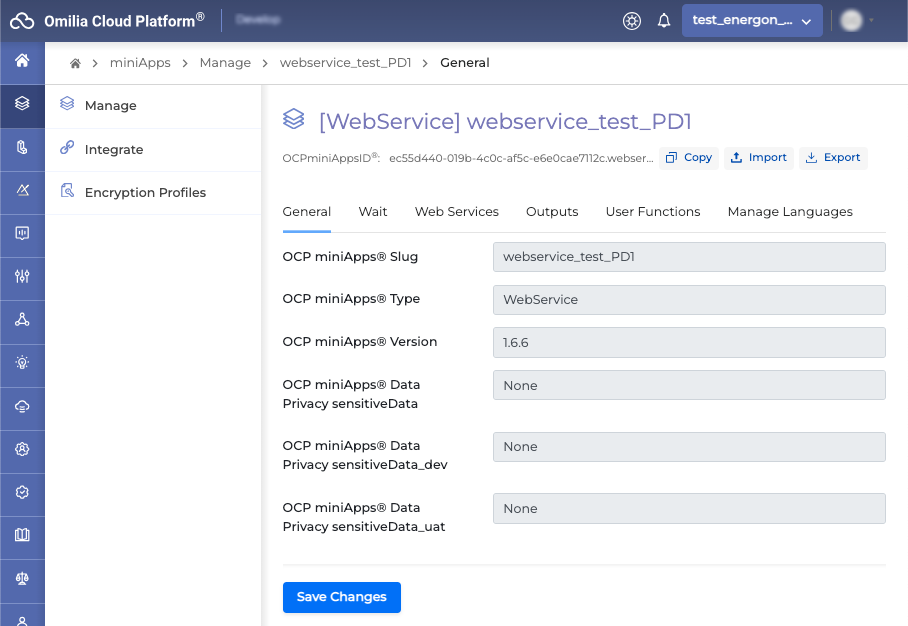
Configuring a Web Service miniApp
Wait Tab
In the Wait tab you can configure the prompts to be played to the caller based on the following parameters:
-
Wait
-
Max Web Service Timeout
-
Custom FailExitReason
Wait Prompt
In the Wait Prompt section, you can set up some waiting announcements, that is things the customer will hear while the data is being pulled. In this particular example, 2.5 seconds after the query start, the customer will hear the prompt "please wait", and 5 seconds after the query start (meaning 2.5 more seconds after the original prompt), they will hear an additional prompt saying, "still trying to get some data."
The Replay prompt checkbox applies to the additional prompt and if checked, it triggers the additional prompt to be repeated after each timeout threshold is reached, which is 5 seconds in the example below.
The maximum allowed value for the initial and the additional Wait Prompt timeouts is 11000ms.

Max Web Service Timeout prompt
In the Max Web Service Timeout section, you can set up the exact time after which the request will timeout and exit; you can also specify the prompt that will be played to the customer in that case. The customer will then be taken to the next step in the Flow you have set up, whether it means being redirected to an agent or proceeding with the next miniApp.

Keep in mind that the Max Web Service Timeout may not be less than the additional timeout (indicated above in this same tab) or the Request timeout set up in the next tab.
In order to Replay the additional prompt the Max Web Service Timeout must be longer than the sum of the initial and the additional prompts timeouts.
Custom FailExitReason prompt
Optionally configure an exit message when the custom FailExitReason is defined.
Turn the toggle button on to enable and configure the Custom FailExitReason prompt.

Web Services Tab
Web Service Environments
On the left, you can see three different tabs that can be configured: wsCall, wsCall_dev, and wsCall_uat.
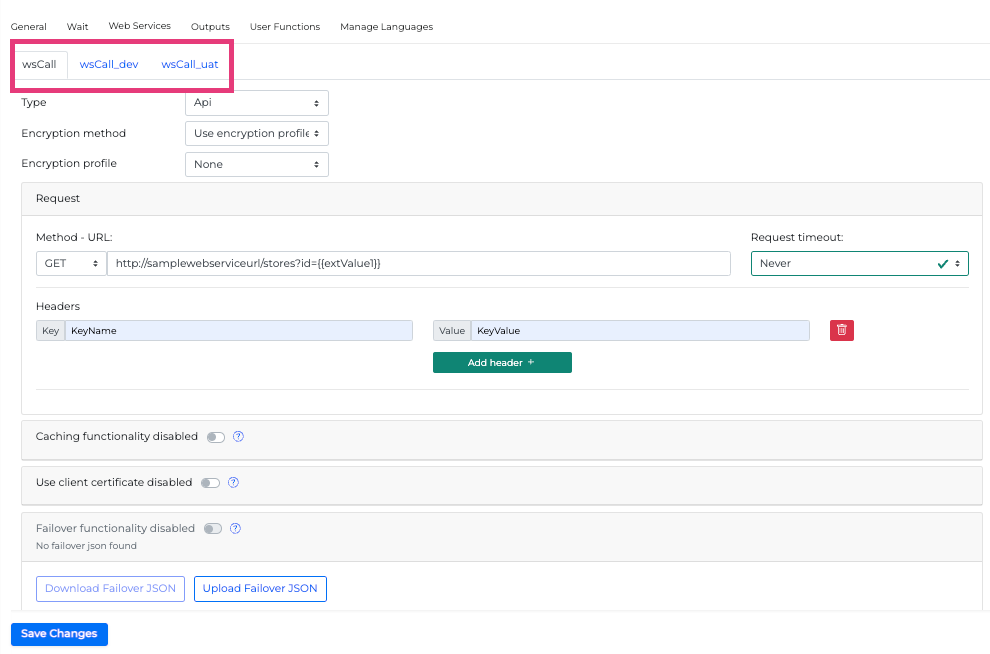
They enable you to specify different API endpoints within one miniApp. For instance, you can configure the tab wsCall_dev when you are testing the application in the development phase, wsCall_uat when you are performing user acceptance testing, and wsCall when you want to use the actual production API. You can switch between them based on the envMode value you pass to your miniApp in the Flow. As such, the possible options are:
-
envMode="DEV" -
envMode="UAT" -
envMode="PROD"
Based on the envMode value, the application will run the correct endpoint.
You don’t have to configure all three tabs if you have no use for three different endpoints; you can just configure whichever one you are going to use.
However, keep in mind that by default your miniApp will run the wsCall tab configurations.
Web Services API Environment Configuration
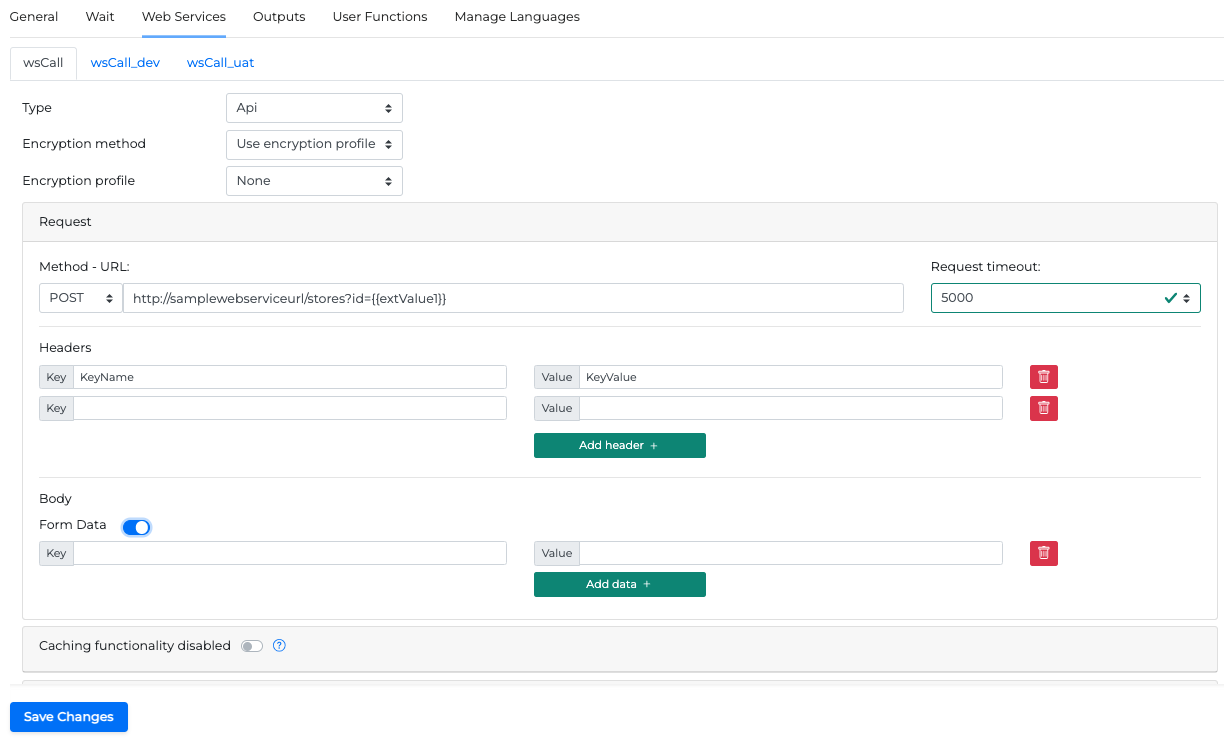
In the wsCall environment tab of your choice you have to specify the HTTP method you want to use, the HTTP endpoint, and the Request timeout. You have the ability to add as many custom HTTP headers as you want and then provide the body in the JSON format or choose the Form Data option and provide key-value pairs.
The Body and Form Data options are hidden if HTTP GET method is selected, since they are not applicable.

Caching Functionality
After the initial invocation of the web service, the response can be cached, thereby preventing the need for a subsequent call to the actual web service.
After enabling the Caching functionality from the corresponding toggle button, you can set the expiration time of the cached response with two methods that can be selected from the Expiration type dropdown list:
-
Static expiration - A fixed expiration time set in seconds.

-
OAUTH expiration - An expiration defined by the customer’s server dynamically by attribute
$.expires_in.
If static expiration is selected it must be aligned with the expiration policy of the data the miniApp receives to avoid errors.
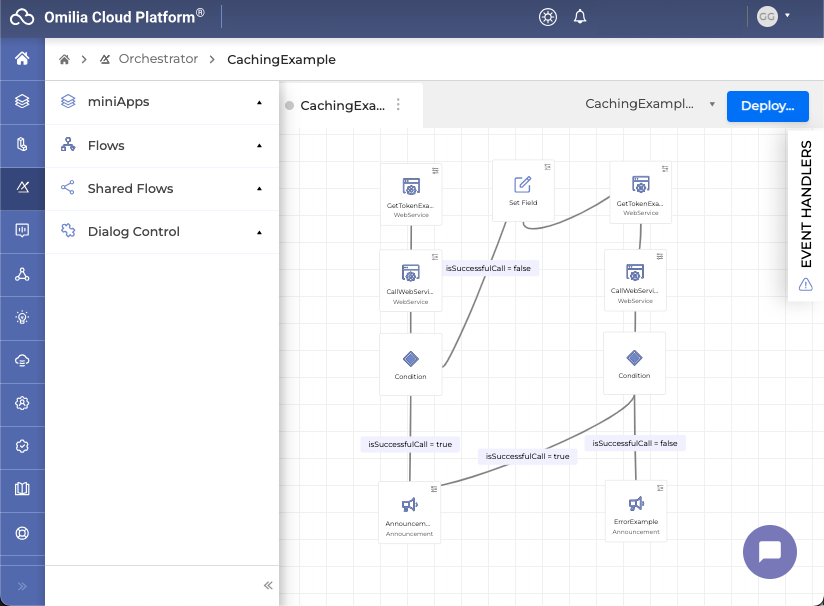
In case a WebService miniApp is used in Orchestrator and cached functionality is activated, to tackle response errors due to misaligned responses (for example if the cached response is a session token that is expired from the server side but cached from the miniApp), a Condition can send unsuccessful outputs to a Set Field with value ignoreCachedResponse = True to direct the Flow to a new response request and override the previously cached response.
If caching is firstly disabled and subsequently re-enabled with a newly set or same expiration time, this adjustment becomes effective only once the period stipulated by the earlier setting concludes.
Client Certificate use
A client certificate can be enabled for API requests using mutual TLS authentication. Enable the certificate usage from the corresponding toggle switch.
Select one of the following types of certificates:
-
PKCS12: The form should have a PKCS12(.pfx/.p12) file content, which is base64 encoded

-
CRT: The form should have a CRT and a key text input. A PEM file is therefore required in the form:
Bash-----BEGIN CERTIFICATE----- MIIEnTfCAocEAwIABgHGAM6Hx4JJ1OgpDA0GCSqGSIb7DQEBCwUAMH4yCzAJBgNVw5XwmKAC+Vfm8tb9tMhUoU0yvL -----END CERTIFICATE-----

A passphrase text can be added in any added certificate.
It’s strongly recommended to have all the certificate related configurations as application variables and use their references in miniApp configuration. For example:
Certificate file content: {{ocpvars:certificate}}
Certificate key file content: {{ocpvars:certPrivateKey}}
Passphrase: {{ocpvars.certPassphrase}}
Failover JSON
You can manage the Failover JSON responses by using the Download/Upload Failover JSON buttons. Failover JSON is a hard-coded JSON response, stored in a file, that the web service miniApp will use in case the actual web service times out or there is an error status code response.

Keep in mind that if you provide the correct endpoint but an incorrect HTTP method, the request will fail.
Encryption
Encryption Profile
When the selected Encryption Method is Use encryption profile, you can select an encryption profile from the dropdown list for each environment. For more info read Encryption Profiles.
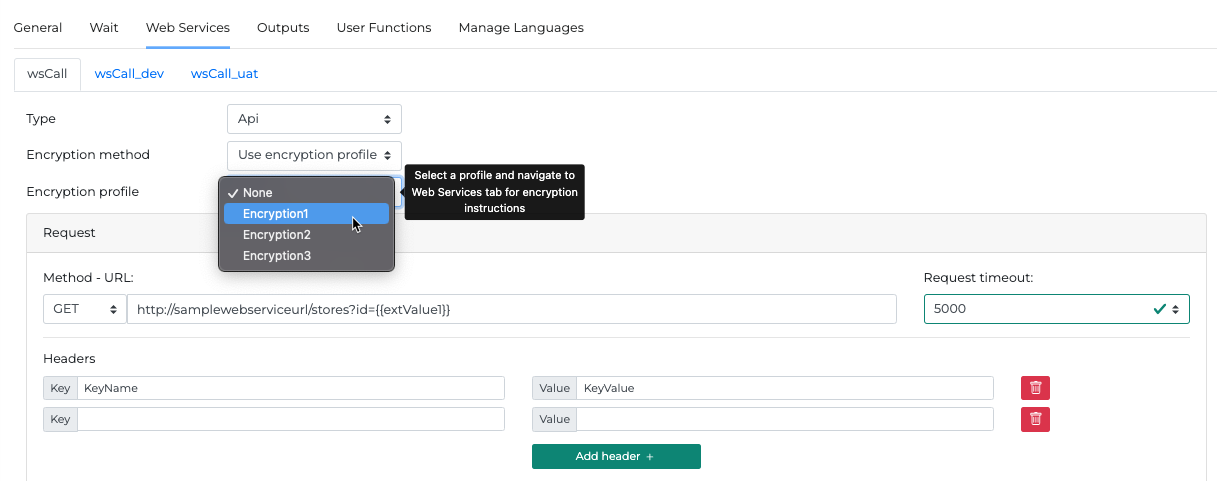
When encrypting a value, if there's a possibility that the result could be empty, it's advisable to use the ?encrypt function instead of just using encrypt. This approach helps prevent any errors in the output.
Example
{{valueToEncrypt|?encrypt}}
In this example, replace valueToEncrypt with the data you want to encrypt. The ?encrypt function safely handles potential empty results, avoiding errors.
Encryption with JSON Web Key (JWK) input
When the selected Encryption Method is Use JWK input a valid JSON Web Key (JWK) string must be provided as input with the name jwkΙnput. The JWK can be obtained in various ways, for example it could be either a hardcoded key, or the output of another webservice miniApp.
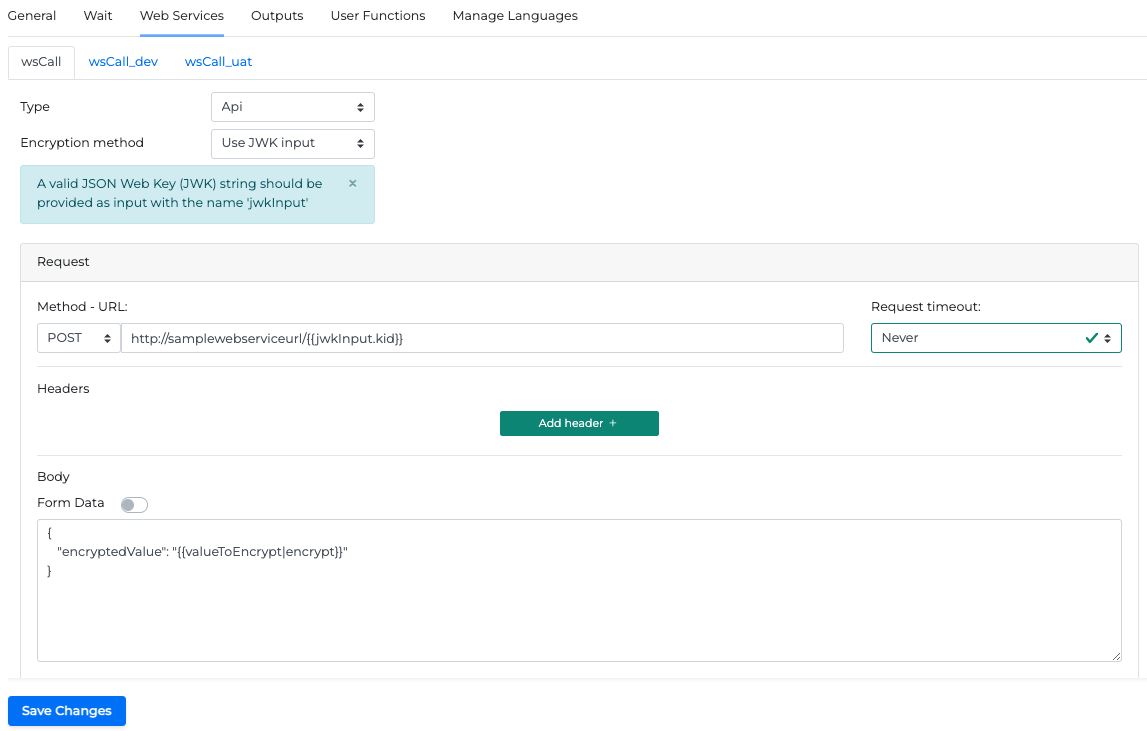
RSA and Elliptic Curve (EC) encryptions are supported.
Example of a JWK RSA
{
  "kty":"RSA",
  "alg":"RSA-OAEP-256",
  "use":"enc",
  "n":"zg7-8aYrduV7H4t...",
  "productId":"a-prd-id",
  "kid":"a-key-id",
  "exp":1710847062,
  "e":"AQAB"
}
Example of a JWK Elliptic Curve
{
  "kid": "a-key-id",
  "x": "5zB1cw...",
  "kty": "EC",
  "productId": "a-prd-id",
  "y": "zbjYf6T7Ts-M6P95...",
  "crv": "P-256",
  "exp": 1710847062
}
Elliptic Curve, Diffie-Hellman encrypter, supports P-256, P-384 or P-521 curves.
The result of the EC encryption is a JWE string.
Web Services ASR grammar compilation Environment Configuration
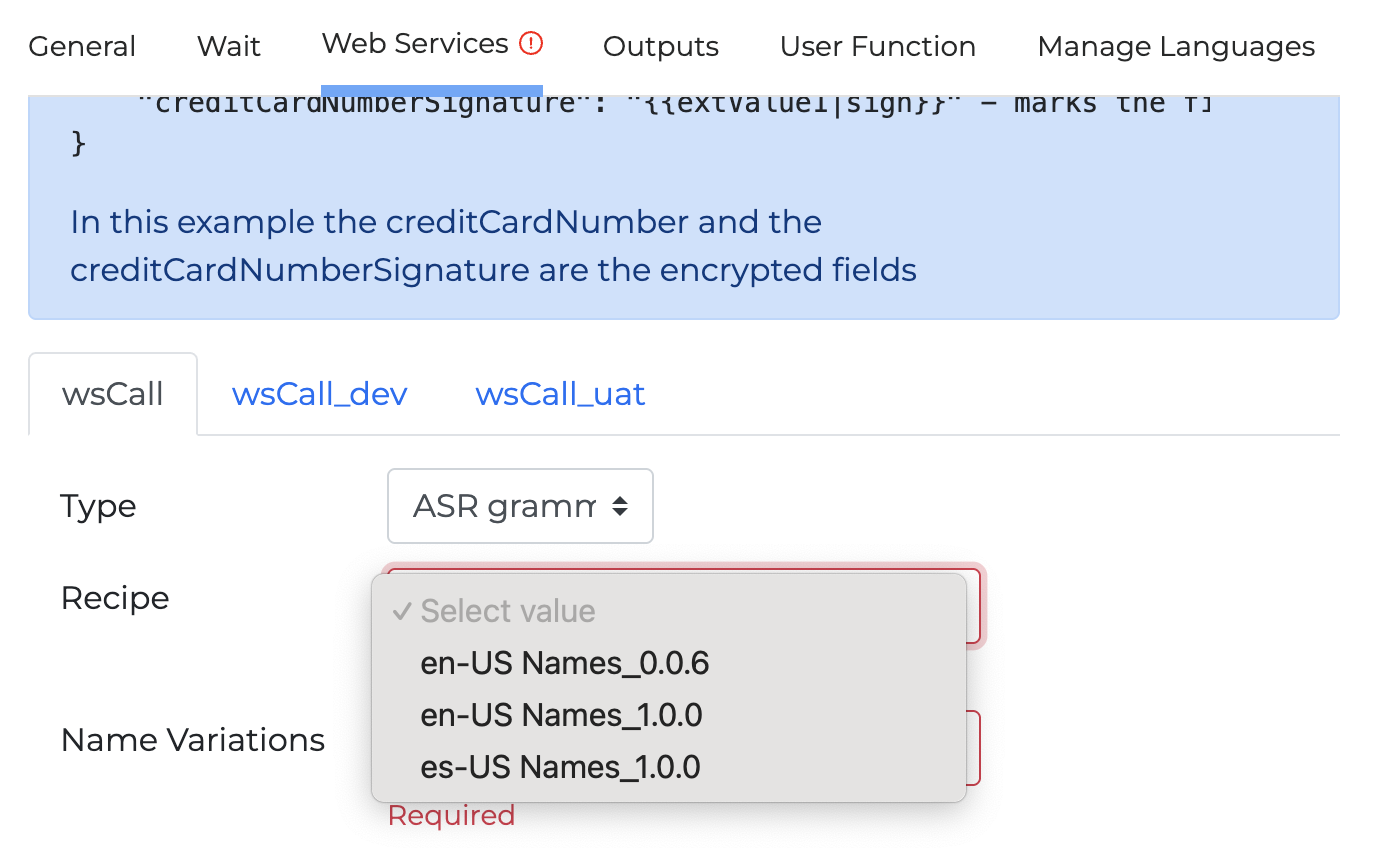
A webservice miniApp can be configured to compile an ASR grammar for a specific recipe.
-
Select the
wsCallType, ASR grammar compilation
-
Select a Recipe from the available list (for example en-US Names)
-
Add a dynamic value for Name Variations (for example {{cardholder_full_names}})
-
Save changes.
When Recipe Name is selected, it allows to enter dynamic values for name variations. This will trigger a call to the grammar server and create a grammar that recognises the mentioned names.
The output field of ASR grammar compilation option is grammar-orn
The value of First Name and Last Name can have multiple outputs if a person has more than one names and the result would be a list of pipe separated names, for example, Jim | Jimmy | Dimitri
If ASR grammar compilation is selected, the outputs set in the Outputs Tab, will not be disregarded.
Web Services ASR grammar status Environment Configuration
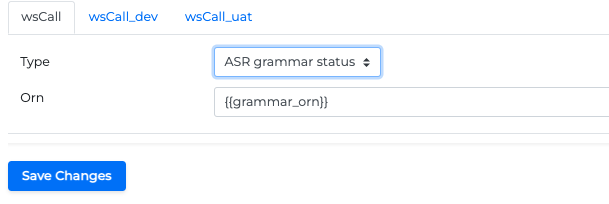
After setting a WebService miniApp with ASR grammar compilation you can set another miniApp with ASR grammar status that can be used in the same flow to pick the grammar-orn output from the ASR grammar compilation webservice and provide the grammar-status.
-
Select the
wsCallType ASR grammar status -
Add a dynamic value for the Orn field (for example {{grammar_orn}})
-
Save changes
Outputs Tab
In this tab, you can map which data you want to get from the JSON the web service request returned.
The declaration of outputs is only applicable if the wsCall type is Api.
In case the miniApp is set as sensitive with data privacy, the output is also set as sensitive and is masked throughout the whole process.
Output Fields
In the Fields sub-tab, you add custom named outputs, and for each one, you can choose to use a JSON path, or a custom function.
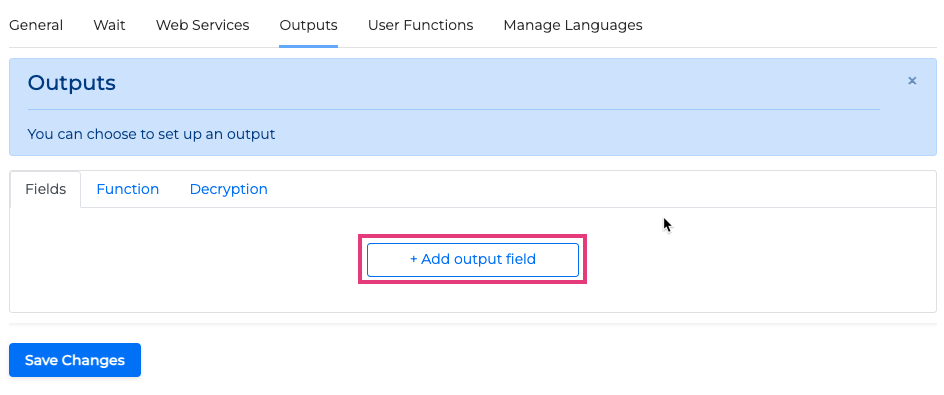
Click the +Add output field button to add a new output field.
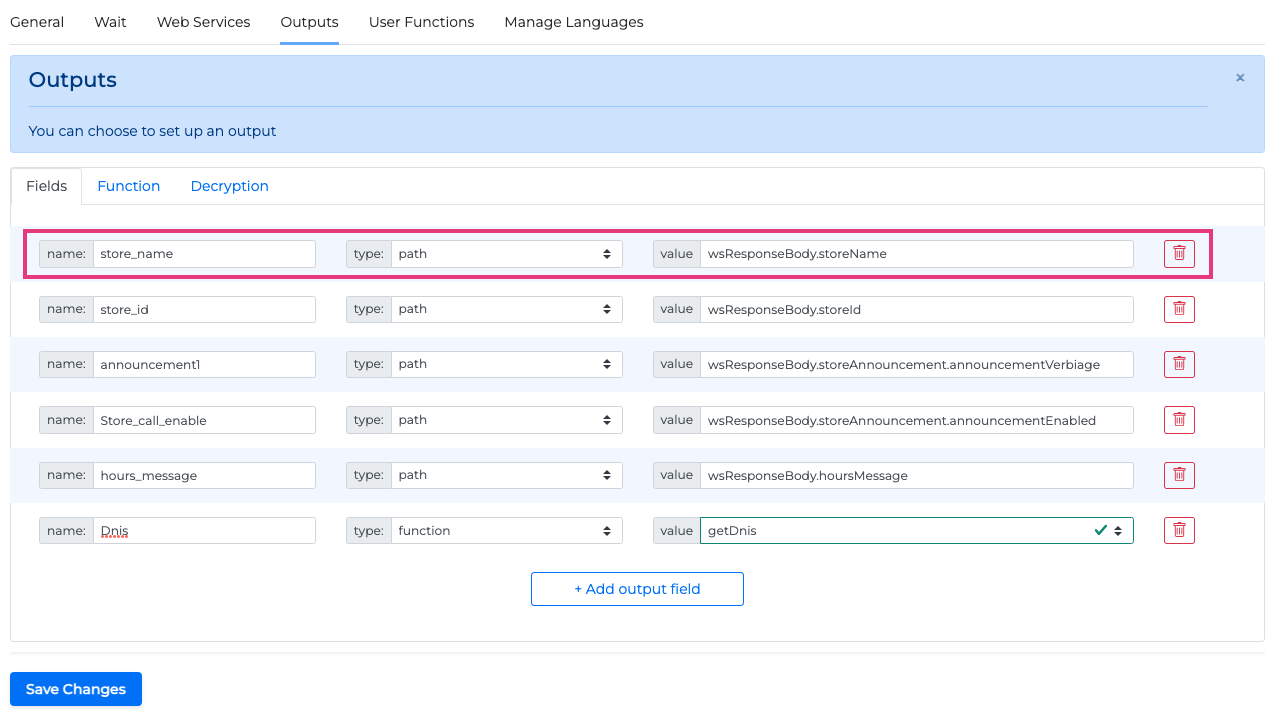
The JSON path approach allows you to get the value directly from the JSON and return it as a specific output. Select type path for this case. In the example below the first output named store_name will return the store’s name, and then you can reassign this output or use it later in your logic in the Flow.
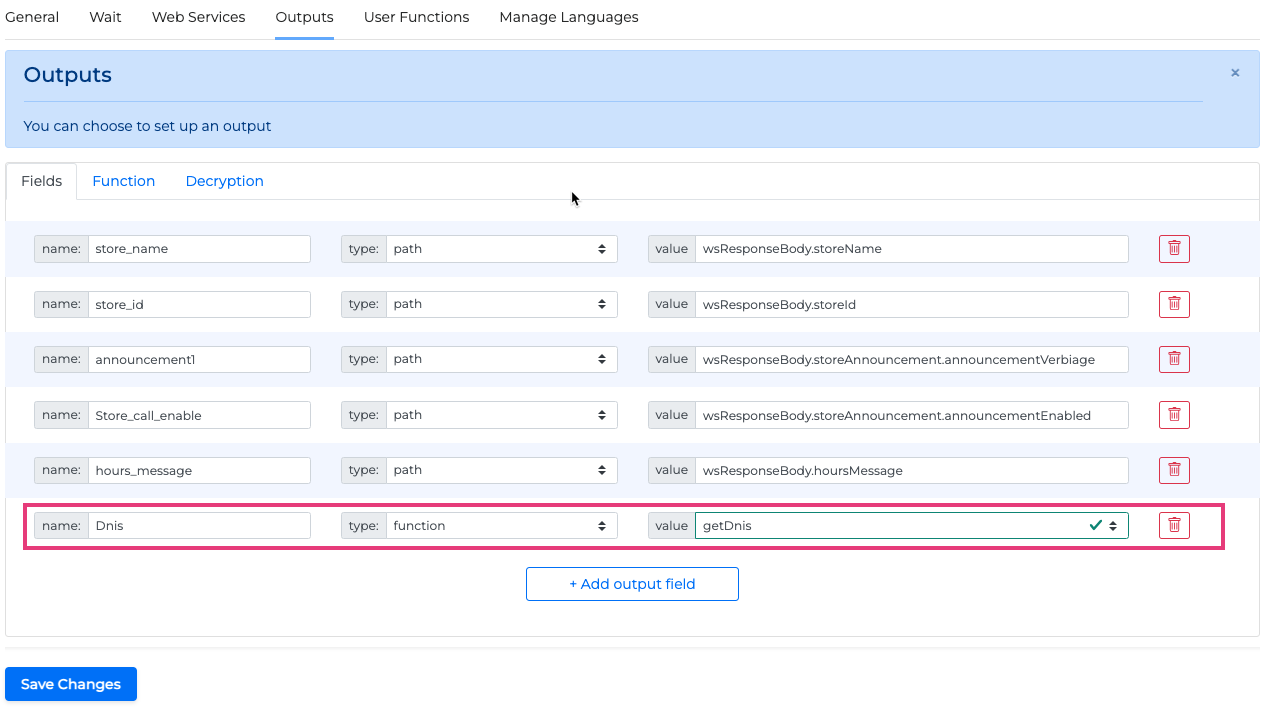
If you want to modify the data first, you need to select type function as the mapping method. Then you can write a function that manipulates the JSON data in the way you want in the User Functions tab and select its name here. For instance, below we have only one defined function, getDnis, the result of which (a string) will be assigned to the output named Dnis.
Output Functions
In the Function sub-tab, you can write a JavaScript function to get some specific values of the response and set them as the output of the miniApp. This is a useful approach because it allows you to process all the data at once and then get exactly what you need (for instance, you might sort some values, calculate time difference, and so on).
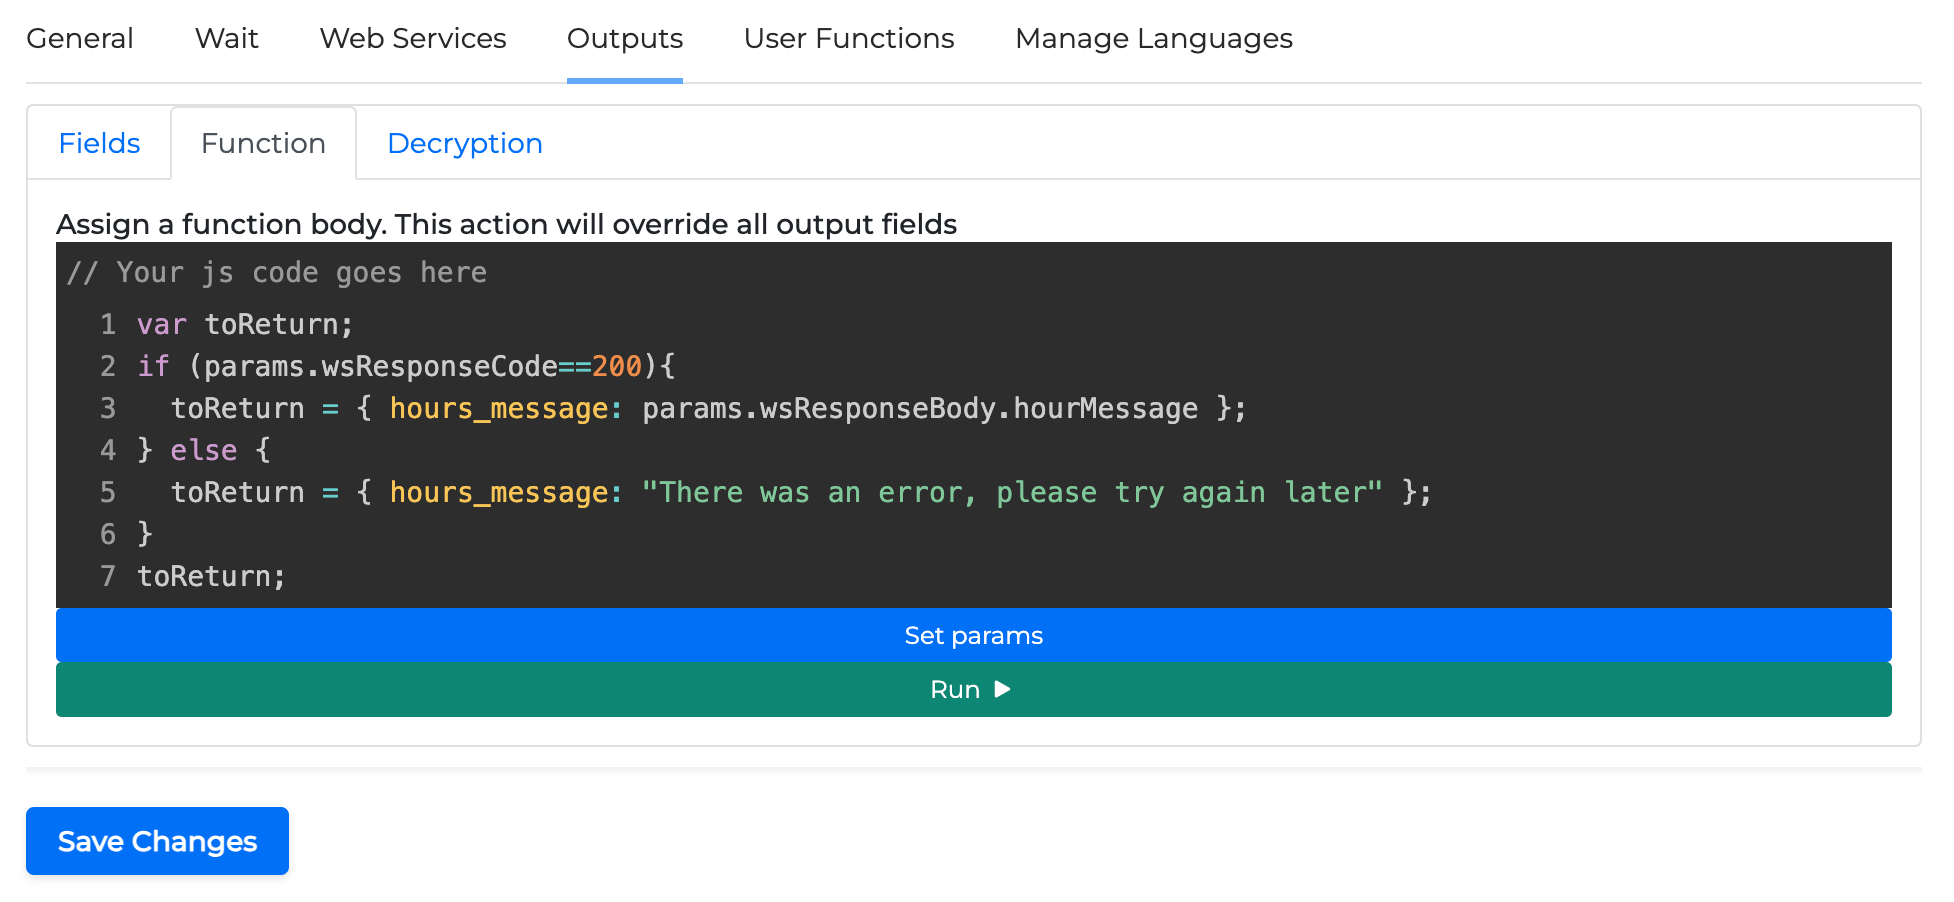
You can have access to the web service response body and code by using params.wsResponseBody and params.wsResponseCode respectively. For this type of JavaScript code, the script must return a JS object that will contain some outputs. See the example below:
var toReturn;
if (params.wsResponseCode==200){
  toReturn = { hours_message: params.wsResponseBody.hourMessage };
} else {
  toReturn = { hours_message: "There was an error, please try again later" };
}
toReturn;
If you want the output function to be empty and not to assign a JS object to the outputs, the script must return an empty JSON object such as {}.
You can assign output values directly from here but keep in mind that this function overrides the field values. So if you have output1 and output2 already set up to take values from a JSON path, then having them assigned here will override those values. However, you can use any other output which is unassigned.
Output Decryption
In the Decryption sub-tab you can set to get the encrypted data from your endpoint and decrypt it when, for instance, announcing it to the user. To do that you need to add a decryption path. For more information please read Encryption Profiles, Add decryption path .

Decryption is available for WebService but not for Intelli miniApps.
User Functions Tab
In this tab, you can specify a JavaScript function for either manipulating the data from the endpoint or just executing some quick actions you want to use elsewhere in the miniApp. Unlike the function in the Outputs tab, which helps deal with bigger business logic, the purpose of the user functions here is to do small actions, such as string manipulation. For instance, you might want to get DNIS values without the +1 prefix. You can write the code here (see the screenshot below) and refer to this function in your API request by including it inside the double curly braces {{}}, like {{getDnis}}.
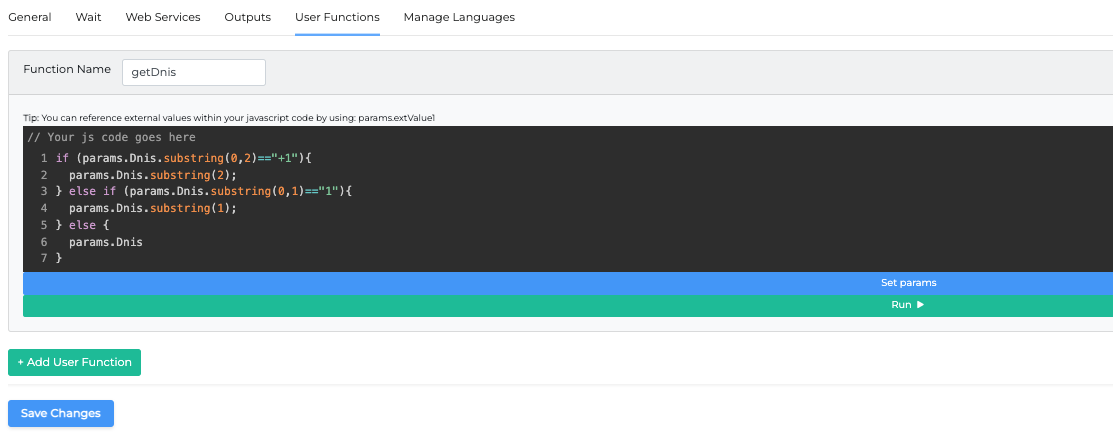
Please make sure that your JavaScript code (whether you have it here or in the Outputs tab, or both) is correct and does not have any syntax or logical errors. You can test it using any JavaScript engines online (for example, https://jsfiddle.net/ ) or offline (nodejs16). At the moment, we are not providing code checking functionality, so if your code is incorrect the miniApp will not work.
Manage Languages Tab
To see the details on how to configure the Manage Languages tab, check out this article.
Configuring an Intelli miniApp
As was mentioned before, Intelli is a simplified version of Web Service, so it allows you to process data without hitting an endpoint. For that reason, this type of miniApp doesn’t have Wait or Web Service tabs, but the rest of the setup is exactly the same.