.svg)
Manage Languages Tab
Languages
In the Manage Languages tab, you can see the available languages for your OCP miniApps®, and activate or deactivate them. Depending on the type of miniApps English (en-US, en-GB, en-CA), French (fr-CA), German (de-DE), Spanish (es-US), Portugal (pt-PT), Greek (el-GR) might also be available. Check the Supported languages vs locales table for the complete list.
Deactivating a language from a miniApp will result to the deletion of all the prompts that have been set for the selected miniApp in that language. Please make sure you do not require this specific language before you proceed with deactivation.
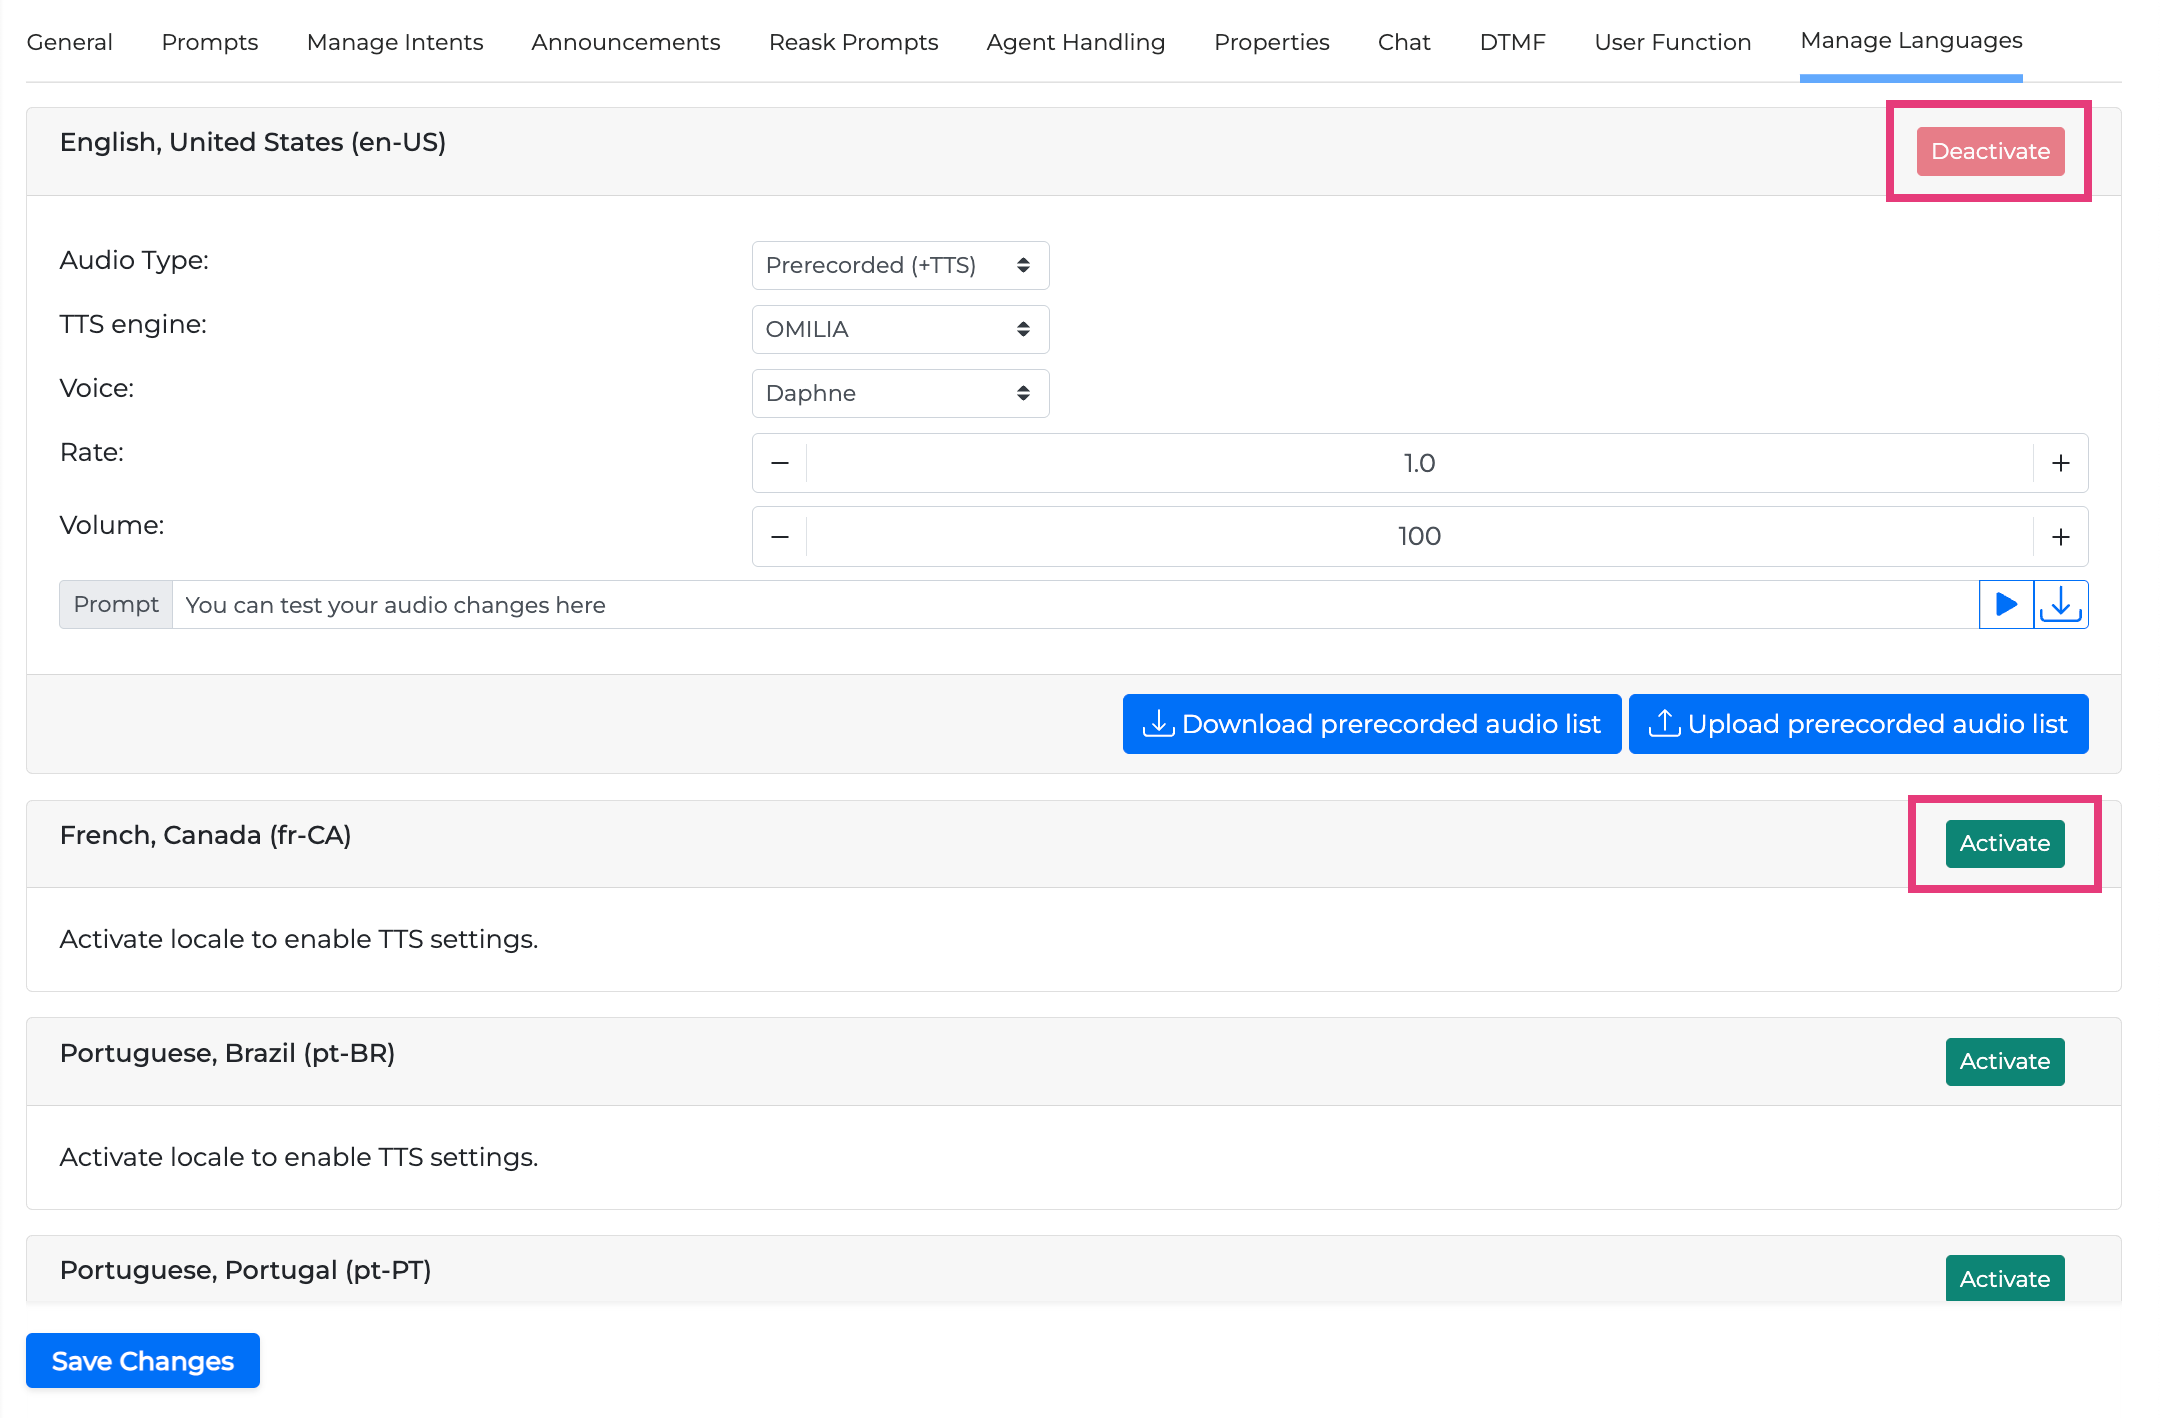
If you activate a language, you will see the option to choose a prompt in every language in all prompts, including nice reactions, error reactions, validations, confirmations, hold functionality, agent reaction, error handling, and so on.
Supported languages
Some locales are available only for specific miniApps. The table below shows the current applicability.
miniApp type | de-DE | en-AU | en-CA | en-GB | en-US | el-GR | es-ES | es-US | fr-CA | pt-PT | pt-BR | uk-UA |
Intent-Banking-2.0 | ✓ | ✓ | ✓ | ✓ | ✓ | ✓ | ✓ | ✓ | ✓ | |||
Intent-CarRetail | ✓ | |||||||||||
Intent-Universal | ✓ | ✓ | ✓ | ✓ | ✓ | ✓ | ✓ | ✓ | ✓ | ✓ | ||
Intent-Telco | ✓ | |||||||||||
Intent-Energy | ✓ | |||||||||||
Numeric | ✓ | ✓ | ✓ | ✓ | ✓ | ✓ | ✓ | ✓ | ✓ | ✓ | ✓ | |
Alphanumeric | ✓ | ✓ | ✓ | ✓ | ✓ | ✓ | ✓ | ✓ | ✓ | ✓ | ✓ | ✓ |
Alpha (only) | ✓ | ✓ | ||||||||||
Amount | ✓ | ✓ | ✓ | ✓ | ✓ | ✓ | ✓ | ✓ | ✓ | |||
Ask | ✓ | |||||||||||
Date | ✓ | ✓ | ✓ | ✓ | ✓ | ✓ | ✓ | ✓ | ✓ | ✓ | ✓ | |
Date Range | ✓ | ✓ | ||||||||||
Announcement | ✓ | ✓ | ✓ | ✓ | ✓ | ✓ | ✓ | ✓ | ✓ | ✓ | ✓ | ✓ |
YesNo | ✓ | ✓ | ✓ | ✓ | ✓ | ✓ | ✓ | ✓ | ✓ | ✓ | ✓ | ✓ |
Corpus | ✓ | ✓ | ✓ | |||||||||
Text (chat only) | ✓ | ✓ | ✓ | ✓ | ||||||||
WebService | ✓ | ✓ | ✓ | ✓ | ✓ | ✓ | ✓ | ✓ | ✓ | ✓ | ✓ | ✓ |
Intelli | ✓ | ✓ | ✓ | ✓ | ✓ | ✓ | ✓ | ✓ | ✓ | ✓ | ✓ | ✓ |
Entity | ✓ | ✓ | ✓ | ✓ | ✓ | ✓ | ✓ | ✓ | ✓ | ✓ | ✓ | ✓ |
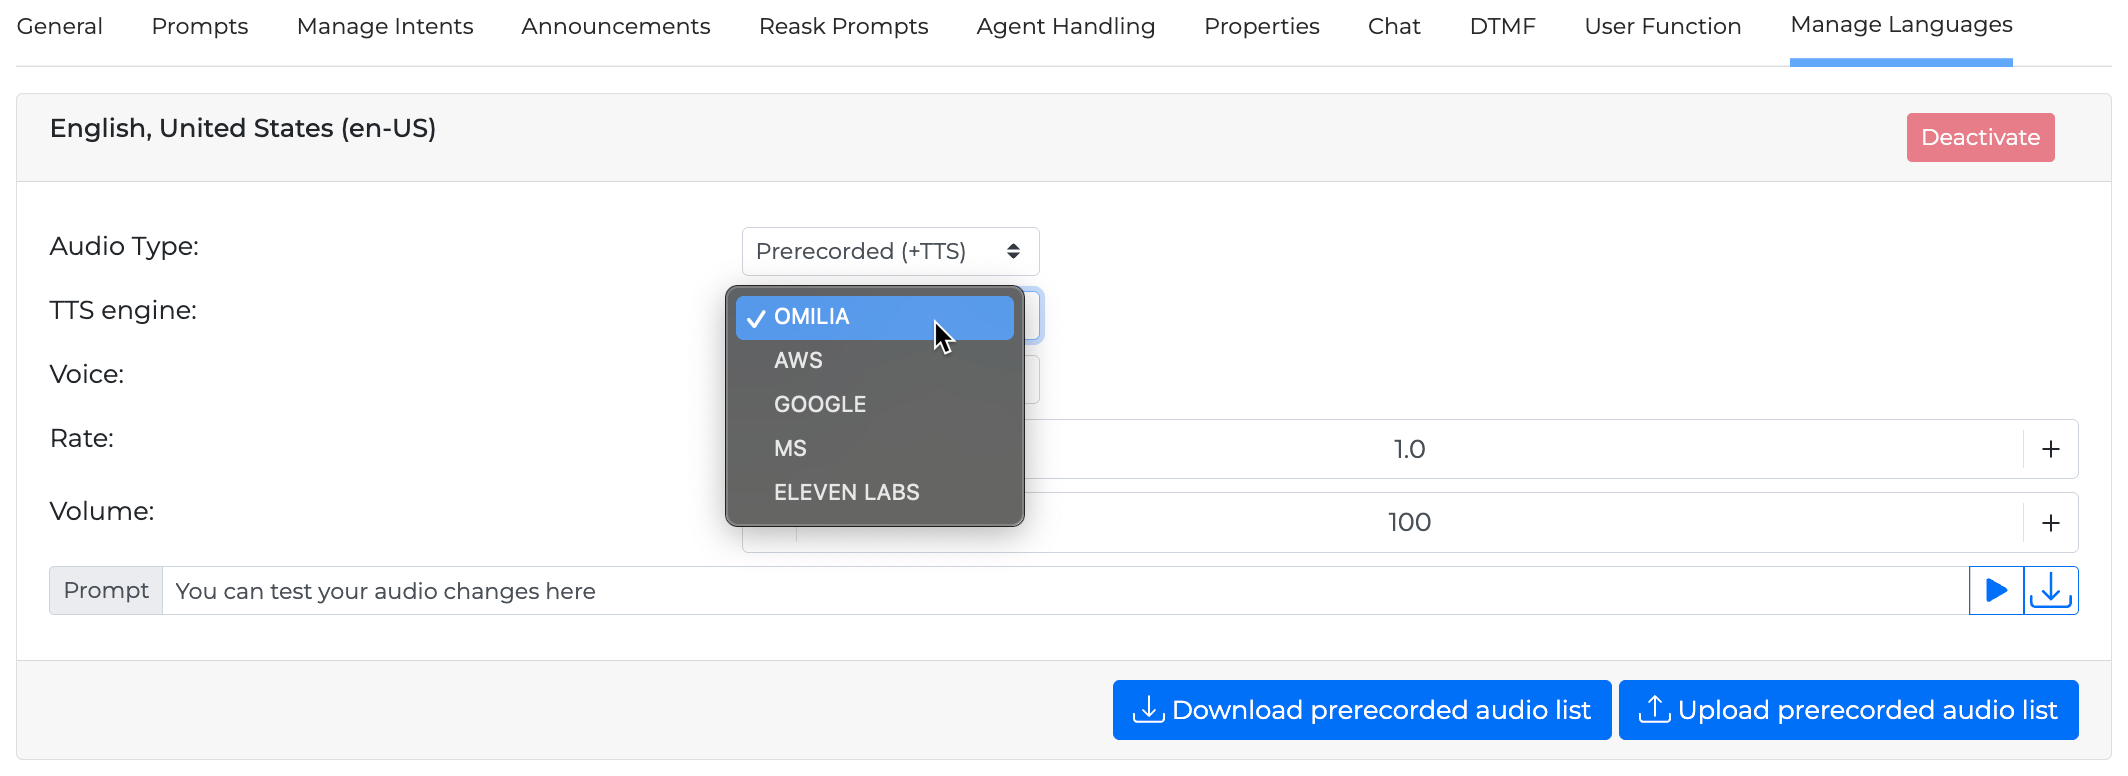
Text To Speech engines
For certain languages there is a variety of TTS engines to select from. For example, en-US has the ELEVEN LABS, MS, AWS, GOOGLE, and OMILIA.
Each of those languages also may offer a variety of different voices that can be adjusted in terms of rate (speech tempo) and volume.
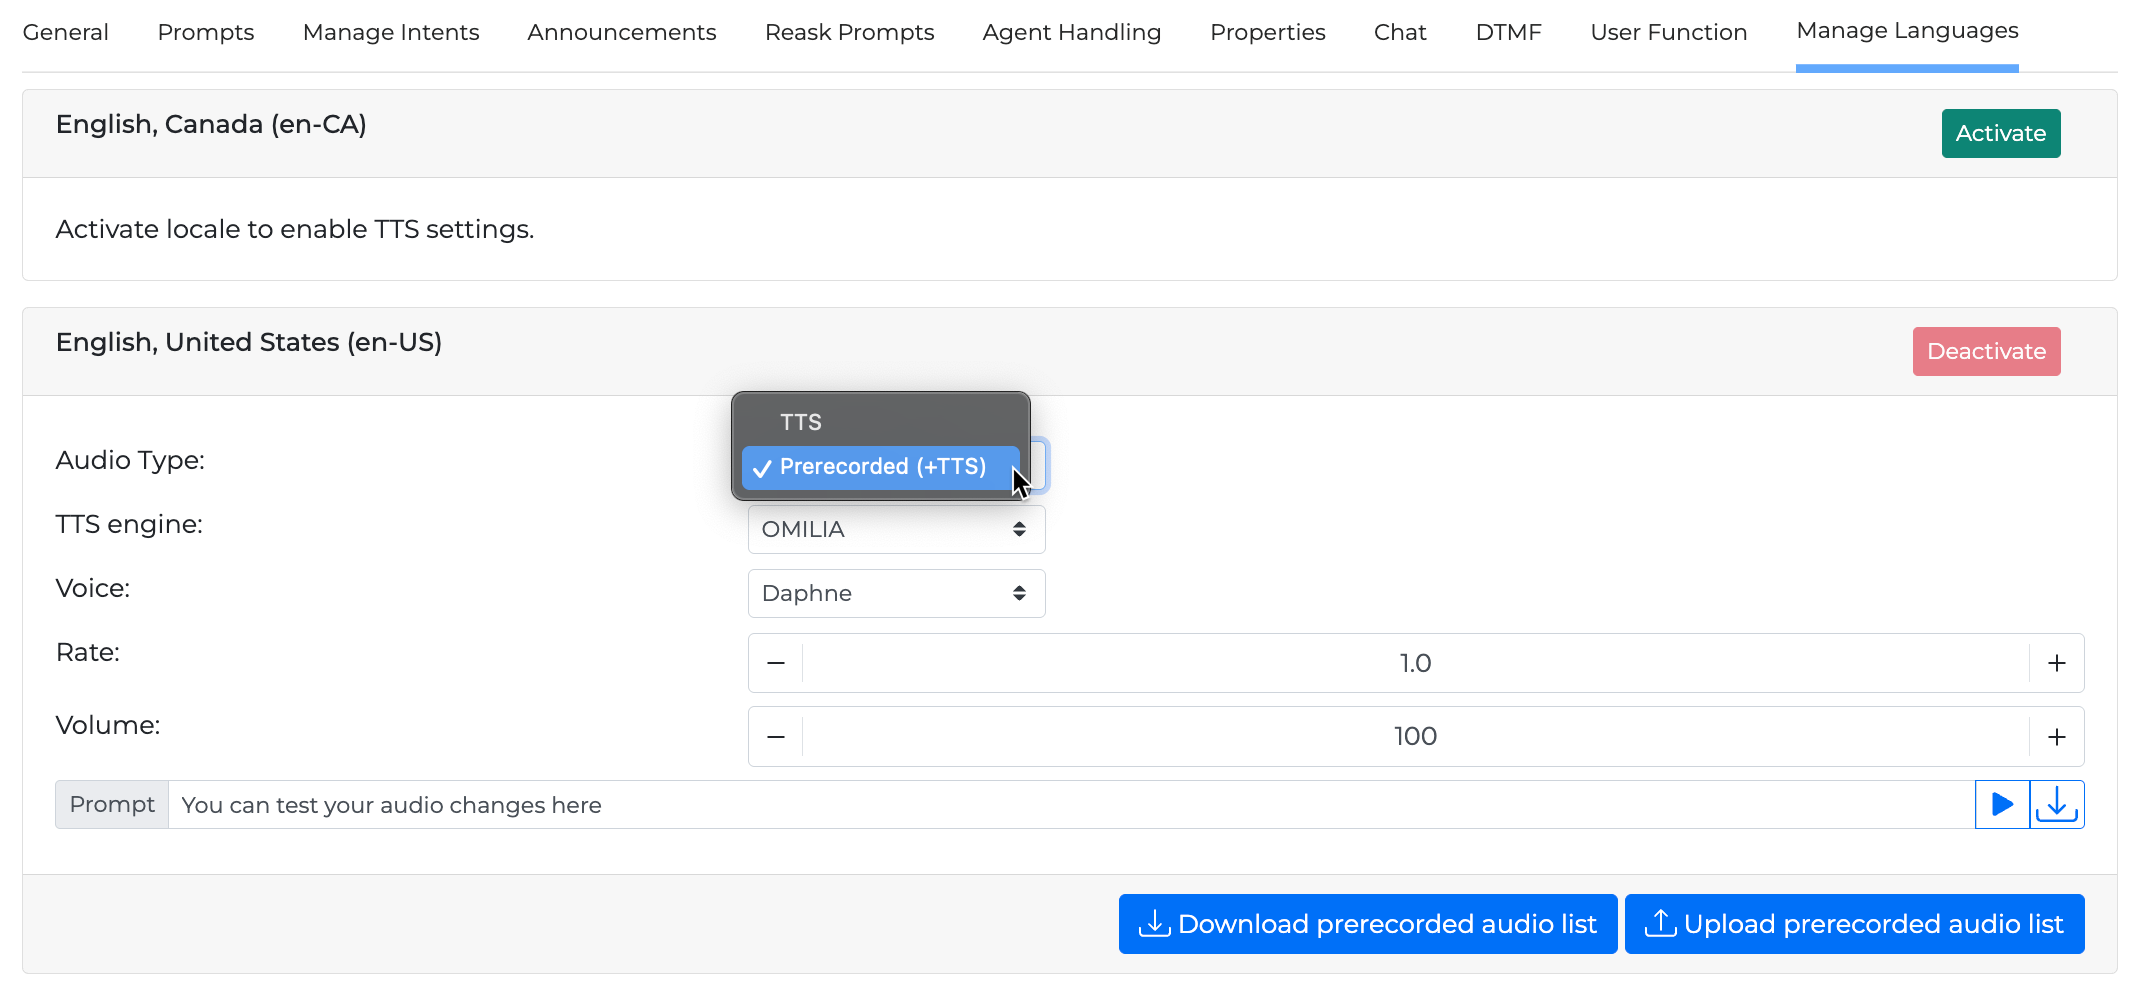
Audio Type
You have the option to use the provided TTS audio or you can combine it with prerecorded audio prompts; This allows you to access all prompts used during a session and record them in your preferred voice and accent, rather than using only the provided TTS functionality.
To do this, change the Audio Type from TTS to Prerecorded (+TTS). After making this change, click Download prerecorded audio list to get a TSV file. This file contains audioID, prompt, and category keys.
There are several ways in which the prompts may be presented. Read the sub-sections below for more information.
Prerecorded (+TTS) option is not available for all locales. Please check availability list below.
Locale | de-DE | en-AU | en-CA | en-GB | en-US | el-GR | es-ES | es-US | fr-CA | pt-PT | pt-BR | uk-UA |
|---|---|---|---|---|---|---|---|---|---|---|---|---|
Prerecorded audio availability | ✓ | ✓ | ✓ | ✓ | ✓ | ✓ | ✓ | ✓ | ✓ | ✓ | ✓ |
Upload pre-recorded audio list
Maintainer role is required in order to have this option available. Otherwise, contact our Customer Support by any convenient means described in the Omilia Care (Support Center) section.
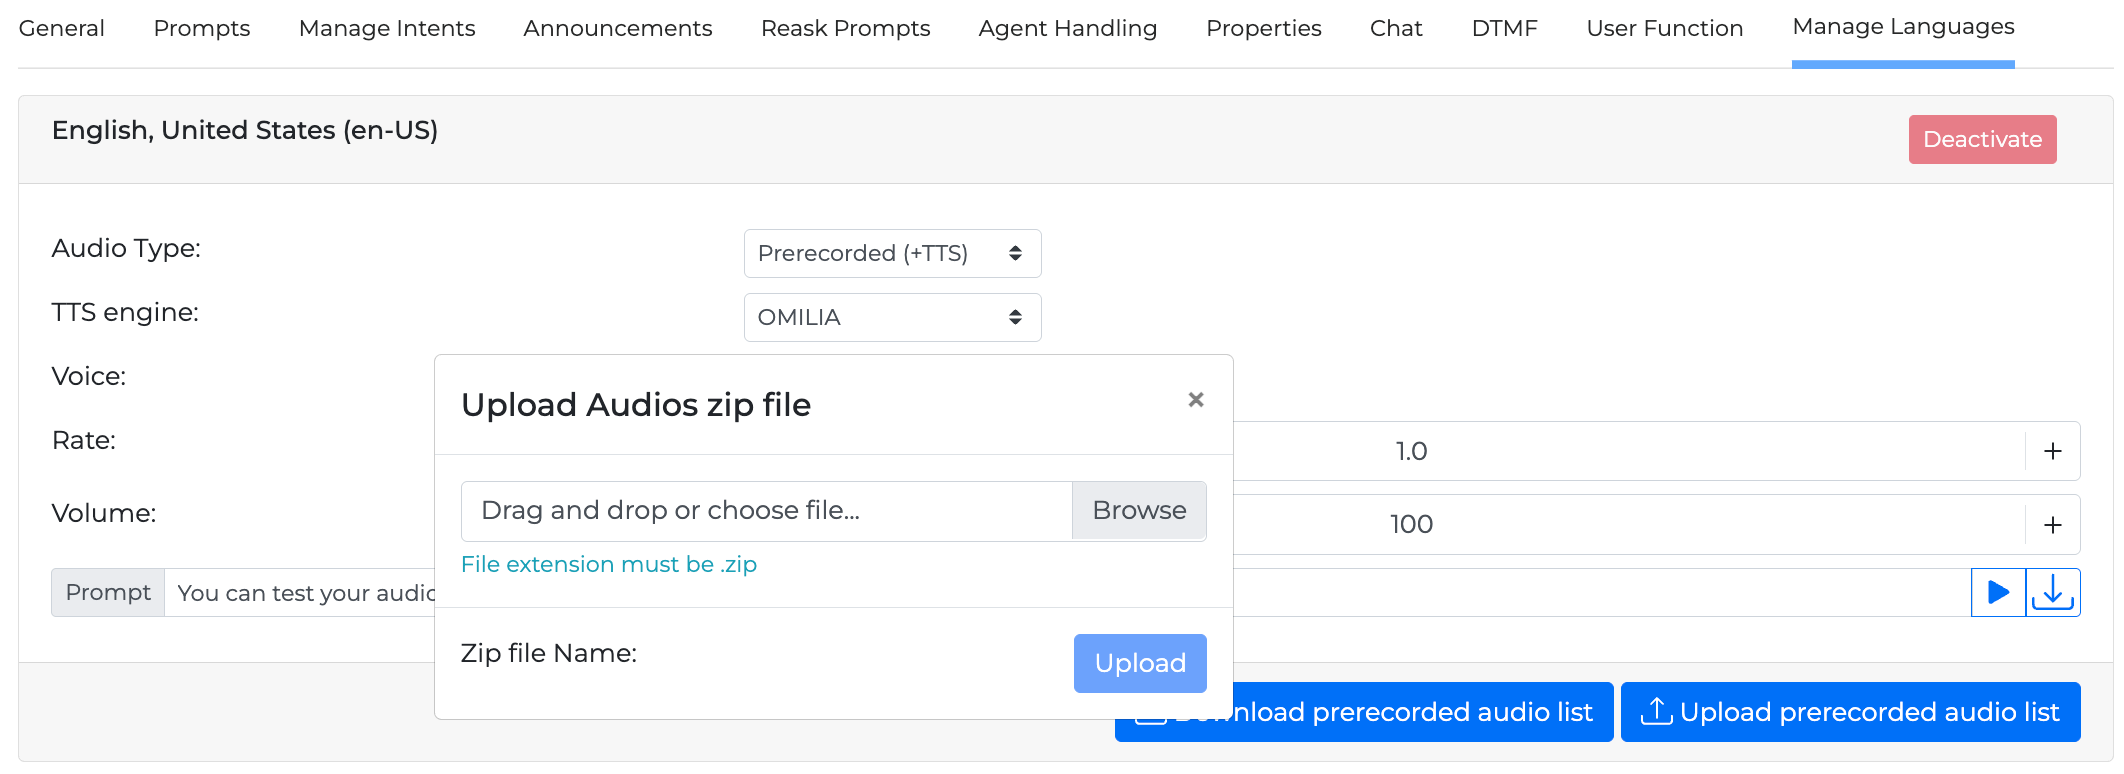
After creating the WAV audio lists, it is possible to upload them back to the required miniApp.
Make sure the audio files are created in the correct format - ULAW.
Move all the WAV files to a single directory (no sub-directories) and compress it to a ZIP file.
Click the Upload prerecorded audio list button.
Add the ZIP file in the pop window and click the Upload button.
Static prompt
If it is a plaintext static prompt without dynamic values in {{}}, then you can record it as is and name the audio file for upload {audioID}.wav (instead of {audioID}, paste the audioID of the corresponding prompt from the TSV file in its entirety).
An example of this might be:
AUDIO_ID|PROMPT|CATEGORY|WARNING
1234-a123-321-40.test.Announcement.MiniApps.username.welcome.locales.en-US.omIVR.normal|Welcome! I'm your virtual assistant|miniAppConfig prompt|
where | corresponds to Tab key
This means the audio file with the recorded prompt should be named 1234-a123-321-40.test.Announcement.MiniApps.username.welcome.locales.en-US.omIVR.normal.wav.
Dynamic prompt with a realizer
If it’s a prompt that contains dynamic values and has an audio type (realizer) (for example, The weather in {{city|generic}} is {{weather|generic}}), it will be split into several different parts, such as the static plaintext parts:
AUDIO_ID|PROMPT|CATEGORY|WARNING
4567-a123-321-40.test.Announcement.MiniApps.username.welcome.locales.en-US.omIVR.normal.0|The weather in|miniAppConfig prompt|
7890-a123-321-40.test.Announcement.MiniApps.username.welcome.locales.en-US.omIVR.normal.1|is|miniAppConfig prompt|
For both of them, you can apply the same process for static prompts described in Static Prompts section and record them as is.
And then, for the dynamic part, at the bottom of the TSV file, you will have a prompt for the Generic Realizer that looks the following:
AUDIO_ID|PROMPT|CATEGORY|WARNING
1526-s26-ar0.test.Announcement.MiniApps.username.generic.en-US.{base64(value)}|ATTENTION! THIS IS A GENERIC REALIZER. MULTIPLE PROMPTS NEED TO BE UPLOADED. Please upload one prompt for every possible value of extValue1 by replacing each time the last part of the audioID with the base64 of each value|Generic Realizer|
This is essentially the placeholder ID for all the possible values that you are going to record for city and weather (as per our example above) and use in your prompts.
For each value you need to record a separate audio file, the name of which will be the audioID as indicated in the TSV entry, except with {base64(value)} replaced with each value encoded in base64 format (such as, Qm9zdG9u for Boston) and .wav, like this: 1526-s26-ar0.test.Announcement.MiniApps.username.generic.en-US.Qm9zdG9u.wav. This way the miniApp will know this is a recording of the word Boston for the prompt The weather in {{city|generic}} is {{weather|generic}}.
Each recording has a specific ID which means it can be used only in one specific prompt. So if, for instance, you need the word Boston in two different prompts, then you need to send the recording twice, with the respective ID each time (so the {base64(value)} will stay the same for the same value, but the part before that should be changed to the ID of the respective prompt).
For encoding the values, you can use any base64 encoder available online, such as base64encode.org.
Dynamic prompt without a realizer
If it’s a prompt that contains dynamic values but doesn’t have an audio type specified, you should go back to the miniApp configuration page and add one. Otherwise it will be played with TTS. As such, these prompts will have warnings attached in the TSV file, so you would be able to spot them and update them if needed.
Summary
To recap, to use the custom prerecorded prompts feature successfully you need the following:
an audio type (realizer) specified for dynamic values in each of the prompts
separate recordings for each possible value to be used inside {{}} in each prompt
the correct name of the prerecorded audio file (base audioID +
.wavextension)
Available audio type realizers
datefor realizing values of dates in the formatYYYY-MM-DDalphanumericfor realizing values such asabcd1234,1234amountfor realizing values such as125.60_EURgenericfor realizing any value
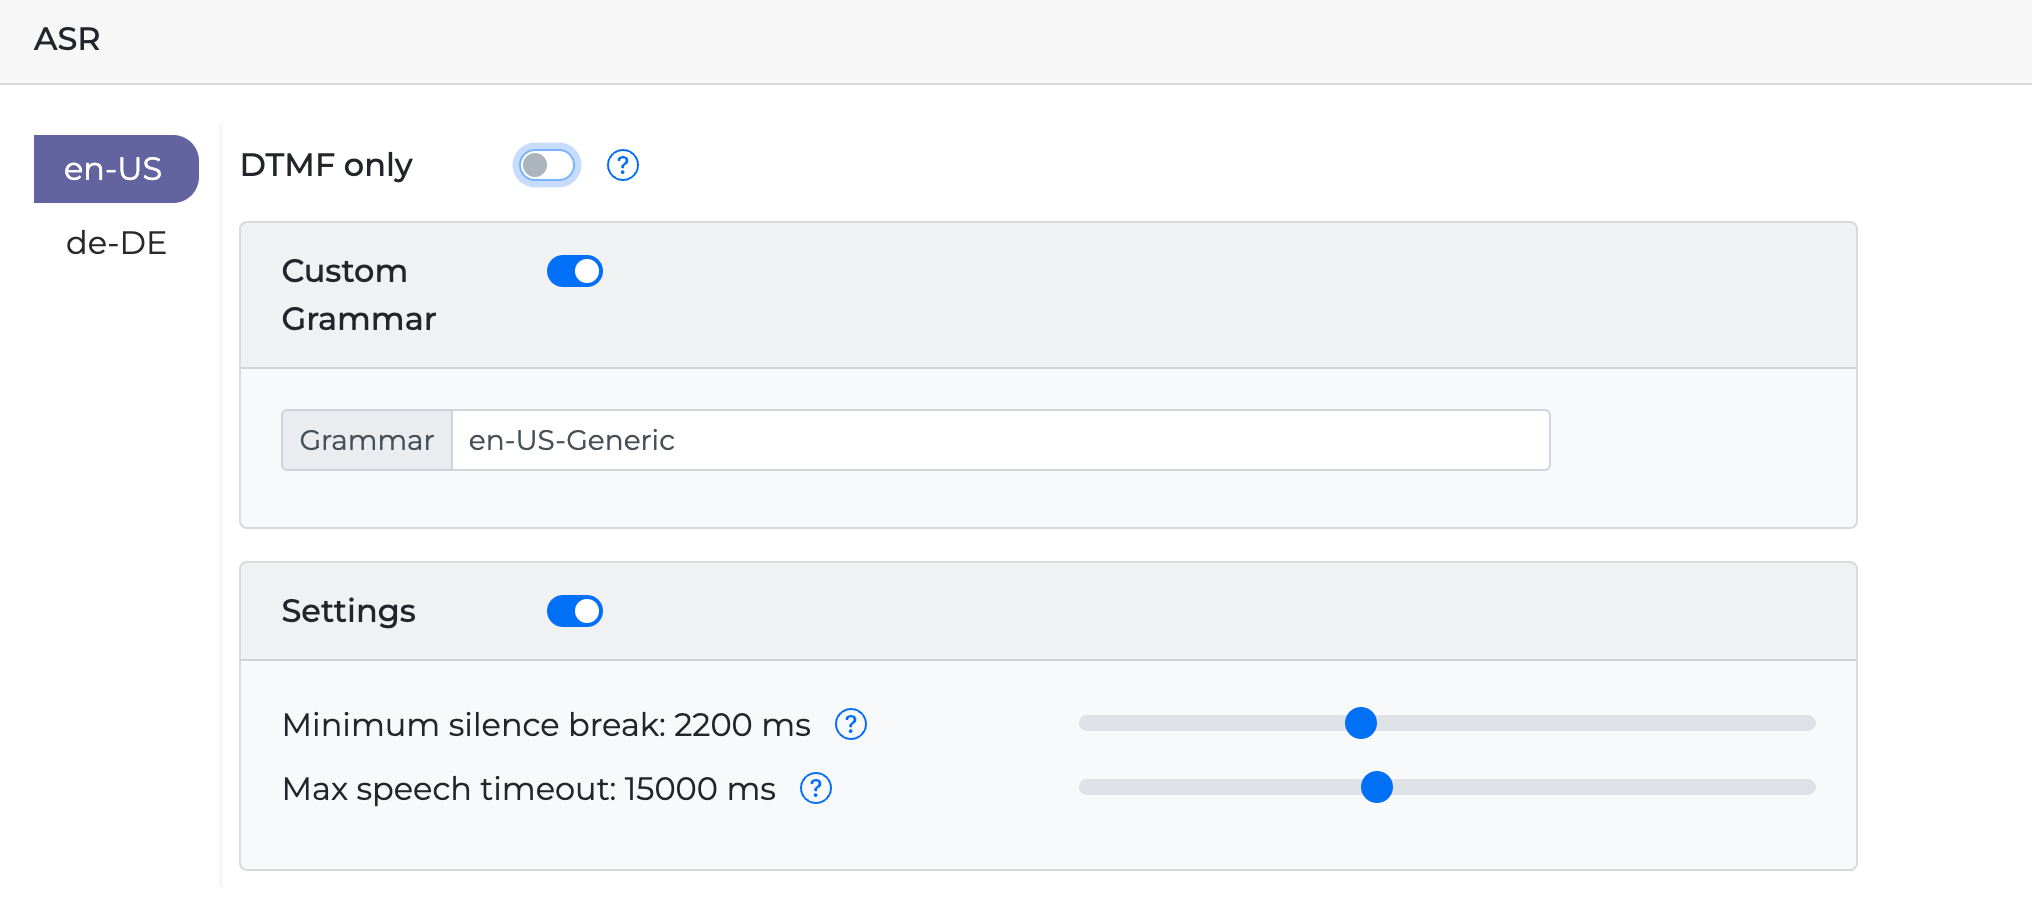
Custom Grammars
If an ASR custom grammar is available, it can be activated in the ASR field box. Follow the steps to enter a custom grammar:
Turn the Custom Grammar Toggle button On.
Enter the custom grammar name.
List is subject to change without notice.
Custom Grammar names format follows the below pattern:
locale.domain.project.task
en-GB.YesNo.Genericen-GB.Universalen-GB.AlphaDigitsen-GB.Numbersen-GB.Datesen-GB.Amounten-GB.Addressesen-GB.FullNamesen-GB.UKCityStateen-GB.AUCityStateen-AU.Alphaen-AU.AlphaDigitsen-AU.Amounten-AU.YesNo.Genericen-AU.Datesen-AU.Numbersen-US.Universalen-US.Banking.GenericGeneric_noBargeInen-US.Banking.EndMenuen-US_Banking_NA_Cardsen-US.AlphaDigitsen-US.Alphaen-US.YesNo.Genericen-US.Numbersen-US.Amounten-US.Datesen-US.DateTimeen-US.EmailSpellouten-US.Covid.Genericen-US.Covid.Confirmen-US.Covid.EndMenuen-US.CarRetail.EndMenuen-US.Insurance.Genericen-US_FullNameen-US.Accounten-US_USCityStateen_SymbolsAlphaDigitsConfirmde-DE.Alphade-DE.AlphaDigitsde-DE.LicencePlatede-DE.Numbersde-DE.Amountde-DE.Datesde-DE.YesNo.Genericde-DE.Covid.Genericde-DE.Covid.EndMenude-DE.FullNamesde-DE.DECityStatede-DE.Addressesfr-CA.Banking.Genericfr-CA.AlphaNumericsfr-CA.YesNo.Genericfr-CA.Numbers.Confirmfr-CA.Datesfr-CA.Amountfr-CA_Banking_NA_Accountel-GR.Telco.Genericel-GR.Banking.Genericel-GR.Datesel-GR.Amountel-GR.Numericsel-GR.Alphael-GR.AlphaNumericsel-GR.ADT(ID Card Numbers)el-GR.Confirm.Genericel-GR.Numeric.Confirmel-GR.Date.Confirmel-GR.Alpha.Confirmel-GR.Alphanumeric.Confirmel-GR.Energy.Generices-US.EmailSpelloutes-US.Numberses-US.AlphaDigitses-US.Dateses-US.Amountes-US.YesNo.Generices-US.FullNameses-US.USCityru-ua-mix_Telco_OQru-ua-mix_Banking_OQru-ua-mix_Universal_Numberru-ua-mix_Universal_Datesru-ua-mix_Banking_Confirmru-ua-mix_Banking_Amountru-ua-mix_Universal_Alphanumerics
(Optional) If you require further customization for your grammar's behavior, turn on the Settings Toggle button and adjust the provided ASR properties.
Minimum silence break: Minimum time in milliseconds that qualify as end of speech indicator.
Max speech timeout: Threshold in milliseconds for the maximum time allowed for speech.
Contact Customer Support if a custom grammar is required.
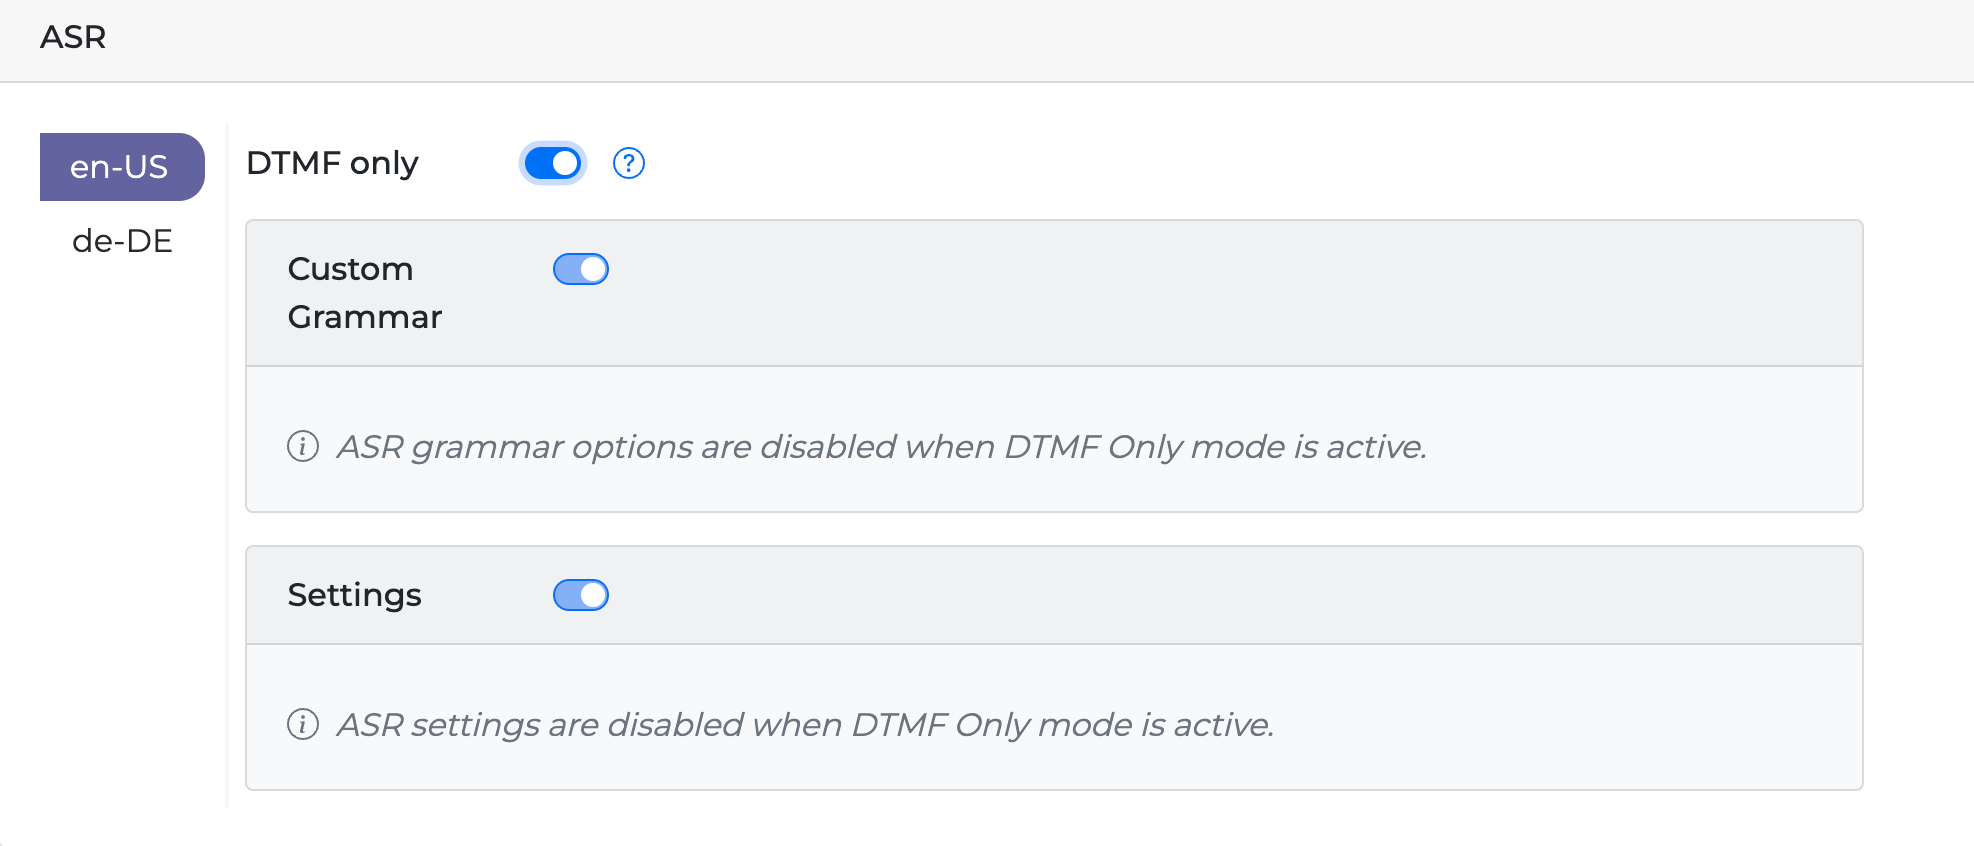
Voice input ignore
You can set up a miniApp to ignore speech input using the DTMF only Toggle Switch.
If the DTMF only is switched on, ASR Grammars and ASR setting will be disabled while the miniApp will ignore any voice inputs and will accept DTMF inputs only.
End Menu

A custom grammar can be used to override the default one for end menu options and take over on new task prompts. To activate the end menu custom grammar, follow the steps:
Activate the Custom Grammar with the Toggle button.
Enter the custom grammar name in the Grammar field text box or click the Sync arrow repeat button in the ASR field to use the same custom grammar across all steps of the dialogue.