Last updated:
About this guide
This document explains how to embed Omilia’s WebChat widget in your own website.
Requirements
Basic HTML and Javascript knowledge.
Embed the chat widget on your website
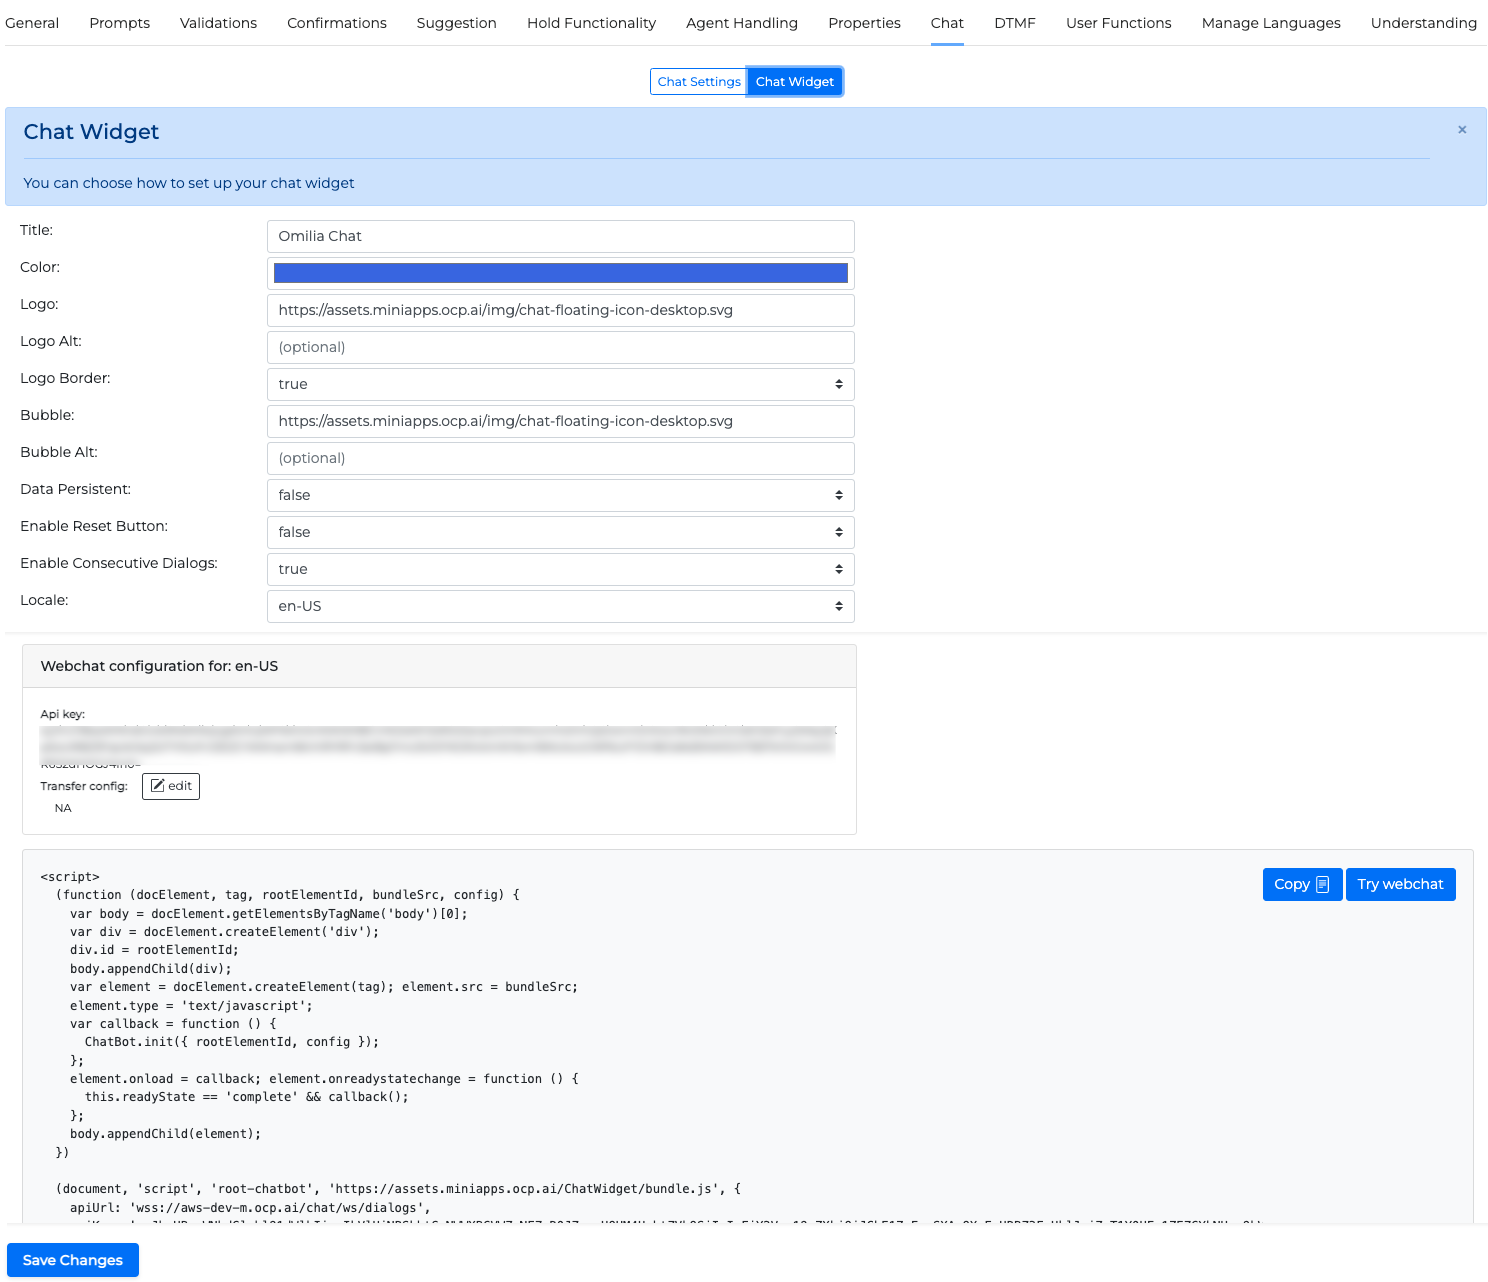
To embed the chat widget to your website, go to the Chat tab of a miniApp, select a Locale and click the Get JS Code button. Copy the Javascript code with the Copy button and paste it to your website’s HTML code. Otherwise copy only the API key and URL Key from the JS code.
It is preferable to use the API URL in order to get new versions of chat delivered instantly. Using a downloaded chat file instead of URL causes a version lock, meaning you will no longer receive any updates.
Click the Try webchat! button to test the webchat.
Create the JS code manually
-
Create the required script. Modify the code snippet by altering the values of the parameters in the table Parameters of chat widget integration script.
-
To embed the WebChat widget in your website paste the code snippet within the body of the HTML code (preferably at the end). [1]
<body>
  ...
  <script>

      (function(docElement, tag, rootElementId, bundleSrc, config, data) {
          var body = docElement.getElementsByTagName('body')[0];
          var div = docElement.createElement('div');
          div.id = rootElementId;
          body.appendChild(div);
          var element = docElement.createElement(tag);
          element.src = bundleSrc;
          element.type = 'text/javascript';
          var callback = function() {
            ChatBot.init({ rootElementId, config, data });
          };
          element.onload = callback;
          element.onreadystatechange = function() {
            this.readyState == 'complete' && callback();
          };
          body.appendChild(element);
      })

      (document, 'script', 'root-chatbot', 'https://cdn.us1-m.ocp.ai/modules/chatwidget/bundle.js', {
          apiUrl: 'YOUR_API_URL',
          apiKey: 'YOUR_API_KEY'
      });
  </script>
</body>
Customers during WebChat initialization, can provide a configuration object (see section Configuration) and an initialization data object (see section Initialization Data).
Integration (Angular)
To embed the WebChat widget in an Angular Universal project, follow the steps below:
-
Access DOM and add bundle script in head section using the following code:
import {DOCUMENT} from "@angular/common";
import {Renderer2} from '@angular/core';

constructor(@Inject(DOCUMENT) private document: any, private renderer:Renderer2) {
}

constructor() {
  const scriptElt = this.renderer.createElement('script');
  this.renderer.setAttribute(scriptElt, 'type', 'text/javascript');
  this.renderer.setAttribute(scriptElt, 'src','https://cdn.us1-m.ocp.ai/modules/chatwidget/bundle.js');
  this.renderer.appendChild(this.document.head, scriptElt);
}
-
Add the rest of the script from the Angular component:
ChatBot.init({
     rootElementId: 'your_chat_container,
     config: {
       apiUrl: 'your_API_URL',
       apiKey: 'your_APIkey',
       title:' Omilia Chat',
       logoUrl: 'data:image/svg+xml;base64,PD94bWwgdmVyc....',
       logoAlt: 'Alt attribute logo icon',
       logoBorder: false,
       bubbleUrl: './path/to/image.svg',
       bubbleAlt: 'Alt attribute bubble icon',
       brandColor: 'yourHTML_color',
    }
 });
Configuration
During the initialization of the WebChat, customers have the option to pass a set of configuration variables to customize the widget.
|
Parameter |
Type |
Required |
Description |
Value |
|---|---|---|---|---|
|
|
string |
Yes |
Unique API URL of WebChat. |
Can be extracted from the Javascript with Get JS Code as described in section Embed the chat widget on your website |
|
|
Array<string> |
No |
WebChat provides an ability to have multiple API URLs so that it can have failover in case some URL is down. The parameter should be used along with the |
Any valid array of API URLs. |
|
|
string |
No |
The parameter only makes sense to use if
|
ORDERED, ROUND_ROBIN |
|
|
string |
Yes |
Unique API key of WebChat. |
Can be extracted from the Javascript with Get JS Code as described in section Embed the chat widget on your website |
|
|
string |
No |
Sets the title of the widget. |
Max character length 16 [2] |
|
|
string |
No |
Sets the subtitle of the widget. |
Max character length 21 |
|
|
string |
No |
Sets the logo of the widget. if an |
Any valid path [3], or Base64 format |
|
|
string |
No |
Sets the alt attribute for the logo icon. |
Any valid |
|
|
boolean |
No |
To hide or not the logo border. |
Boolean value, by default is visible |
|
|
boolean |
No |
When true the data (either given during |
true/false. Default value false |
|
|
string |
No |
To set the bubble icon of the chat widget. |
Any valid path [3], or Base64 format |
|
|
string |
No |
To set the alt attribute for the bubble icon. |
Any valid string |
|
|
boolean |
No |
When the value is true, the webchat has a button that the user can click to reset the chat. When clicked, it calls the |
true/false. Default value false |
|
|
string |
No |
To set the colour theme of the chat widget. |
Any valid HTML colour |
|
|
string |
No |
Sets the color of the chat background. |
Any valid HTNL color |
|
|
boolean |
No |
If it is true after the dialogue ends, the input box remains active (user can type), and inactive if it is false (user cannot type and needs to be restarted by closing and opening or by pressing the reset button). |
true/false. Default value true |
|
|
|
No |
Provide an object with form properties to show the form at the beginning of the chat dialog. For more details see the Form section. |
Form values |
|
|
|
No |
Feedback Configuration options:
If
|
Example: JavaScript
For more information on how to configure a form please visit the Form section. |
|
|
boolean |
No |
Enables Google Analytics tracking. |
true/false. Default value false |
|
|
boolean |
No |
Enables “Download as PDF“ button in the end of the dialog, by clicking on which chat transcription will be downloaded. |
true/false. Default value false |
|
|
string |
No |
Pass any font name from GoogleFonts to change WebChat’s font. |
A string with a font name.
|
|
|
object |
No |
Enables chat notifications.
|
Default values: JavaScript
|
|
|
Object |
No |
Shows footer text at the bottom of the chat.
|
JavaScript
|
|
|
Object |
No |
Configure agent’s
|
JavaScript
|
|
|
Object |
No |
Configure bot’s
|
JavaScript
|
|
|
string |
No |
ALWAYS - after chat is minimized it will be reopened when users go to different website sections in the same tab, reload the page, or open new tabs. NEVER - after chat is minimized it will not be reopened when users go to different website sections in the same tab, reload the page, or open new tabs. NEXT_TABS - after chat is minimized it will not be reopened unless users go to different sections of the website in the same tab or reload the page's current page. In the newly opened tabs chat will be opened. |
JavaScript
Default value: NEXT_TABS |
|
|
string |
No |
Changes Webchat widget language |
Default value: en
|
|
|
boolean |
No |
|
Default value: true |
|
|
boolean |
No |
When true, the chat input is disabled while a transfer to a live agent is in progress (i.e. after TRANSFERRED_DISABLE_INPUT is received and until AGENT_JOINED is received). Set to false to keep the input active throughout the transfer. |
Default value: true |
|
|
boolean |
No |
When true, the chat input switches to a password-style field (with a reveal/hide toggle) whenever the server signals a sensitive prompt. |
Default value: false |
Table 1. Parameters of chat widget integration script
config = {
    apiUrl: '<YOUR_API_URL>',
    apiKey: '<YOUR_API_KEY>',
    title:' Omilia Chat',
    logoUrl: 'data:image/svg+xml;base64,PD94bWwgdmVyc....',
    logoAlt: 'Alt attribute logo icon',
    logoBorder: false,
    bubbleUrl: './path/to/image.svg',
    bubbleAlt: 'Alt attribute bubble icon',
    brandColor: '<YOUR_HTML_COLOR>'
}
Example configuration object
Initialization Data
During the initialization of the WebChat, customers have the option to pass their own data (for example, key-value pairs). Initialization data are transmitted when a new dialog starts and used by OCP to improve the conversational experiences of users.
Make sure data contains only whatever is necessary to improve the experience of the users.
data = {
    userName: 'bilbo',
    firstName: 'Bilbo',
    lastName: 'Baggins'
    customerNumber: '345453543544'
    bearerToken: 'feawfjklej9820jr39802edj032#$23rni32ojrnkd23oj8230'
}
Example initialization object
Data object does not support complex data structures, for example, arrays or nested object.
An alternative way for customers is to use the setData method on the widget.
ChatBot.setData({
    userName: 'bilbo',
    firstName: 'Bilbo',
    lastName: 'Baggins'
    customerNumber: '345453543544'
    bearerToken: 'feawfjklej9820jr39802edj032#$23rni32ojrnkd23oj8230'
})
It can be used only when ChatBot is fully initialized. If you want to call setData right after Chat.init, it would be safer to move this data directly in the init method.
Data that have been set during intialization or with setData method, are sent only when one clicks the WebChat bubble to open or clicks the reset button.
Every time setData is used, it overwrites previous data.
Event Callback
WebChat can provide chat events by setting up an appropriate callback method.
ChatBot.setEventCallback(event -> () {


})
The Event object has the following structure:
event = {
    type: 'route',
    meta: {
      key1: 'value1',
      key2: 'value2'
    }
}
|
Property |
Type |
Description |
Value |
|---|---|---|---|
|
|
string |
Type of the event |
start_dialog, route, end_dialog |
|
|
object |
Depending on the event type |
(TO BE DETERMINED)
|
Table 2. Parameters
At the moment, this method is triggered only when we have key meta data inside the event. It might not be triggered on the events that do not give or reset meta information.
Event Subscribe
WebChat provides a method to subscribe to the events.
ChatBot.subscribe('onOpen', isOpen => {
  if (isOpen) {
    ChatBot.setData(data);
  }
});

ChatBot.subscribe('onMinimized', isMinimized => {
  console.log('isMinimized', isMinimized);
})
|
Event |
Description |
|---|---|
|
|
Triggered when the chat opens or closed. You can use this event if you want to set data with |
|
|
Triggered when the chat is minimized or maximized. |
|
|
Triggered when the restart chat button is clicked. |
Open Chat
WebChat provides a method to open the chat proactively. You can call it without arguments or providing a text utterance.
ChatBot.open();
ChatBot.open('How to reset a password?')
|
State |
After method call |
Description |
|---|---|---|
|
Open method called without any arguments |
Opened |
The WebChat is opened and initialized as if manually clicked on a chat bubble. |
|
Open method called with utterance |
Opened |
The WebChat is opened and initialized with the utterance. The utterance sent by the website is not visible when the chat is opened. |
If the ChatBot.setData() is called before then the chat will be initialized with data from setData method.
Close Chat
WebChat provides a method to close the current chat. A "close" resets the Chat and closes the connection.
ChatBot.close()
|
State |
After method call |
Description |
|---|---|---|
|
WebChat windows is open and a chat is in progress or terminated |
Closed |
The chat closes and disconnects any open connections. Any dialog in progress will be lost. |
|
WebChat is closed and only the chat bubble is visible |
Closed |
The chat remains closed. |
Table 4. UX Close description
The close method does NOT clear the data that was set with the setData method, if the dataPersistent is true. If you need to change the aforementioned data, you need to call setData again.
Restart Chat
|
State |
After method call |
Description |
|---|---|---|
|
WebChat windows is open, and a chat is in progress or terminated |
Open |
The chat closes and reopens in an instant. It disconnects any open connections. Any dialog in progress will be lost. It initializes a new chat, and the dialogs from previous chat are neither visible nor retrievable. |
|
WebChat is closed and only the chat bubble is visible |
Open |
The chat opens in an instant. It initializes a new chat, and the dialogs from previous chat sessions are neither visible nor retrievable |
Table 3. UX Restart description
The restart method does NOT clear the data that was set with the setData method, if the dataPersistent is true. If you need to change the aforementioned data, you need to call setData again.
Form
There are two instances when you can display a form:
-
Before the dialogue: Place the form configuration in the
welcomeFormfield found at the root of the configuration object. -
At the end of the dialogue: This is used as part of the feedback-gathering process. For this instance, place the form configuration in the appropriate
formfield within thefeedbackobject.
The maximum number of form elements is limited to five.
{
  title: 'Form to fill in',
  subtitle: 'Fill in all fields in the form',
  required: false,
  fields: [
    {
      type: 'input',
      email: true,
      order: 1,
      required: false,
      label: 'Email',
      placeholder: 'Email',
      name: 'email',
    },
    {
      type: 'checkbox',
      order: 5,
      name: 'terms_conditions',
      required: true,
      label: 'Terms & Conditions',
    },
    {
      type: 'select',
      order: 3,
      name: 'countries',
      required: false,
      label: 'Countries',
      placeholder: 'Pick an option',
      value: { label: 'Ukraine', value: 'ukraine' },
      options: [
        { label: 'Ukraine', value: 'ukraine' },
        { label: 'Greece', value: 'greece' },
        { label: 'USA', value: 'usa' },
        { label: 'France', value: 'france' },
        { label: 'Poland', value: 'poland' },
      ],
    },
  ],
},
Form Props
|
Field |
Required |
Type |
Description |
|---|---|---|---|
|
|
No |
string |
A title of the form |
|
|
No |
string |
A subtitle of the form |
|
|
Yes |
boolean |
true - form can’t be skipped and should be submitted. false - form is optional, can be skipped |
|
|
Yes |
FormFields |
Array of |
Form Field: Input
|
Field |
Required |
Type |
Description |
|---|---|---|---|
|
|
Yes |
|
Defines a type of the displayed form element |
|
|
Yes |
string |
Used as key for the form values object |
|
|
No |
string |
Input’s value |
|
|
No |
boolean |
Defines if the input is required field to submit the form |
|
|
Yes |
string |
Input’s label |
|
|
No |
string |
Error message. Appears in case of the field validation error.
|
|
|
Yes |
number |
Defines an order in which input will be displayed among other form elements from top to bottom |
|
|
No |
boolean |
If true, the input will accept only emails as value |
|
|
No |
string |
Input’s placeholder |
Form Field: Select
|
Field |
Required |
Type |
Description |
|---|---|---|---|
|
|
Yes |
|
Defines a type of the displayed form element |
|
|
Yes |
string |
Used as key for the form values object |
|
|
No |
|
A A |
|
|
Yes |
Array |
Select options. Max number of options is limited to 5, e.g. if you provide 7 options only first 5 will be displayed. |
|
|
No |
boolean |
Defines if the select is required field to submit the form |
|
|
Yes |
string |
Select’s label |
|
|
No |
string |
Error message. Appears in case of the field validation error.
|
|
|
Yes |
number |
Defines an order in which select will be displayed among other form elements from top to bottom |
|
|
No |
string |
Select’s placeholder |
Form Field: Checkbox
|
Field |
Required |
Type |
Description |
|---|---|---|---|
|
|
Yes |
|
Defines a type of the displayed form element |
|
|
Yes |
string |
Used as key for the form values object |
|
|
No |
boolean |
Default value of the checkbox |
|
|
No |
string |
Examples:
|
|
|
No |
boolean |
Defines if the checkbox is required field to submit the form |
|
|
Yes |
string |
Checkbox’s label |
|
|
No |
string |
Error message. Appears in case of the field validation error.
|
|
|
Yes |
number |
Defines an order in which checkbox will be displayed among other form elements from top to bottom |
Google Analytics Integration
WebChat supports Google Tag Manager and Global Site Tag (gtag.js) integrations. You can use only one of these approaches, not both at the same time.
To enable chat analytics please pass ga: true parameter to the configuration object of the WebChat
Steps to add Google Analytics to your website:
Global Site Tag (gtag.js)
Go to your Google Analytics to find this script.
Copy and paste it in the code of every page of your website, immediately after the <head> element. Don’t add more than one Google tag to each page.
NOTE: Google ID in the script below is not real. You should copy the script with your personal Google ID from your Google Analytics account.
<!-- Google tag (gtag.js) -->
<script async src="https://www.googletagmanager.com/gtag/js?id=G-D2KL1GKXCD"></script>
<script>
  window.dataLayer = window.dataLayer || [];
  function gtag(){dataLayer.push(arguments);}
  gtag('js', new Date());

  gtag('config', 'G-D2KL1GKXCD');
</script>
Google Tag Manager
Go to the Tag Manager account
Copy the code below and paste it on to every page of your website.
NOTE: Google ID in the scripts below is not real. You should copy the scripts with your personal Google ID from your Google Analytics account.
Paste this code as high in the <head> of the page as possible:
<!-- Google Tag Manager -->
<script>(function(w,d,s,l,i){w[l]=w[l]||[];w[l].push({'gtm.start':
new Date().getTime(),event:'gtm.js'});var f=d.getElementsByTagName(s)[0],
j=d.createElement(s),dl=l!='dataLayer'?'&l='+l:'';j.async=true;j.src=
'https://www.googletagmanager.com/gtm.js?id='+i+dl;f.parentNode.insertBefore(j,f);
})(window,document,'script','dataLayer','GTM-ASGFQW2');</script>
<!-- End Google Tag Manager -->
Additionally, paste this code immediately after the opening <body> tag:
<!-- Google Tag Manager (noscript) -->
<noscript><iframe src="https://www.googletagmanager.com/ns.html?id=GTM-ASGFQW2"
height="0" width="0" style="display:none;visibility:hidden"></iframe></noscript>
<!-- End Google Tag Manager (noscript) -->
Events
Custom analytics events that are sent by WebChat:
|
Event name |
Event data |
Description |
|---|---|---|
|
|
Current URL |
Fires when the Chat Widget Window is opening |
|
|
Current URL |
Fires when the Chat Widget Window is closing |
|
|
Current URL |
Fires when the process of transferring to the live agent is started |
|
|
|
Fires when agent is connected. It is guaranteed that only the current URL will be sent to GA. The remaining fields may not be presented in the event data. |
Calling URL of WebChat with parameters
The WebChat integration allows you to start a dialog with predefined semantics by passing parameters, such as an Intent, directly when the widget is initialized.
This functionality is supported because the WebChat widget provides the ability to start the dialog with predefined semantics using the setData() method or by passing it in init().
To configure this feature during widget integration, follow the steps below:
Step 1. Configure the feature
-
Use JavaScript to fetch the value of a specific query parameter from the URL.
-
Set this fetched value during the widget initialization (for example, in the
init()method). -
The value will be sent as the Intent to DiaManT when the dialog starts.
Step 2. Handle the Orchestrator Flow
After configuration, the next step is to set up a proper Orchestrator Flow to handle cases where the initial value for the Intent is passed or not.
The Flow can utilize a Condition building block to decide the subsequent action based on the value of the Intent. The example below shows a condition that decides which announcement will be played depending on the Intent value.
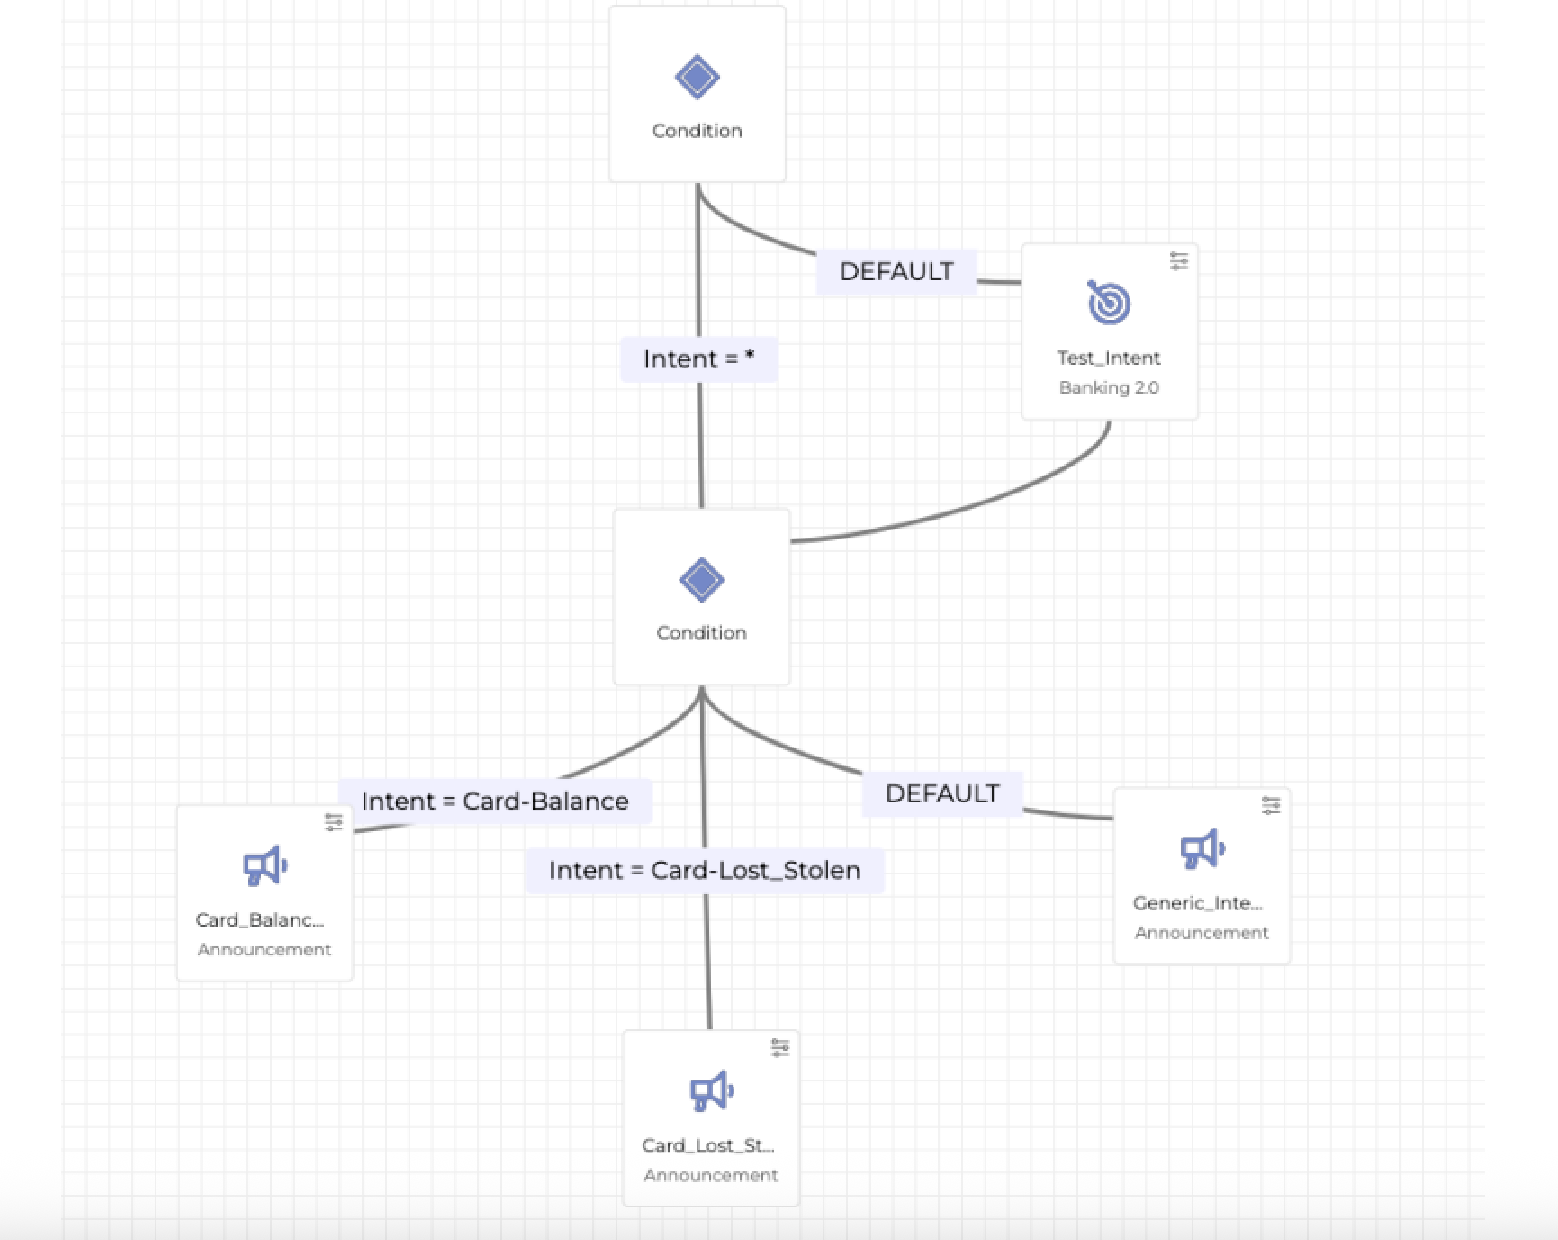
-
If the initial Intent is passed (for example,
Intent = Card-BalanceorIntent = Card-Lost-Stolen), a specific announcement or minApp/Flow is triggered. -
If no specific Intent is passed (
DEFAULT), a generic announcement or Flow is used.
This approach works even for more complex logic, such as a chain of miniApps or a Flow.
Important notes
When working with semantics sent within the session_start_req, be aware of how they persist across consecutive dialogs:
-
Session persistence: If consecutive dialogs are enabled, it is not possible to send semantics only for the first dialog. Both
start_session_reqandstart_dialog_reqevents rely on the data provided by theinit()method, meaning semantics persist across all dialogs within the session. This can lead to unintended results if you expect semantics to reset or vary between dialogs automatically. -
Cross-tab inconsistency (
crossTabSync=true):-
If a user opens two browser tabs, each configured with different semantics (for example, one with ATM and one with Balance semantics), the semantics may become inconsistent.
-
The
start_session_reqwill reflect the semantics from the tab where the chat was initially loaded. -
The
start_dialog_reqwill reflect the semantics of the currently active tab when a new dialog starts. -
Switching between tabs can result in different semantics being sent within the same session.
-
If a chat session is opened with a specific intent (and
crossTabSync=true), and the user opens the chat in another tab with different semantics, the existing session and dialog will be restored instead of starting fresh with the new semantics. The chat may display the previously loaded app or dialog.
-
-
Single-page applications (SPAs):
-
In SPAs where multiple chat widgets with different semantics are placed on different pages, the
init()method is typically called only once on the initial load. -
As a result, semantics will not automatically update when navigating between views or widgets.
-
To handle this correctly, the
setData()method must be used to update semantics dynamically as the user moves through the SPA. Neglecting this can result in outdated or incorrect semantics being sent.
-
[1] Code snippet can be minified
[2] Including spaces
[3] To an SVG or png file with 60px X 60px size